Asset Movement

Assets may be required to send out of premise for Repairing and later its replacement also needs to be collected. Thus, to keep track of such asset movements in and out of the facility support of Asset Movement Tracking functionality is added. Asset movements in such scenarios also require Approval from the respective department head in some cases and also a valid Asset Gate Pass as proof to clear the security checks of the facility.

Asset Movement functionality implementation is currently implemented for Asset Repairing thus only below types of asset movements are added:

Asset Conditions include the assets to be declared or marked as Faulty before requesting for a movement.

To view the Asset Movement page, navigate to Admin > Asset Management > Asset Movement and the list page appears.

List Page

The list page displays a list of asset movement along with their details. You can also perform various tasks from here.

Asset Movement Page
Asset Movement Page

The page provides the following features:

  1. Filter: You can filter the assets by clicking the desired option. For example: If All Open Movement Requests is selected, the grid displays all the open movements with requested status.
  2. Search: You can look for specific asset movement by searching them. The search is a faceted search and allows you to find with specific criteria. You can find more details in the search section.
  3. Refresh: You can refresh the asset movement list. This is useful when multiple people are working on the asset movement and contents are updated frequently.
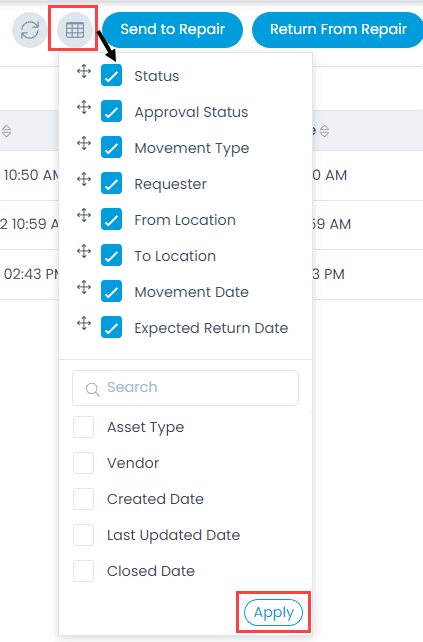
  4. Column Selection: You can select the columns that you want to view in the grid table as shown below. You can select maximum 10 columns.
Column Selection
Column Selection
  1. Send To Repair: You can create an asset movement request of type – send to repair type.
  2. Return From Repair: You can create an asset movement request of type – return from repair.
  3. Grid: The grid displays the details of the asset movement as per the selected columns. By default, it displays the first 8 columns. Also, the data is displayed in the descending order of Created Date by default.
  4. View Details Page: You can click the Asset Movement ID to view the Asset Movement Details page.
  5. View Details Page in a new tab: You can click the arrow icon next to the ID to view the details page in a new tab.

Details Page

On the Details page, you can view the complete details of the asset movement and perform the desired activity. To view the Asset Movement Details page, on the List page click on the desired ID or the arrow next to it, and the below page appears.

Details Page
Details Page

Classifiers of Asset Movement

These properties tell you the current statistics of the asset movement and help you to classify them under different labels. When someone works on asset movement, the person updates the labels accordingly. For example: If the ‘status’ is closed, it means you have nothing to do with the asset movement.

Asset Movement Classifiers
  • Status: This label classifies the asset movement based on the status. The default status are: Requested, Completed, and Cancelled.
  • Movement Date: This displays the date of the asset movement.
  • From Location: This displays the location from where the asset is to be moved.
  • To Location: This displays the destination location of the asset. You can change it if required.
  • Vendor: This displays the vendor of the asset.
  • Returnable Type: This displays whether the asset is Returnable or Not Returnable. You can change it if required.
  • Expected Return Date: This displays the date when the asset is expected to return after repair.
  • Approval Status: This displays the approval status of the asset movement.

Associated Actions for Asset Movement

You can create or update different actions and activities as a part of communication, collaboration, and resolution in the asset movement. The available types of actions are:

  • Assets: You can view the number and exact name of the Asset which is in movement. You can either edit or delete the asset from this tab.
Assets Tab
Assets Tab
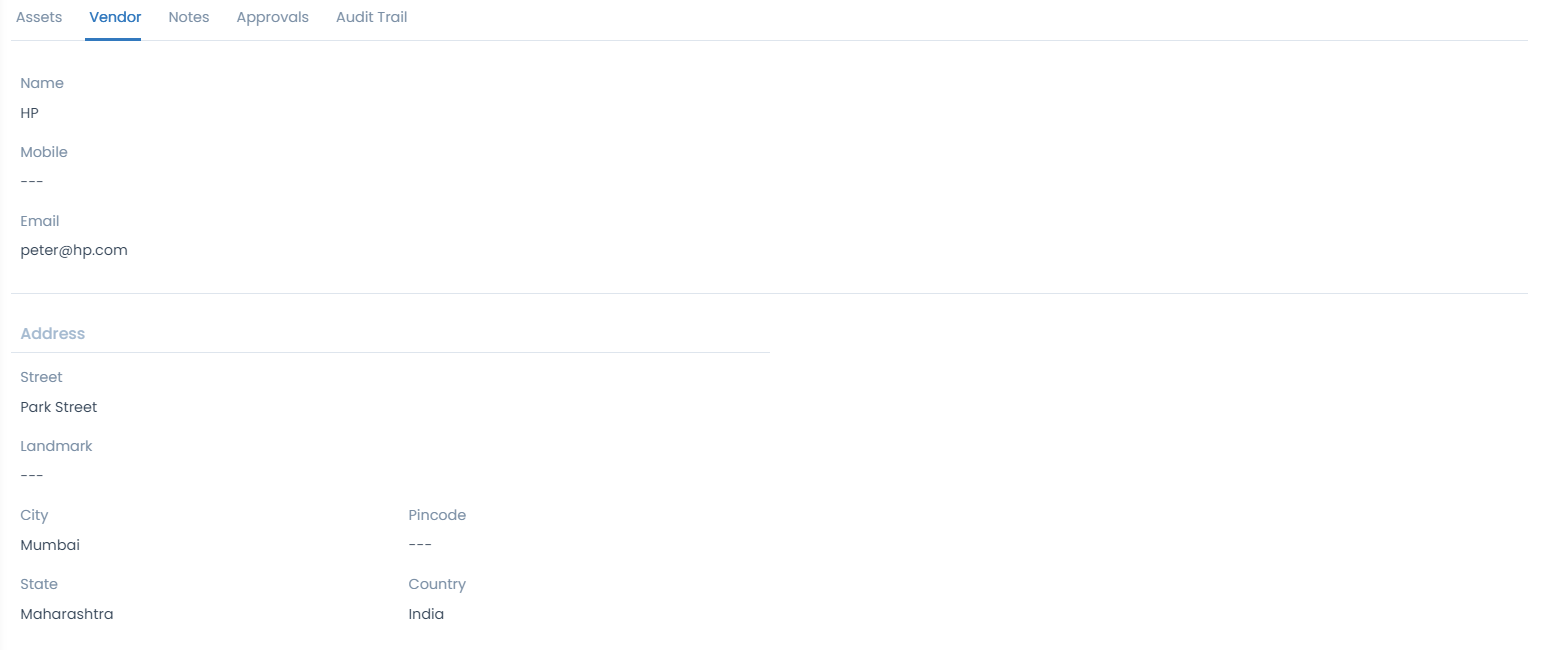
  • Vendor: You can view the vendor details.
Vendor Tab
Vendor Tab
  • Notes: You can view the list of notes if made during the movement. Also, here you can create new notes using the Add Note button.
Notes Tab
Notes Tab

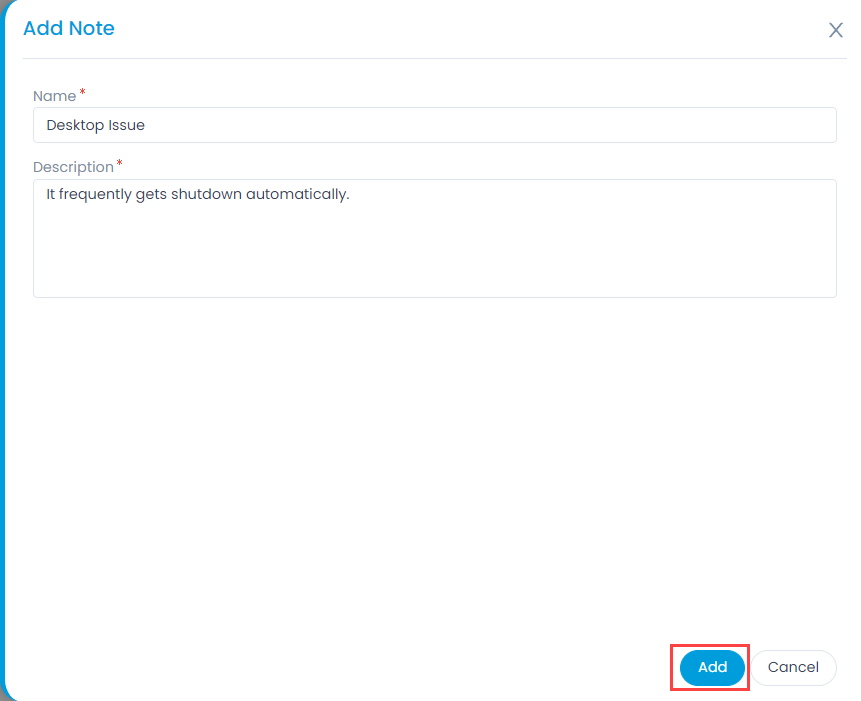
To add a note,

  1. Click the Add Note button and a popup appears.
  2. Enter the Name and Description.
  3. Click Add and the note gets added.
Add a Note.
Add a Note.
  • Approvals: You can view the pending and approved approvals of the asset movement and remind the concerned technician about it.
    Note: The Approvals tab is visible only when there is a pending approval for the asset movement.
Approvals Tab
Approvals Tab
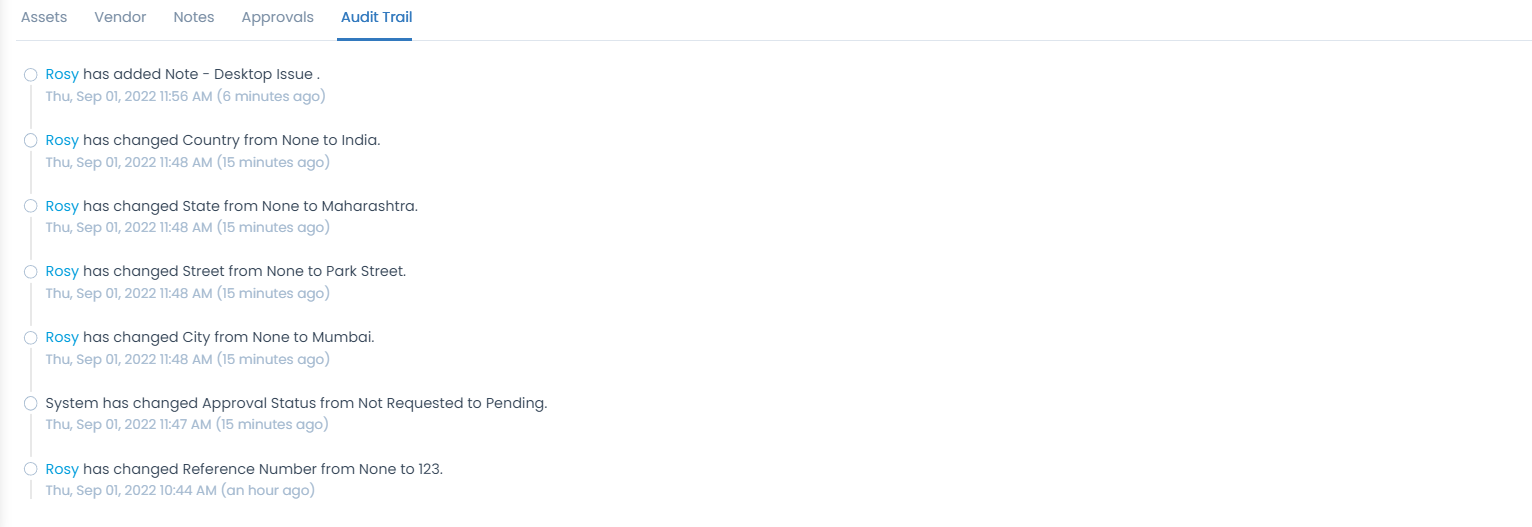
  • Audit Trail: You can view the overall activities performed for the particular asset’s movement.
Audit Trail Tab
Audit Trail Tab
  • Along with the above, you can Ask for Approval or directly even Cancel Asset Movement.
Ask For Approval or Cancel Asset Movement

Ask For Approval

An approval process makes sure that there are no unauthorized actions. You can ask for an approval if a technician is assigned to the movement. You can initiate an approval from the asset movement details page. To do this:

  • Click on the vertical three dots on the top-right corner of the details page. It will open a dropdown menu.
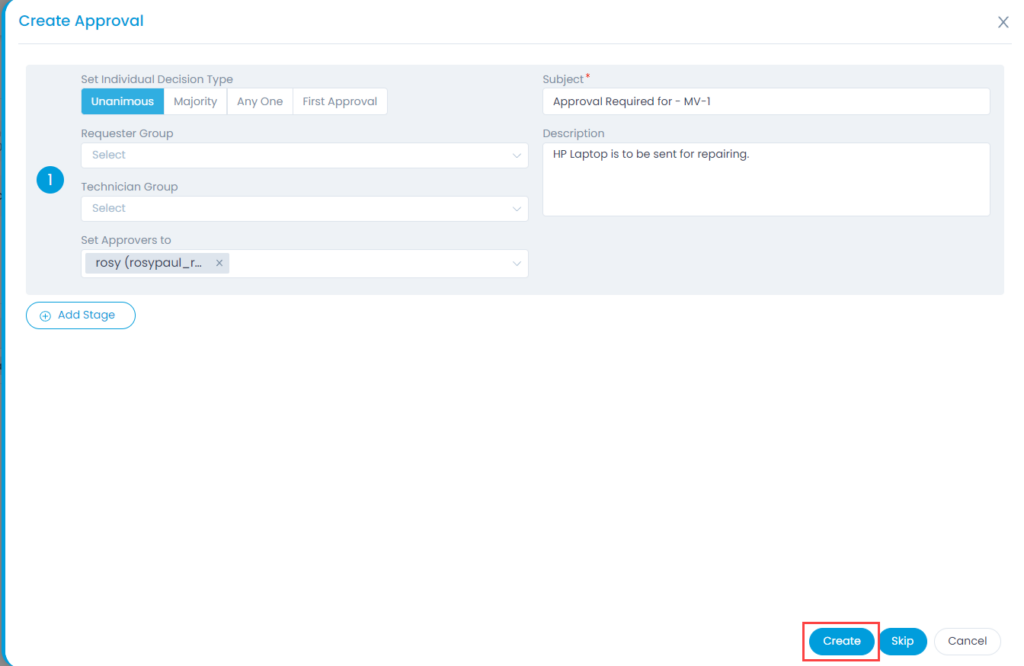
  • Select Ask for Approval and a popup opens to create the approval. Fill the approval form will allow the sender for approval:
Ask for Approval
Ask for Approval
  • Now, in case of available options the user skips the creation of approval, it will by default be re-directed to the Approval Workflow.
  • Approval Workflow can be created from the Admin Section as shown below:
Approval Workflow
Approval Workflow

Gate Pass for Asset Movement

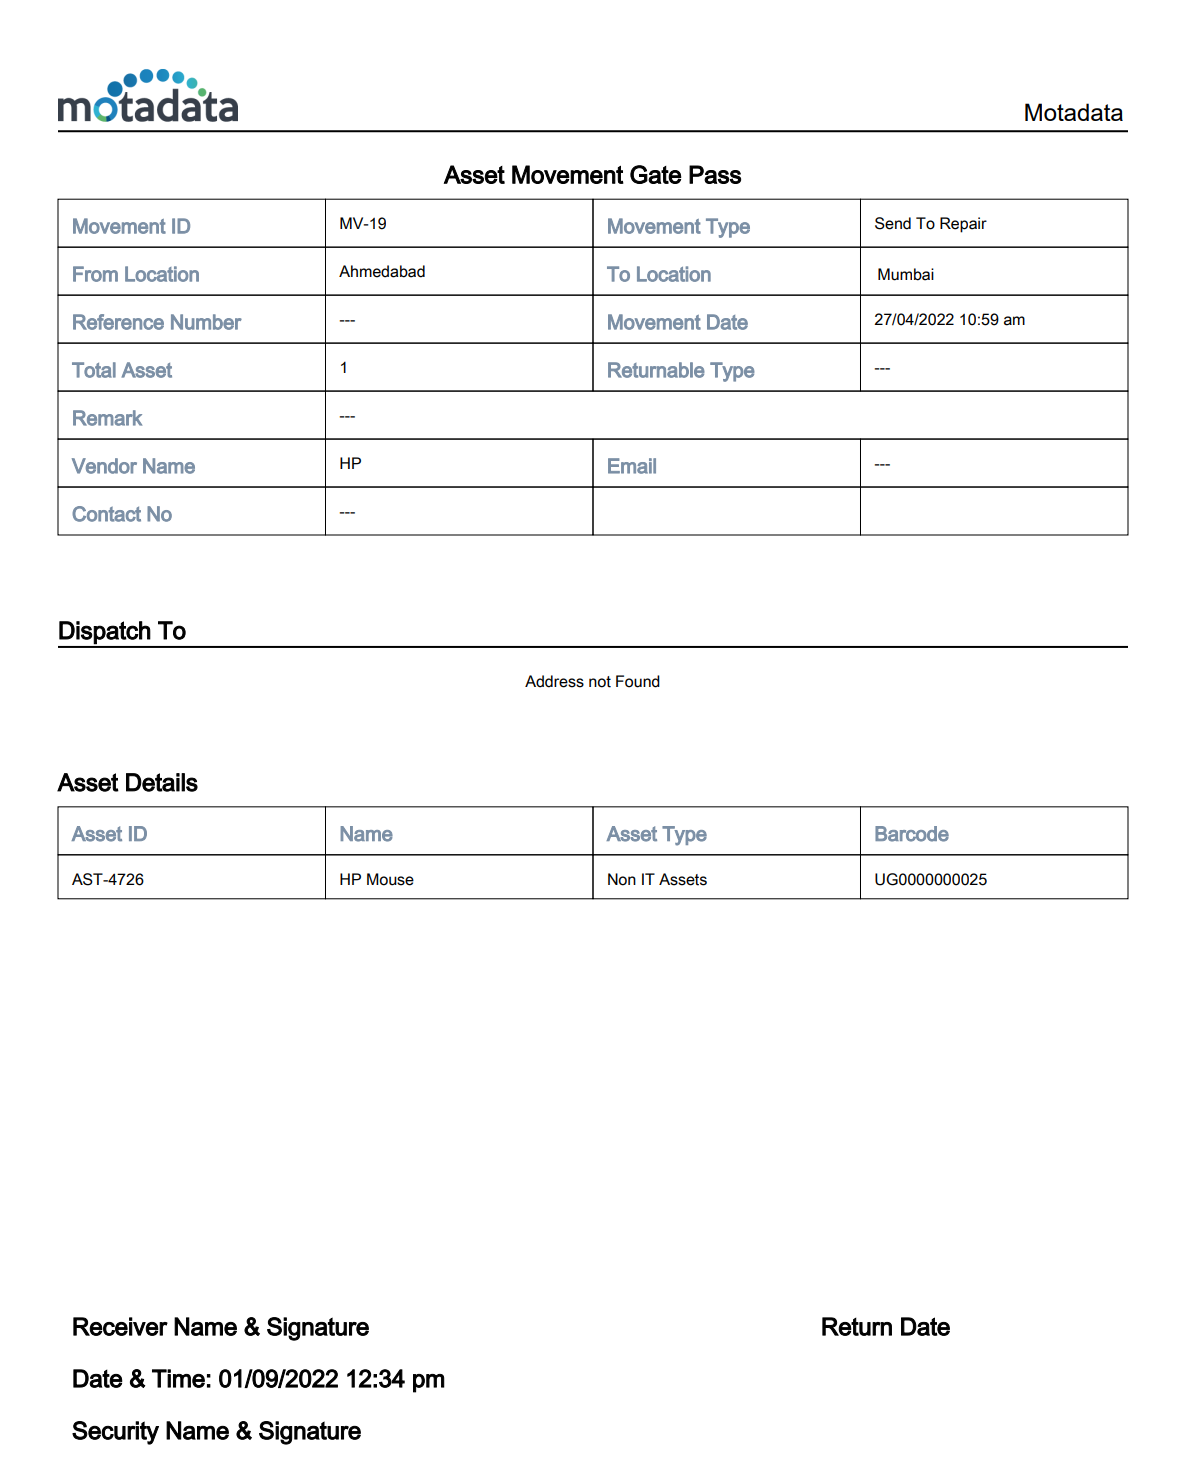
A gate pass can be generated by selecting the Print option available by clicking on the button available on the top-right corner, as shown below. This option is available once the Asset Movement is approved and completed.

Gate Pass
Gate Pass

Cancel Asset Movement

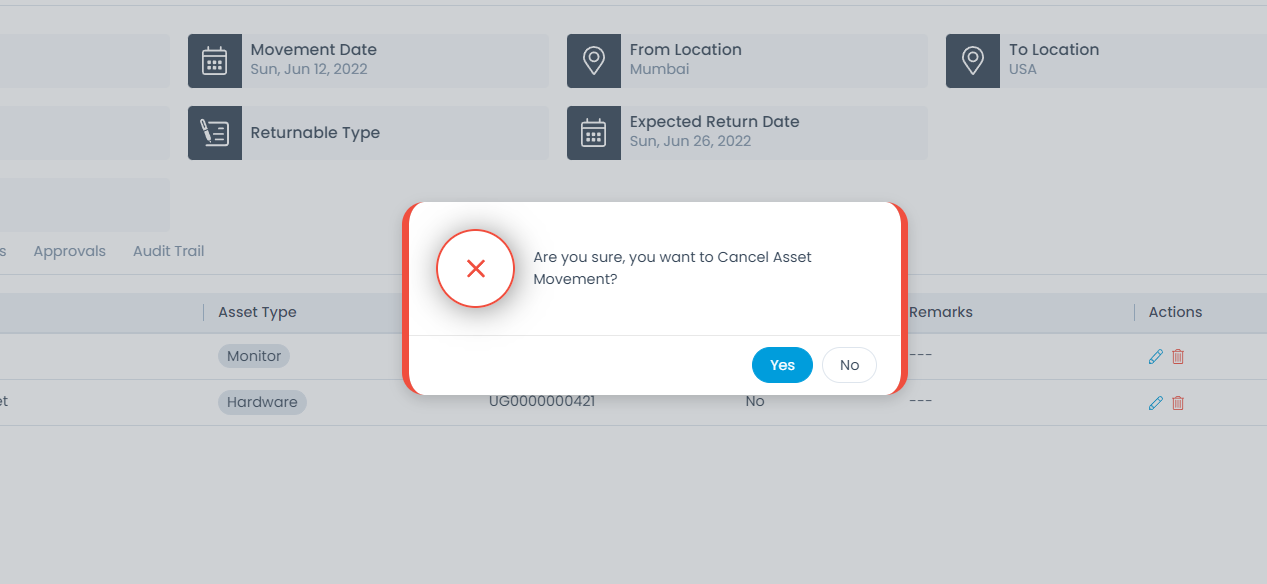
Whenever you try to cancel a movement, system will ask for confirmation.

Cancel Asset Movement

Notifications

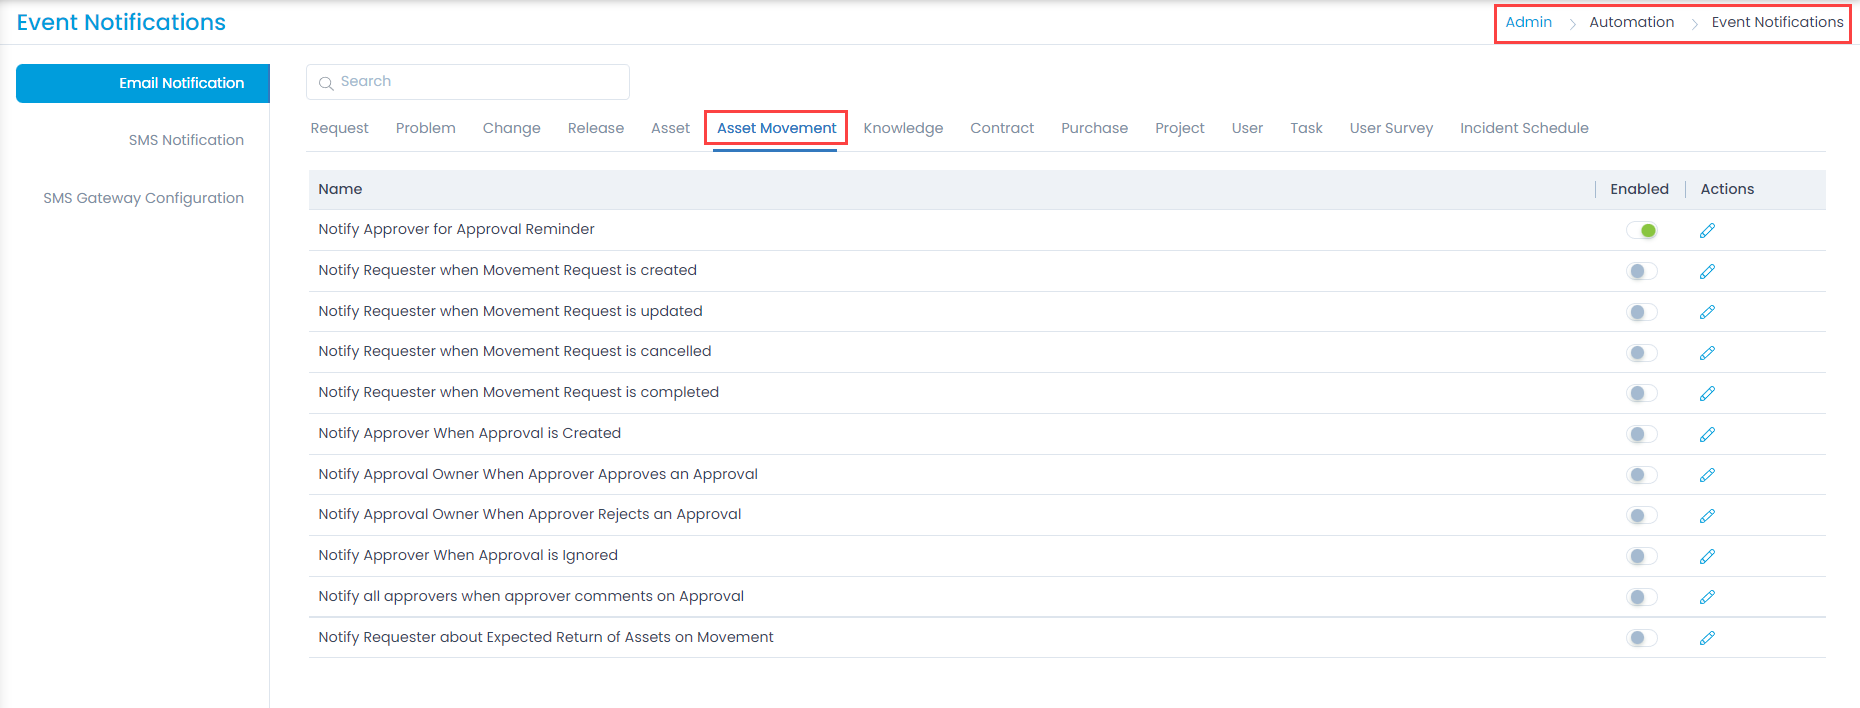
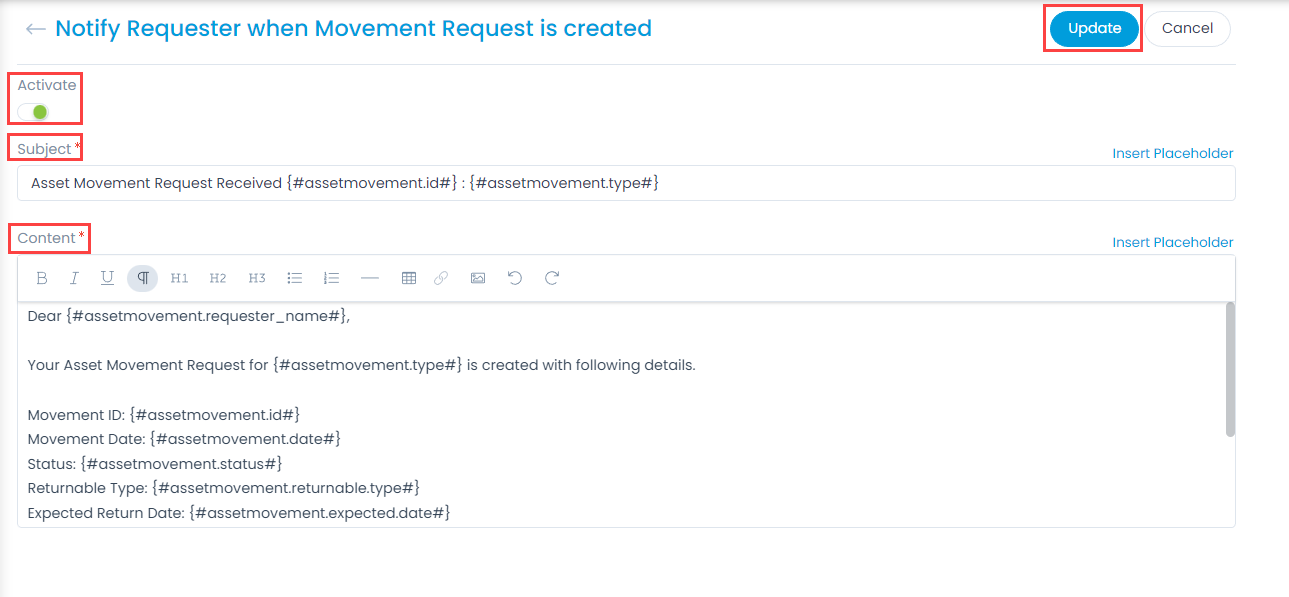
The Asset Movement module offers variations of notifications to be notified to the user as shown below:

Email Notification
Email Notification
Email Notification
Email Notification

Other Info

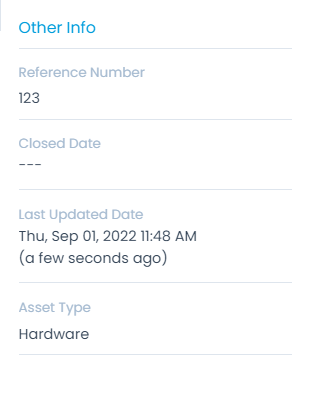
The other information displays additional details about the Asset Movement. You can also change them if required.

Other Info
Other Info
  • Reference Number: Displays the reference number of Asset Movement.
  • Closed Date: Displays the closed date of the Asset Movement.
  • Last Updated Time: Displays the date and timestamp of the last activity on the Asset Movement.
  • Asset Type: Displays the type of asset which is in movement.

Variance Detection

Hardware Asset Variance is the contrast or difference observed in the hardware properties of the recent most asset baseline data. Asset attributes are defined with a baseline. If there is a variance to the specified baseline, the captured variance details would be notified to the technicians specified in the Baseline configuration.

Using the Hardware Variance, the Asset Managers can verify the latest Asset Discovery Data against the Asset Management Data and update the Asset Management Data or identify unauthorized Hardware upgrades or additions. Variance only in the Hardware Assets Attributes are considered.

Advantages

  • Unauthorized hardware device identification.
  • Avoids discrepancies and updates Asset Management Data accurately.
  • Helpful to configuration managers in taking appropriate actions like updating or removing the hardware.
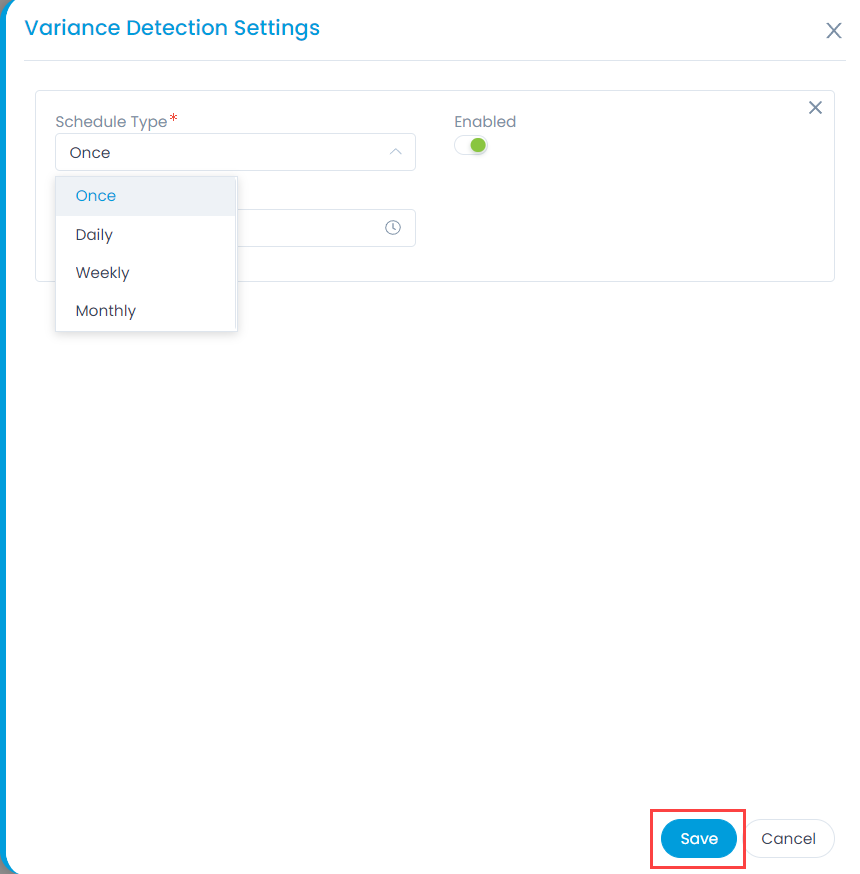
Variance Detection Settings

When you click on Variance Detection Settings you can schedule a detection session using the type, Once, Daily, Weekly, or Monthly. The input columns are:

Schedule Type: Choose to schedule detection. The options are:

  • Once: If selected, the schedule will run only once.
  • Daily: If selected, the schedule will run daily as per the selected Time.
  • Weekly: If selected, the schedule will run once in a week as per the selected Day and Time.
  • Monthly: If selected, the schedule will run once in a month as per the selected Date and Month.

Enabled: Choose to Enable or Disable the scheduler.
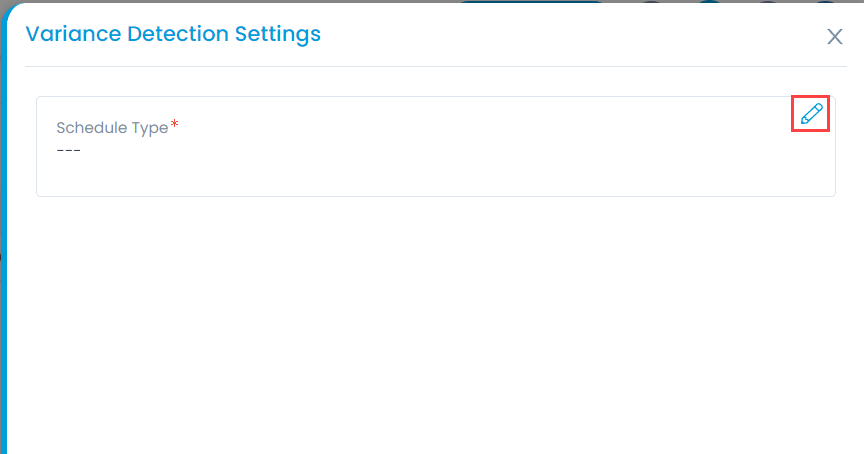
Once done, click Save. The Variance Detection schedule can be edited by clicking on the edit icon as shown below:

Edit Variance Detection Schedule

Variance Detection Notifications

System generated email will be pushed to the technicians specified in the Baseline configuration settings, in-case of Detected variance with respective Asset Details and Variance Attributes.

Manage Baselines

A baseline can be considered as the recorded state of any information or attribute of a product, at a specific point of time, which can serve as a basis for defining change. It also serves to provide a fixed reference point for change management. Baselines are not only used to identify the working state of a product but also provides comprehensive views of current baselines against the historical thereby depicting how product attributes have proceeded over time and working conditions.

When a historical baseline is retrieved, the identification of the state of the product gets significant with respect to the history of changes; which enables the configuration managers to compare or identify individual items that lags or leads by progressing towards better functionality or performance. In addition to this, establishing a baseline is useful while backing out and restoring the original configuration after patching any change, or if it is necessary to rebuild a specific version of a configuration at any later stage. Current implementation will support Asset Baselining for the Computers and Servers.

To view the Manage Baselines page, navigate to Admin > Asset Management > Manage Baselines and the list page appears.

List Page

The list page displays the created baselines along with their details.

Note: Users holding the Manage Asset Management role can access the Baseline CRUD.
Manage Baseline List Page

Here, you have the below options:

  1. Search: You can search the baseline using the pre-defined filters like ID, Name, Asset Type, and Status of the baseline.
  2. Variance Detection Settings: You can configure the variance detection.
  3. Create Baseline: You can create a baseline.
  4. Re-Order: You can re-order the location of the baseline using drag and drop.
  5. View: You can view the details of the baseline.
  6. Delete: You can delete the baseline if not required. A confirmation message appears. Click Yes to continue or Cancel to stop the process.

Visible Columns

  • ID: It is the unique number of the baseline.
  • Name: It is the name of baseline.
  • Asset Type: It is the type of the Asset.
  • Status: It shows the status of the Asset.
  • Created Date: It shows the created date of the asset baseline.
  • Last Updated Date: It shows the date when the baseline was lastly updated.
  • Actions: It shows the available options for the baseline. Either you can edit the created baseline using the Edit Icon or else directly delete the baseline using the Delete Icon.

Create Baseline

To create a baseline, follow the below steps:

  1. Click the Create Baseline button on the top-right corner of the page.
Manage Baseline List Page
  1. Enter the below details:
    • Name: Enter the name of the baseline.
    • Description: Add a brief about the baseline.
    • Asset Type: Select the type of Asset.
    • Notify to: Select the relevant requester or technician to whom you want to notify.
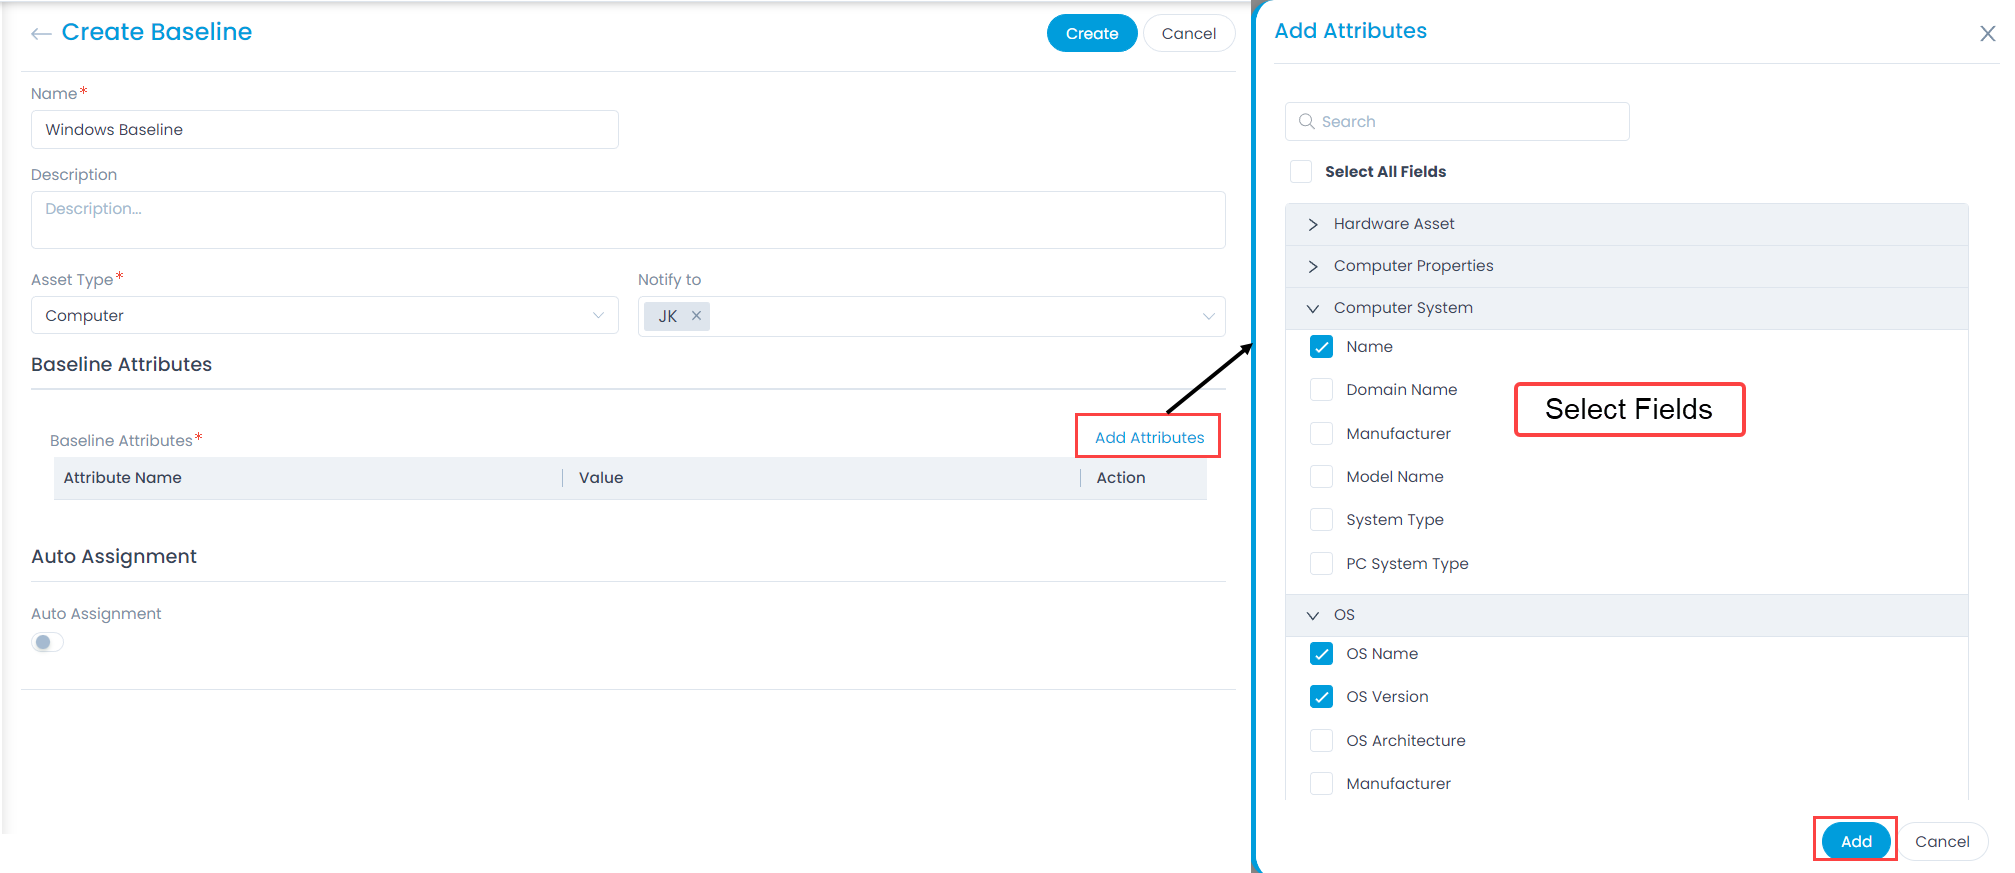
    • Baseline Attributes: You can add the required attributes using the Add Attributes link. They are the extra fields which corresponds to the created baseline.
Add Attributes
Add Attributes
  • Once added, enter values for the attributes in their respective fields as shown below.
Add Values to the Attributes
  • Auto Assignment: You can assign the baseline automatically to the assets based on conditions. By default, it is disabled. If enabled, the below fields will appear.
    Conditions: Select the Conditions based on which the baseline should be applied.
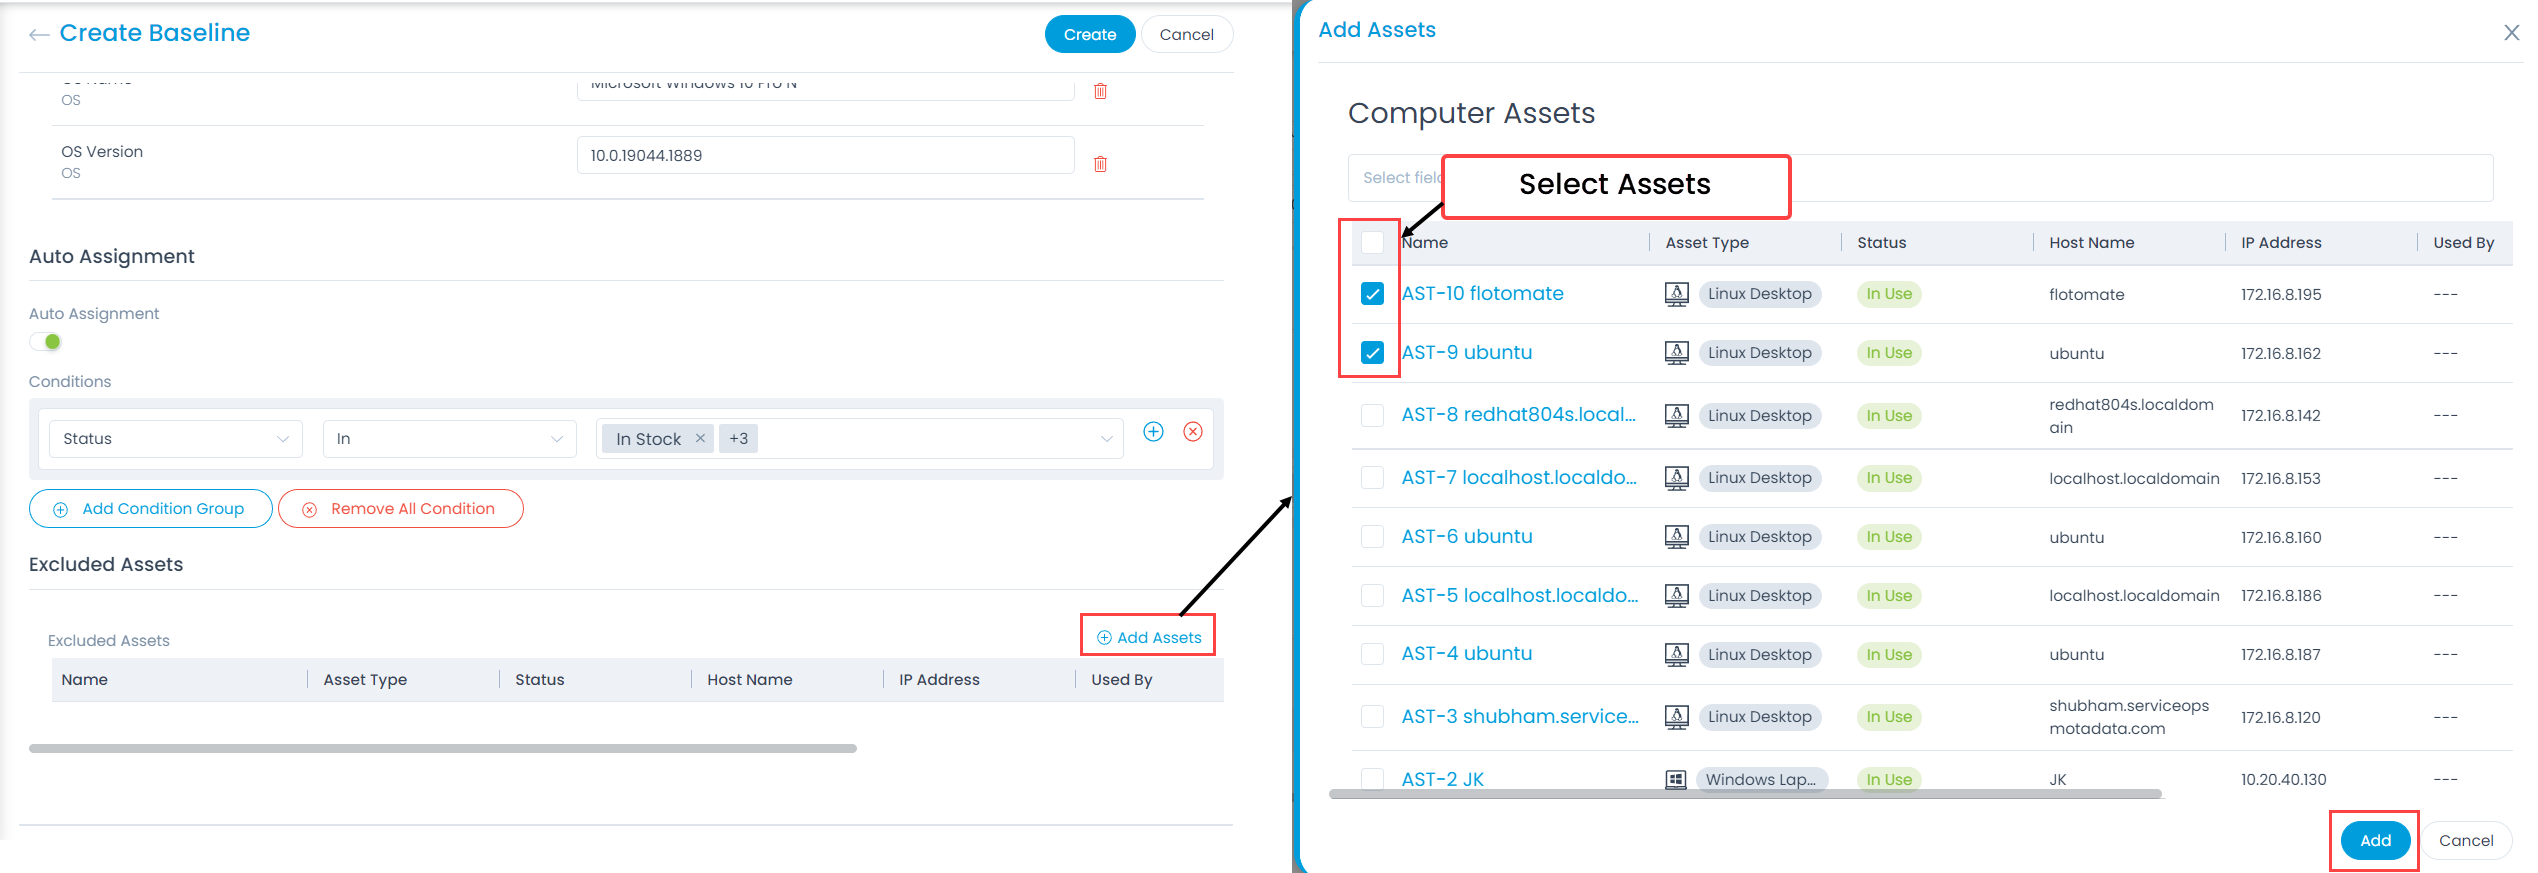
    Excluded Assets: Add the assets that you want to exclude from the automatic assignment.
Add Assets to Exclude
Excluded Assets List
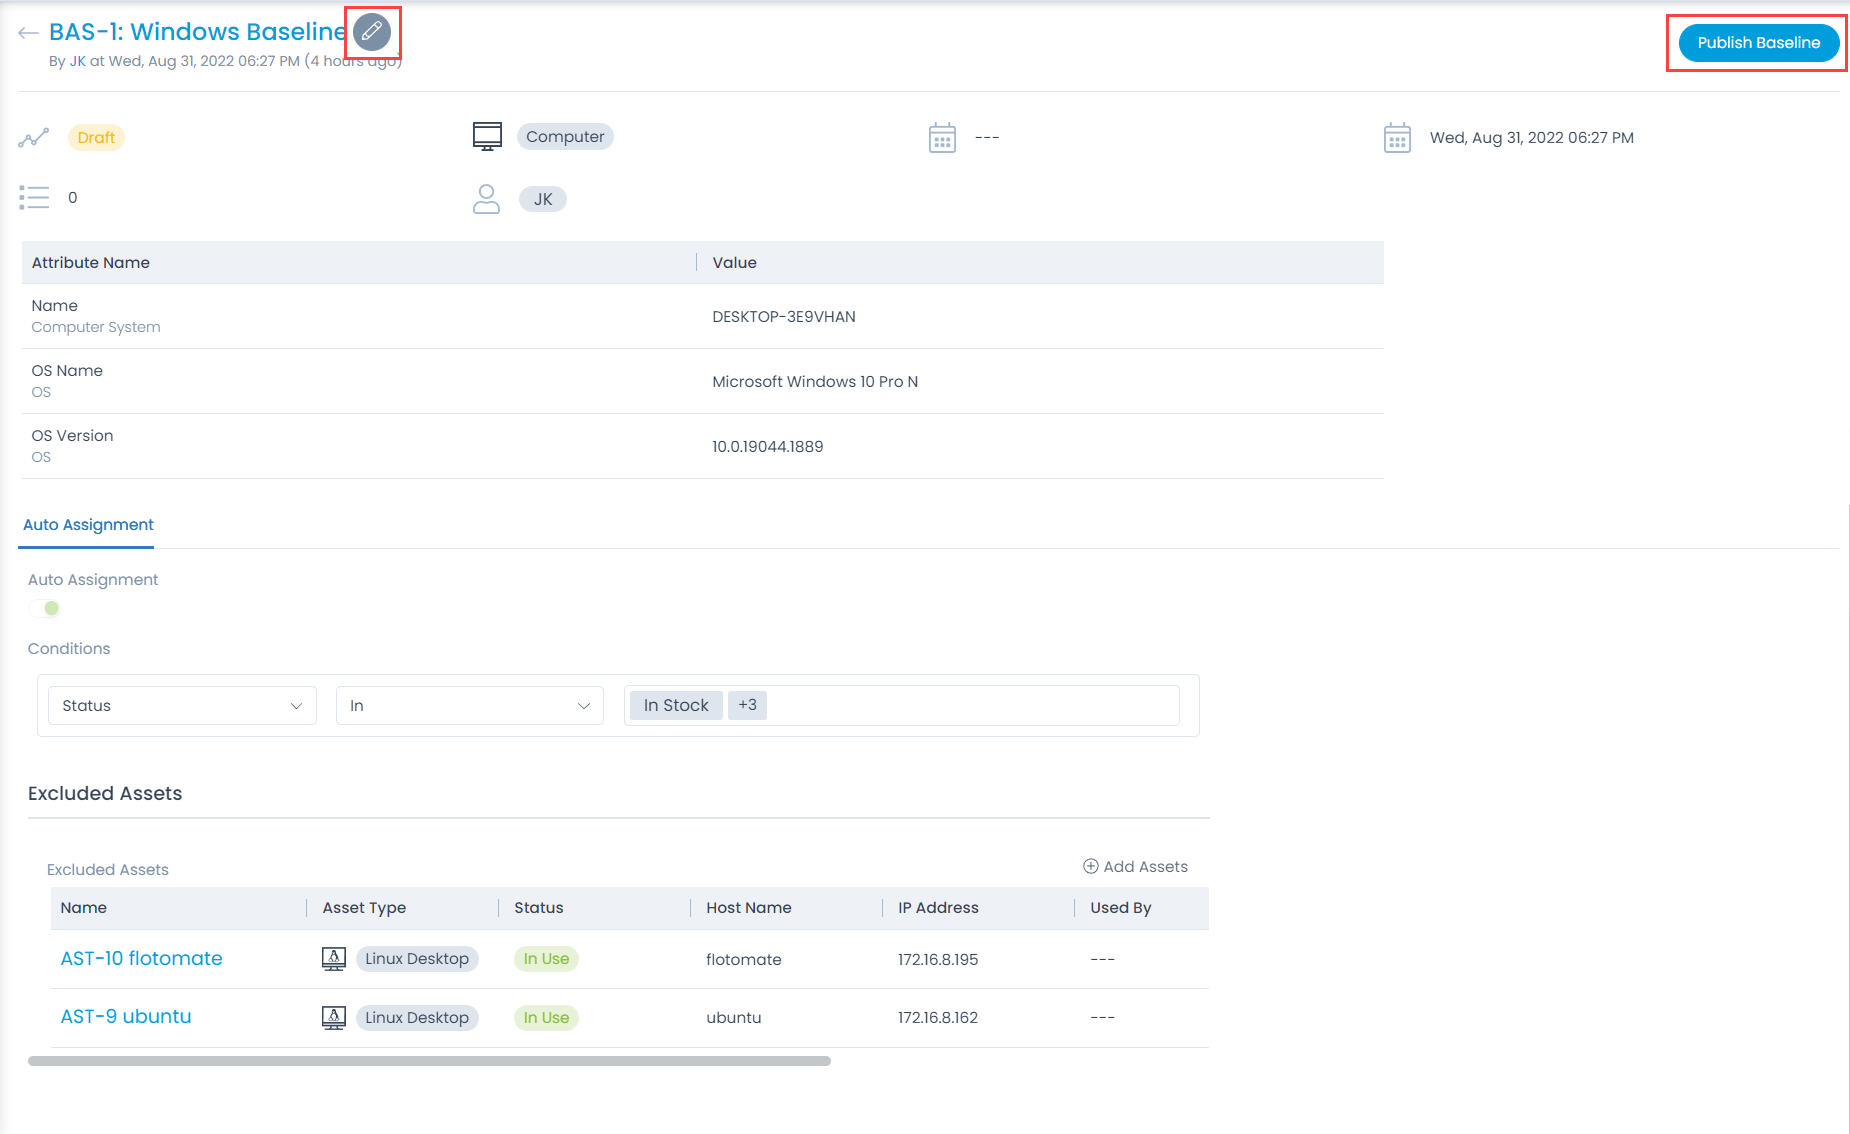
  1. Once all the details are filled, click Create and the baseline gets created. By default, it is in Draft Status.
  2. On clicking the Baseline from the list view, Baseline attributes can be edited if required and published using the Publish Baseline button available on the top-right corner of the interface. If you want to publish the baseline, you can view the baseline using the View Icon from the list Page. Here, the details of the created baseline will be visible and also an option for publishing the baseline will appear as shown below:
Publish Baseline
Publish Baseline
  1. For the Baseline status ‘Draft’- Attribute details of the Baseline can be updated and for the Status ‘Published’- attribute details cannot be updated and it can be associated with the Assets.

Project Custom Rules

The custom rules help you to enforce the organization’s compliance while processing a project. Using these rules you can ensure that any change in the project attributes is supported by proper comments or notes. For example, a project should not move to the approved state if there is no owner assigned to it. Similarly, you can use custom rules to enforce the approval workflows and closing tasks to close a project.

To view the Project Custom Rules page, navigate to Admin > Project Management > Project Custom Rules.

When Should Custom Rules be Enforced

For the project management module, the custom rules are evaluated based on the actions configured at any of the below stages:

  • Planning Rules: Check the items that should be enforced while planning a project.
Rules to Plan a Project
  • Implementation Rules: Check the items that should be enforced before implementing a Project.
Rules to Implement a Project
  • Required Note Rules: Check the items that should require a note before changing their values.
Fields that require a note before changing their values

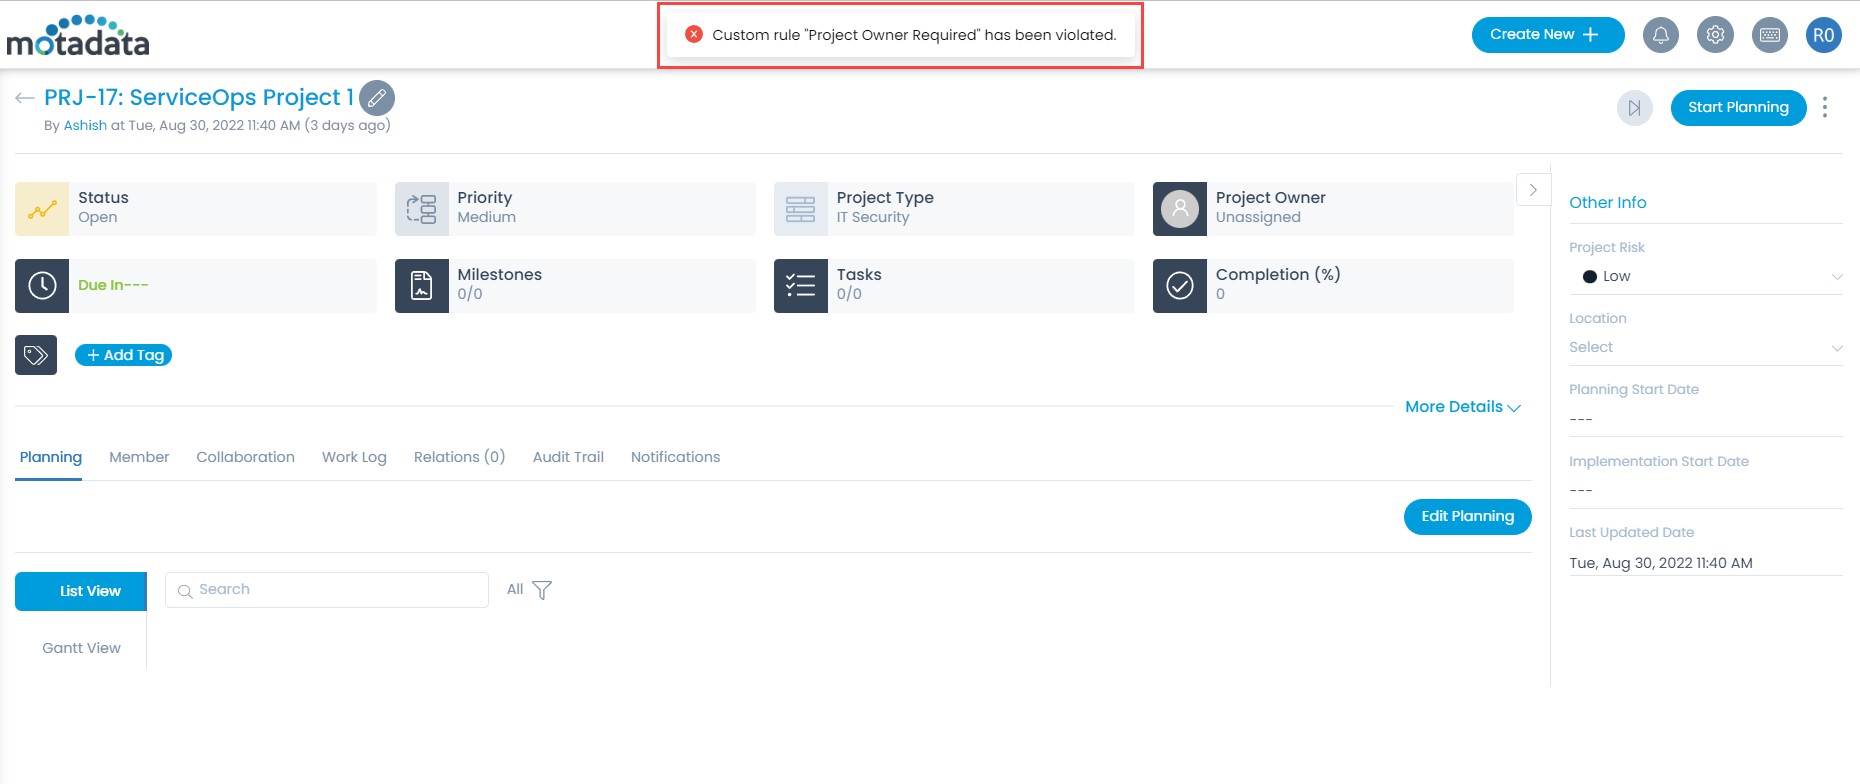
Example Scenario: You cannot Start Planning until a Project Owner is assigned.

Example of Custom Rules in Project Management

Project Types

Project Type determines the kind of project that is requested. It is another set of classification that helps technician filter the projects.

To view the Project Types page, navigate to Admin > Project Management > Project Types.

Here, you can view the default project types as well as add the custom. Also, you can edit the type names, and change their color as per the organization’s theme.

The default available types are:

  • Infrastructure
  • Maintenance
  • Business
Project Types
Project Types

Add Project Type

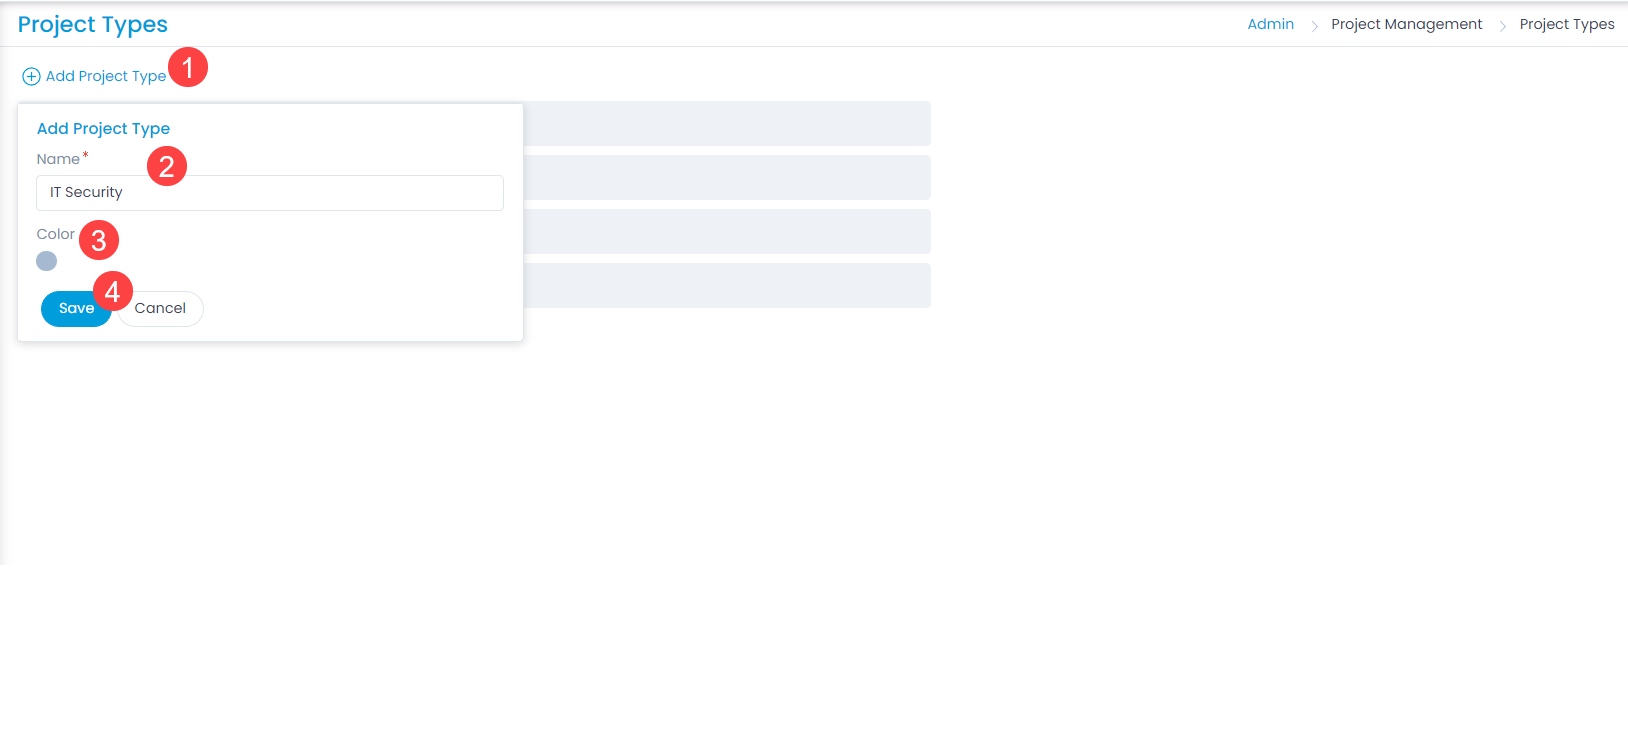
To add a project type,

  1. Click the Add Project Type link.
  2. Enter the Name of the project type.
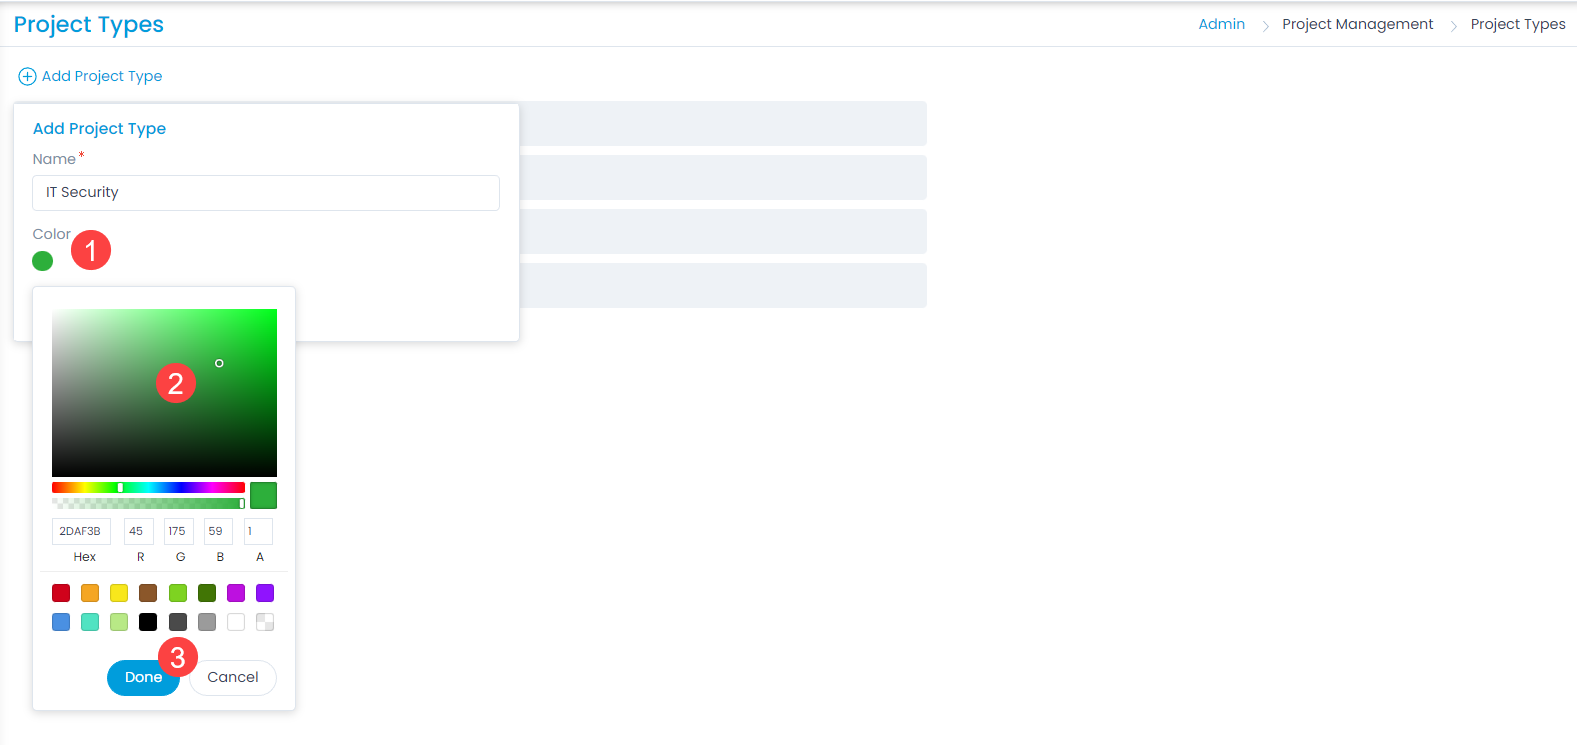
  3. Select the color or enter the hexadecimal code by clicking the color pallet icon.
  4. Click Save.
  5. Once added, you can edit or delete the custom project type. But, the default ones can only be edited and not deleted.
Adding Project Type
Adding Project Type
Selecting Color of the Project Type

Project Risk

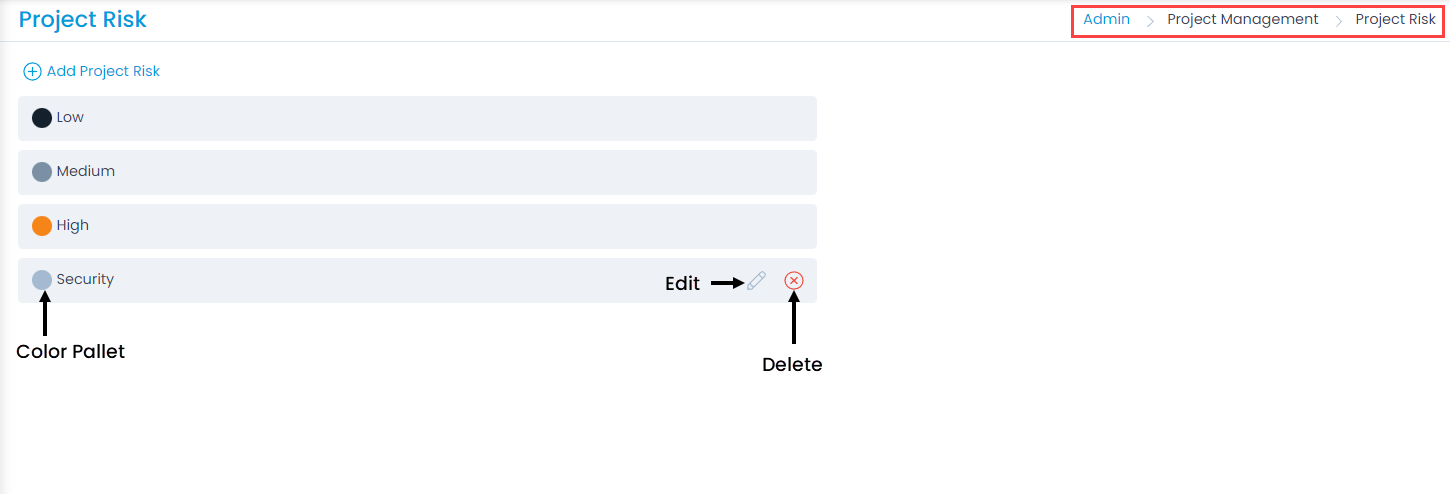
Project Risk shows the risk factor involved which would affect the project adversely. There are pre-defined levels of risk mentioned in the system by default which cannot be removed.

To view the Project Risk page, navigate to Admin > Project Management > Project Risk.

Here, you can do the following:

  • View and edit the default risks.
  • Add and manage the custom risks.
Levels of Project Risk

Add Project Risk

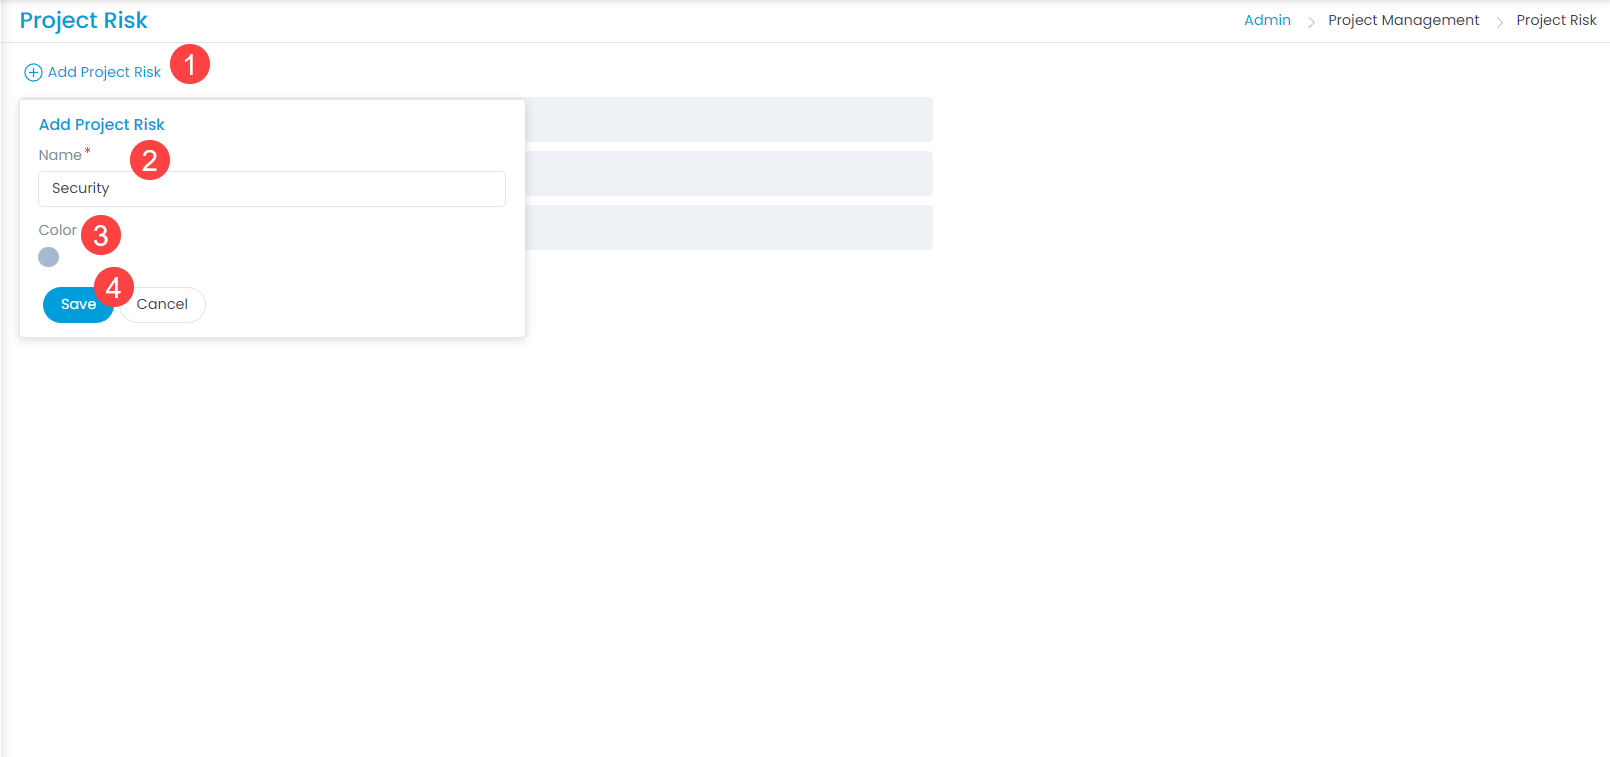
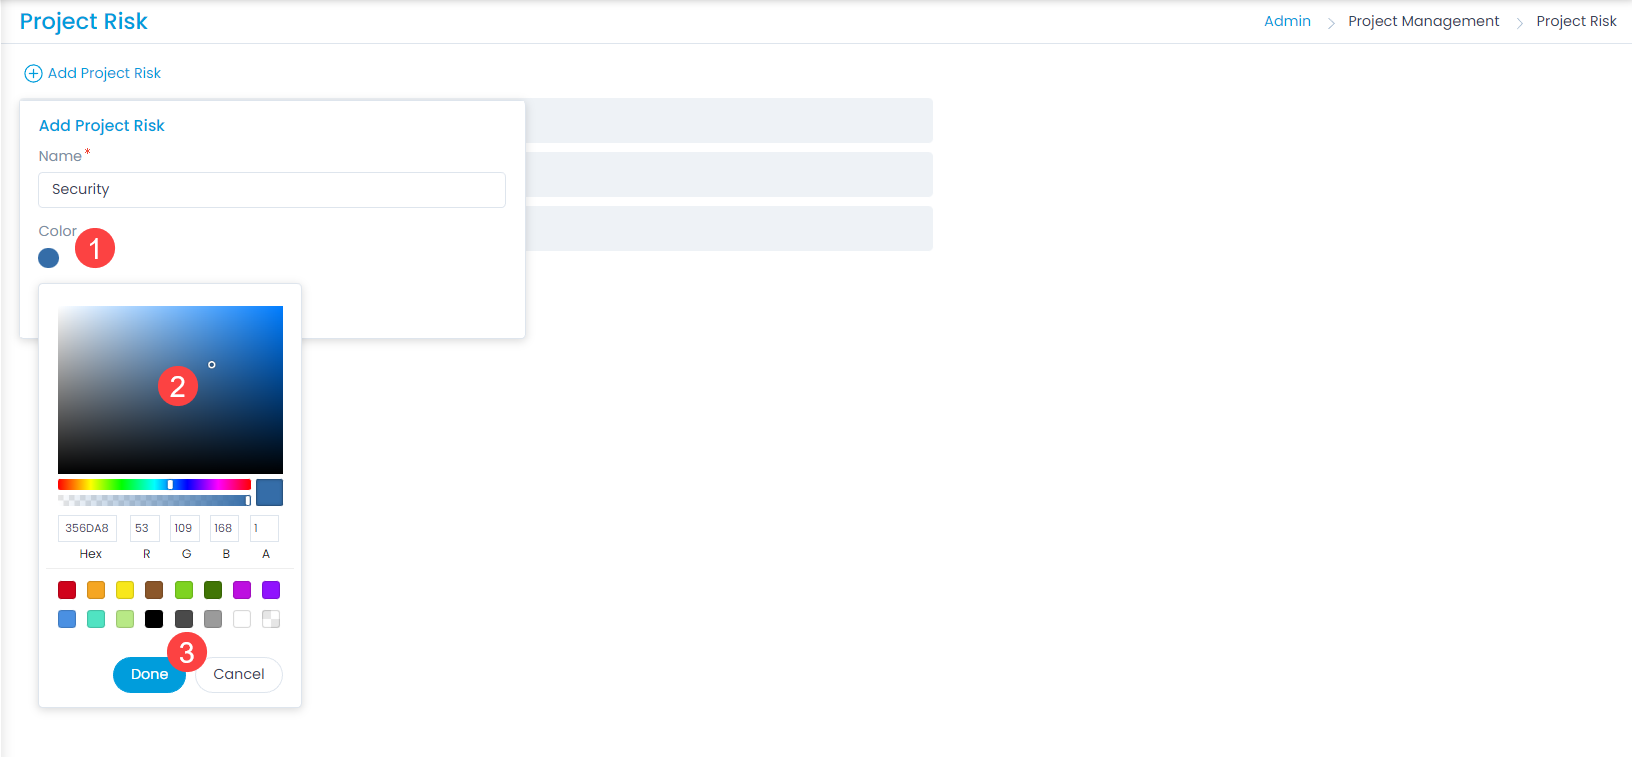
To add a custom project risk,

  1. Click the Add Project Risk link.
  2. Enter the Name of the risk.
  3. Select the color or enter the hexadecimal code by clicking the color pallet icon.
  4. Click Save.
  5. Once added, you can edit or delete the custom risk. You can only edit the default risks and not delete.
Adding a Project Risk
Selecting Color of the Risk

Project Form

The layout of asset management has all the fields required to manage the projects of an organization. However, to meet the organization’s needs, you can modify the default template and add new fields. The fields can later be used in the automation settings also.

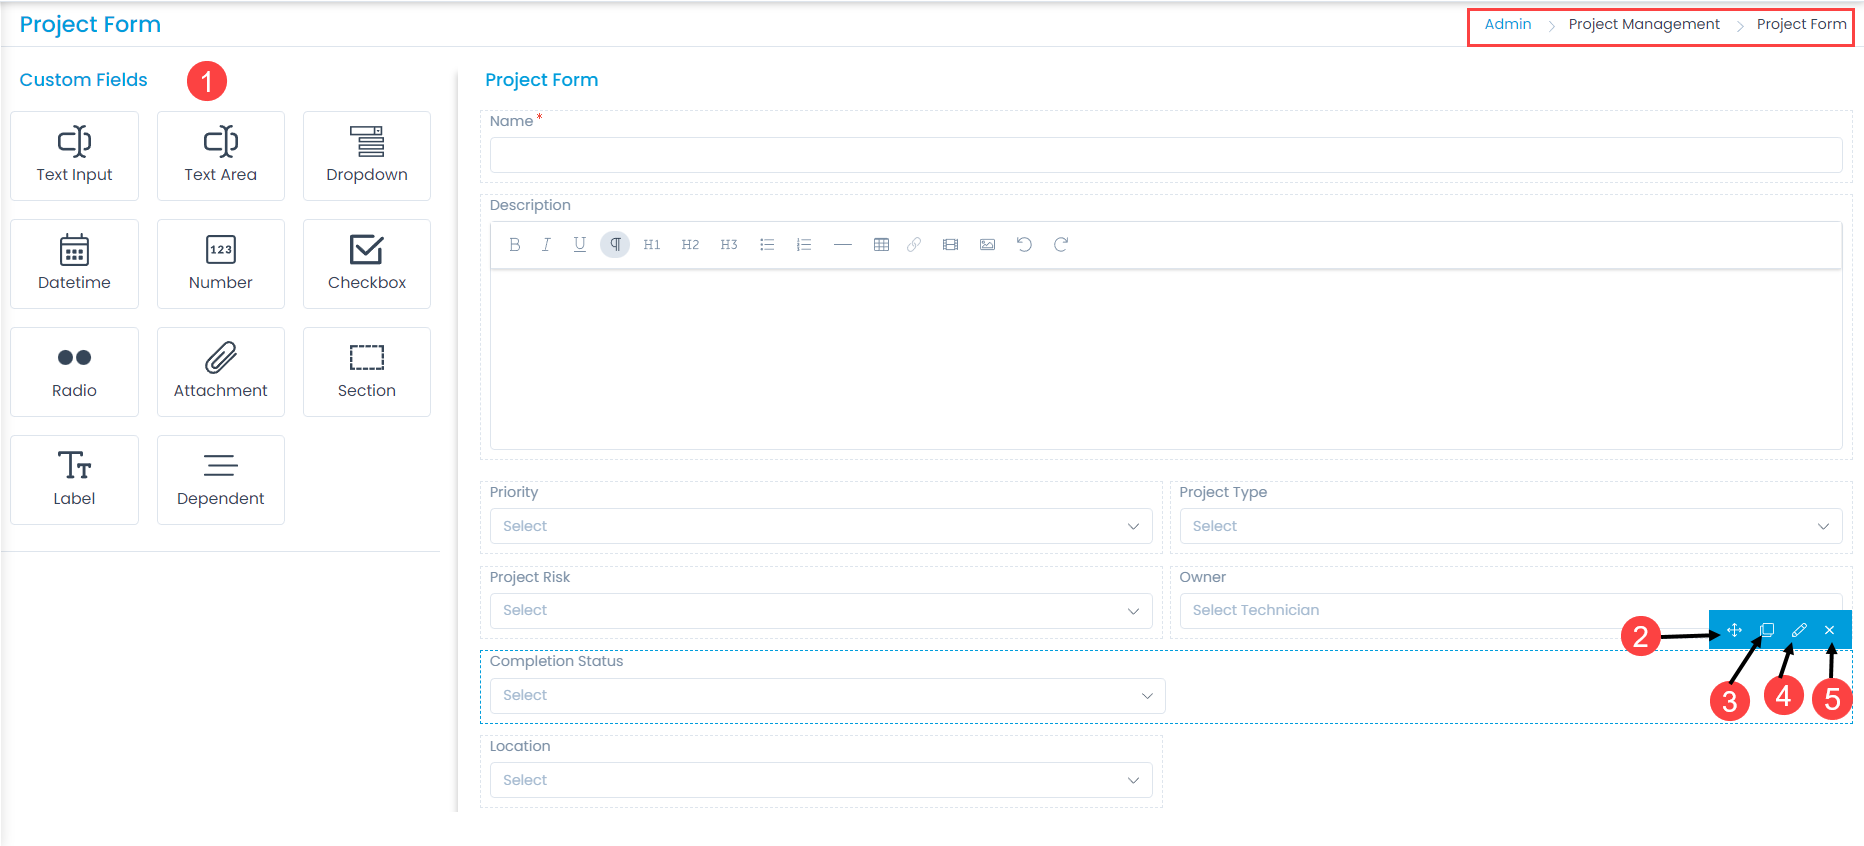
To view the Project Form, navigate to Admin > Project Management > Project Custom Fields and the below page appears.

Project Form
Project Form

The page displays two types of fields:

  • Default Fields: These are the primary fields that come with the fresh installation. The field names can neither be changed nor deleted.
  • Custom Fields: These are the additional fields added from the pallet. The fields can be renamed and deleted.

Here, you can customize the form using the below options:

  1. Field Pallet: You can drag and drop the fields from the pallet to add into the form.
  2. Re-Order: You can drag and drop the fields to change the order of the form.
  3. Duplicate: You can create duplicate fields from the custom fields.
  4. Edit: You can edit the fields, make them mandatory, or change their characteristics.
  5. Remove: You can delete the custom fields and not the default.

Example Scenario: For example, every Project in an organization requires a product owner for the Project to be followed up. By mentioning the owner, Project Manager, and other Teams can be kept updated for the upcoming improvements or changes.

Dropdown

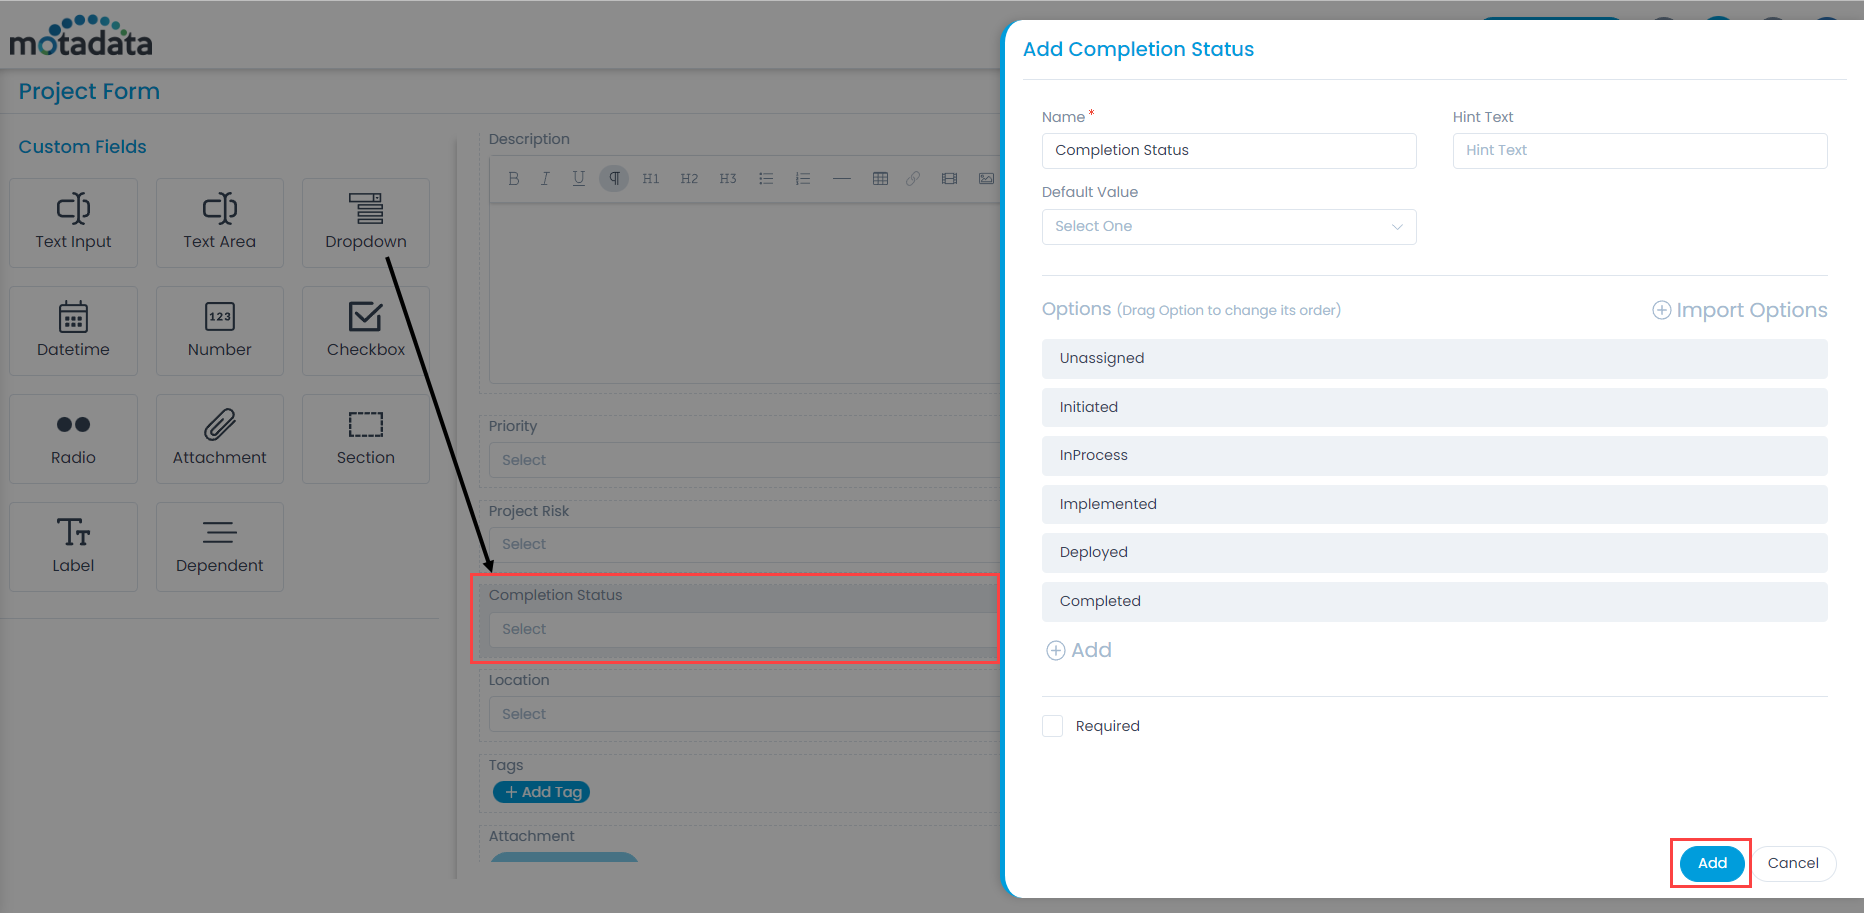
To add the Dropdown custom field, drag and drop it on the form in the right-hand side, and a popup appears.

Adding Custom Fields in the Project Form

Enter the following details:

  • Name: Enter the name of the field.
  • Hint Text: Enter the text to appear by default. It appears in grey color.
  • Default Value: Enter the default value of the field.
  • Options: Add the options for the field. You can also import multiple options using the Import Options link.
  • Required: Enable to make the field mandatory.

Once done, click Add. You can then re-arrange its location, create a duplicate field, edit, or delete it if required. Similarly, you can add other custom fields. For more details, refer to the link Request Form.

Agent Nomination

This tab allows you to nominate the agents to be used for managing the REDHAT patches.

To view the Agent Nomination page, navigate to Admin > Patch Management > Agent Nomination.

Here, you can nominate only two agents: Workstation and Server.

Agent Nomination List page

You can nominate only those agents that hold an active subscription and the Internet connection. To nominate, click the Edit icon and the following popup appears.

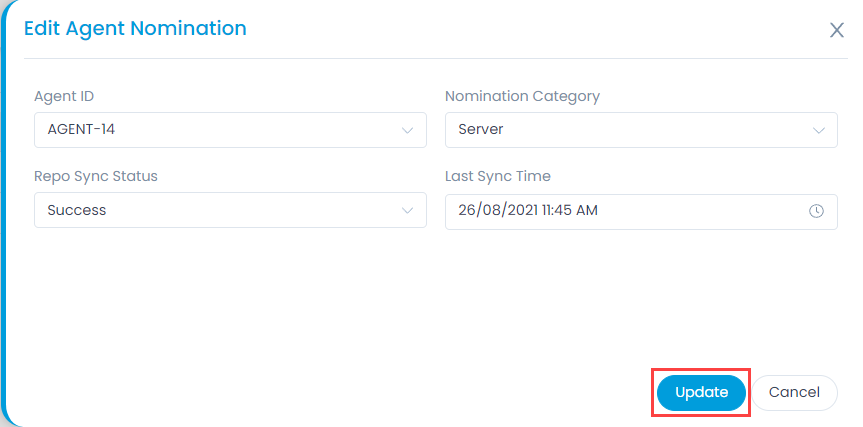
Edit Agent Nomination

Provide the below details:

  • Agent ID: Select the Agent ID to be nominated. You can select only those agents that are present in the End Points Scope page.
  • Nomination Category: Displays the category for which the agent is to be nominated. It can be either Workstation or Server.
  • Repo Sync Status: Displays the repo sync status as success or failed.
  • Last Sync Time: Displays the date and time when the nominated agent synchronized last with the REDHAT repository.

Once done, click Update. If there is no agent nominated, the record remains blank as shown below.

No Agent Nominated
No Agent Nominated

Registry Templates

These are templates that contain majority of the configurations related to the installed software, operating system, device drivers, and detected hardware.
To view the Registry Templates page, navigate to Admin > Patch Management > Registry Templates.

Registry Templates List page

Here, you can do the following:

  • Search: You can search for the required template based on keywords.
  • View: You can view the list of templates along with their description in the grid.
  • Add: You can add a new registry template using the Add Registry Template button.
  • Edit: You can make changes in the default registry templates using the Edit icon.
  • Delete: You can delete the custom registry templates using the Delete icon.

Add Registry Templates

Windows Registry contains keys and values and by manipulating them you can change the behavior of the OS.
To add a registry template,

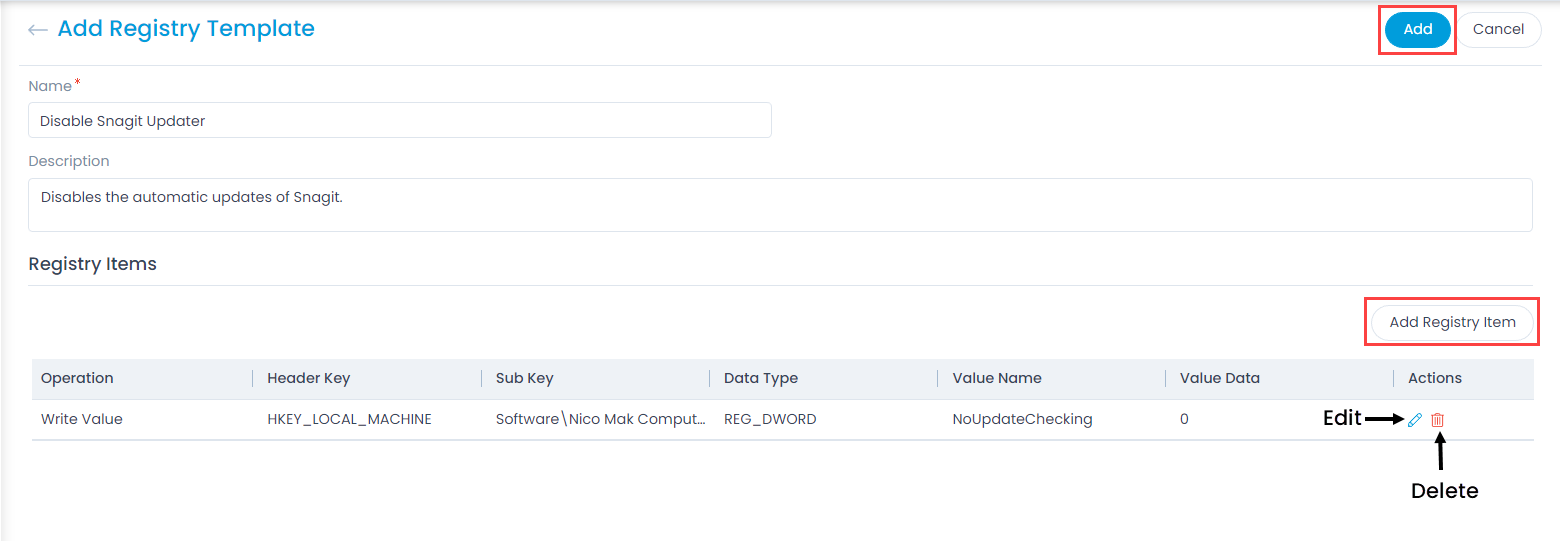
  1. Click the Add Registry Template button and the below page appears.
Add Registry Template
  1. Enter the below details:
    • Name: Enter the name of the registry template.
    • Description: Enter a short description about the registry template.
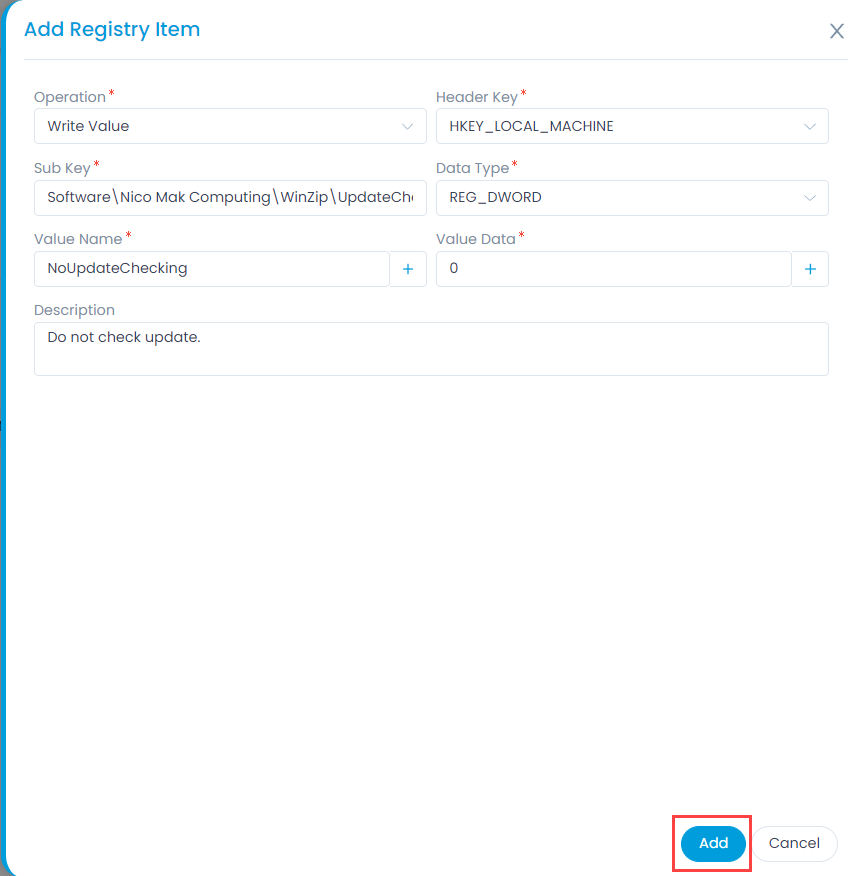
    • Registry Items: Add the registry items in this section. Click the Add Registry Item button and a popup appears.
Add Registry Item
Add Registry Item
    • Enter the below details:
      Parameter Description
      Operation Select the operation that you want to perform. The options are: Write Value, Delete Value, Add Key, and Delete Key.
      Header Key Select the header key. The options are: HKEY_LOCAL_MACHINE and HKEY_USERS\.Default
      Sub Key Enter the sub key.
      Data Type Select the data type of the registry. The options are: REG_SZ, REG_DWORD, REG_EXPAND_SZ, and REG_QWORD.
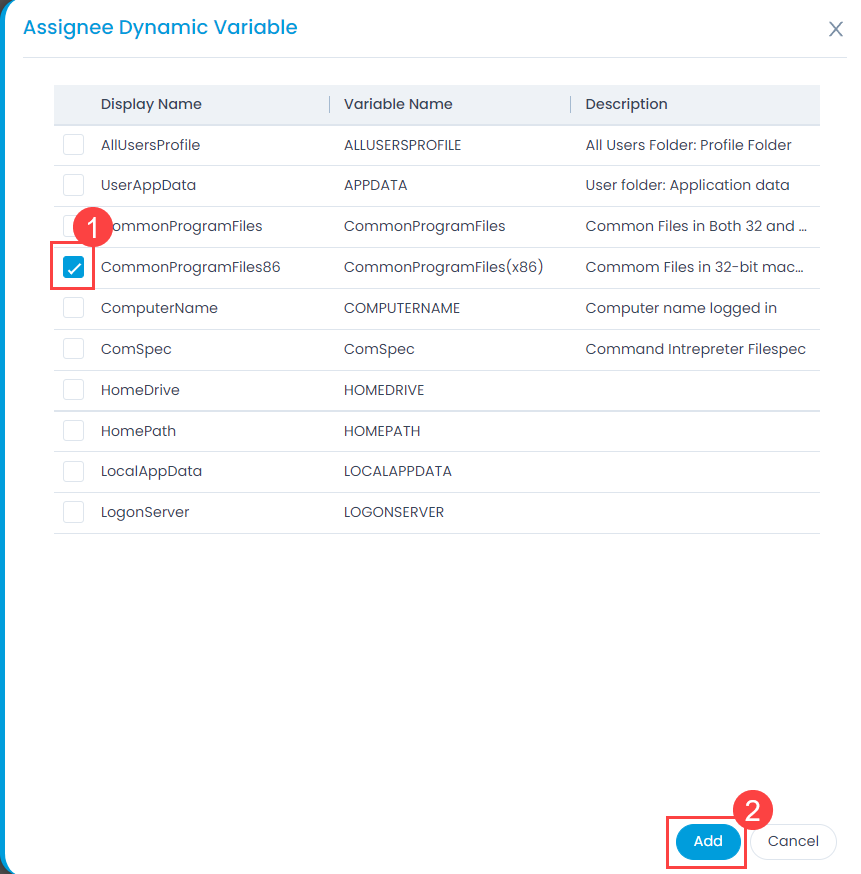
      Value Name Specify the value name or assign a dynamic variable by clicking the blue plus(+) icon, selecting the desired variable, and adding it as shown in the below figure.
      Value Data Specify the value data.
      Description Enter a short description about the registry item.
Assign Dynamic Variable
  1. Once all the details are filled, click Add, and the registry template appears on the list page.

Packages

The first step towards Deployment is to add Software Packages in the system. A Package has to be manually added to the Deployment module before it can be attached to a Deployment Request.

To view the Packages page, navigate to Admin > Patch Management > Packages.

Package List page
Package List page

Here, you can search, view, create, edit, and delete packages.

Add Package

To add a package,

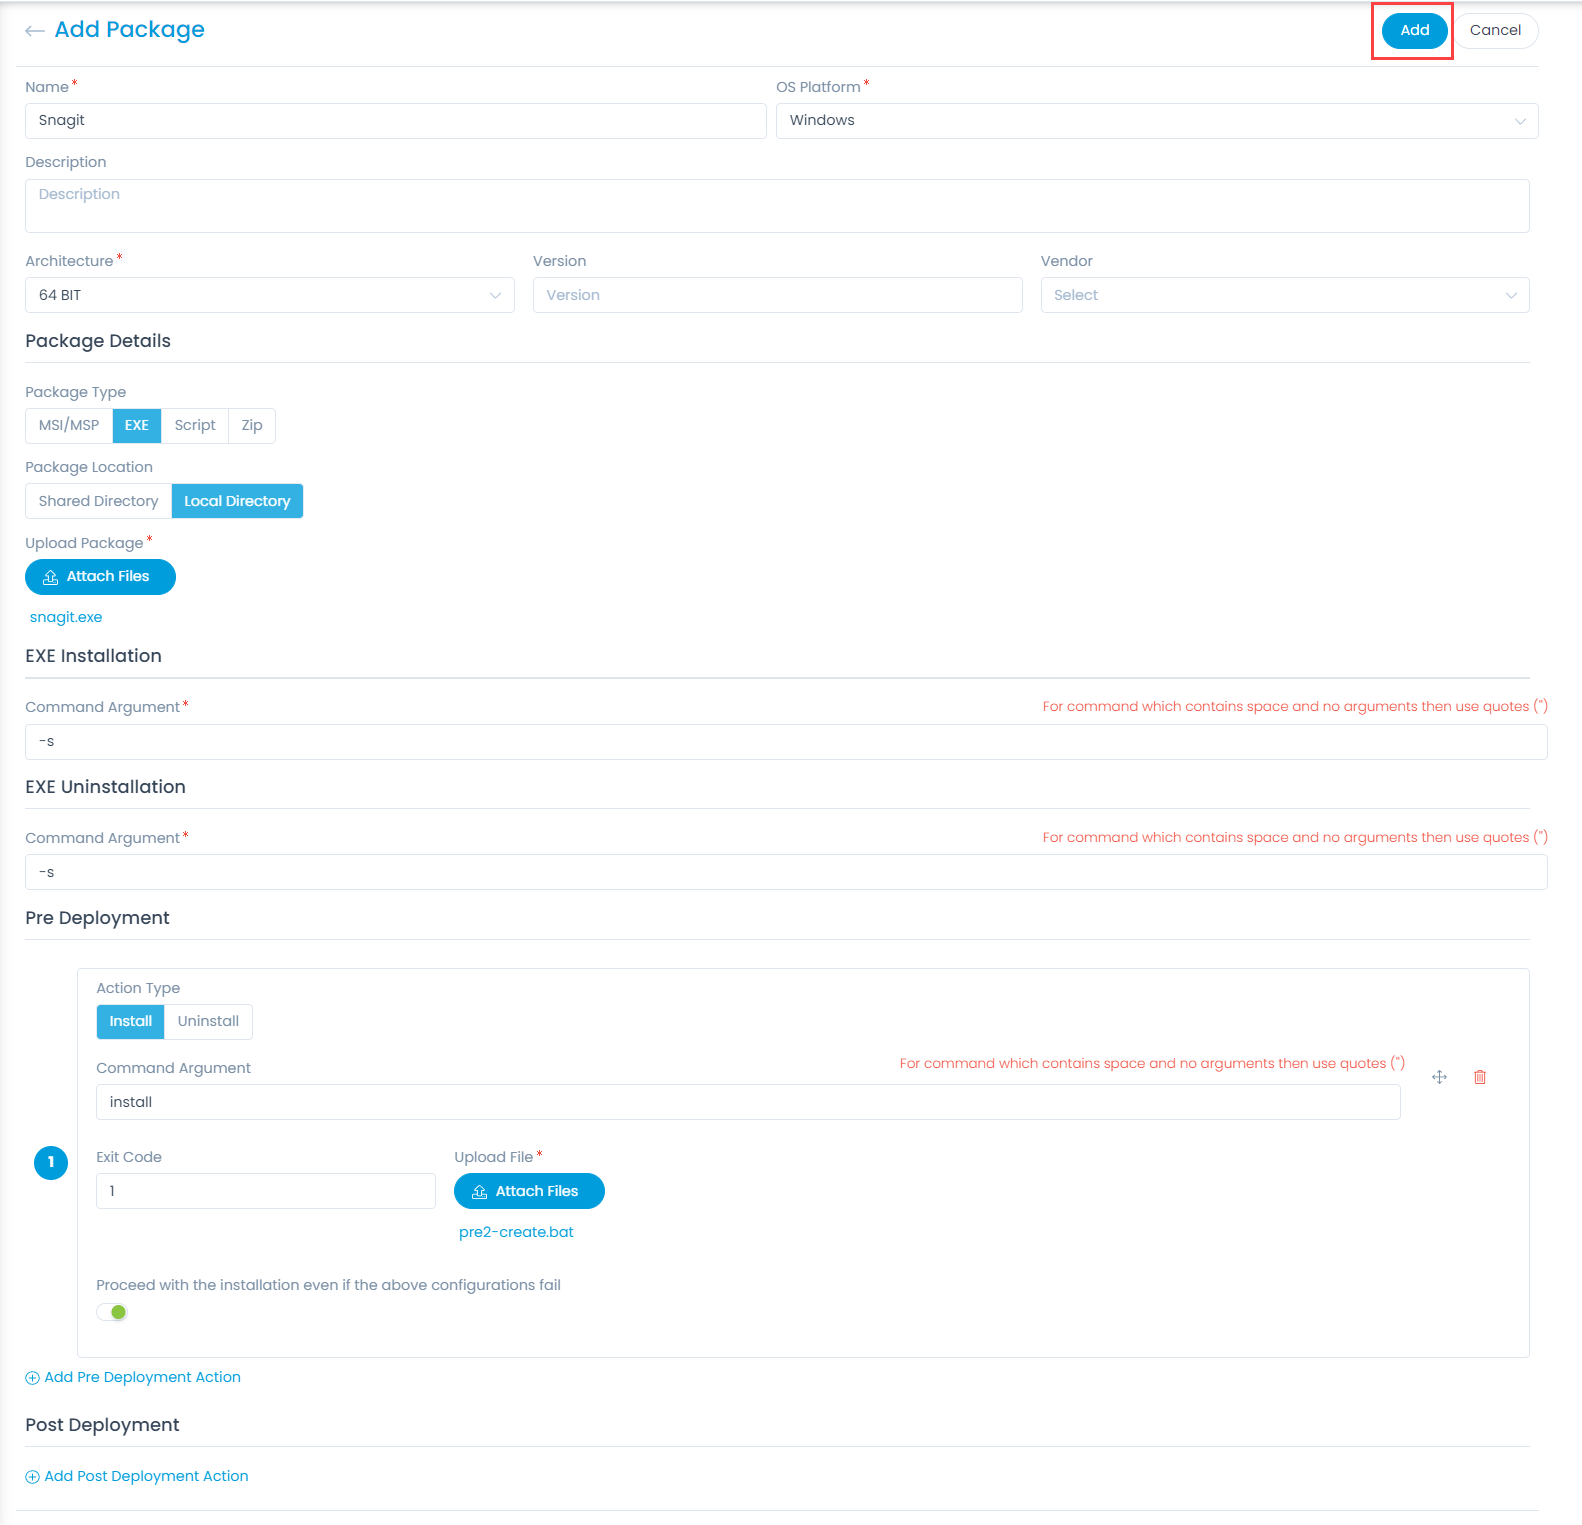
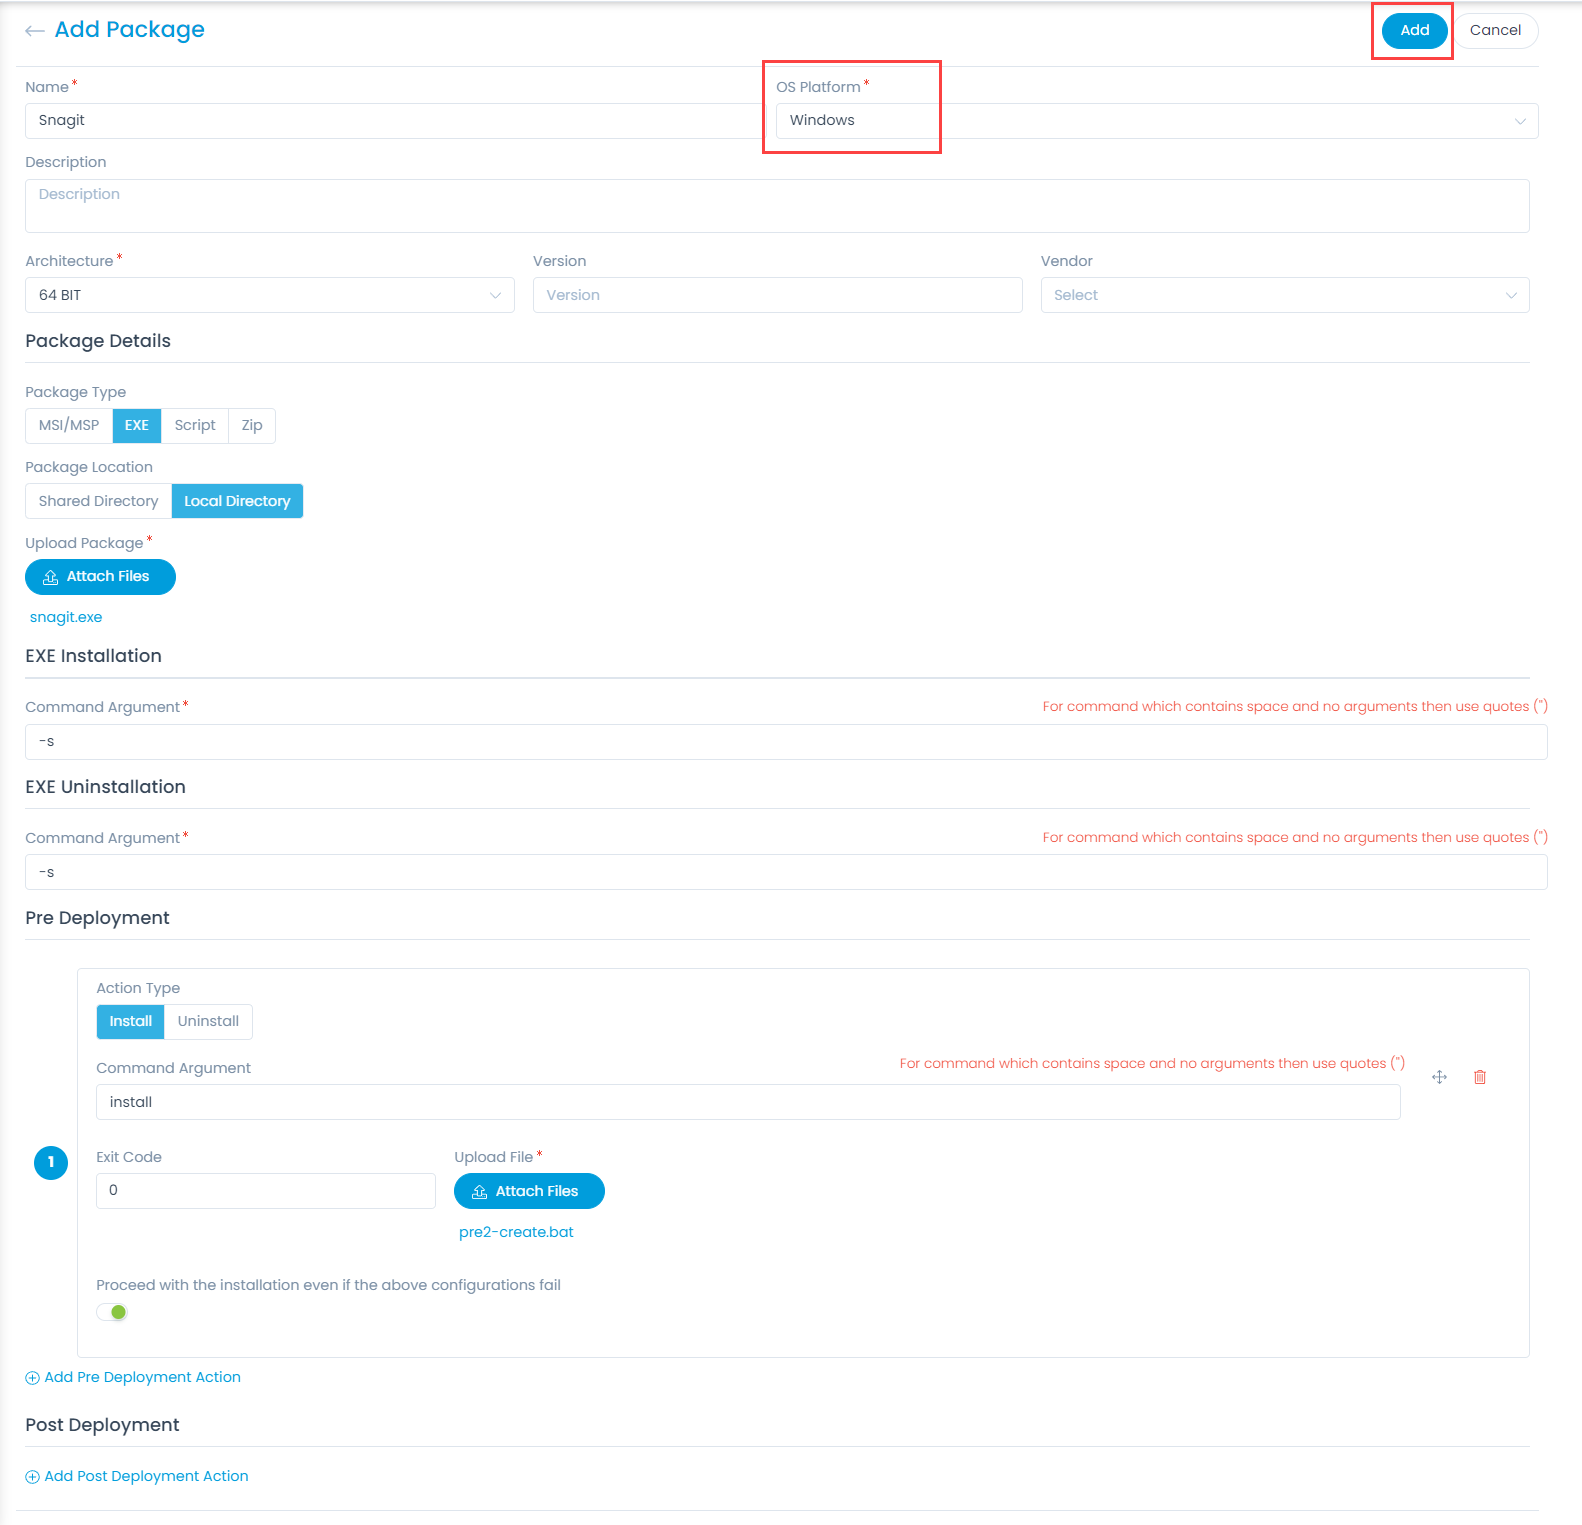
  • Click the Add Package button and the below page appears.
Add Package
Add Package

Enter the below details:

Parameter Description
Name Enter the name of the package.
OS Platform Select the OS platform. The options are: Windows, MAC, and Linux
Description Enter a short description about the package.
Architecture Select the architecture of the system in which the package is to be installed. The options are: 64 Bit, 32 Bit, and ARM64.
Version Enter the version number of the package.
Vendor Select the vendor of the package. For more details on addition, refer to the link Vendor Catalog.
Package Details
Package Type Select the type of package. The options are:

  • MSI/MSP (Windows)
  • EXE (Windows)
  • Script (Windows/MAC/Linux)
  • Zip (Windows/MAC/Linux)
  • Application (MAC/Linux)
Package Location Select the location from which the package is to be fetched. The options are:

  • Shared Directory: If selected, enter the Shared Drive File Path using the Add Path link.
  • Local Directory: If selected Upload Package from the local directory using the Attach Files button.

Windows Platform

If OS Platform is Windows, the below parameters are available:

Windows Platform Parameters
Parameter Description
MSI/MSP Installation (MSI/MSP Package Type)
MSI/MSP File Name  Enter the name of MSI (Microsoft Software Installer) file to install.
Properties Arguments Enter the silent installer command based on the package. For example: FileZilla_3.51.0_win64-setup.exe /S
MSI/MSP Uninstallation (MSI/MSP Package Type)
MSI/MSP File Name Enter the name of MSI (Microsoft Software Installer) file to uninstall.
Properties Arguments Enter the silent uninstaller command based on the package.
EXE/Zip Installation (EXE/Zip Package Type)
Command Argument Enter the silent installer command using which installation of the exe or zip file will begin.
EXE/Zip Uninstallation (EXE/Zip Package Type)
Command Argument Enter the silent uninstaller command using which the uninstallation of the exe or zip file will begin.
Script Execution 
Command Argument Enter the command using which the execution of the script file will begin.

Pre Deployment

This section enables you to configure the actions that must be fulfilled before the deployment of a package. Once configured, when the package deployment process initiates, the pre-installation script will get executed. If the script executes successfully, the package deployment will start. If the script fails the installation process will also fail. You can configure multiple actions.

Notes:

  • The defined actions will be executed as per the given order.
  • The pre deployment actions are supported for Windows OS only.

The benefits are:

  • Ensure that old PCs on the network have enough space before installation.
  • Installing it only on the systems that don’t have the latest version.
  • Uninstalling previous version of Java, as it may cause issues otherwise.
  • Specifying the path to JRE installation, so that the users do not have to specify it every time they run a Java command.
  • Disabling the automatic updates to have complete control over which version is being used.
Parameter Description
Pre Deployment
Action Type Select the action type as Install or Uninstall.
Command Argument Enter the command using which the install or uninstall action will begin.
Exit Code Enter the exit code for successful deployment. For Example: 0.
Proceed with the installation even if the above configurations fail Enable if you want to continue the deployment though the above configuration fails.
Add Pre Deployment Action Click the link to add more pre deployment actions like above.

Post Deployment

This section enables you to configure the actions that must be fulfilled after the deployment of a package. Once configured, when the package deployment process ends, the post-installation script will get executed. If the script fails remarks will be added. You can configure multiple actions.

Note:

  • The defined actions will be executed as per the given order.
  • The post deployment actions are supported for Windows OS only.
Parameter Description
Post Deployment
Action Type Select the action type as Install or Uninstall.
Command Argument Enter the command using which the install or uninstall action will begin.
Exit Code Enter the exit code for successful deployment. For Example: 0.
Proceed with the installation even if the above configurations fail Enable if you want to continue the installation though the above configuration fails.
Add Post Deployment Action Click the link to add more post deployment actions like above.

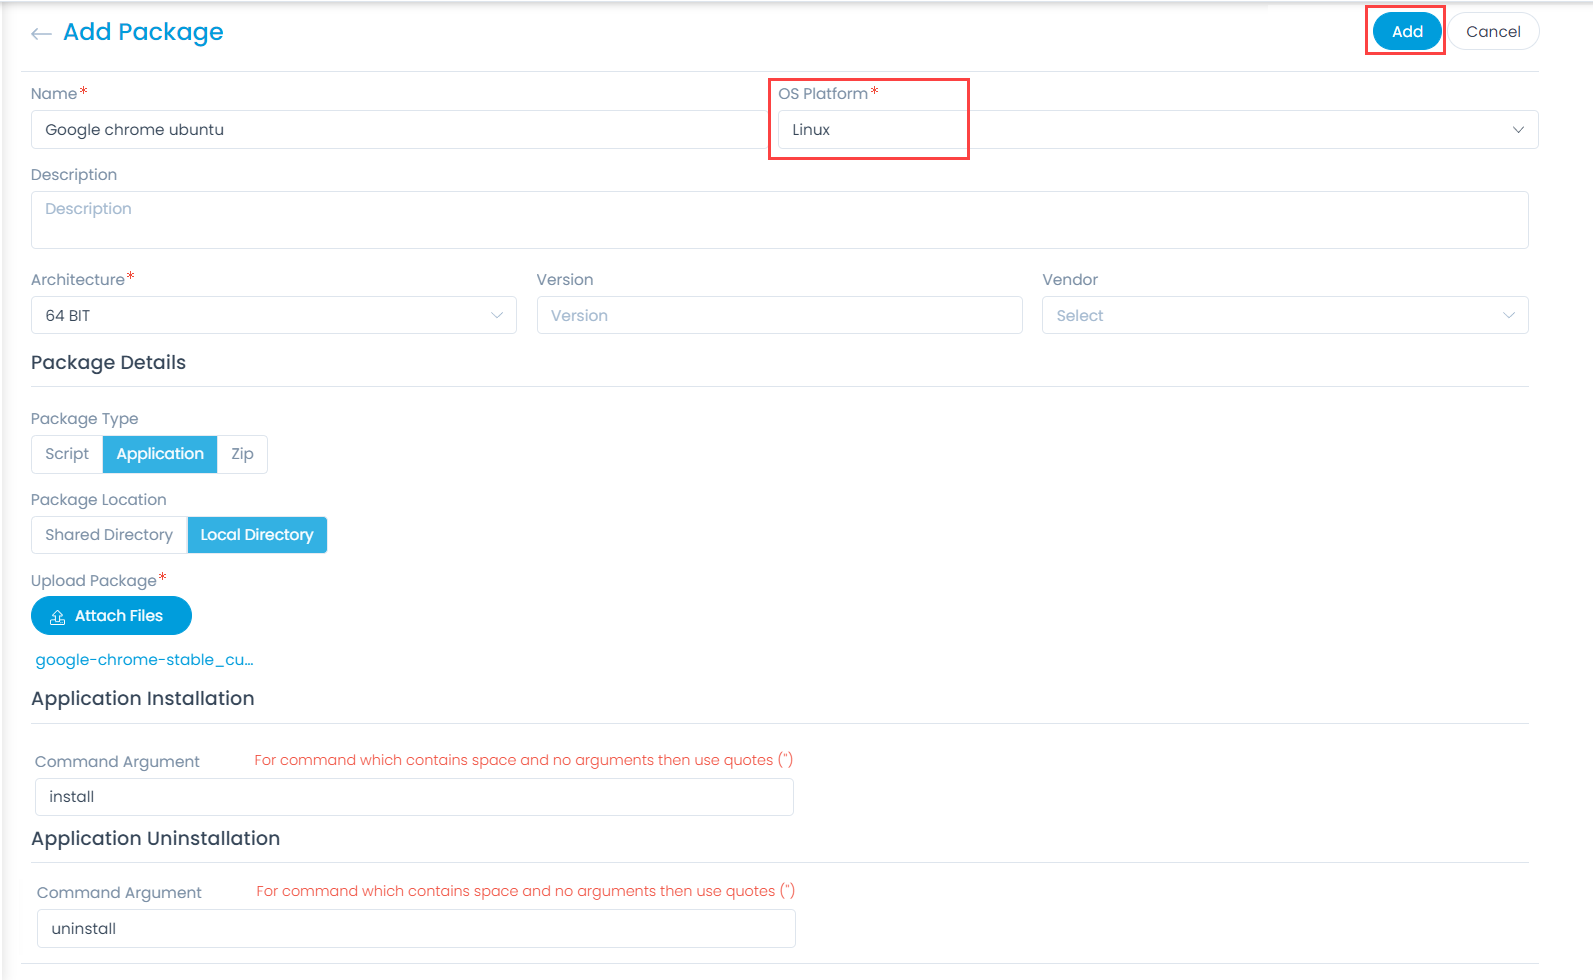
MAC or Linux Platform

If OS Platform is MAC or Linux, the below parameters are available:

MAC or Linux Platform Parameters
Parameter Description
Script/ZIP Execution (Script/Zip Package Type)
Command Argument Enter the command using which the execution of the script or zip file will begin.
Application Installation (Application Package Type)
Command Argument Enter the command using which the installation of the application will begin.
Application Uninstallation (Application Package Type)
Command Argument Enter the command using which the uninstallation of the application will begin.

Once all the details are filled, click Add and the package gets created with a prefix PKG. For Example: PKG-1