Decline Patches

Decline Patch Configuration allows you to automate the process to ignore Patches for a specific set of Computers which is different from manual ignoring.

A decline configuration jumps into action whenever a Computer demands a Patch. It checks whether the Patch is a part of any DC and updates the Patch database accordingly. Patches ignored automatically are also added to the global ignored list, but you can drill down to the specific Computers where they have been ignored using the UI features.

To view the Decline Patches page, navigate to Admin > Patch Management > Decline Patches.

Decline Patches page

Here, you can view, create, edit, and delete the patch decline policy.

Create a Patch Decline Policy

To create a patch decline policy, follow the below steps:

  1. Click the Create Patch Decline Policy button and a popup appears.
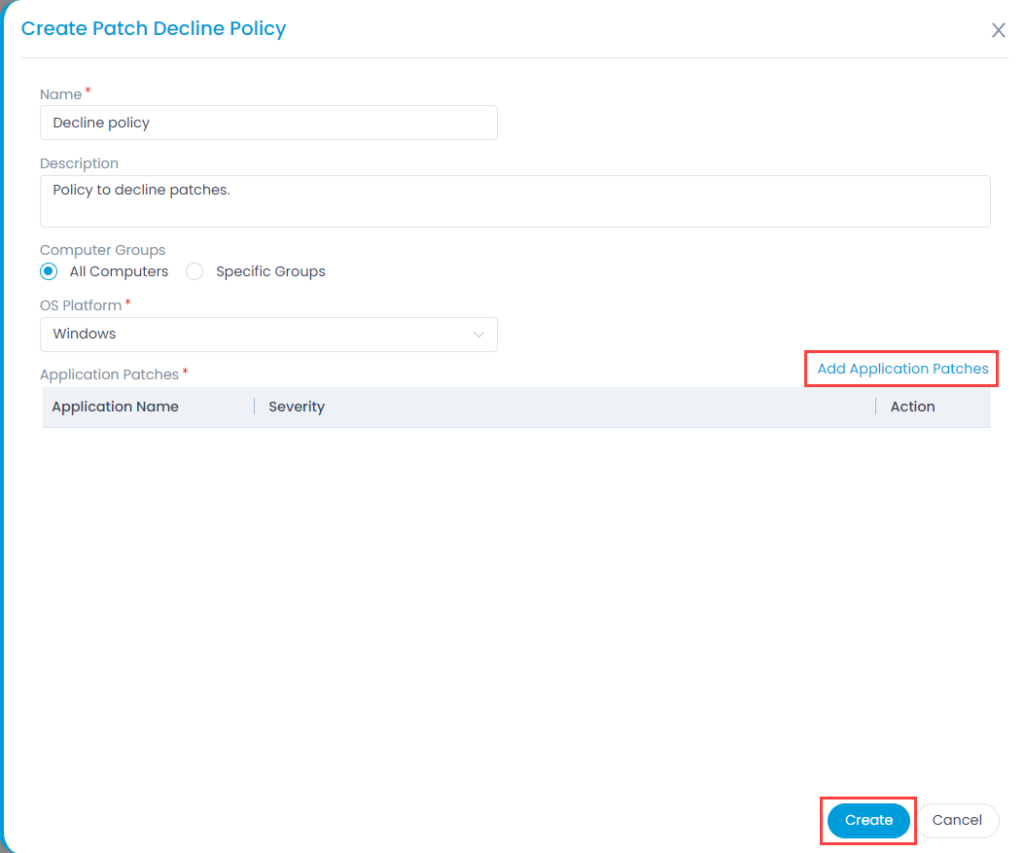
Create Patch Decline Policy
  1. Enter the below details:
    • Name: Enter the name of the policy.
    • Description: Enter a short description about the decline policy.
    • Computer Groups: Select the groups of computers on which the policy should be applicable. the options are:
      • All Computers: Select if you want to decline the policy for all the computers.
      • Specific Groups: Select if you want to decline the policy for some specific groups of computers only. If selected, select the desired Computer Groups from the dropdown.
    • OS Platform: Select the OS platform on which the policy is to be applied. The options are: Windows, Linux Ubuntu, Linux Mint, Linux CentOS, Linux Redhat, Linux Opensuse, Linux Debian, and Linux Oracle.
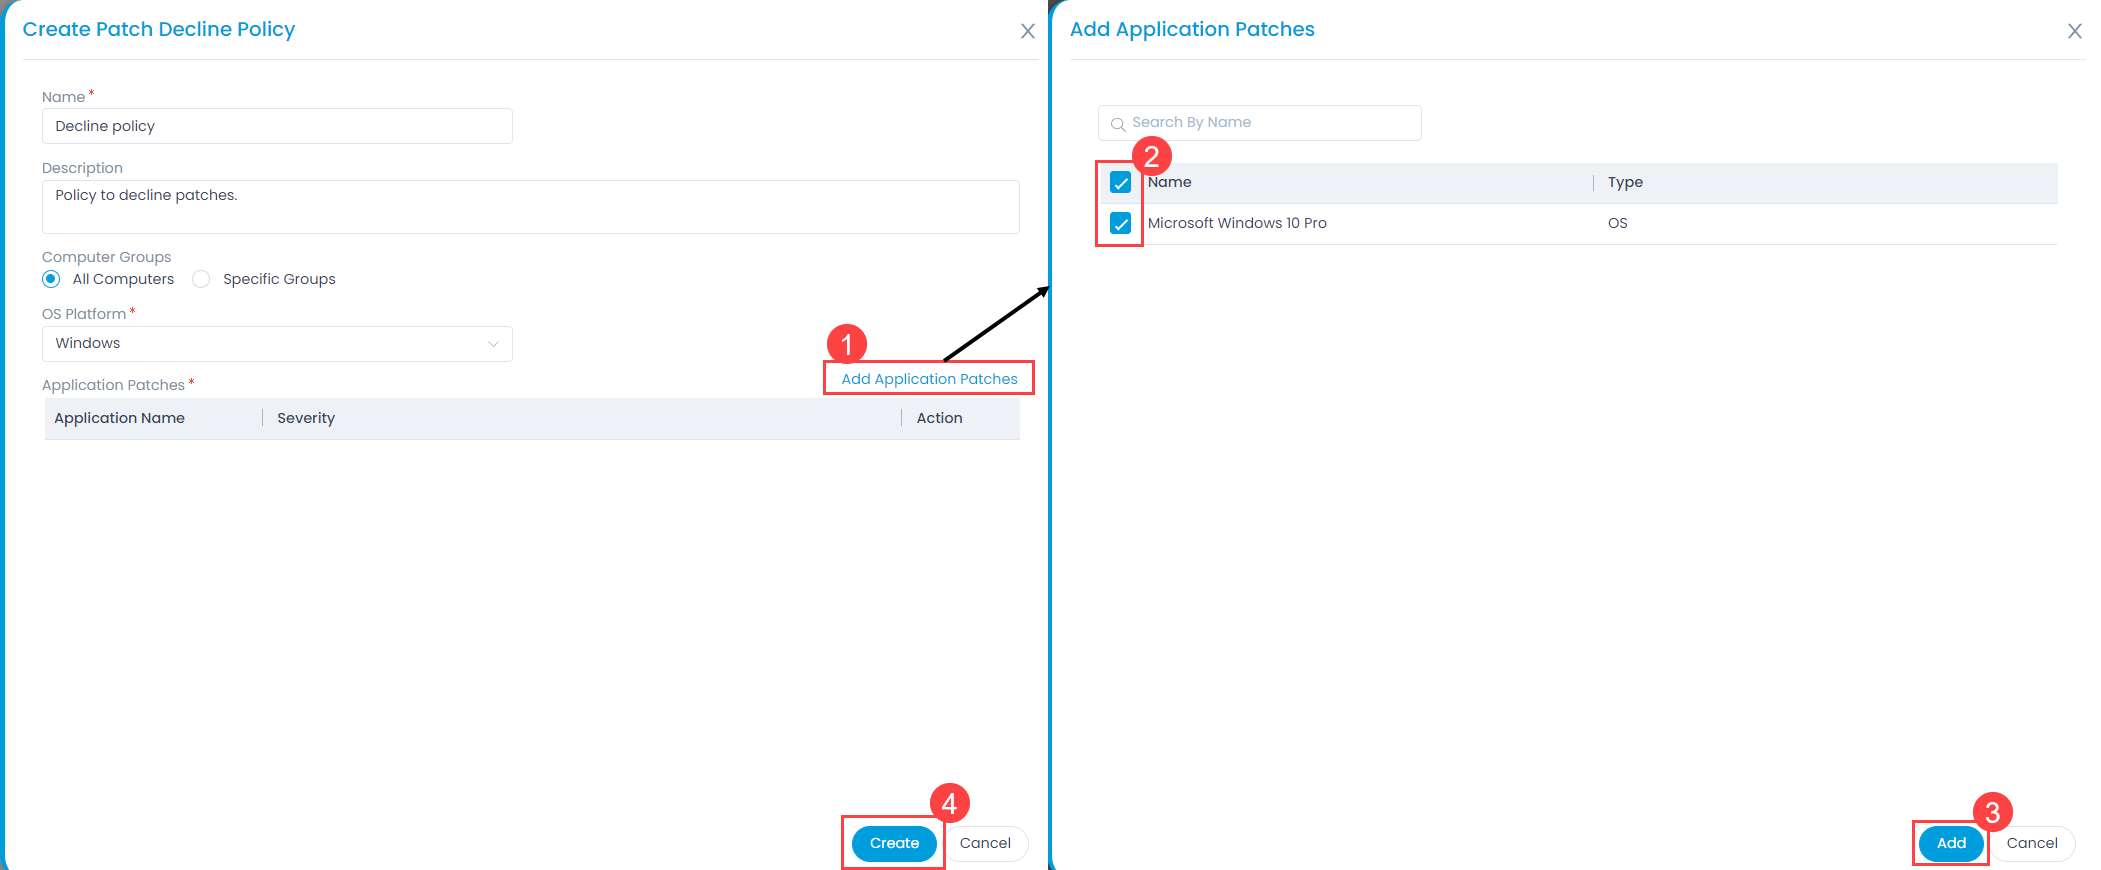
    • Application Patches: Select the application patches on which the policy will be applicable. To add patches, click the Add Application Patches link and a popup appears as shown below. Select the required patches and click Add.
Add Application Patches
  1. Once done, click Create and the decline policy gets created.

Deployment Policies

A deployment policy is created to control how a Deployment Request actually carries out the deployment of Patches. A user can create multiple policies and select any one of those when creating a Deployment Request.

A Deployment Policy uses fine-grained configurations to control the deployment initiation, reboot policy, user interaction, and notifications.

To view the Deployment Policies page, navigate to Admin > Patch Management > Deployment Policies.

Deployment Policies page

Here, you can view, add, edit, and delete the deployment policies.

Note: You cannot delete a policy if it is associated with a Deployment Request. You have to delete the request first then the policy.

Add Deployment Policy

To add a deployment policy,

  1. Click the Create Deployment Policy button and a popup appears.
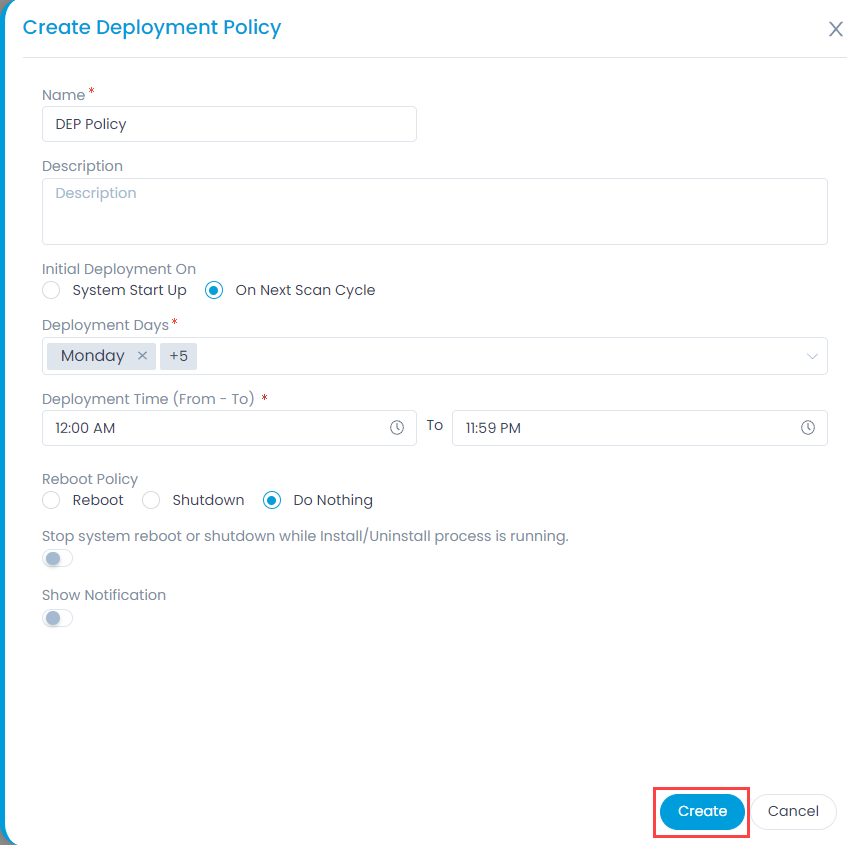
Create Deployment Policy
  1. Enter the below details:
    Parameter Description
    Name Enter the name of the policy.
    Description Enter a short description about the policy.
    Initial Deployment On Select when you want the product server to send command to a Computer every time the System starts up or send command on the Upcoming Next Scan Cycle.
    Deployment Days Select the desired day for deployment.
    Deployment Time Select the desired time for deployment.
    Reboot Policy Select the action to perform after successful installation. The options are:

    • Reboot: Select if you want the system to reboot on successful patch deployment.
    • Shutdown: Select if you want the system to shutdown on successful patch deployment.
    • Do Nothing: Select if you want to do nothing on successful patch deployment.
    Skip Reboot/Shutdown if not required Select if you want to skip the reboot or shutdown of the system after successful deployment. By default, it is disabled.
    Stop system Reboot or shutdown while Install/Uninstall process is running Enable if you want to stop the system to reboot or shutdown while the install or uninstall process is running.
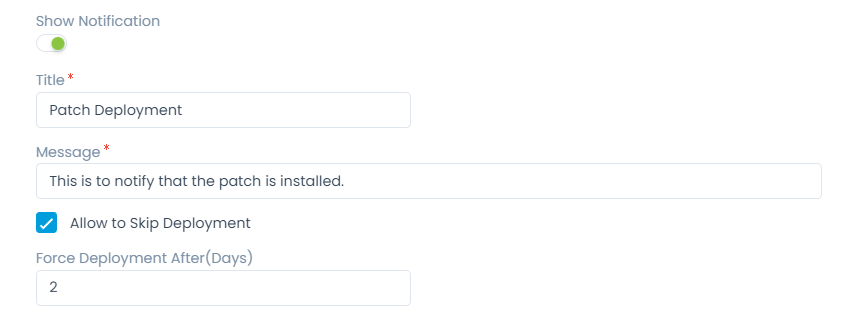
    Show Notification Enable if you want to notify the users of Computers before a deployment. If you select Yes, provide the below details:

    • Title: Enter the title of notification.
    • Message: Enter the message to be sent to the computer users.
    • Allow to Skip Deployment: Enable if you want to give the users of Computers the option to skip a deployment. If enabled, the below parameter becomes available.
    • Force Deployment After (Days): Enter the number of days after which the deployment is to be enforced.
Show Notification Parameters
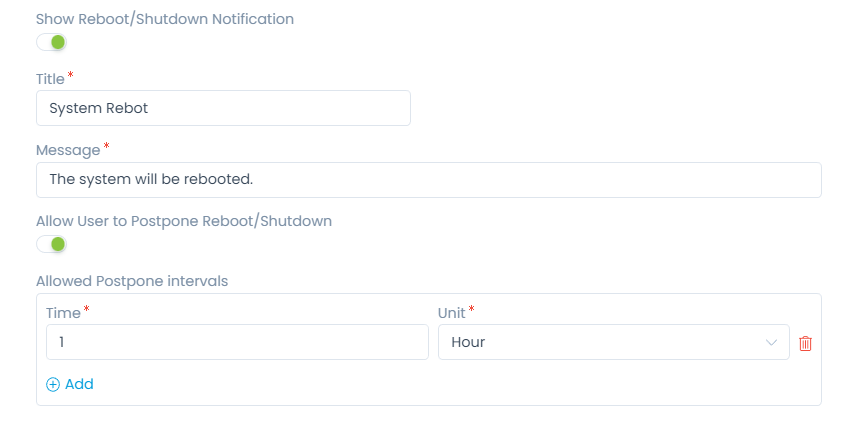
Show Reboot/Shutdown Notification Enable if you want to notify the users of Computers before reboot or shutdown. If you select Yes, provide the below details:

  • Title: Enter the title of notification.
  • Message: Enter the message to be sent to the Computer users.
  • Allow User to Postpone Reboot/Shutdown: Enable if you want to give the users of Computers the option to postpone the reboot or shutdown of the system. If enabled, the below parameter becomes available.
  • Allowed Postpone Intervals: Set the interval by selecting the Time and Unit in Minute, Hour, or Day. You can add more intervals using the Add link
Show Reboot/Shutdown Notification Parameters
  1. Once all the details are filled, click Create.

System Health Settings

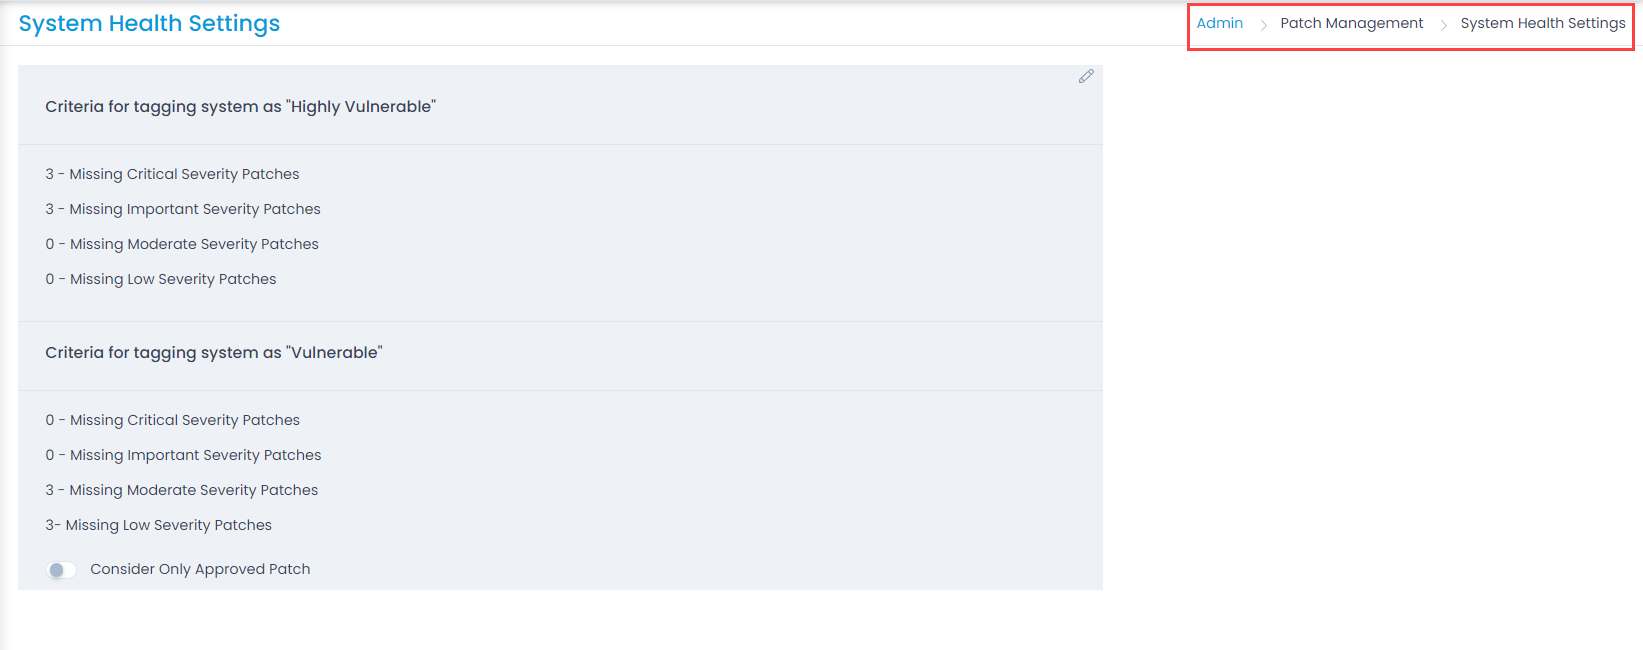
These settings help Motadata to flag Computers as either Highly Vulnerable or Vulnerable.

To view the System Health Settings page, navigate to Admin > Patch Management > System Health Settings.

Here, you can set the conditions separately to define Highly Vulnerable and Vulnerable.

System Health Settings page

Click on Edit to make the fields editable. You are expected to enter the minimum number of missing Patches for each severity label.

Each vulnerability status has a set of four severity labels and their counts. No two same labels can have the same numbers.

The number zero in a field signifies that there’s no condition for the corresponding severity label.

If a Computer has a missing Patch number that is equal to or exceeds a minimum value for a label, then the Computer is flagged with the corresponding health status. In case a Computer satisfies multiple labels then the label top in the hierarchy is considered (Critical Patches having the highest priority and Low severity having the lowest).

Computer Groups

You can classify Computers into groups. Some of the use cases where having Computer Groups can be convenient are as follows:

  • You want to deploy Patches in Computers belonging to a particular department. You can create a Computer Group having all the Computers of that department and quickly create a Deployment Request with that group.
  • If you want to deny a specific set of Computers certain Patches, then you can create a Computer Group and decline them the Patches. The Decline Patch Configuration feature allows you to perform such an action.
  • You can test the download ability of a set of Patches by deploying them in a Computer Group. The Automatic Patch Test feature allows you to perform such tests.

To view the Computer Groups page, navigate to Admin > Patch Management > Computer Groups.

Computer Groups page

Here, you can created, edit, and delete a Computer Group.

To create a group,

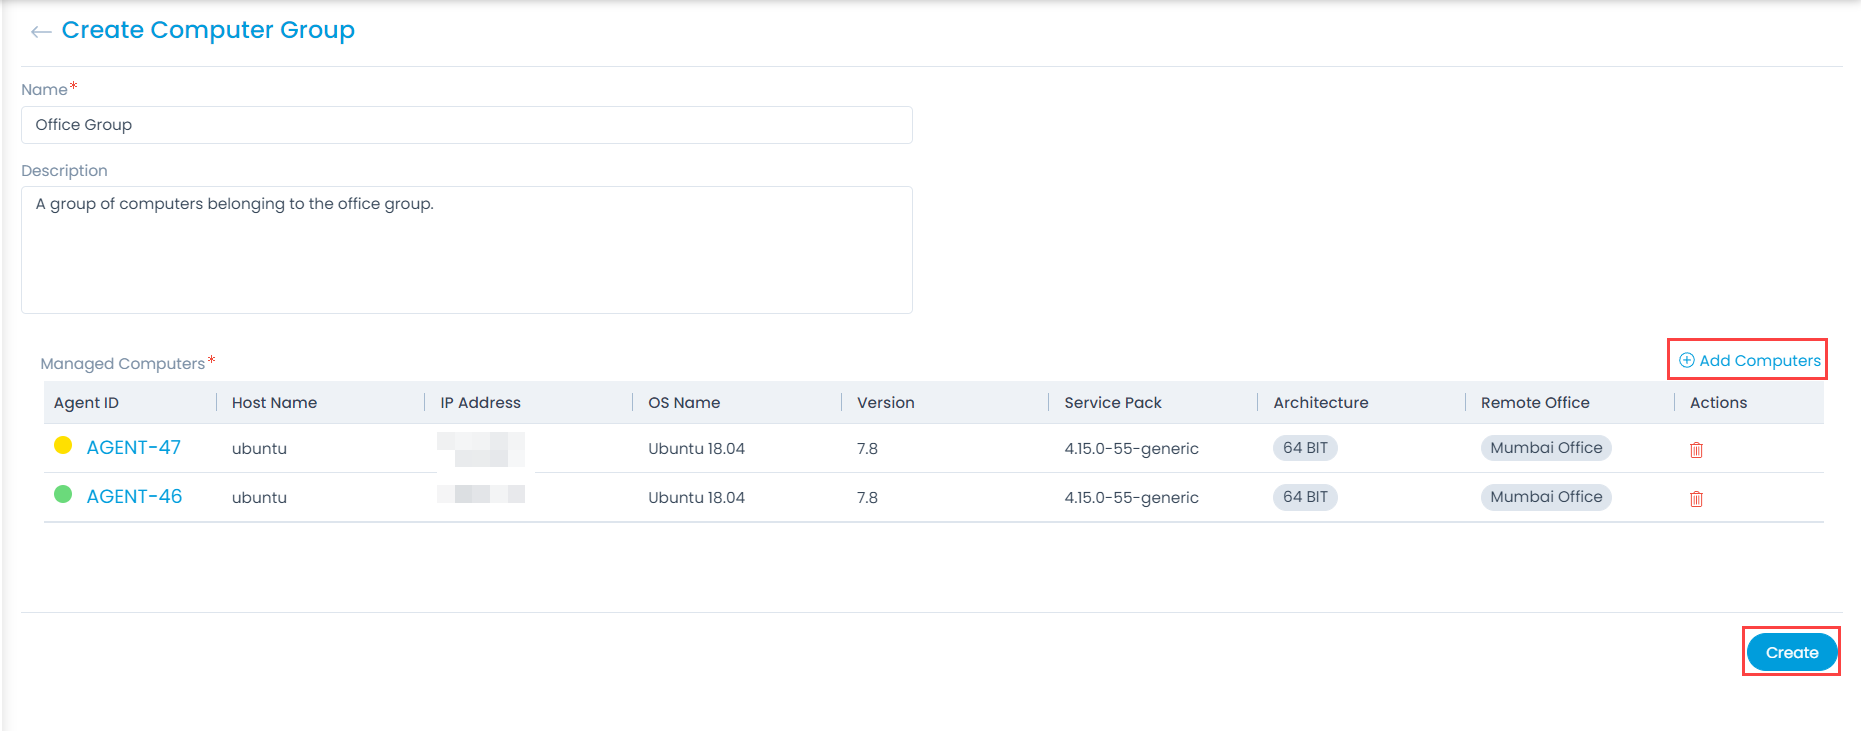
  1. Click the Create button on the list page, and the below page appears.
Create Computer Group
  1. Enter the below details:
    • Name: Enter the name of the Computer Group.
    • Description: Enter a short description about the group.
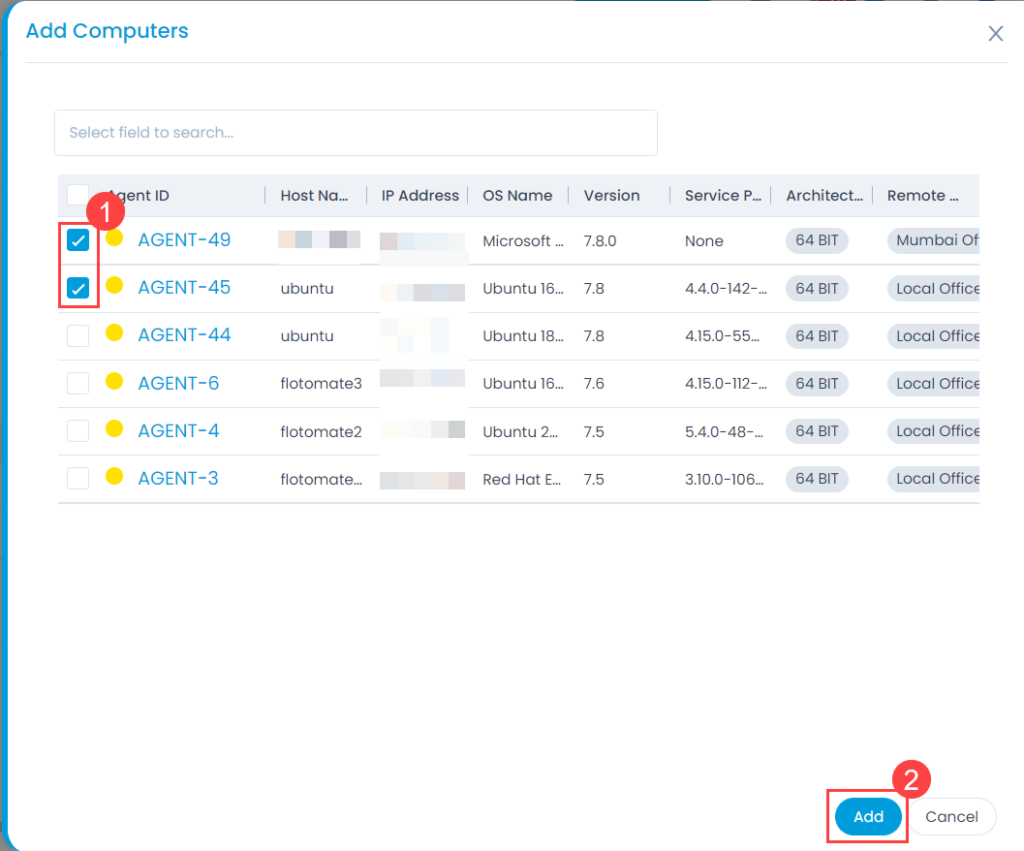
    • Add Computers: Add the computers in the group using the Add Computers link. A popup appears, select the desired computers and click Add. The list displays all the computers that are added in the End Points Scope.
Add Computers
Add Computers
  1. Once all the computers are added, click Create and the group gets created.

End Points Scope

Depending on the License agreement you have with us, the number of Computers you can manage for Patches is limited. All discovered Computers (with our Agent application) stay out of the scope of Patch Management by default; you have to bring them within the scope before you can use Patch Management.
To view the End Points Scope page, navigate to Admin > Patch Management > End Points Scope.

End Points Scope page

Here, you can view all the available Computers (both in and out of the Endpoint Scope) and add them to the Scope. You can set certain conditions that allow the system to add any new Computers automatically. You can also add Computers manually.

There is a counter that shows how many Computers you can add to scope to the left-side of the Add Computers button. In no situation, you can exceed the total number of Computers allowed to add to the Scope.

Note: Only Computers configured with our Agent Application are visible in the End Points Scope page.

Add Computers to a Scope

To add, click the Add Computers button and a list appears in the popup as shown below.

Add Computers
Add Computers
  • You can manually search and add Computers to a scope (target). The search bar supports the Advanced Search feature where you get the search options by clicking on the search bar.
  • You can also enter keywords to search for a Computer. When entering a keyword, the product explores all the Computers with the keyword in their Name, Hostname, IP Address, OS name and Service Pack. A Computer has to have at least one field matched (partial or full) with the keyword; in case there are multiple keywords, a Computer has to have at least one field matched for each keyword.
  • Once you have found your Computers, add by selecting them, and they move to the Selected Computers list. Manually selected Computers override the exclude criteria or conditions set for the Remote Office.

Remote Offices

Modern organizations are geographically dispersed. They have offices at different locations all controlled from a main office. Offices that are away from the main office are termed as Remote Offices. It may happen that all the offices of an organization form part of a single network. Individual offices may have a relay server: A relay server is used to allow communications from outside a company’s firewall to the internal Servers.

In order to accommodate such situations, we have the following Remote Automation features:

  • A user can create a group of computers for a location and save it as a Remote Office.
  • A user can add a Remote Office in a scope (Endpoint Scope) instead of individual computers for Patch/Package/Registry Management.
  • Users can point a Remote Office to a Relay Server. This is useful when there are multiple offices, and the admin doesn’t want them to hog the central File Server for Patch/Package download. This is why we have the feature that allows a Remote Office to download Patches/Packages from a Relay Server rather than the central File Server.
To view the Remote Offices page, navigate to Admin > Patch Management > Remote Offices.

Remote Offices Page
Remote Offices Page

Create Remote Office

To create a Remote Office,

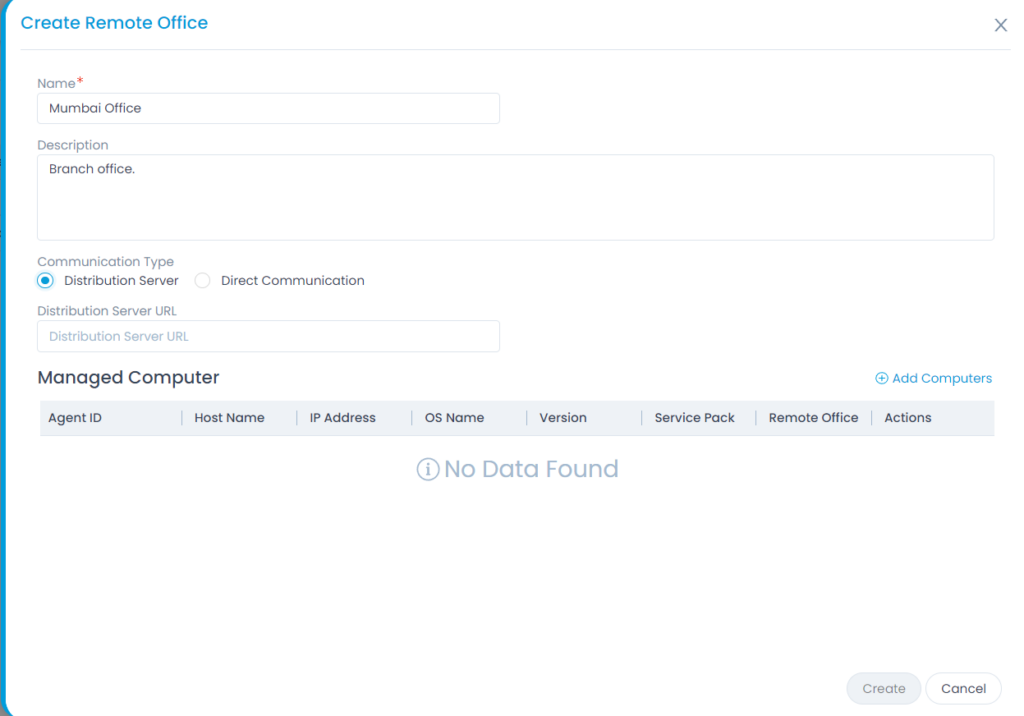
  1. Click the Create Remote Office button on the top-right corner of the page and a popup appears.
Create Remote Office

Enter the below details:

  1. Name: Enter the name of the remote office.
  2. Description: Enter a short description about the remote office.
  3. Communication Type: It is where you configure for a relay server. The options are:
    • Distribution Server: Select if your remote office is outside your local network at a remote location. Enter the Distribution Server URL so that the main server can route the Patches or Packages to the Remote Office’s relay server.
    • Direct Communication: Select when you are creating a remote office locally within your base network.
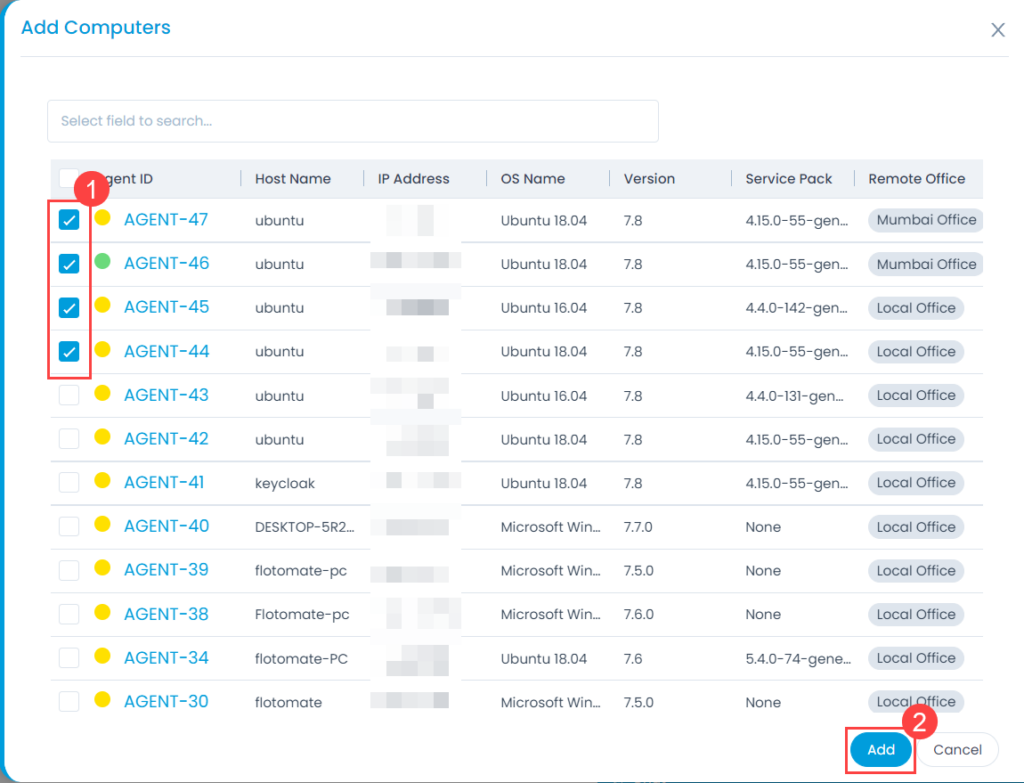
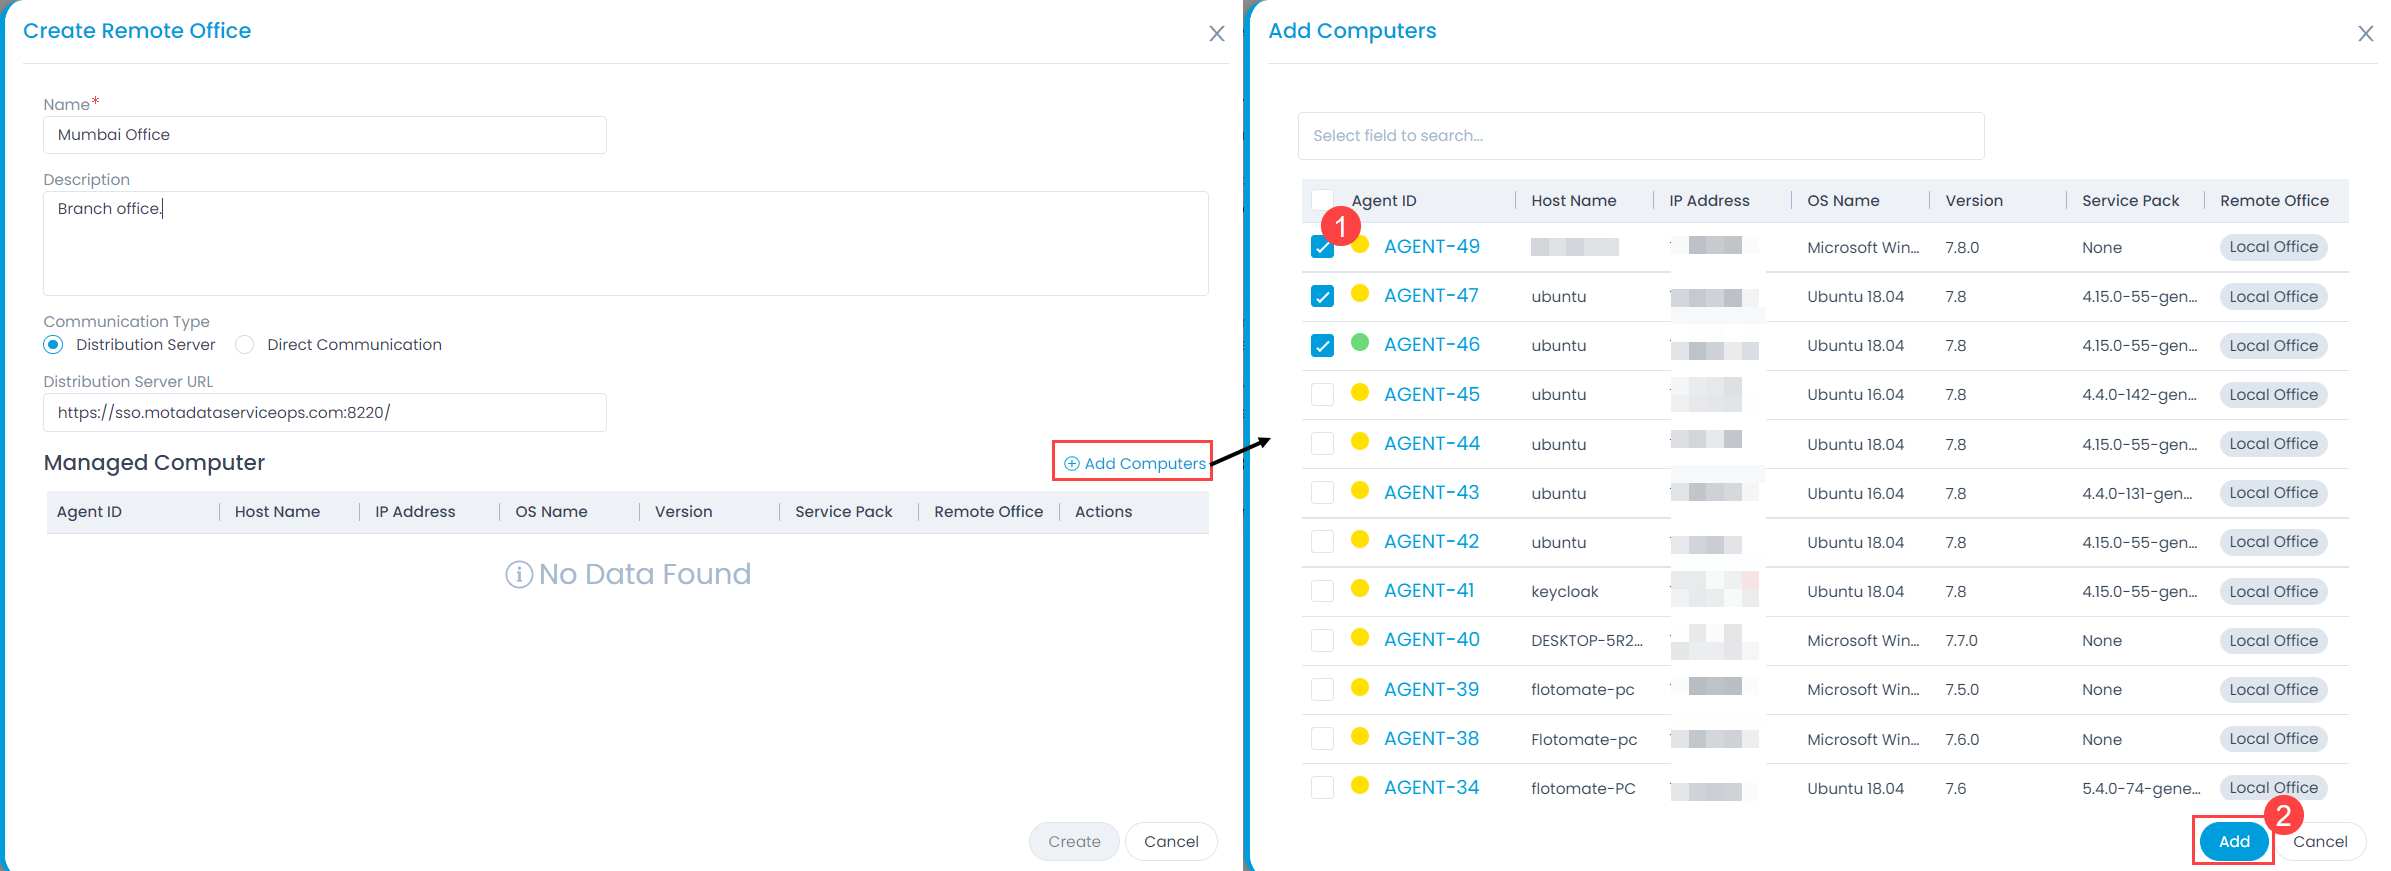
  4. Add Computers: Add computers to the remote office using the Add Computers link as shown below. A list of Agents appears, select the desired agents and click Add.
Add Computers to the Remote Office
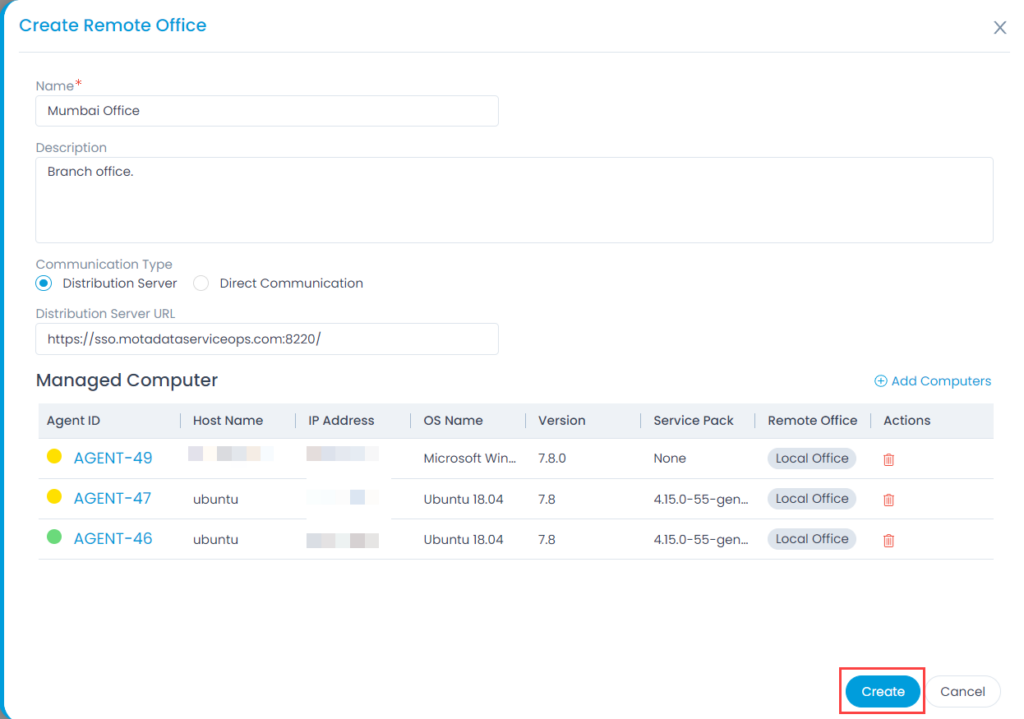
Computers Added
Computers Added
  1. Once done, click Create, and the remote office appears on the list page. Once added, you can edit or delete them using the respective icons. If delete is clicked, a confirmation message appears. Click Yes to continue or Cancel to stop the process.

Access Controls

This tab allows you to configure the proxy server, bandwidth utilization, and relay server settings.

To view the Access Controls page, navigate to  Admin > Patch Management > Access Controls.


Access Controls Page

Proxy Server

For the Proxy server configuration there are 3 options available: Direct Internet Access, Configure Manual Proxy, and DMZ. For the Direct Internet Access, select the Direct Internet Access from the dropdown list and click Update.

Proxy Server Configuration - Direct Internet Access Option

To configure the Proxy Server manually, select the Configure Manual Proxy option and configure the below parameters.

Configure Manual Proxy
  • Host: Enter the Host IP address. It is a mandatory field.
  • Port: Enter the reachable port of the IP address. It is a mandatory field.
  • Username: Enter the username of the host, which would be used to sign-in.
  • Password: Enter the Password. It is in encrypted format.

Once all the details are provided, click Update. You can also test the connection using the Test Connection button.

To configure the DMZ, select the DMZ option, enter the Host IP address, Port number, and click Update. You can also test the connection using the Test Connection button.

DMZ
DMZ

Bandwidth Utilization

This tab allows you to set the bandwidth speed limit for downloading patch files from the Internet, File Server, and Distribution server.

Bandwidth Utilization

Enable the Bandwidth Utilization Limit to set the speed limit to download patch files. By default, disabled. If enabled, you can set the following parameters:

  • KB/Second Download Speed While Downloading File From the internet: Enter the speed limit at which the patch file will be downloaded from the Internet.
  • KB/Second Download Speed While Downloading File From File Server To Distribution Server: Enter the speed limit at which the patch file will be downloaded from the File Server to the Distribution server.
  • KB/Second Download Speed While Downloading File From File Server / Distribution Server to Agent: Enter the speed limit at which the patch file will be downloaded from the the File Server or Distribution server to the Agent.

Once done, click Update.

Relay Server Settings

This tab allows you to configure the relay server.

Relay Server Settings
  • Enable Allow Relay Server to Download Patch from Internet to allow the relay server to download and store the patch from the Internet for the remote office agents. Thus, the agents in the remote office can download the patch from the relay server instead of the Internet directly. This helps in reducing the bandwidth. By default, disabled.
  • If enabled, select the desired Remote Office for which the patch is to be downloaded and click Submit.

Patch Settings

Here, you will be able to make various configurations related to Patch. Patch Settings comes within the domain of Endpoint System Management. It is the process of the acquiring, testing, and deploying patches across the administered IT Assets (generally workstations and servers) in a systematic way. It also includes the administrative decision of deciding which patches are appropriate for deployment and documenting procedures like required configurations.

To view the Patch Settings page, navigate to Admin > Patch Management > Patch Settings.

Patch Settings Page
Patch Settings Page

Update Patch Database

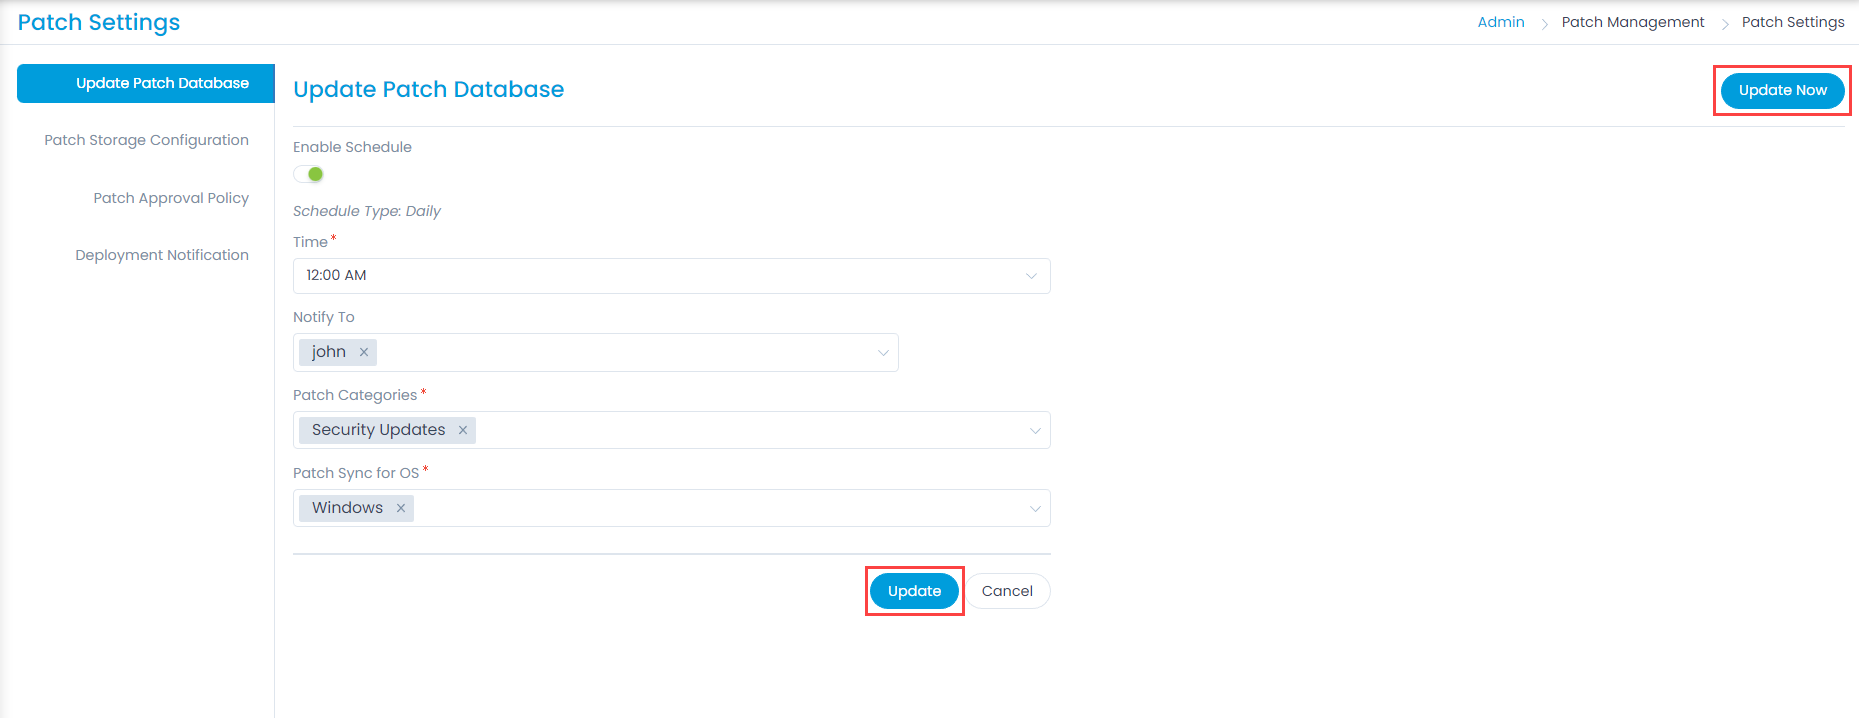
This tab allows you to synchronize the local patch database with the central patch repository. You can update the patch database either manually or based on a schedule. It also displays the date and time when the patch was last updated at the top-right corner of the page.

Update Patch Database

You can update the patch database manually using the Update Now button. Once clicked, a message “Process is running” appears. Once completed, a confirmation message is displayed.

Enable Schedule to update the patch database at a particular time. The following parameters appear.

Parameter Description
Schedule Type The schedule runs on a daily basis.
Time Select the time at which the schedule should run and start the update process. It is a mandatory field.
Notify To Select the technicians to whom an email notification should be sent once the update process is completed.
Patch Categories Select the categories to which a patch belongs. Multiple patch categories can be selected. It is a mandatory field.
Patch Sync for OS Select the OS for which the patch is to be synchronized. The OS supported are:

  • Mac (Supported for Mac OS version 10 and above)
  • Windows
  • Linux Ubuntu
  • Linux Mint
  • Linux Centos
  • Linux Redhat
  • Linux Opensuse
  • Linux Debian
  • Linux Oracle

Click Update and the process begins. Once completed a confirmation message is displayed.

Note: At a time you can run only one instance of the update patch database process.

RedHat Patch Management Configuration

Prerequisites

  • At least one machine must have Internet connection and license subscription should be activated in all the machines.
  • ServiceOps supports RedHat Linux Servers V7 and V8 only.

Configuration

  1. Add device in Endpoint Scope which would act as an agent in Settings > Patch Management > Endpoints Scope.
  2. Under Settings > Patch Management > Agent Nomination, add the device which will be connected to the Internet. This device now acts as an agent.
Agent Nomination
Agent Nomination
  1. While operating systems like Windows and other Linux OSs communicate with Central Repository, the agent installed downloads the data from the RedHat Repository and pushes it into the ServiceOps Patch server deployed on the client site.
  2. When the Repository finishes its sync process, the status gets changed to ‘Success’.

Patch Storage Configuration

The current architecture allows a file server to act as a central storage for the deployment of patches. A file server is the backbone of the desktop automation features, which is why it becomes important for an admin to make sure there is sufficient space in the file server. The Patch Storage Configuration performs two functions:

  • Clean the file server.
  • Generate a notification when the file server reaches a certain storage limit.
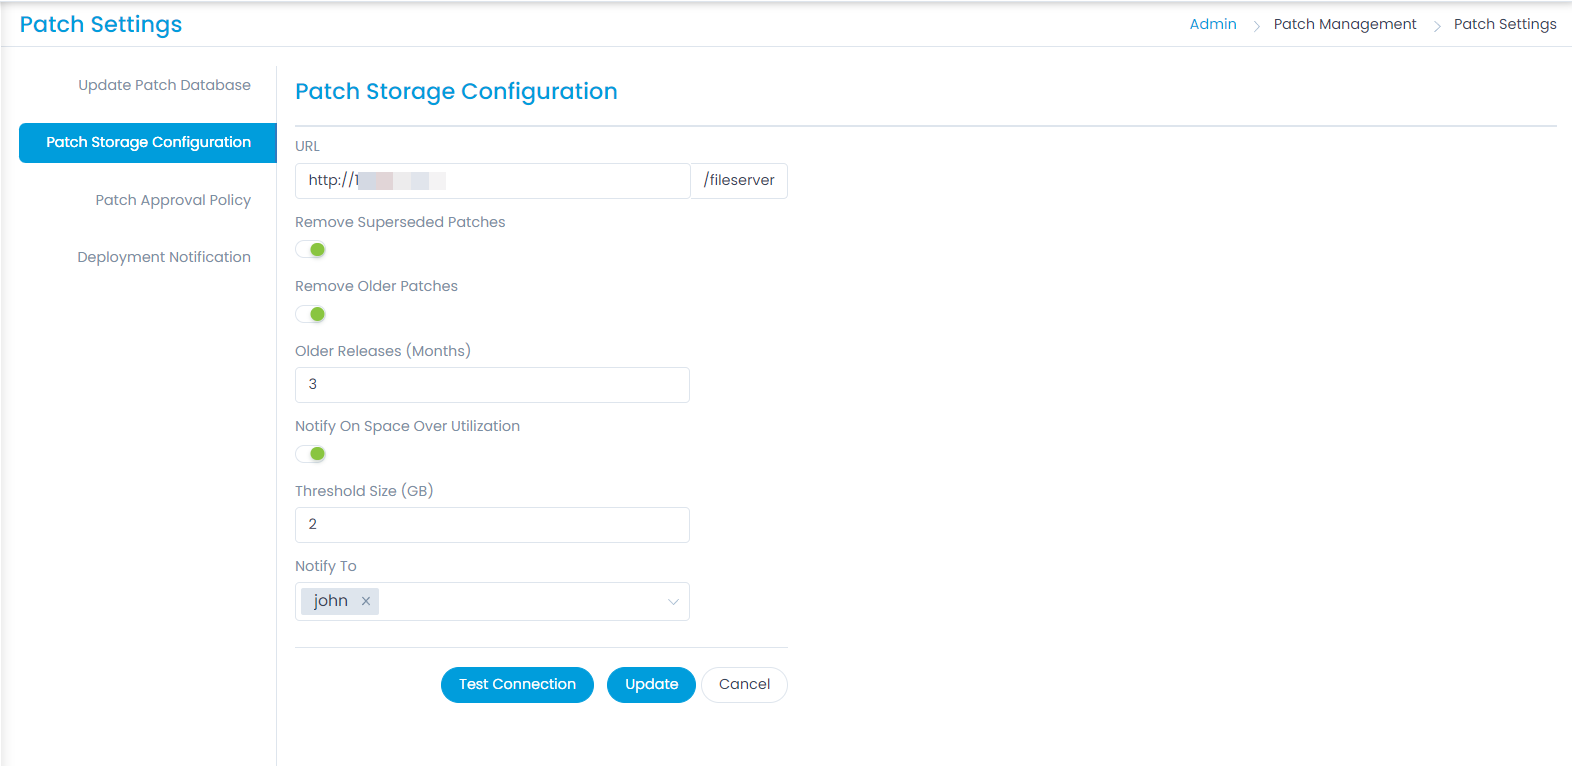
Patch Storage Configuration

Here, you can perform three functions. The URL of the file server is auto-filled as per the configuration settings of the ServiceOps policy.

  1. Remove Superseded Patches: If a vendor releases a patch that replaces an earlier patch, the new patch is called a superseding patch. Enabling this option allows you to delete the replaced patches over earlier patch. By default, disabled.
  2. Remove Older Patches: Enabling this option allows you to delete patches older than a specified number of months considering only the release date of a patch. If enabled, set the number of months in the Older Releases (Months) field. By default, disabled.
  3. Notify on Space Over Utilization: Enabling this option allows you to set the system to generate a notification when the storage in the file server reaches a certain limit. By default, disabled. If enabled specify the following parameters:

    Threshold Size(GB): Specify the storage limit in terms of GB.

    Notify To: Select the recipients to whom the notification is to be sent. Multiple recipients can be selected. The recipient can be a Requester Group, All Requester Groups, and individual emails.

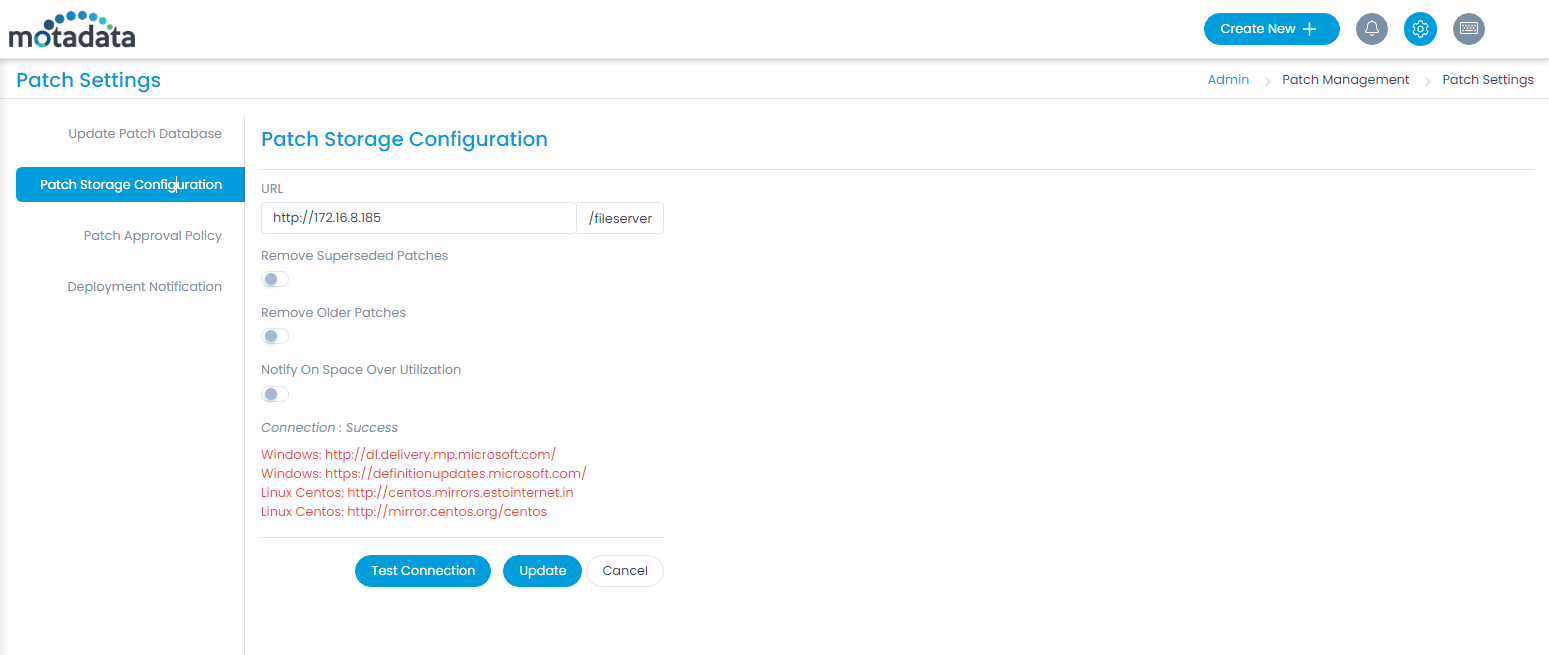
  4. When you are done with the above settings click Update to save the changes. Also, at the end you can check your connection with the file server by clicking on the Test Connection button, and here the inaccessible URLs will get listed as shown below:
Test Connection
Test Connection

Patch Approval Policy

This tab enables you to set the approval policy for patch deployment.

Patch Approval Policy
  1. Pre-Approved: As the name suggests, all the incoming patches (both new and missing) are Pre-Approved by default. A user can manually change the Approval status of a patch to Reject or Approved. The Automatic Patch Test fails to function with this selection. This selection comes into effect for incoming future patches, while it remains ineffective on the already existing patches in the product.
  2. Manually Approve: All new incoming patches have the Approval status Not Approved by default. A user has to change the status manually to either Approved or Reject.
  3. Test and Approve: All new incoming patches have the status Not Approved by default. You can manually set the status. Also, you can create a Test Task. Once enabled, select the Time when the patch is to be tested and approved. A Test Task, also known as Automatic Patch Test, deploys a selected set of patches to a specific set of computers. If deployment is successful in all the computers, the patches are auto-approved after a set number of days. Test Task only works in this setting.

Select an approval policy type and click Update.

Deployment Notification

The page allows you to configure the notification frequency of the patches. The notification can be set to hourly interval. Click Update once done.

Deployment Notification
Note: For precise information, the system also displays the Next Execution Time after you update the hour interval.

Purchase Custom Rules

The custom rules help you to enforce the organization’s compliance while processing a purchase order. Using these rules you can ensure that any change in the purchase order attributes is supported by proper comments or notes. For example, a purchase order should not move to the approved state if there is no manager assigned to it. Similarly, you can use custom rules to enforce the approval workflows and closing tasks to close a purchase order.

To view the Purchase Custom Rules page, navigate to Admin > Purchase Management > Purchase Custom Rules.

When Should Custom Rules be Enforced

For purchase management module, the custom rules are evaluated when a manager tries to violate:

  • Sent for Approval Rules: Check the items that should be enforced before approving a purchase request.
Rules to Approve a Purchase
  • Closed Rules: Check the items that should be enforced before closing a purchase order.
Rules to Close a Purchase
  • Required Note Rules: Check the items that should require a note before changing their values.
Fields that require a note before changing their values

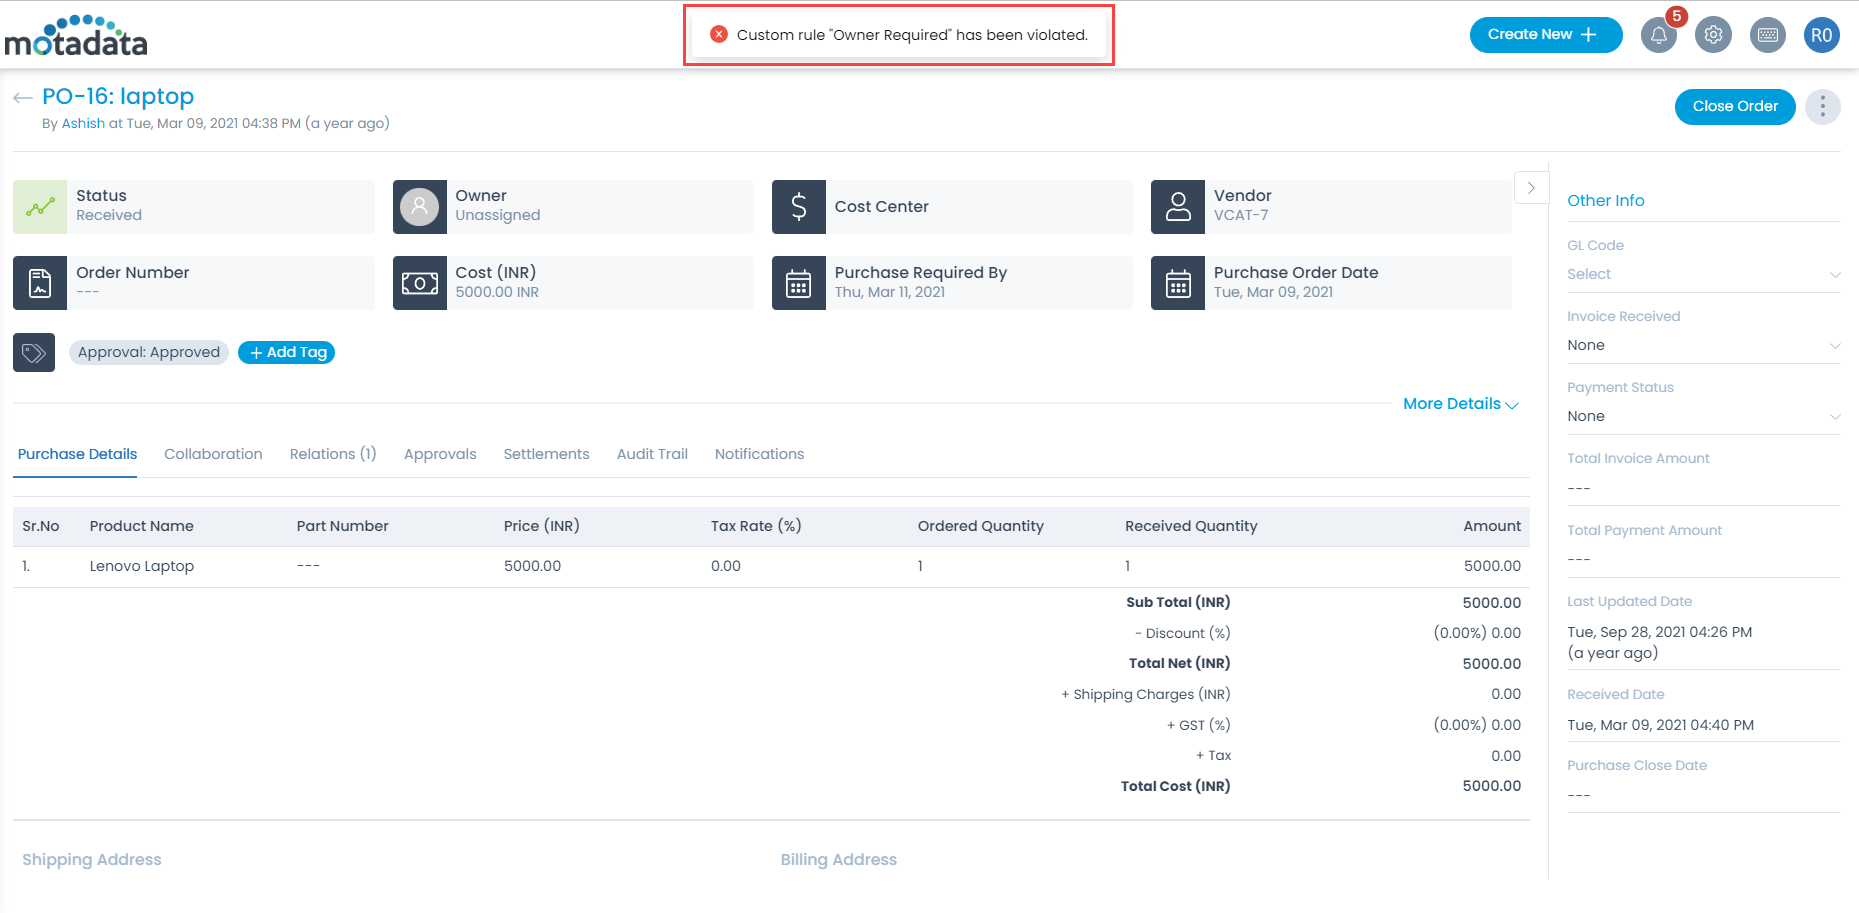
Example Scenario: You cannot close a Purchase Order until an Owner is assigned to it.

Example of Custom Rules in Purchase Management

Cost Center

A Cost Center is a department or a part of a department that directly adds cost to the organization and indirectly adds to profit. These are used to track the budget requirements of individual departments or business units. For example: Human Resource.

Purchase Orders are generally associated with either a Cost Center or Profit Center. A Purchase Manager can add a Cost Center to a PO. A Cost Center is added from a pre-defined list. A person with admin rights can add n number of Cost Centers in the system.

To view the Cost Center page, navigate to Admin > Purchase Management > Cost Center.

Cost Center Page
Cost Center Page

Here, you have the below options:

  • Search: You can search for the required cost center based on the name column.
  • Create Cost Center: You can create a cost center.
  • View User Details: You can view the details of the owner.
  • Edit: You can edit the details of the cost center.
  • Delete: You can delete the cost center if not required anymore. A confirmation message appears. Click Yes to continue or Cancel to stop the process.

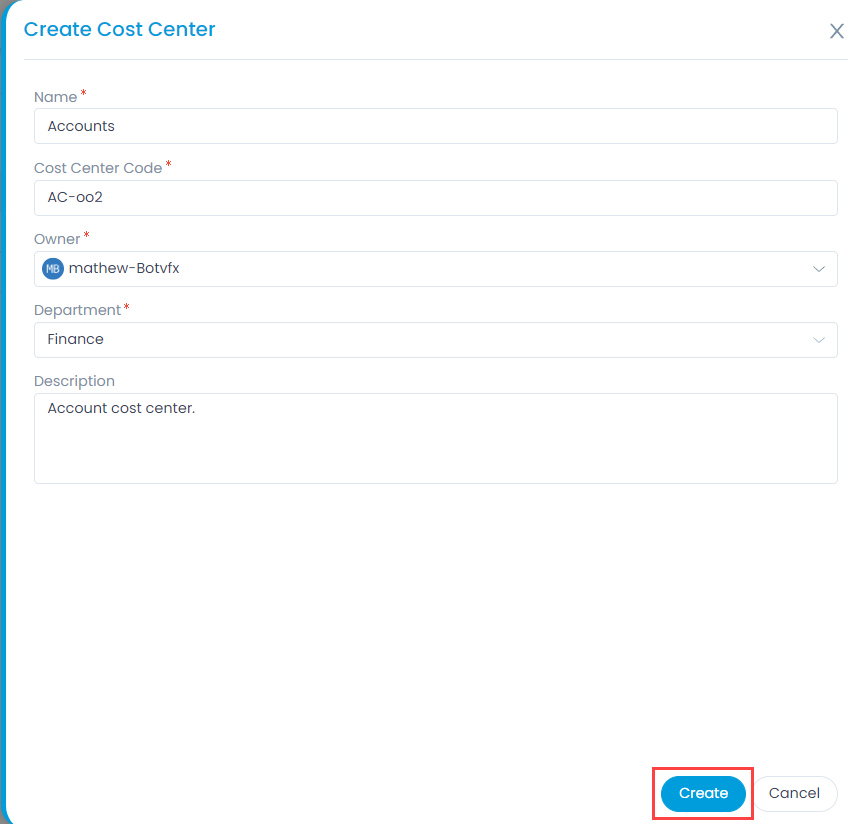
Create Cost Center

To create a cost center, follow the below steps:

  1. Click the Create Cost Center button on the top-right corner of the page. A popup appears.
Create Cost Center
Create Cost Center
  1. Enter the below details:
    Parameter Description
    Name Enter a unique name of the cost center. The maximum length allowed is 100.
    Cost Center Code Enter a unique code of the cost center.
    Owner Select the owner of the cost center. The owner is of technician type.
    Department Select the department to which the cost center belongs.
    Description Enter a short description about the cost center.
  2. Once done, click Create. The cost center will be available in the Purchase Order Form for use.
Note: Cost Centers associated with PO cannot be deleted.