GL Code

GL code stands for General Ledger Code. General ledger codes are (alpha) numerals assigned to different debit or credit entries in a General Ledger to make accounting easy and functional.

A GL Code is generally associated with a PO (Purchase Order) for accounting purpose. A Purchase Manager can access all the available GL codes when filling the details of a PO.

An admin has to maintain a list of GL Codes in the system.

To view the GL Code page, navigate to Admin > Purchase Management > GL Code.

GL Code Page
GL Code Page

Here, you can have the below options:

  • Search: You can search for the required entry based on GL code column.
  • Create GL Code: You can create a GL Code.
  • Edit: You can edit the GL Code.
  • Delete: You can delete the GL Code if not required. A confirmation message appears. Click Yes to continue or Cancel to stop the process.

Add GL Code

To add a GL Code,

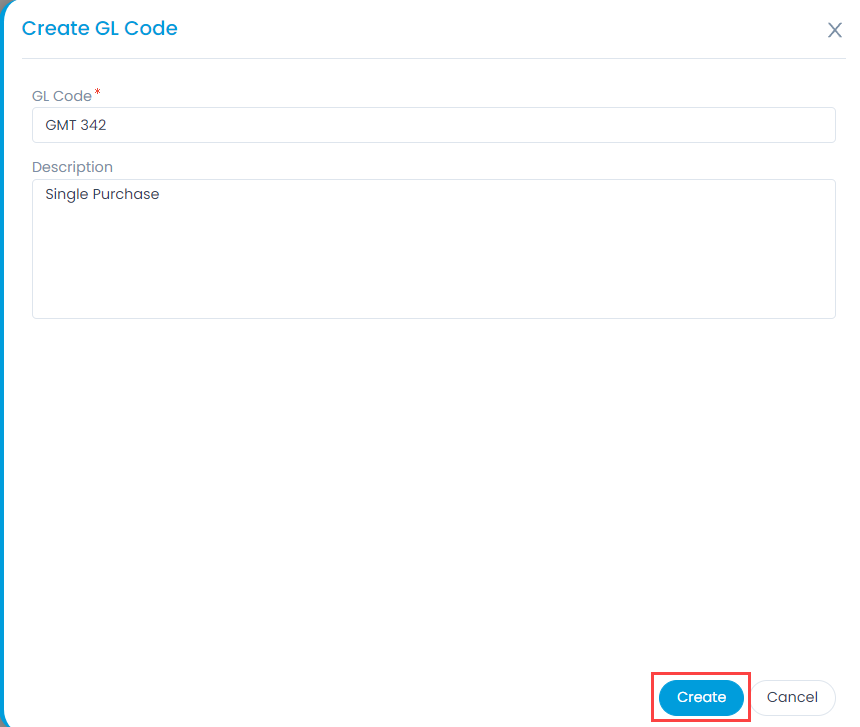
  1. Click the Create GL Code button on the top-right corner of the page and a popup appears.
  2. Enter the GL Code and Description about it.
  3. Once done, click Create. The code will be available in the Purchase Order form.
Create GL Code
Create GL Code

Purchase Price Fields

Price fields are fields to support the information related to the global taxation, discounts, or adjustments that you want to apply on the net value of the purchase order.  Only numeric fields are supported.

There are no default fields added for the Price fields. Any custom value in the form of numerals can be configured.

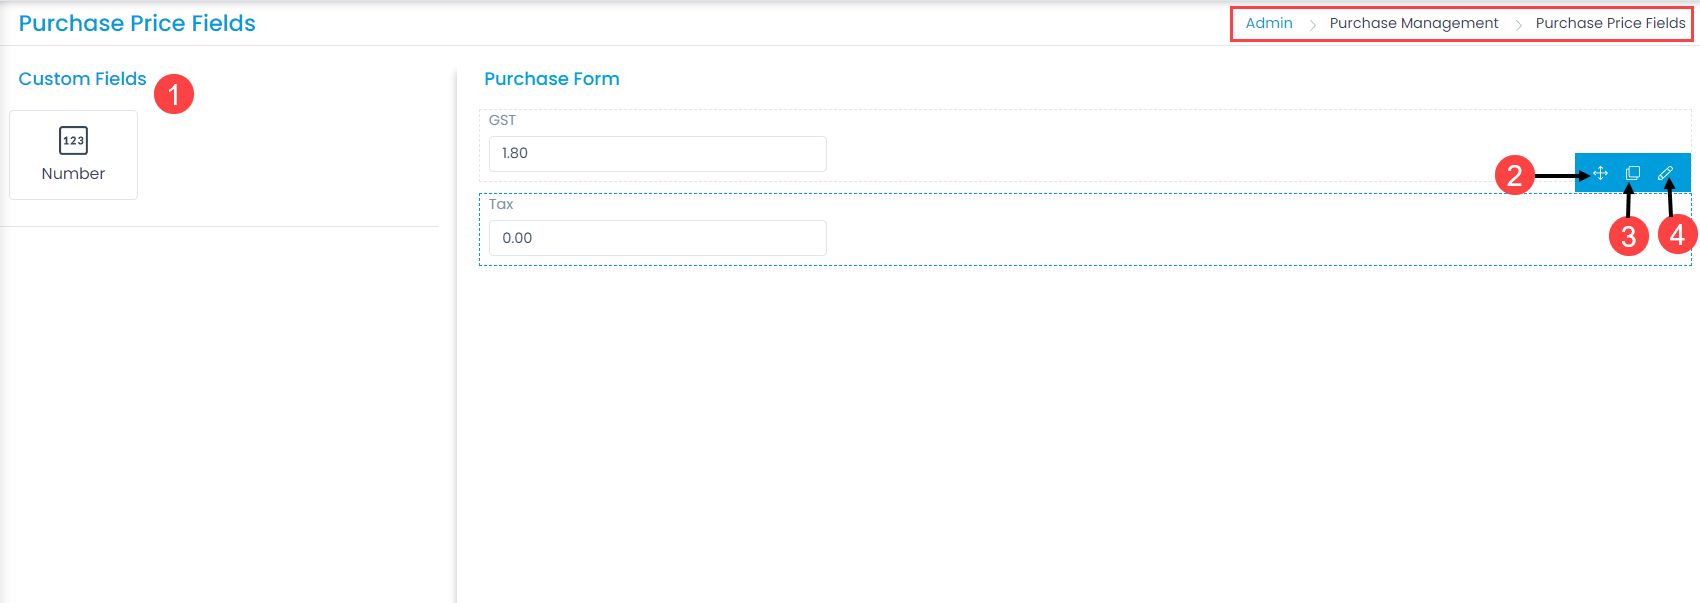
To view the Purchase Price Fields page, navigate to Admin > Purchase Management > Purchase Price Fields.

Purchase Price Fields

Here, you can customize the form using the below options:

  1. Field Pallet: You can drag and drop the number field from the pallet to add into the form.
  2. Re-Order: You can drag and drop the fields to change the order of the form.
  3. Duplicate: You can create duplicate fields from the custom fields.
  4. Edit: You can edit the fields, show or hide them from purchase order, or change their characteristics.

Example Scenario: For example: Every purchase in an organization requires a tax addition as per government norms. This is the tax in the form of GST by which an addition of mentioned amount would get calculated and added along with the main purchase amount.

Number

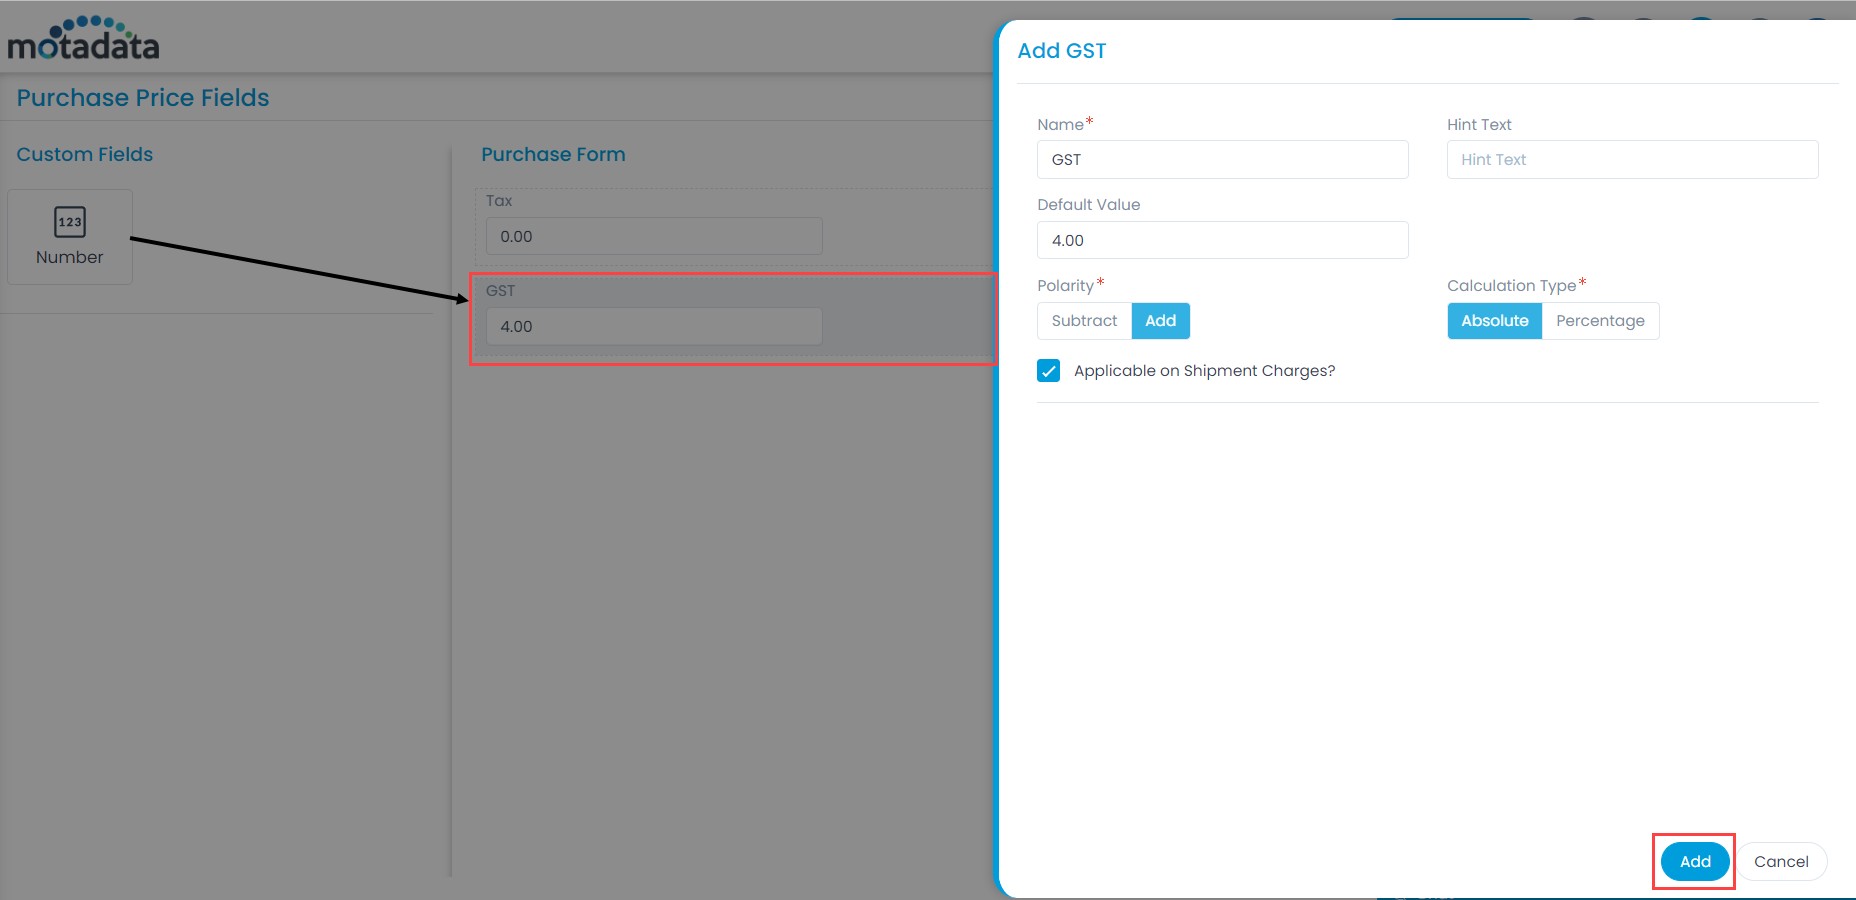
To add the Number custom field, drag and drop it on the form in the right-hand side, and a popup appears.

Adding Custom Field in the Purchase Form

Enter the below details:

  • Name: Enter the name of the field.
  • Hint Text: Enter the text to appear by default. It appears in grey color.
  • Default Value: Enter the default value of the field.
  • Polarity: Select whether to add the amount of this field to the net value of the purchase order or to subtract it from the net value. This is a mandatory field.
  • Calculation Type: Select the type of calculation as Absolute or Percentage.
  • Applicable on Shipment Charges?: Enable if you want to apply this calculation on the net value or as Net Value + Shipment Charges. It is disabled by default.

Once done, click Add. You can then re-arrange its location, create a duplicate field, or edit it if required.

Note: Once the Purchase Price Fields are added, you can only edit them and not delete.

Edit Field

To edit the field,

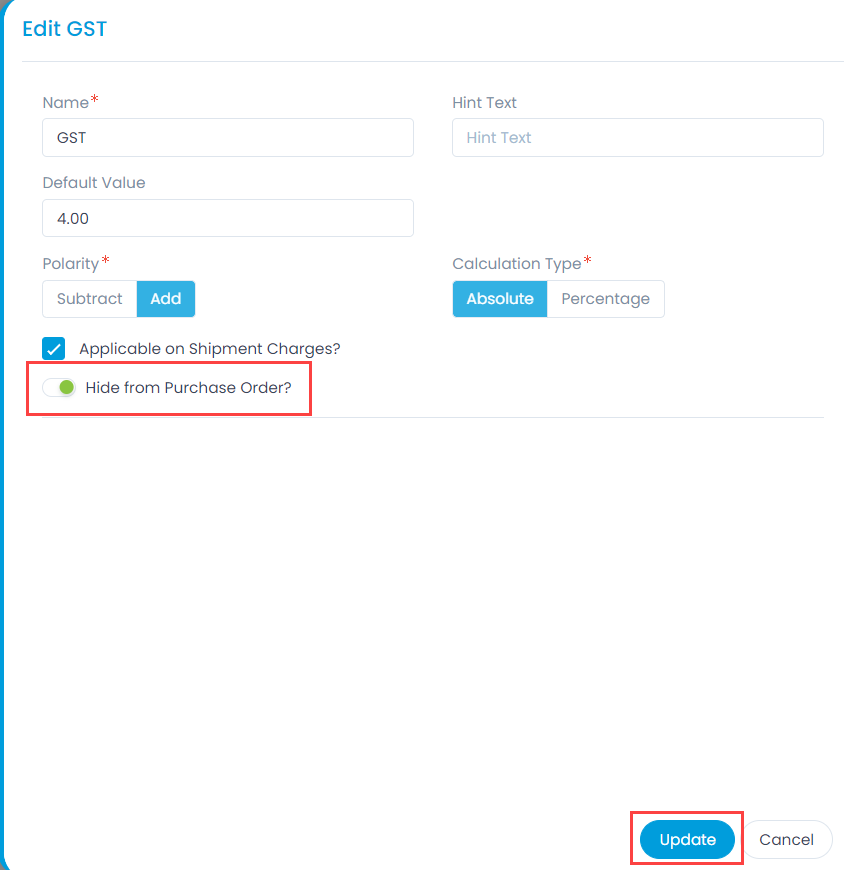
  1. Click the edit icon next to the desired field and a popup appears.
  2. Make the required changes in the form.
  3. Apart from the parameters in the Add Field popup, here you can configure whether the field should be visible or hidden in the Purchase Order using the option Hide from Purchase Order.
  4. Once done, click Update.
Edit Field
Edit Field

Purchase Form

The layout of asset management has all the fields required to manage the purchases of an organization. However, to meet the organization’s needs, you can modify the default template and add new fields. The fields can later be used in the automation settings also.

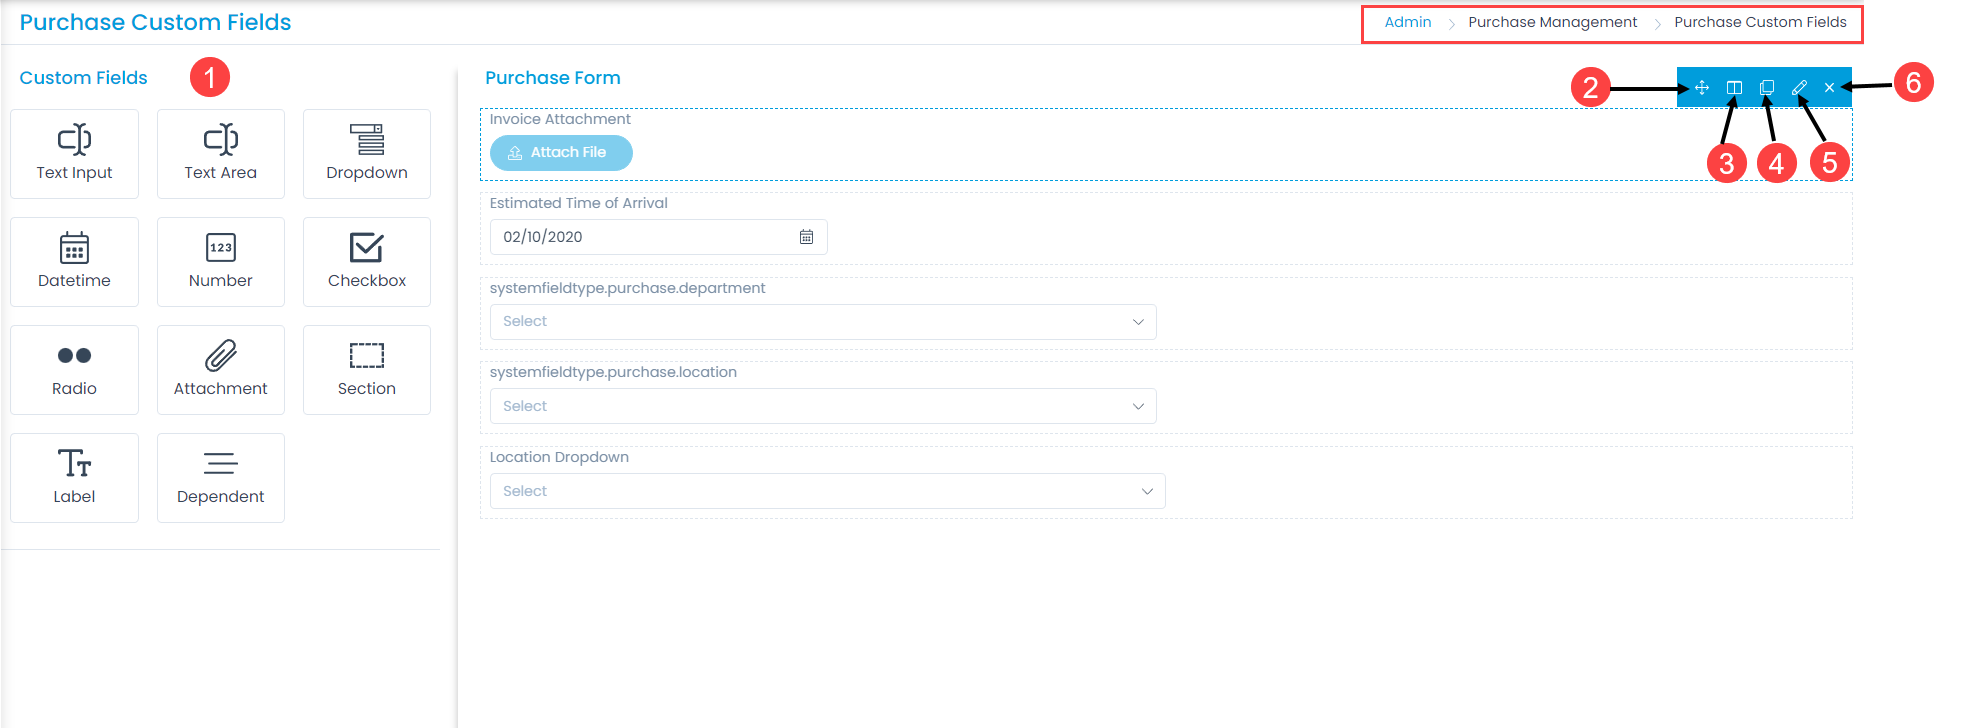
To view the Purchase Form, navigate to Admin > Purchase Management > Purchase Custom Fields and the below page appears.

Purchase Form
Purchase Form

The page displays two types of fields:

  • Default Fields: These are the primary fields that come with the fresh installation. The field names can neither be changed nor deleted.
  • Custom Fields: These are the additional fields added from the pallet. The fields can be renamed and deleted.

Here, you can customize the form using the below options:

  1. Field Pallet: You can drag and drop the fields from the pallet to add into the form.
  2. Re-Order: You can drag and drop the fields to change the order of the form.
  3. Expand/Collapse: You can expand and collapse the fields to show 1 in a row or 2 in a row. If collapsed, the width of the field will get reduced to half.
  4. Duplicate: You can create duplicate fields from the custom fields.
  5. Edit: You can edit the fields, make them mandatory, or change their characteristics.
  6. Remove: You can delete the custom fields.

Example Scenario: For example, every purchase in an organization requires a version for newer purchase follow-up date. This is the version by which a purchase Manager and other Teams can identify the purchased updated version of the upcoming purchase.

Radio

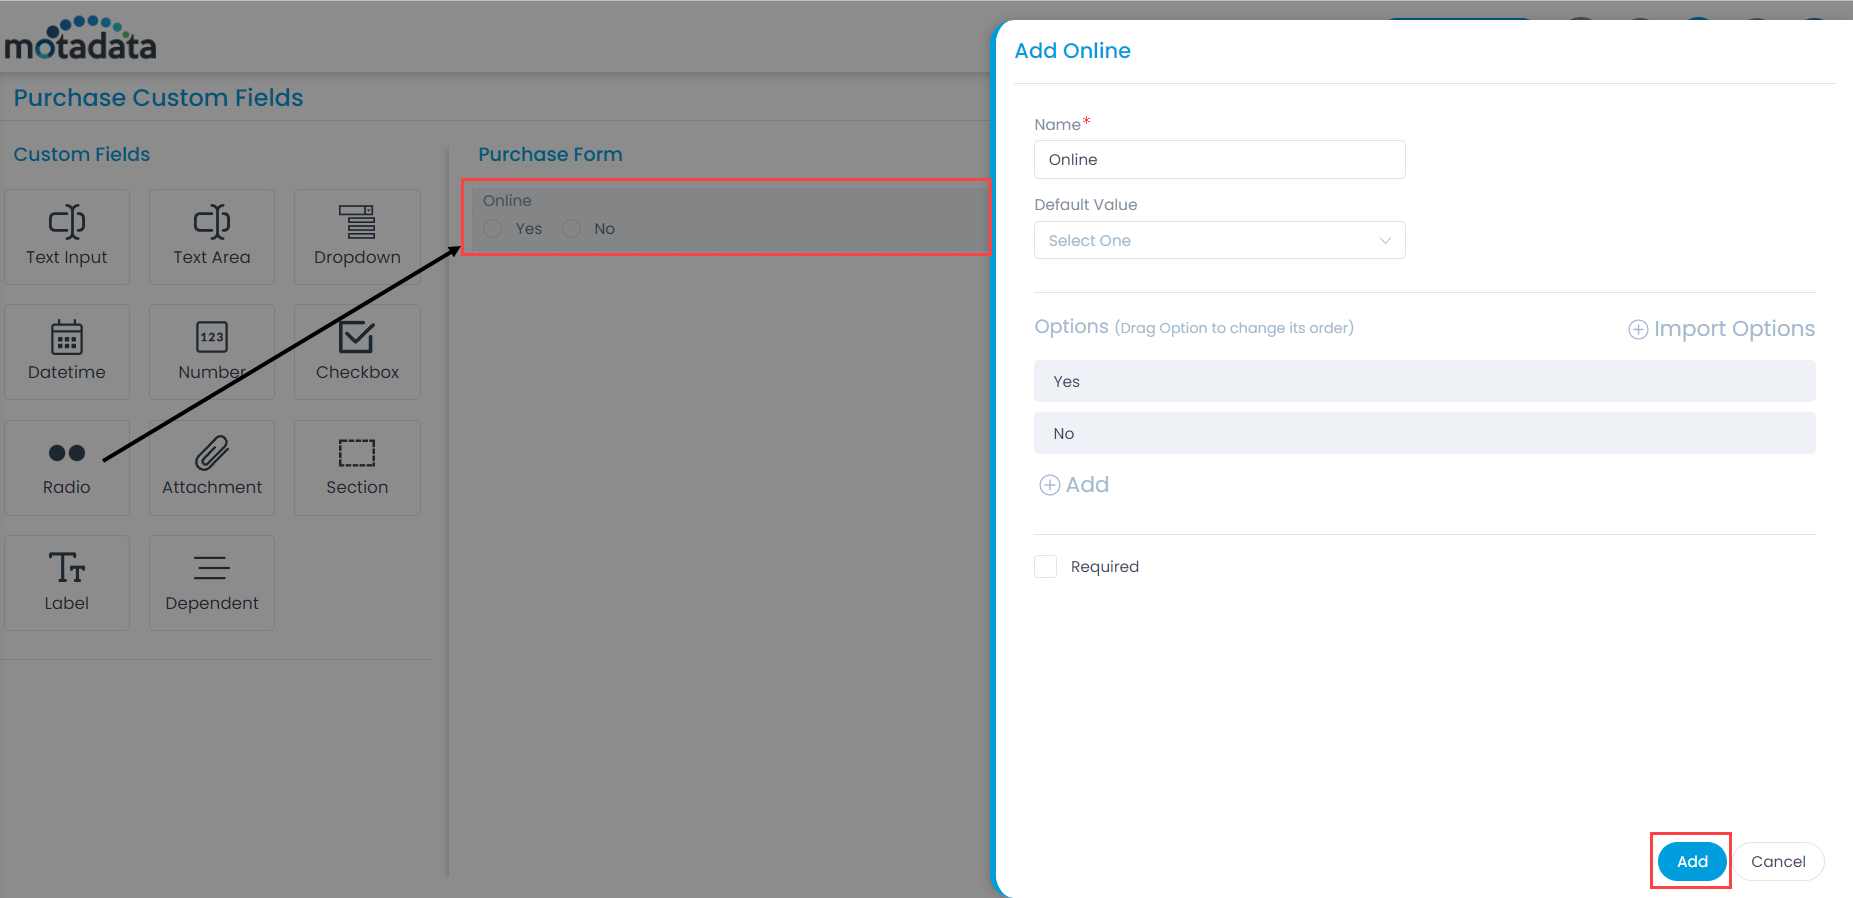
To add the Radio custom field, drag and drop it on the form in the right-hand side, and a popup appears.

Adding Custom Fields in the Purchase Form

Enter the following details:

  • Name: Enter the name of the field.
  • Default Value: Enter the default value of the field.
  • Options: Add the options for the field. You can also import multiple options using the Import Options link.
  • Required: Enable to make the field mandatory.

Once done, click Add. You can then re-arrange its location, create a duplicate field, expand/collapse its width, edit, or delete it if required. Similarly, you can add other custom fields. For more details, refer to the link Request Form.

Contract Form

The layout of asset management has all the fields required to manage the contracts of an organization. However, to meet the organization’s needs, you can modify the default template and add new fields. The fields can later be used in the automation settings also.

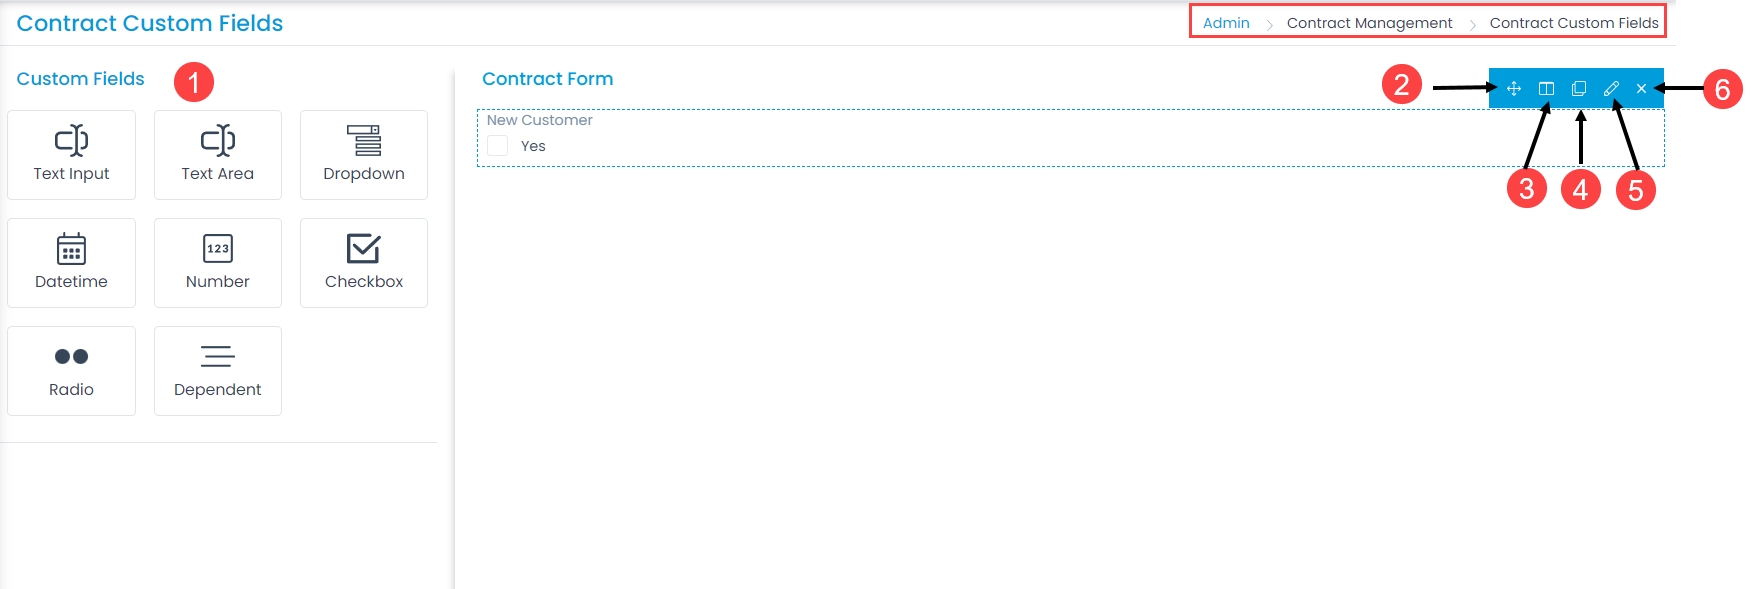
To view the Contract Form, navigate to Admin > Contract Management > Contract Custom Fields and the below page appears.

Contract Form
Contract Form

Here, you can customize the form using the below options:

  1. Field Pallet: You can drag and drop the fields from the pallet to add into the form.
  2. Re-Order: You can drag and drop the fields to change the order of the form.
  3. Expand/Collapse: You can expand and collapse the fields to show 1 in a row or 2 in a row. If collapsed, the width of the field will get reduced to half.
  4. Duplicate: You can create duplicate fields from the custom fields.
  5. Edit: You can edit the fields, make them mandatory, or change their characteristics.
  6. Remove: You can delete the custom fields.

Example Scenario: For example, every contract in an organization requires a Notification for the Date. This is the number by which an admin will know the renewal date of the contract.

DateTime

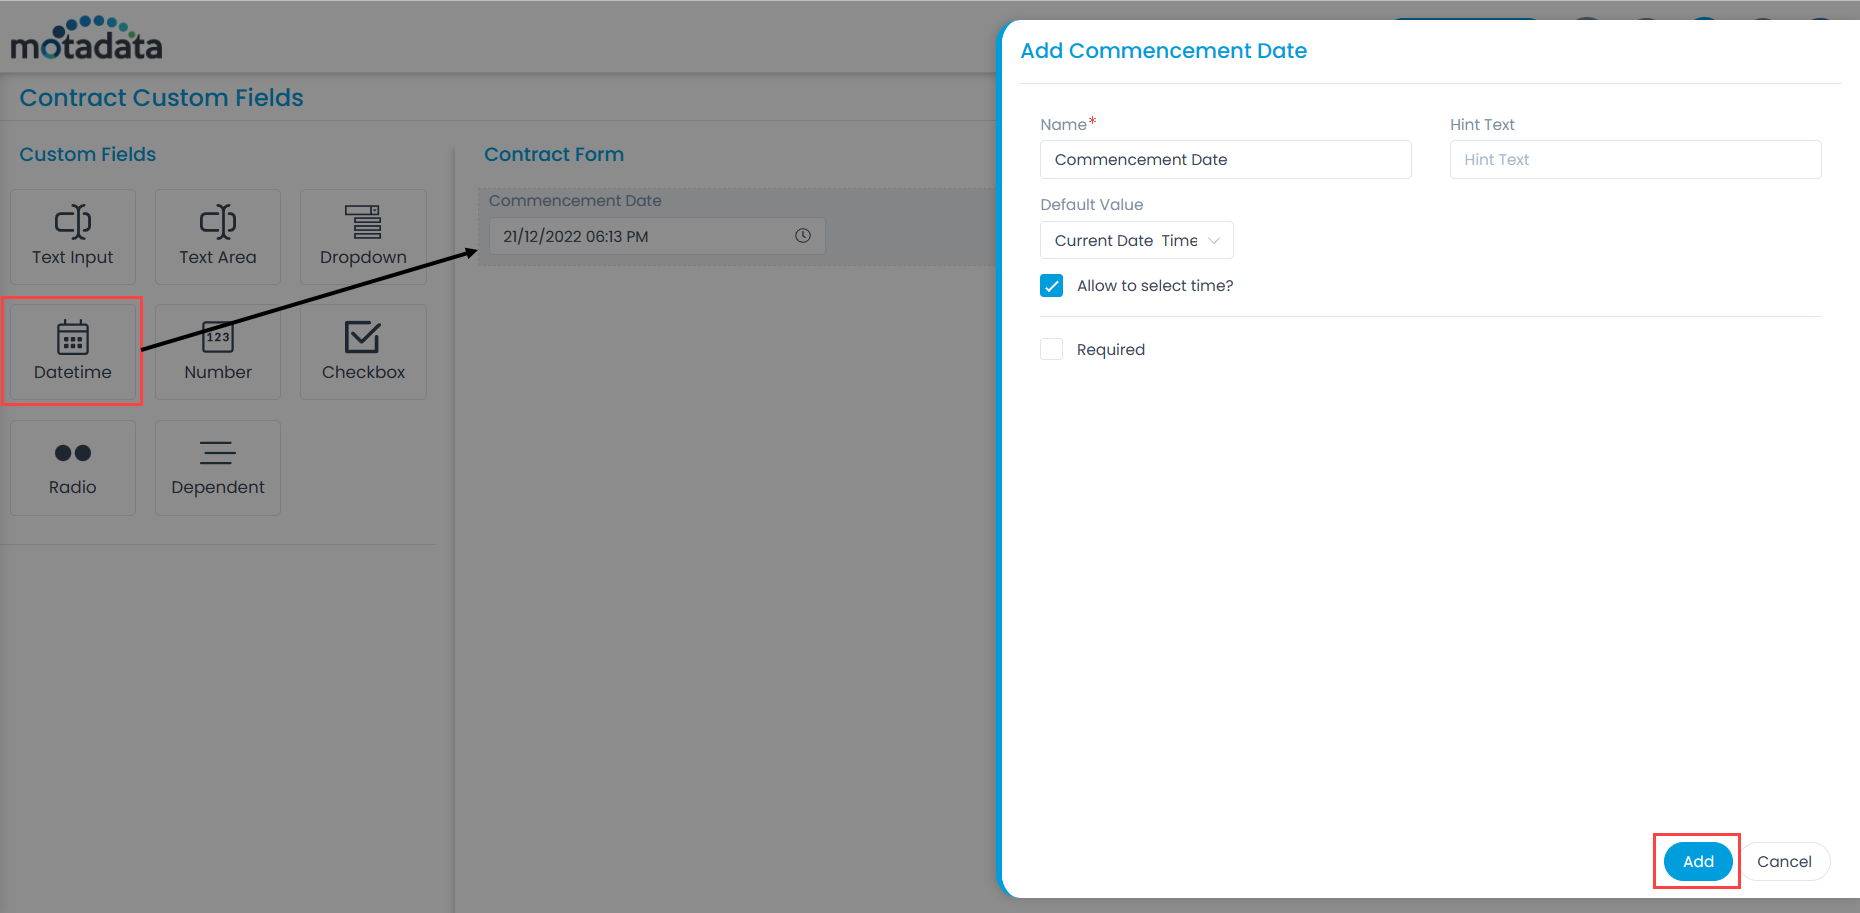
To add the Datetime custom field, drag and drop it on the form in the right-hand side, and a popup appears.

Adding Custom Fields in the Contract Form

Enter the following details:

  • Name: Enter the name of the field.
  • Hint Text: Enter the text to appear by default. It appears in grey color.
  • Default Value: Select the default value of the field. The options are: Current Date and Custom.
  • Allow to Select Time?: Enable to allow the user to select time along with the date.
  • Required: Enable to make the field mandatory.

Once done, click Add. You can then re-arrange its location, create a duplicate field, expand/collapse its width, edit, or delete it if required. Similarly, you can add other custom fields. For more details, refer to the link Request Form.

Contract Types

Contract type refers to the differences in contract structure and form, which includes compensation arrangements and the amount of risk. Currently, Motadata provides four Contract Types out of the box. The system has the provision for adding more types, also refers to as custom Contract Types.

To view the Contract Types page, navigate to Admin > Contact Management > Contract Types.

Here, you can search, view, edit, and delete the contract types. You can delete only the custom contracts and not the default.

The default contract types are:

  • Lease
  • Warranty
  • Support
  • Maintenance
Contract Types
Contract Types

Add Contract Type

To add a contract type,

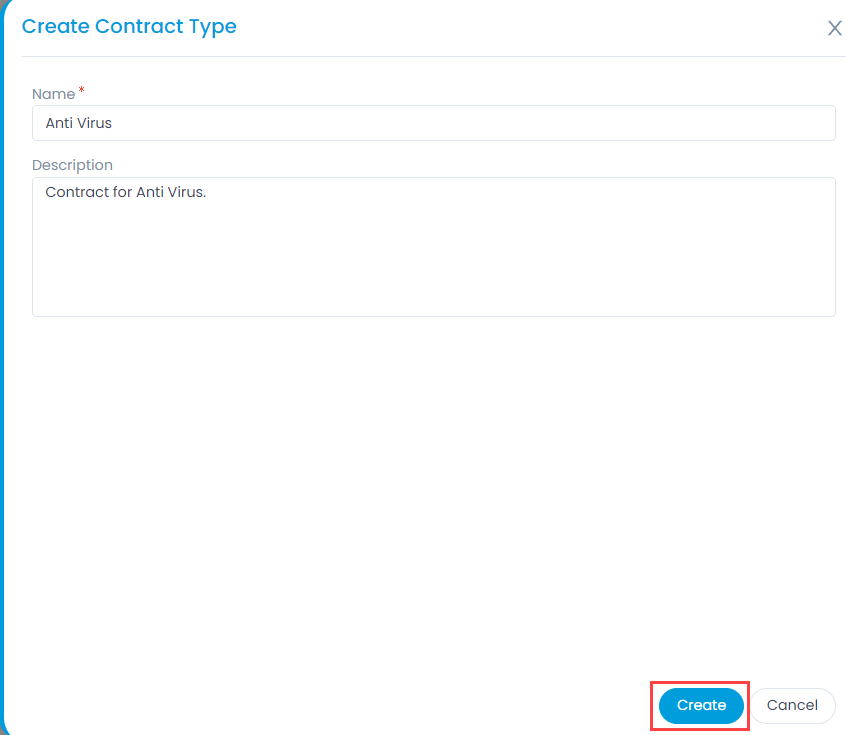
  1. Click the Create Contract Type button on the top-right corner of the page.
  2. Enter the Name of the contract.
  3. Enter a short Description about the contract.
  4. Click Create.
  5. Once created, you can edit or delete it if required. You can only delete the custom contract types and not the default.
Create Contract Type

IP Range Location

This section helps in defining a specific range of IP where the group of specific IP’s can be created. Also, Support of mapping site or location with the defined IP Ranges of an organization network needs to be added. Purpose of this functionality is to track or pin point location of the device based on its scanned IP for the cases of agent-based discovery.

List Page

The List Page displays all the created IP range groups.

IP Range Location List Page

You can also Edit or Delete the IP Range group anytime when not in use.

Add IP Range Location

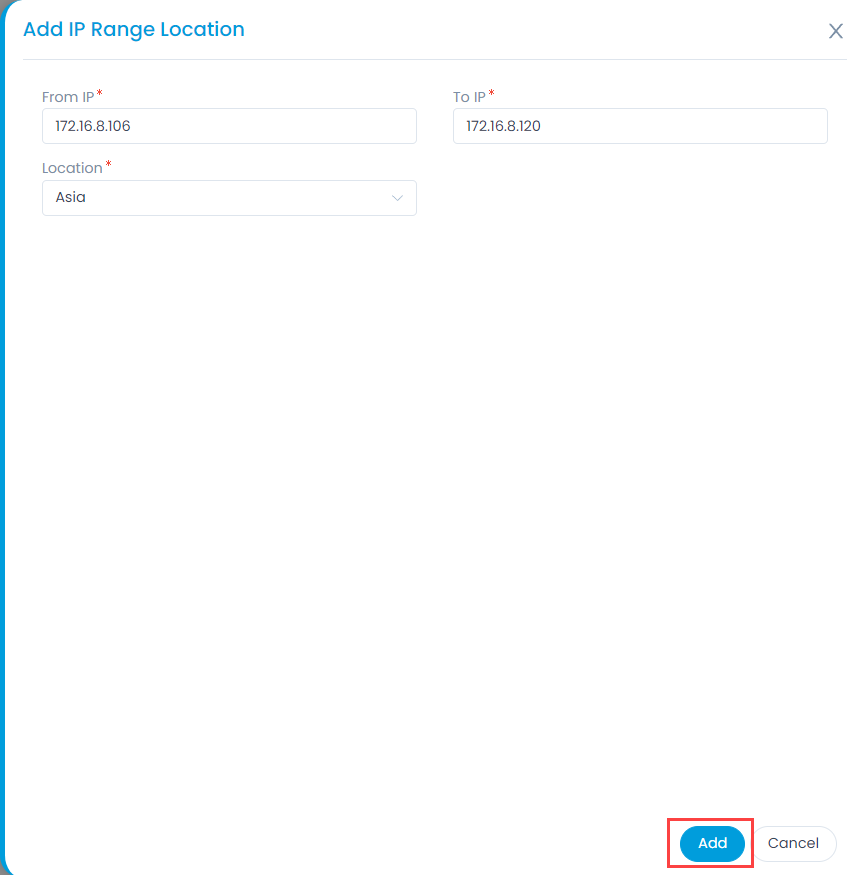
To create a range of IP’s, click on the Add IP Range Location button.

Add IP Range Location

Specify the From IP Range, To IP Range and also select the Location from the dropdown.
Once done, click Add and the IP Range gets added.

Relationship Types

Relationship Type shows a topology of Assets depicting the nature of their relationship with one another. Currently only Hardware, Software, and Non-IT Asset Types have the Relationship tab.

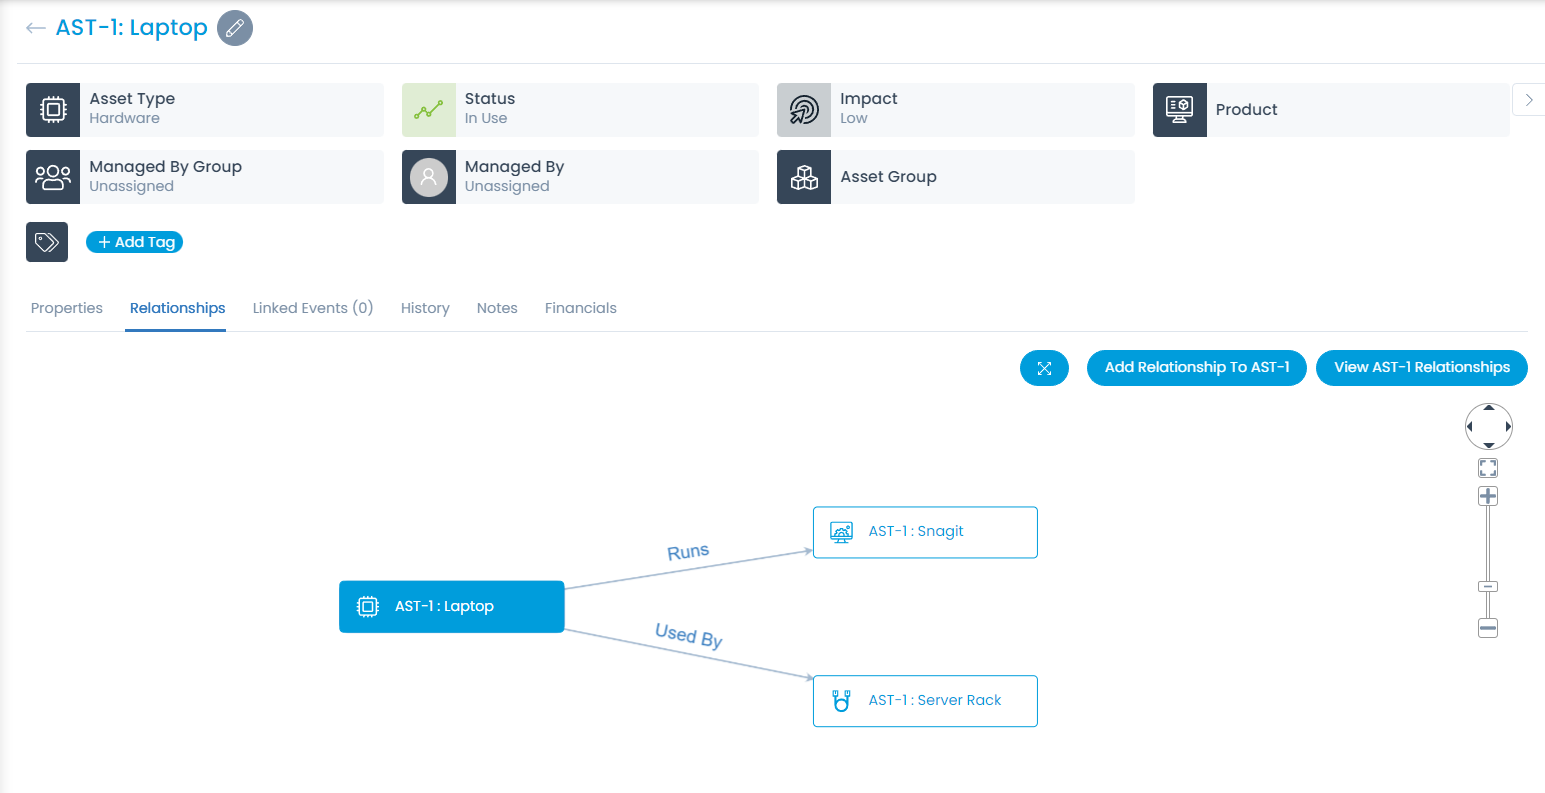
While creating a topology, the Assets are shown as nodes on a map. You start with a single node, the Asset whose Relationship tab you are using; then you add relationships; with each addition a new node is created. The relationship between two nodes can be of two types: Direct and Inverse.

The relationships created between nodes (Assets) are saved in the system and can be viewed in their respective Relationship tabs.

To view the Relationship Types page, navigate to the Admin > Asset Management > Relationship Types.

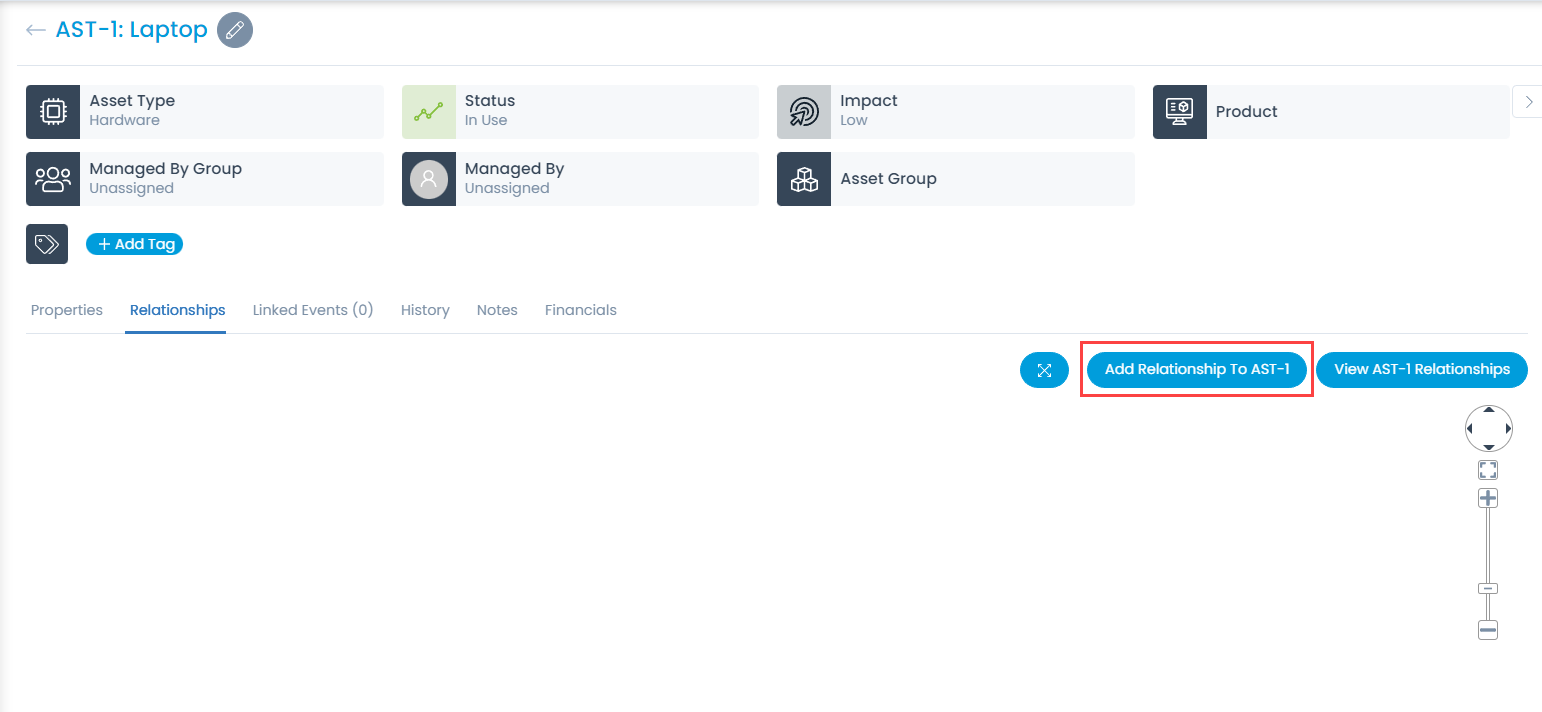
You can access the Relationship tab from the Details View of any Hardware, Software, and Non-IT Asset.

Add Relationship
Add Relationship
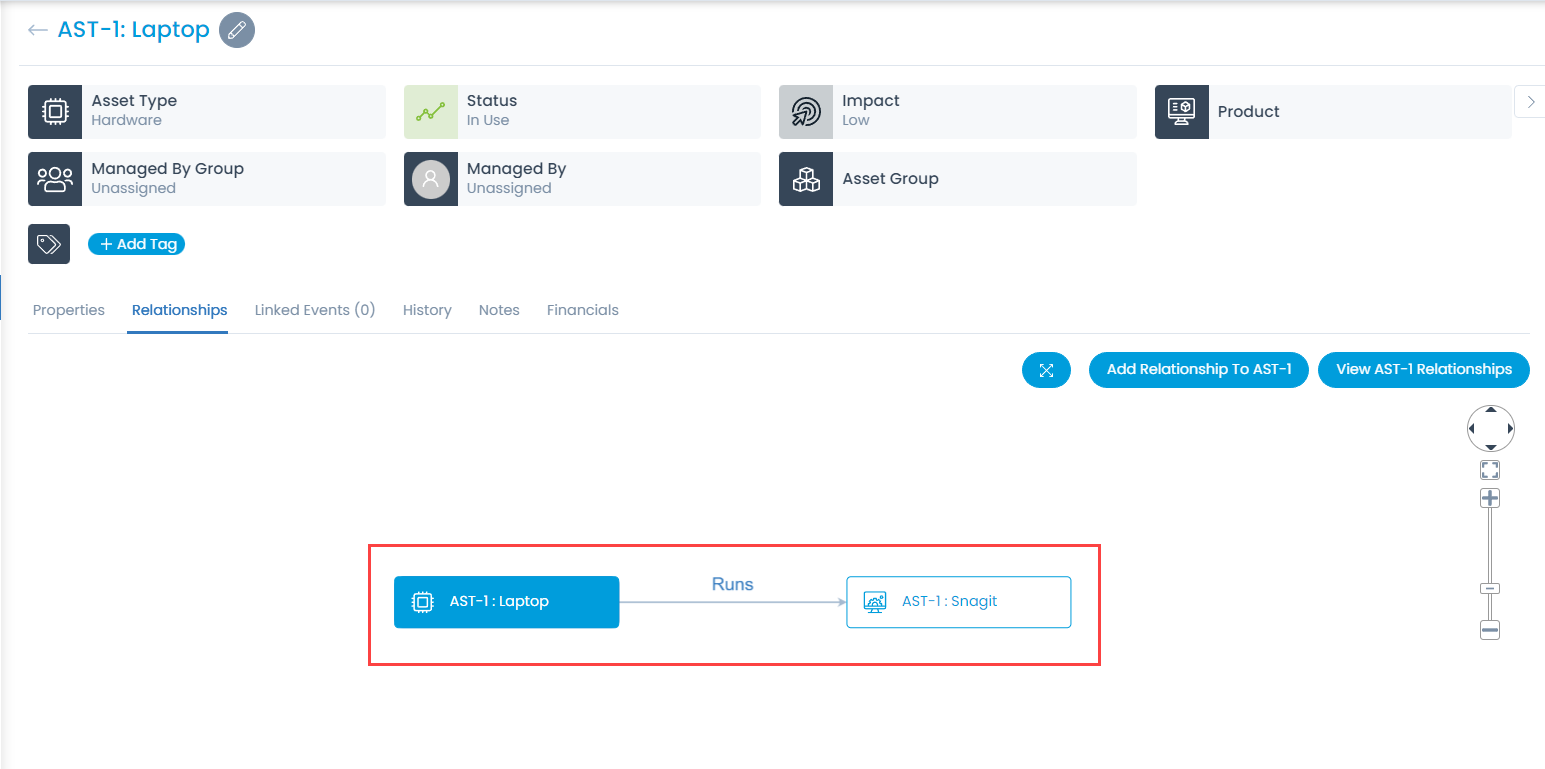
Relationship
Relationship

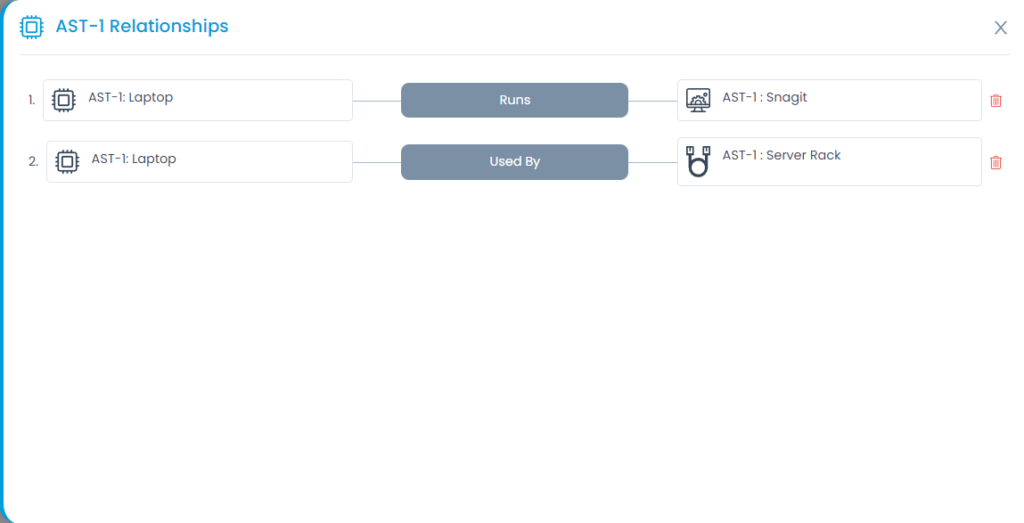
The relationship operation happens between two nodes at a time. The above figure shows the relationship of the Hardware asset to the a Software AST-1

Viewing Relationship

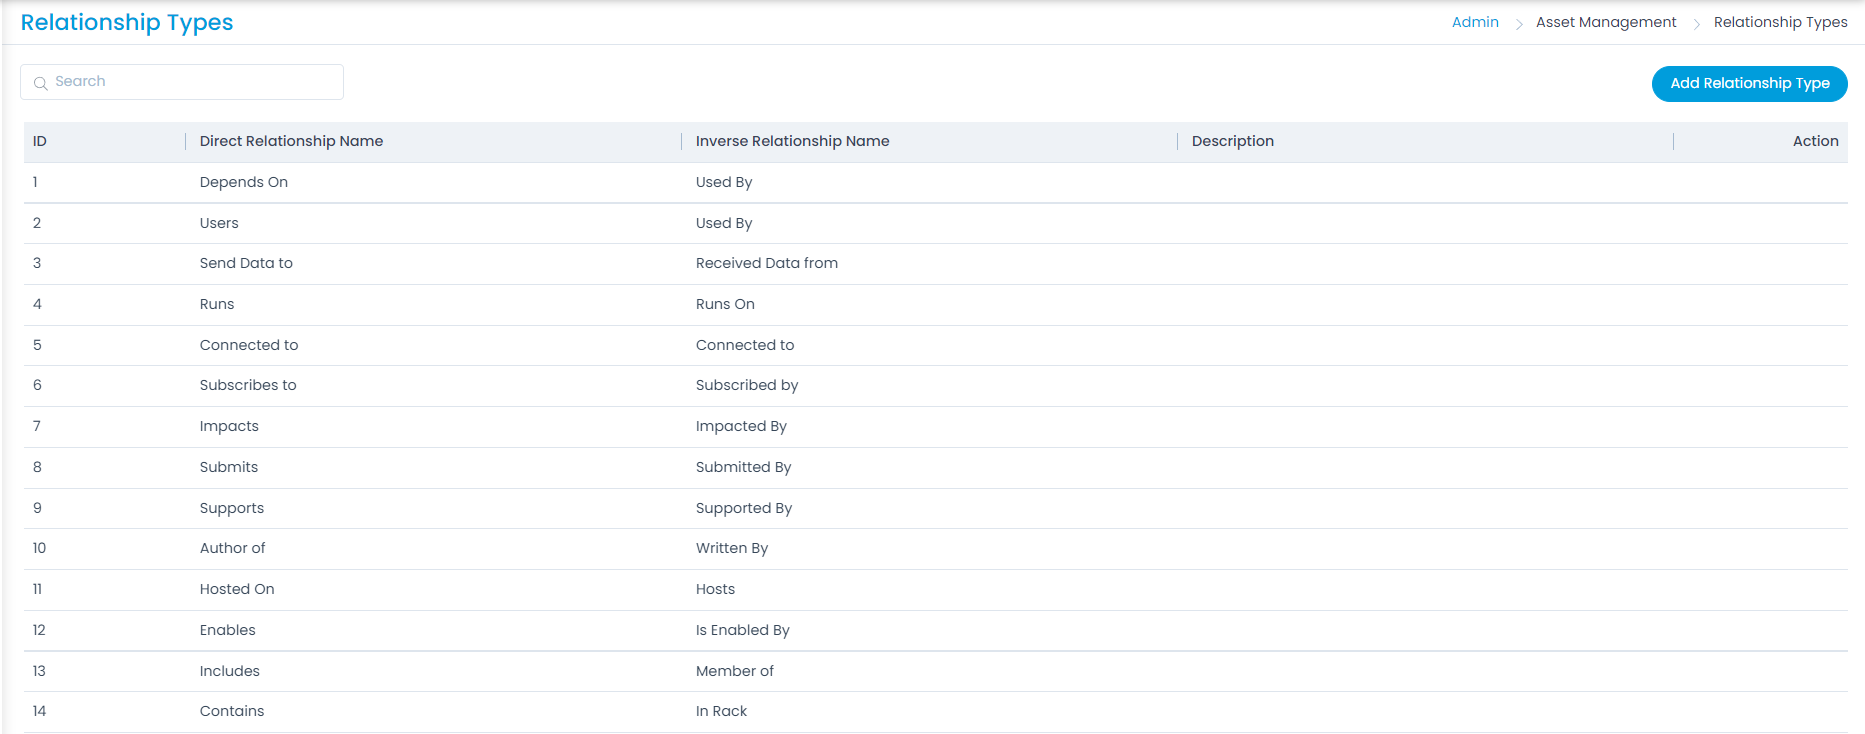
Relationship Types are two: Direct and Inverse. These two types represent two directions of a relationship.

Relationship Types
Relationship Types

Default Relationship Types

By default there are system generated relationship which cannot be removed or edited.

Default Relationships

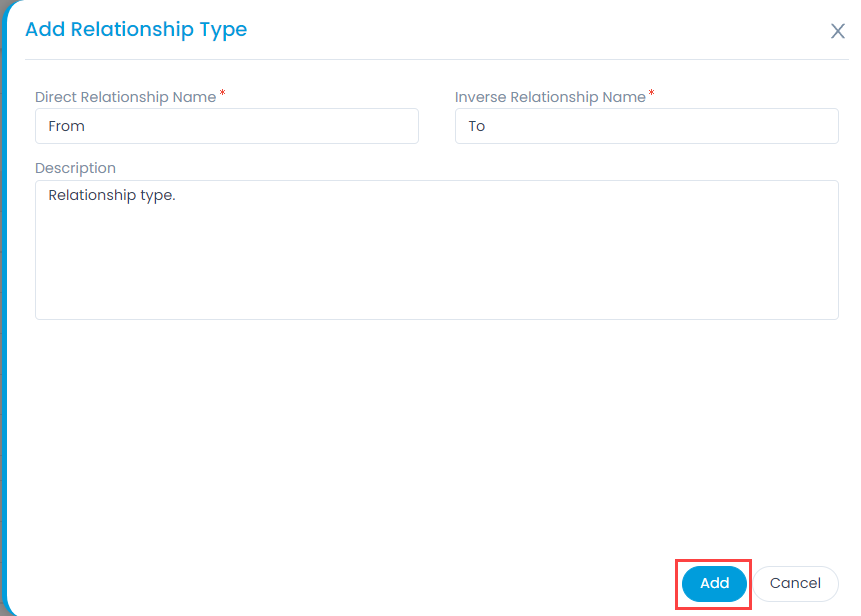
If you wish to create your own relationship type, click Add Relationship Type to create a custom relationship.

Adding a Relationship Type

Product Types

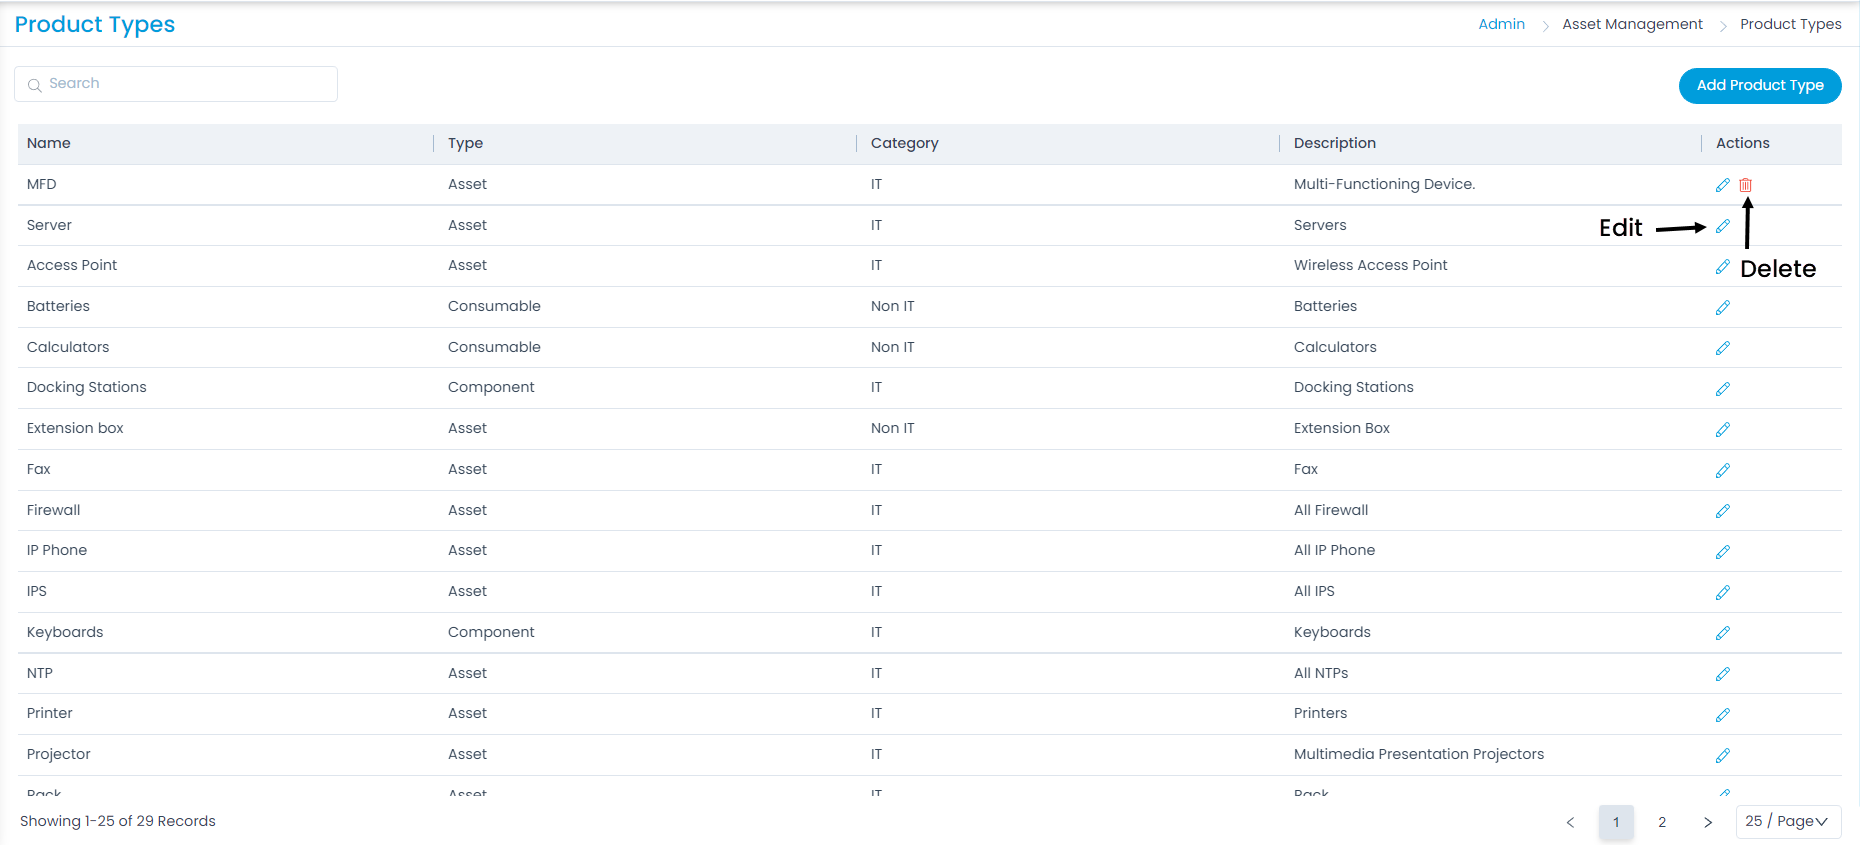
A Product can be further categorized into Product Types. A Product Type is a generic category to group Products. For example, Router is a Product Type that describes Products like Asus, TP-Link, etc. In Motadata, you get a list of Product Types out of the box, but you can also add more types.

To view the Product Types page, navigate to Admin > Asset Management > Product Types.

Product Types Page
Product Types Page

Here, you can do the following:

  • Search: You can search for the required product type by entering the keyword.
  • Add Product Type: You can add a product type.
  • Edit: You can edit the details of the product type.
  • Delete: You can delete the product type if not required. You can delete only the custom product types and not the default.
  • No. Of Records: You can set the number of records to view on a single page. By default you can view 25 records per page. You can set it to 10 or 50 also.

Add Product Type

To add a product type,

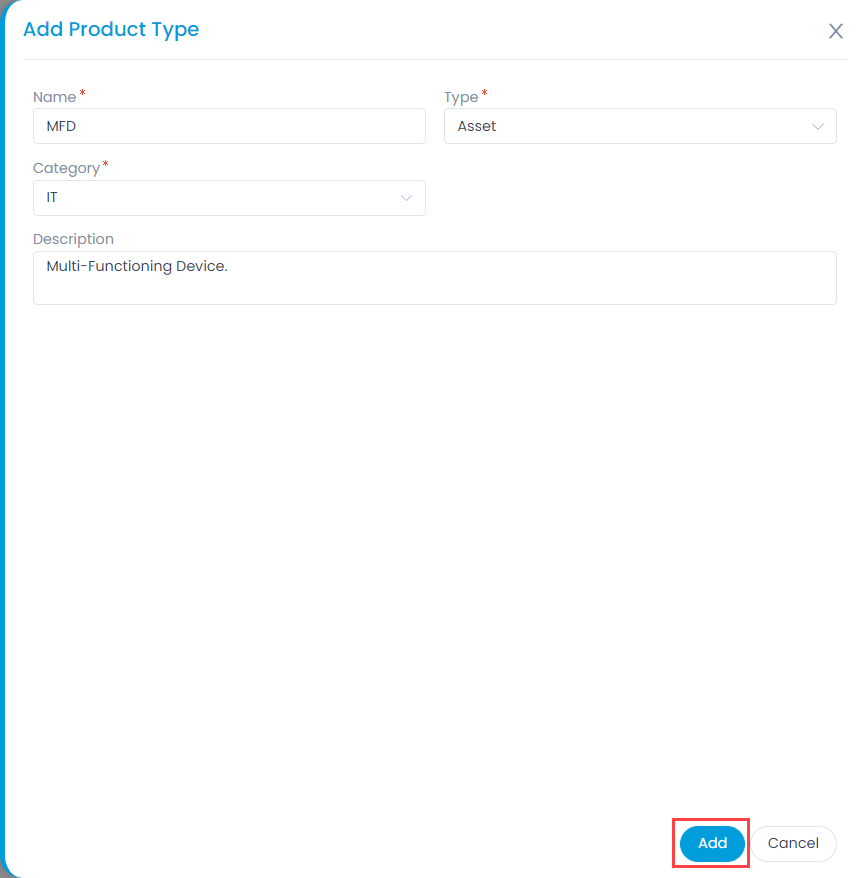
  1. Click the Add Product Type button on the top-right corner of the page and a popup appears.
Add Product Type
Add Product Type
  1. Enter the below details:
    • Name: Enter the name of the product type. For example: Desktop.
    • Type: Select the type. The options are:
      • Asset: It is a thing that can provide value generally for more than a year. For example: A Laptop or computer.
      • Component: It refers to a functional part of an Asset. For example: A GPU card is a component that goes into a Desktop.
      • Consumable: It is a thing whose ability to deliver value gets exhausted within a short period, generally less than a year. For example: A Printer’s toner cartridge.
      • Others: Anything that doesn’t fall in the above three Types.
    • Category: Select the category of the product as IT or Non IT.
    • Description: Enter a short description about the product type.
  2. Once done, click Add.

Software Types

A Software Type tries to define the nature of existence of a Software Asset.

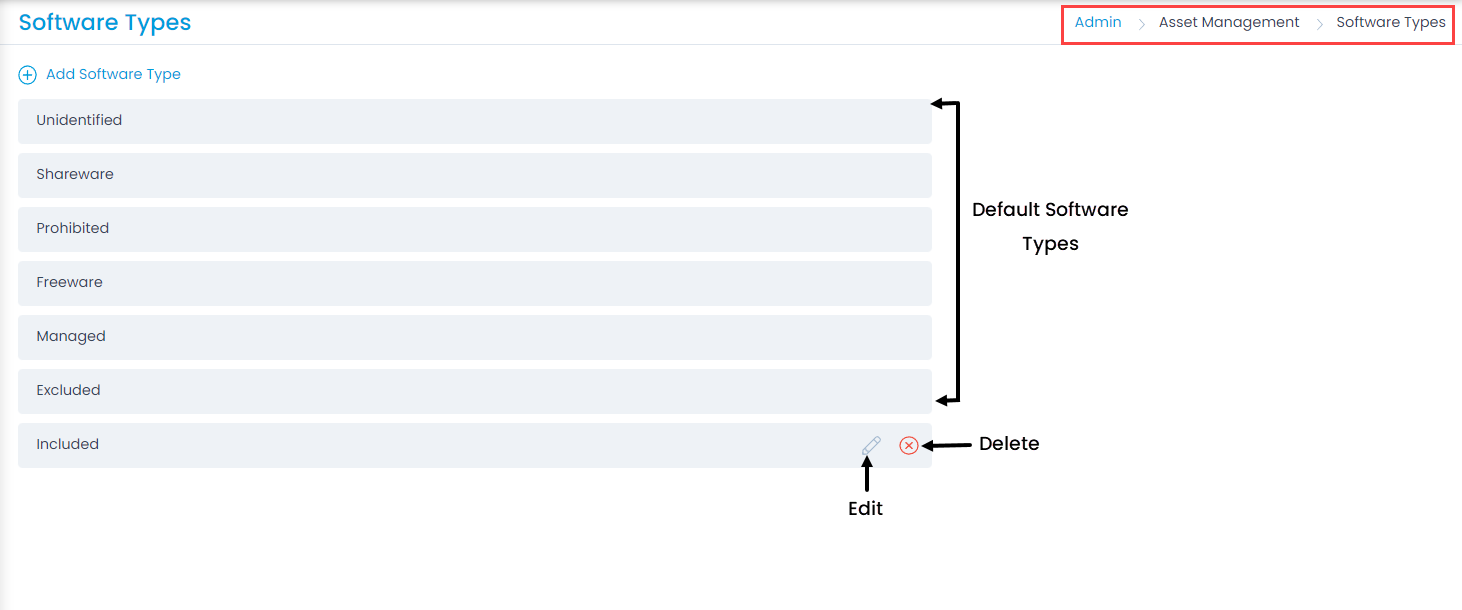
To view the Software Types page, navigate to Admin > Asset Management > Software Types.

Here, you can view the default software types as well as add the custom ones. By default, Motadata provides six Software Types out of the box. They are :

  • Unidentified: These software are the unidentified ones with unknown source.
  • Shareware: These software run on a free Trial.
  • Prohibited: These software are not allowed to be used.
  • Freeware: These software are free to use.
  • Managed: These software need managing with regards to License and Compliance.
  • Excluded: These software do not need any managing.
Software Types
Software Types

Add Software Type

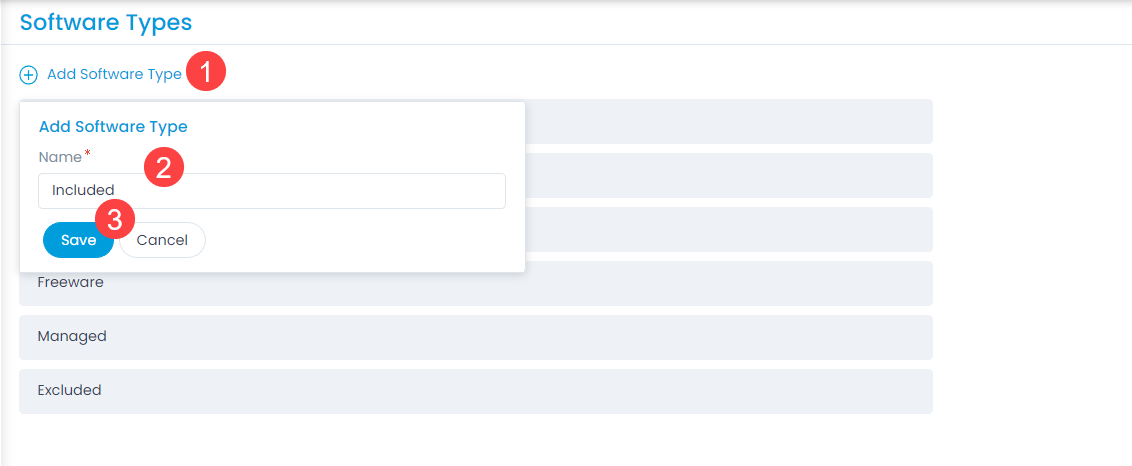
To add a software type,

  1. Click the Add Software Type link and a popup appears.
  2. Enter the Name.
  3. Click Save. The software type gets added to the list. Once added, you can edit and delete the software type if required. You can only edit the default software types and not delete.
Note: This operation requires administrative rights.
Adding a Software Type

Software Categories

Categories enable you to bring the similar software under a single group. This helps the technicians in filtering out the required software easily and quickly from a huge list. It defines the type of the asset and the category that it belongs. By default, there are no Categories defined in the system.

To view the Software Categories page, navigate to Admin > Asset Management > Software Categories.

Software Categories List

Here, you have the below options:

  • Add Category: You can add a category.
  • Add Sub Category: You can add a sub category.
  • Edit: You can edit the category name.
  • Delete: You can delete the category if not required. A confirmation message appears. Click Yes to continue or Cancel to stop the process.

Add Category

To add a category, follow the below steps:

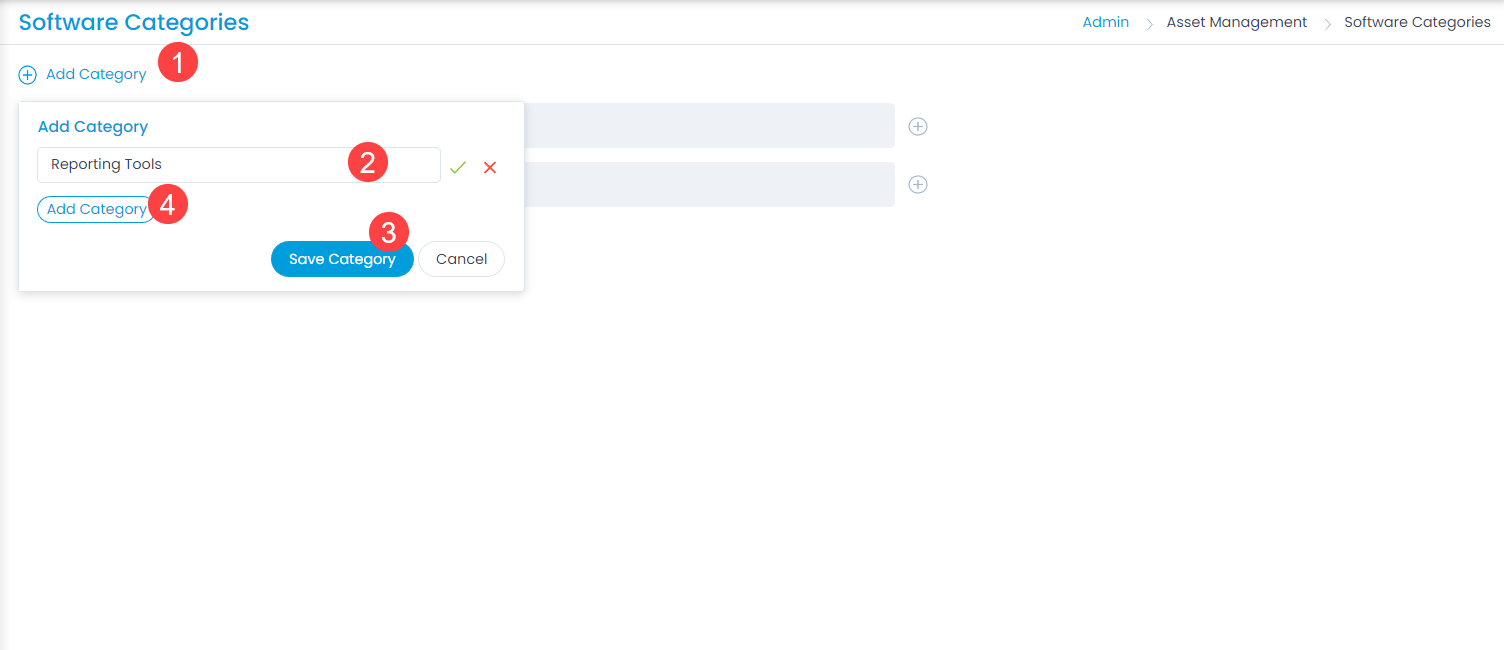
  1. Click the Add Category link and a popup appears.
Adding a Software Category
  1. Enter the Name of the Category.
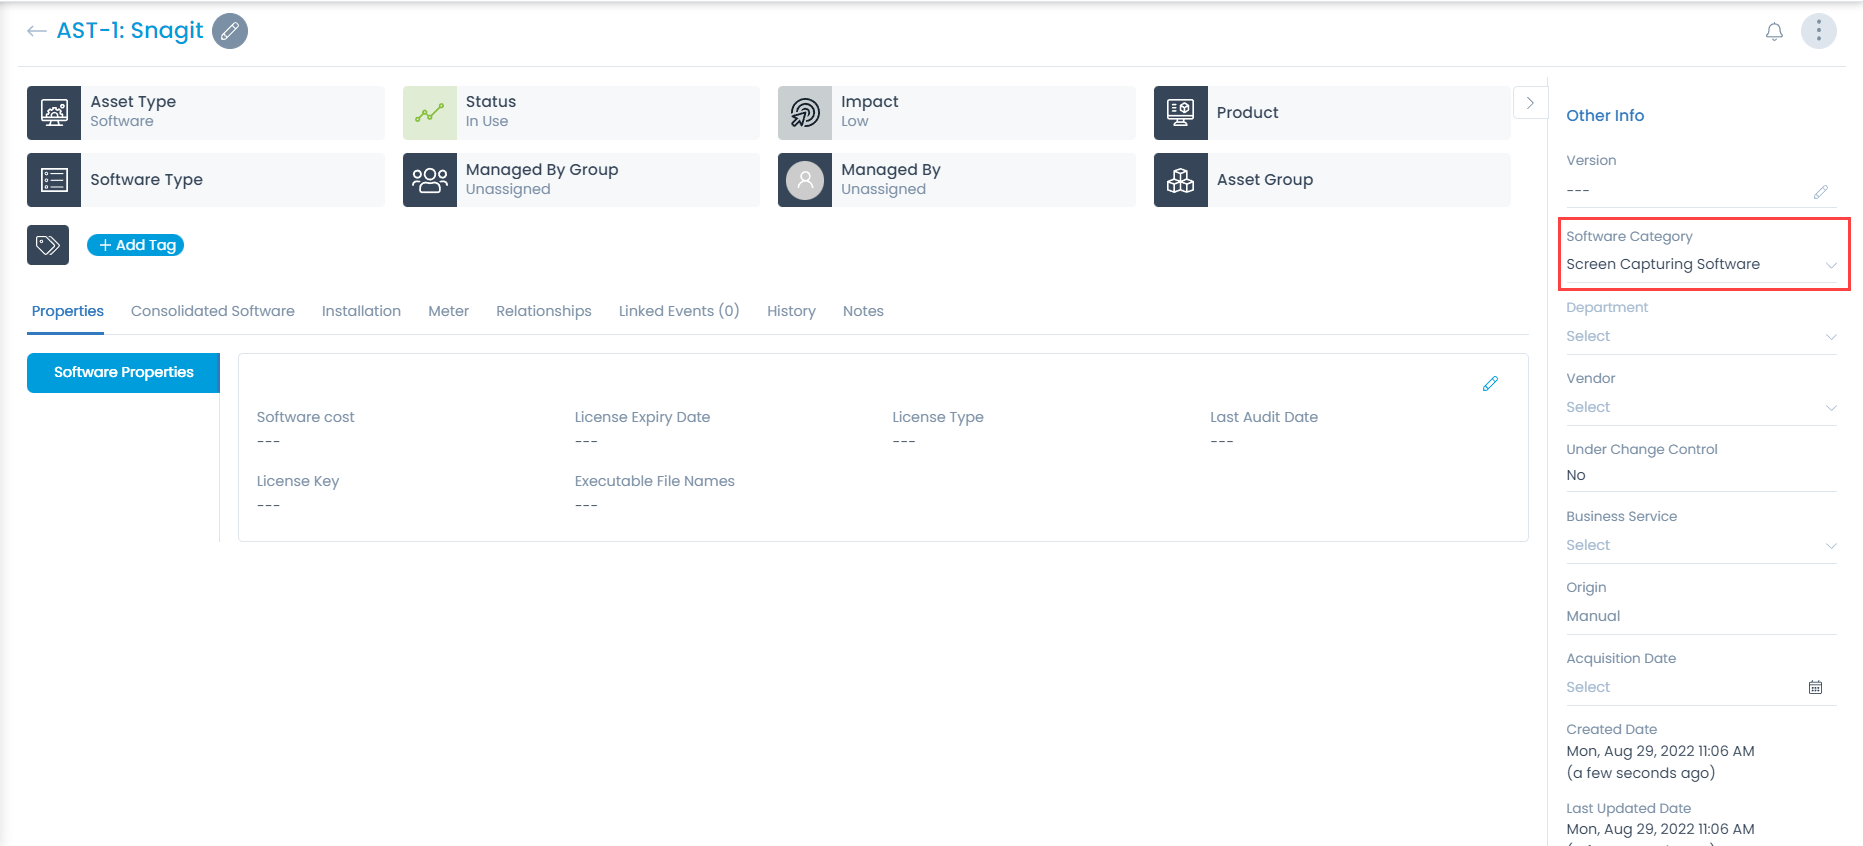
  2. Click Save Category. You can add more categories from here using the Add Category button below the name. Once the category is added,  you can assign it to the required asset from its details page.
Software Category Assigned to the Asset

Add Sub Category

To add a sub category, follow the below steps:

  1. Click the Add Sub Category icon next to the required category and a popup appears.
Adding a Sub Category
  1. Enter the Name of the sub category.
  2. Click Save Category. You can add sub categories up to 5 levels.