Release Status

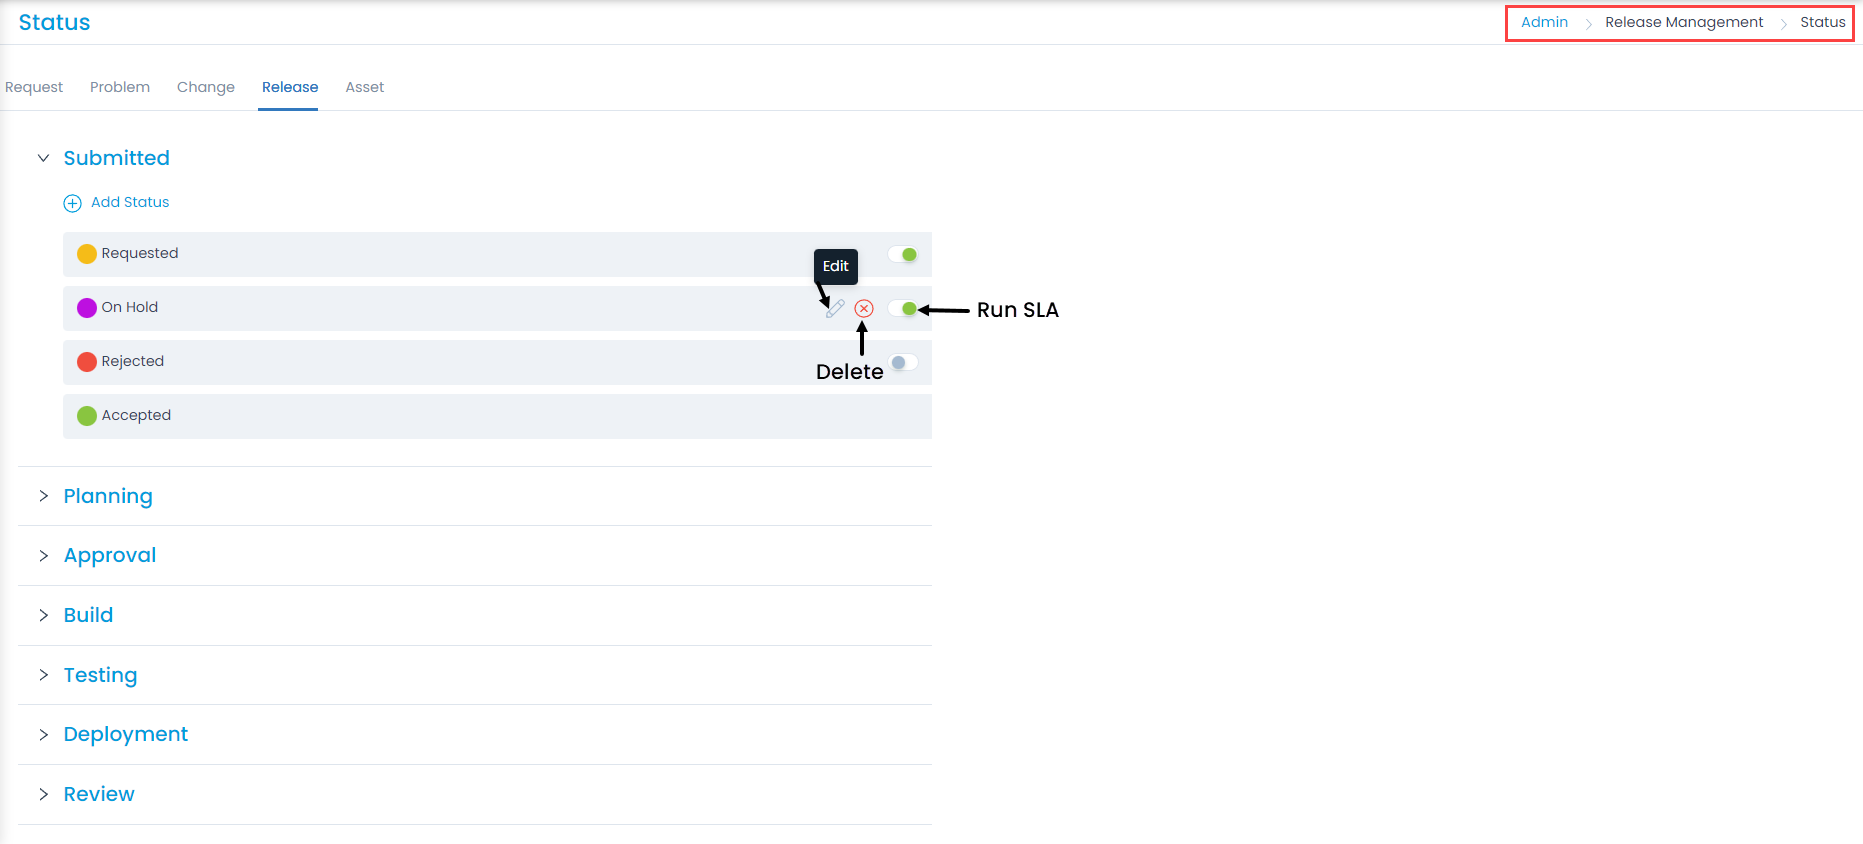
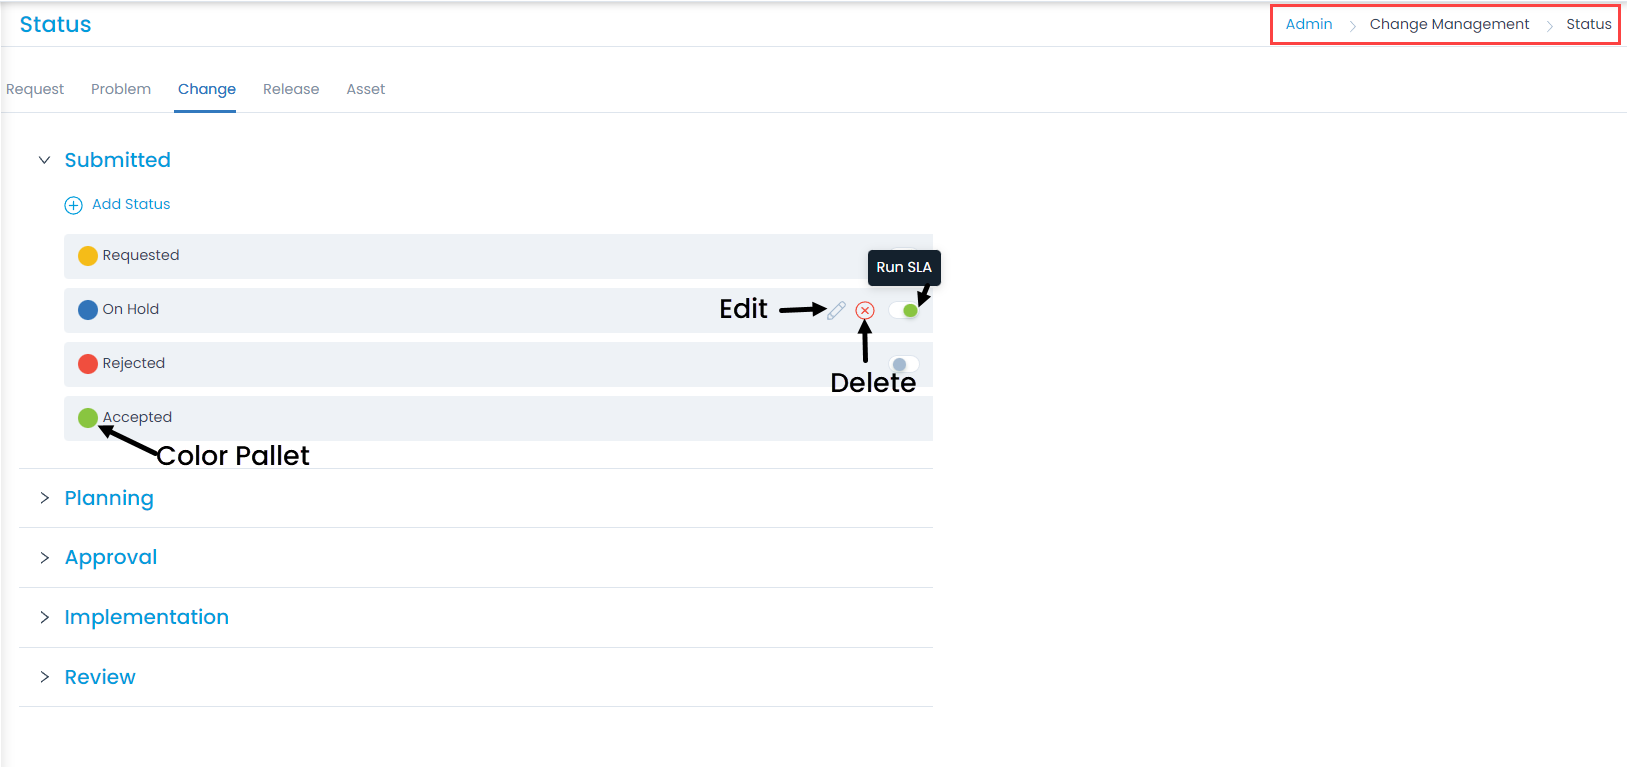
Release Status determines the progress of the Release tickets at each stage. Using these you can know how much work is done or pending on the ticket and accordingly actions can be taken. The system provides some default status values that are ready for use.

To view the Release Status page, navigate to Admin > Release Management > Release Status > Release tab.

Here, you can manage the status of the tickets at different stages. Also, you can edit the status names, run SLA, and change the color of the status values as per the organization’s theme.

Manage Release Status

Here, you can do the following:

  • Add and manage the Custom status for all the stages.
  • Enable or disable the SLA for the status value using Run SLA.
  • Change the color of the status.

Add Status

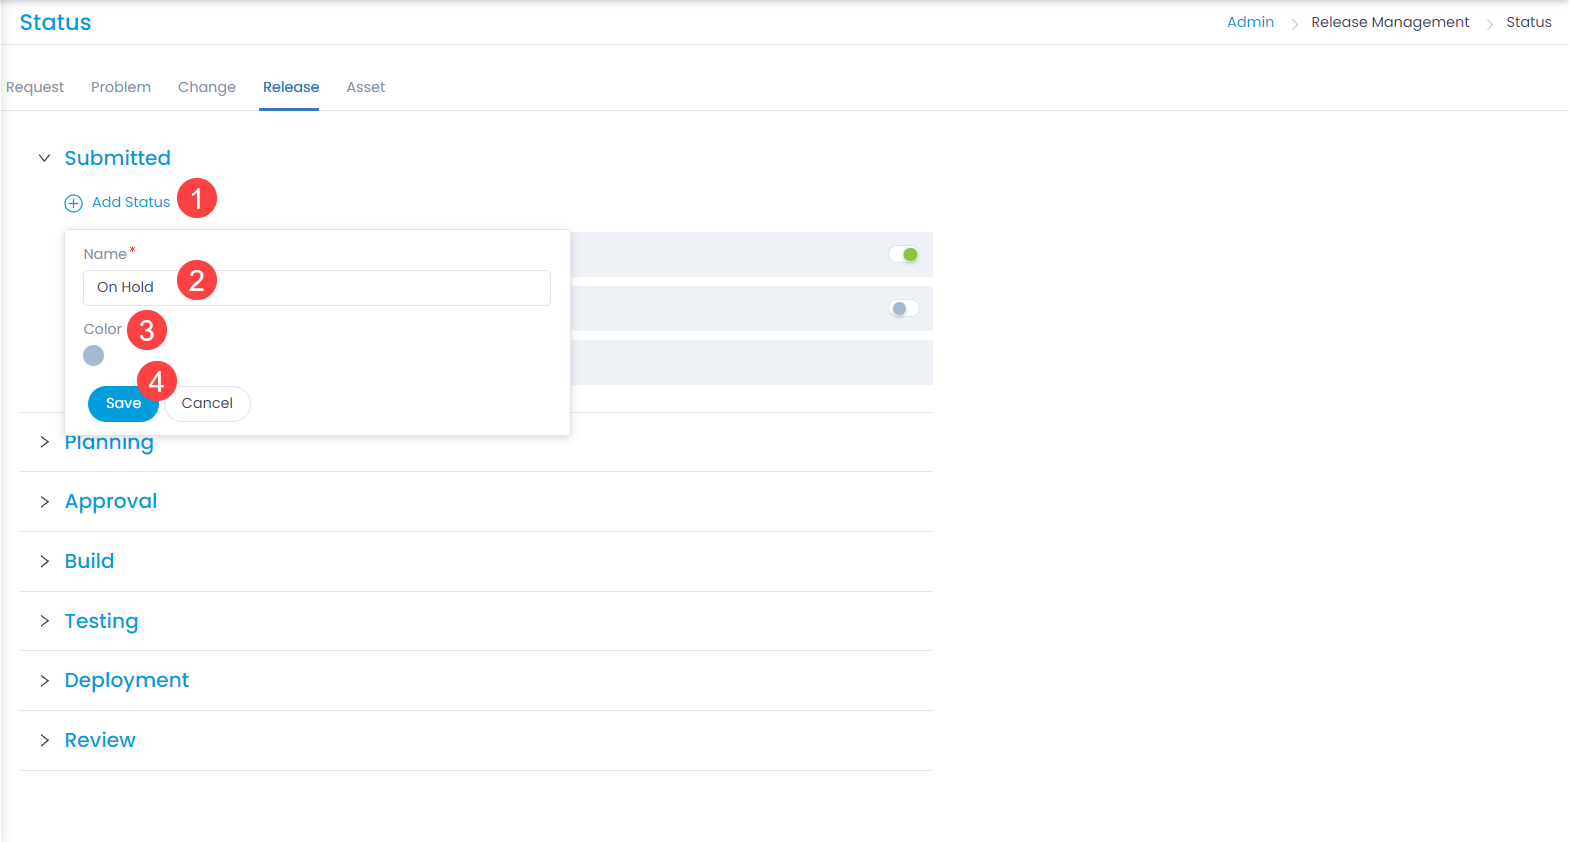
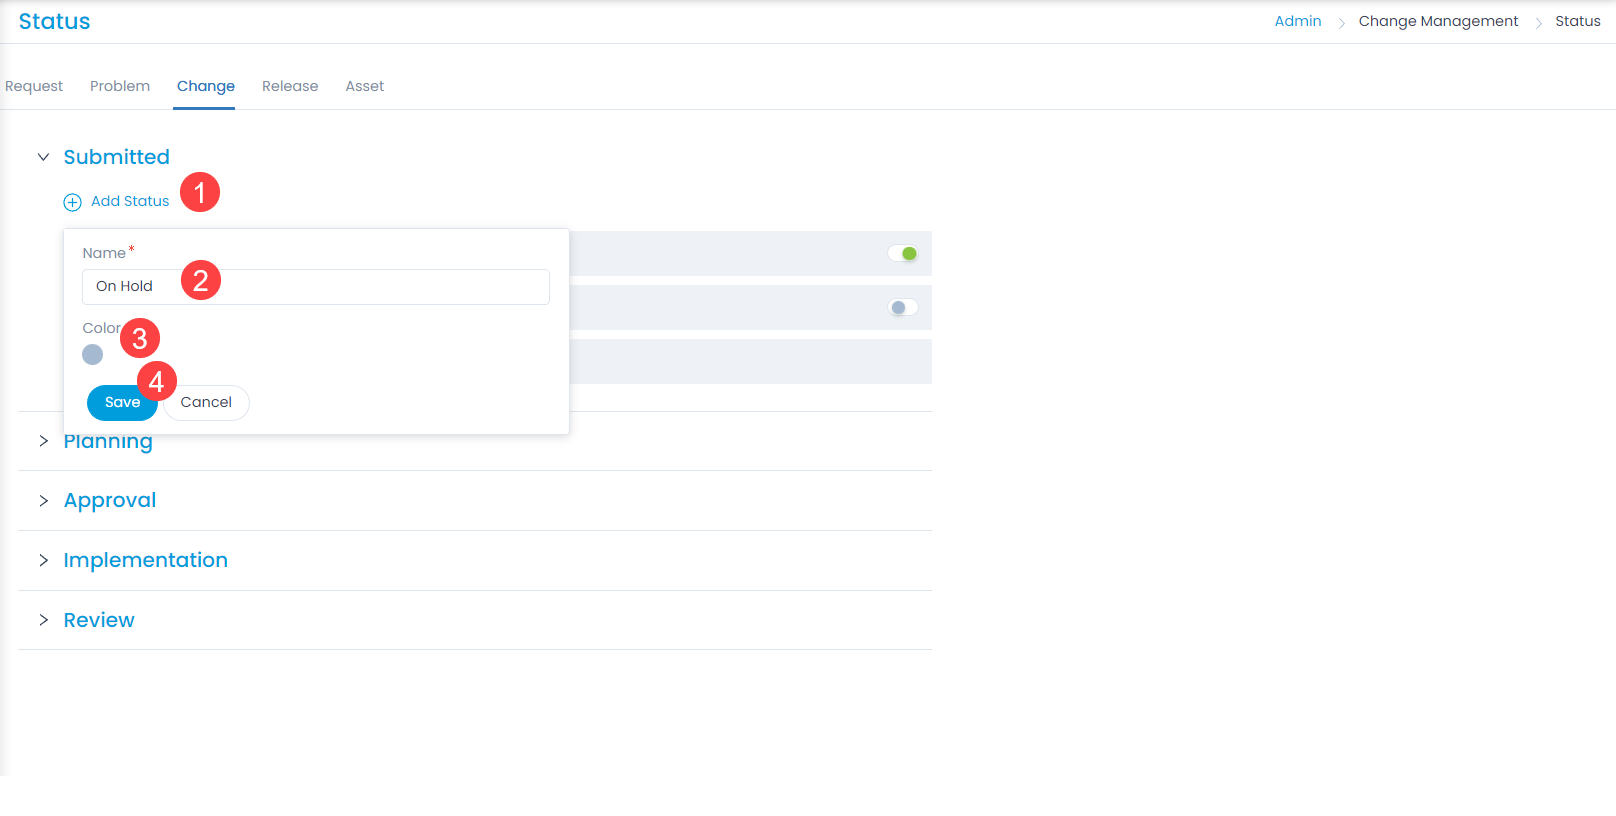
To add a custom status,

  1. Click the Add Status link.
  2. Enter the Name of the status.
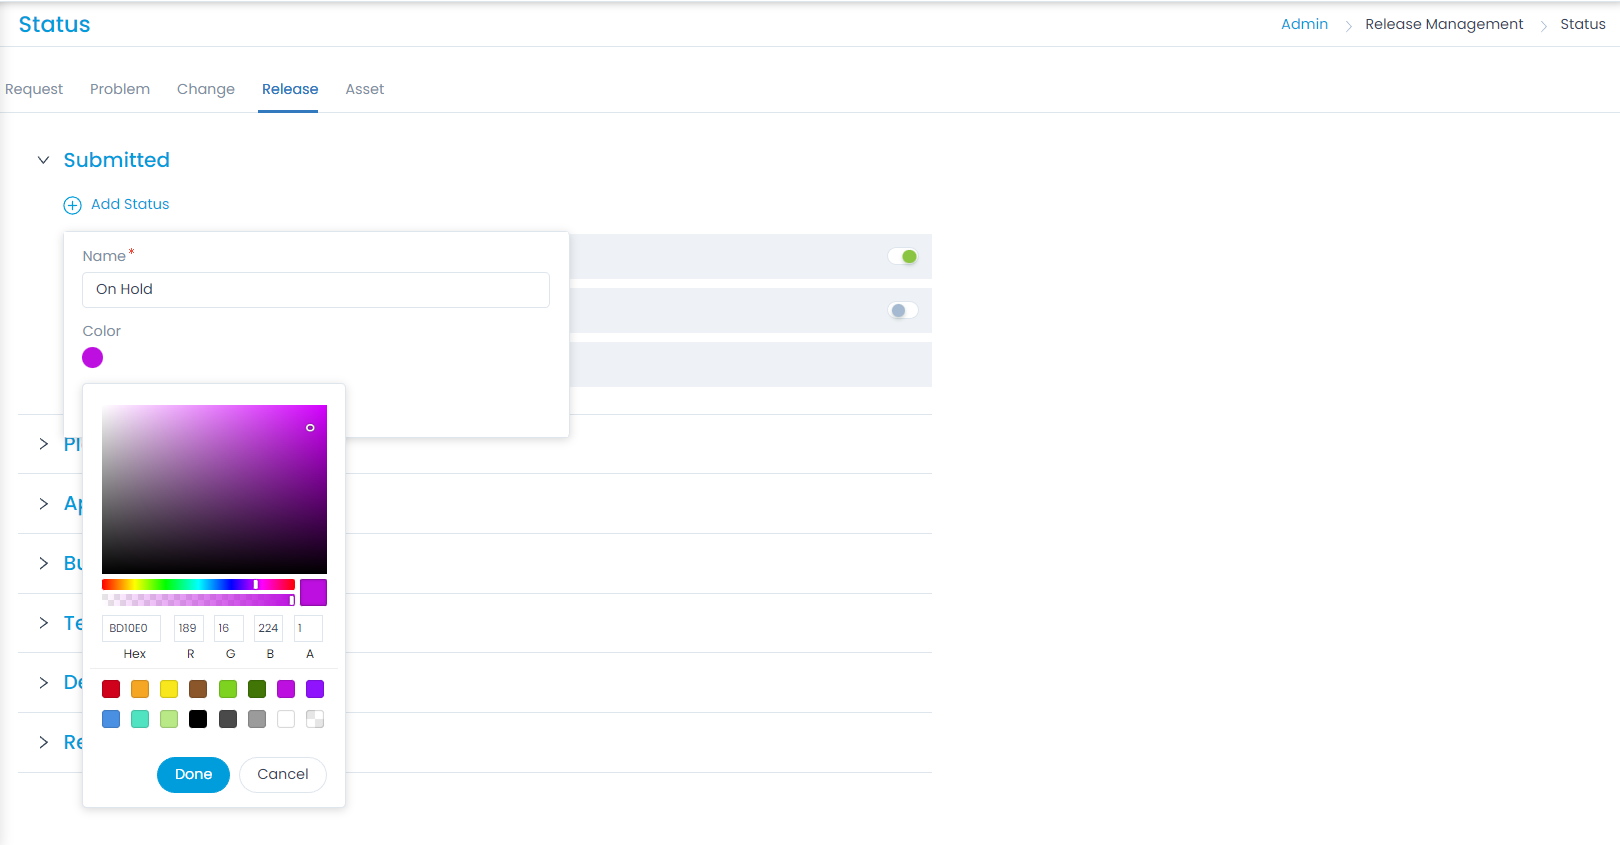
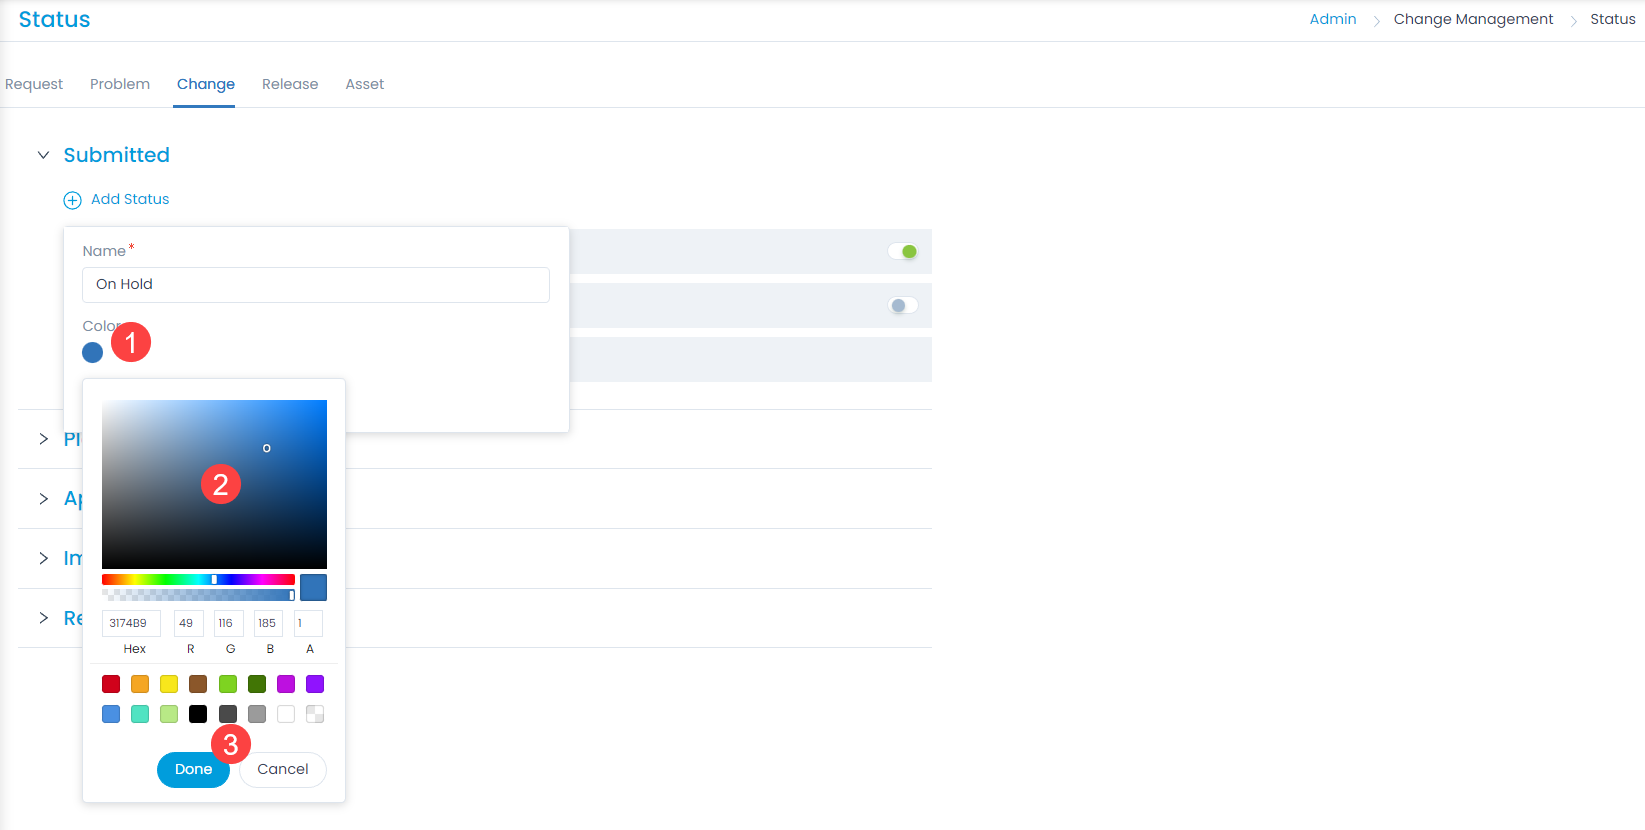
  3. Select the color or enter the hexadecimal code by clicking the color pallet icon.
  4. Click Save.
  5. Once added, you can edit or delete the custom status. But, the default statuses can only be edited and not deleted.
Adding Status
Adding Status
Selecting Color of the Status

Release Form

The layout of release management has all the fields required to manage the releases of an organization. However, to meet the organization’s needs, you can modify the default template and add new fields. The fields can later be used in the automation settings also.

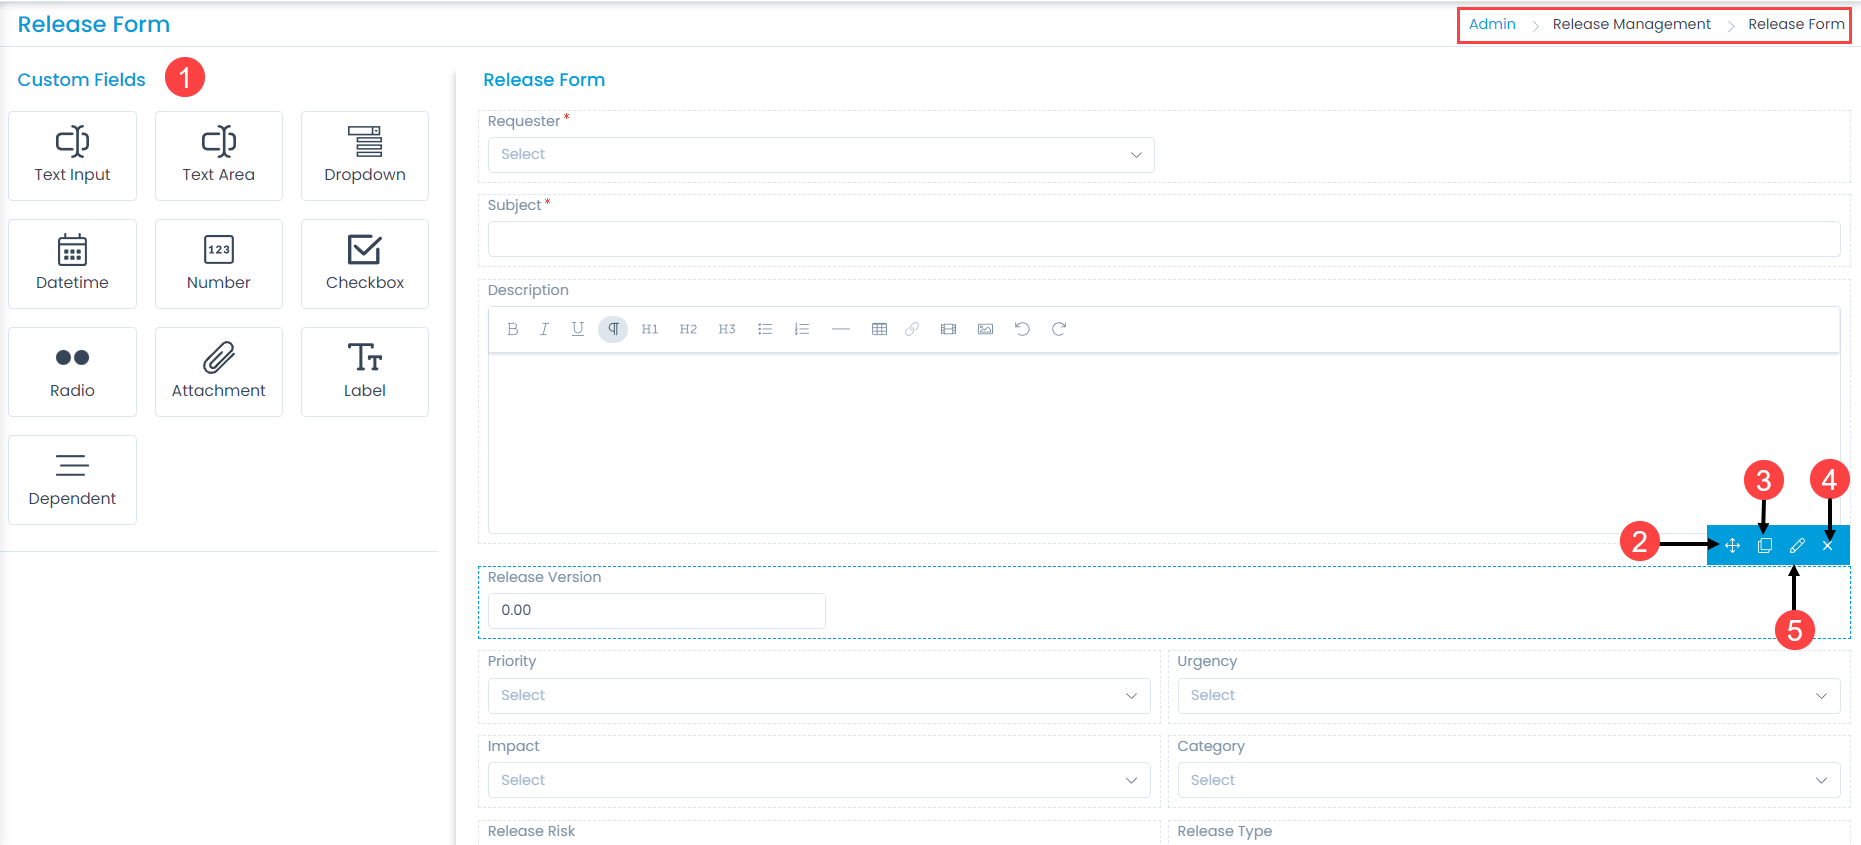
To view the Release Form, navigate to Admin > Release Management > Release Form and the below page appears.

Release Form
Release Form

The page displays two types of fields:

  • Default Fields: These are the primary fields that come with the fresh installation. The field names can neither be changed nor deleted.
  • Custom Fields: These are the additional fields added from the pallet. You can rename and delete them.

Here, you can customize the form using the below options:

  1. Field Pallet: You can drag and drop the fields from the pallet to add into the form.
  2. Re-Order: You can drag and drop the fields to change the order of the form. This option is available for both: default and custom fields.
  3. Duplicate: You can create duplicate fields from the custom fields. This option is available only for custom fields.
  4. Edit: You can edit the fields and make them mandatory, show on release form, or change their characteristics. For default fields, some of the options are restricted.
  5. Remove: You can delete the custom fields and not the default ones.

Example Scenario: For example, every release in an organization requires a version for the new release. This is the version by which a Release Manager and other Teams can identify the updated version of the upcoming release.

Text Input

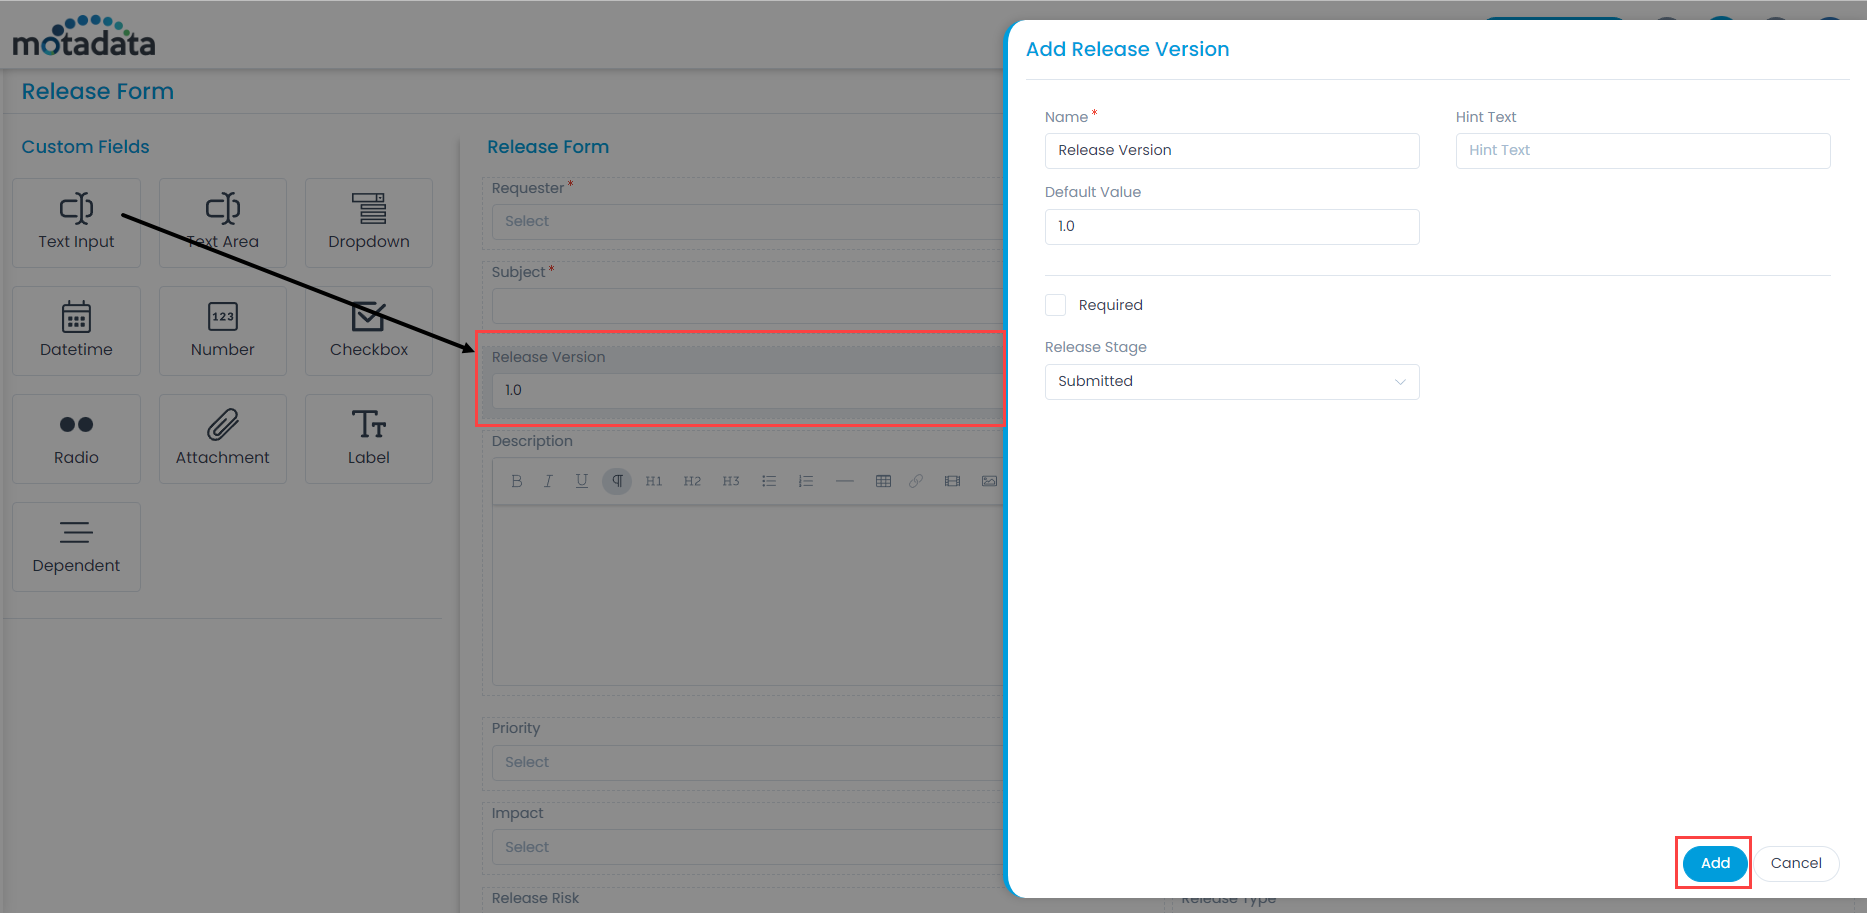
To add the Text Input custom field, drag and drop it on the form in the right-hand side, and a popup appears.

Adding Custom Field in the Release Form

Enter the following details:

  • Name: Enter the name of the field.
  • Hint Text: Enter the text to appear by default. It appears in grey color.
  • Default Value: Enter the default value of the field.
  • Required: Enable to make the field mandatory on the release form.
  • Release Stage: Select the stage at which the field should be available in the More Details section of Release Details page. The options are:
    • All: If selected the parameter will be available at the time of release creation.
    • Submitted: If selected you can edit the field only in the Submitted stage. During other stages it will be non-editable.
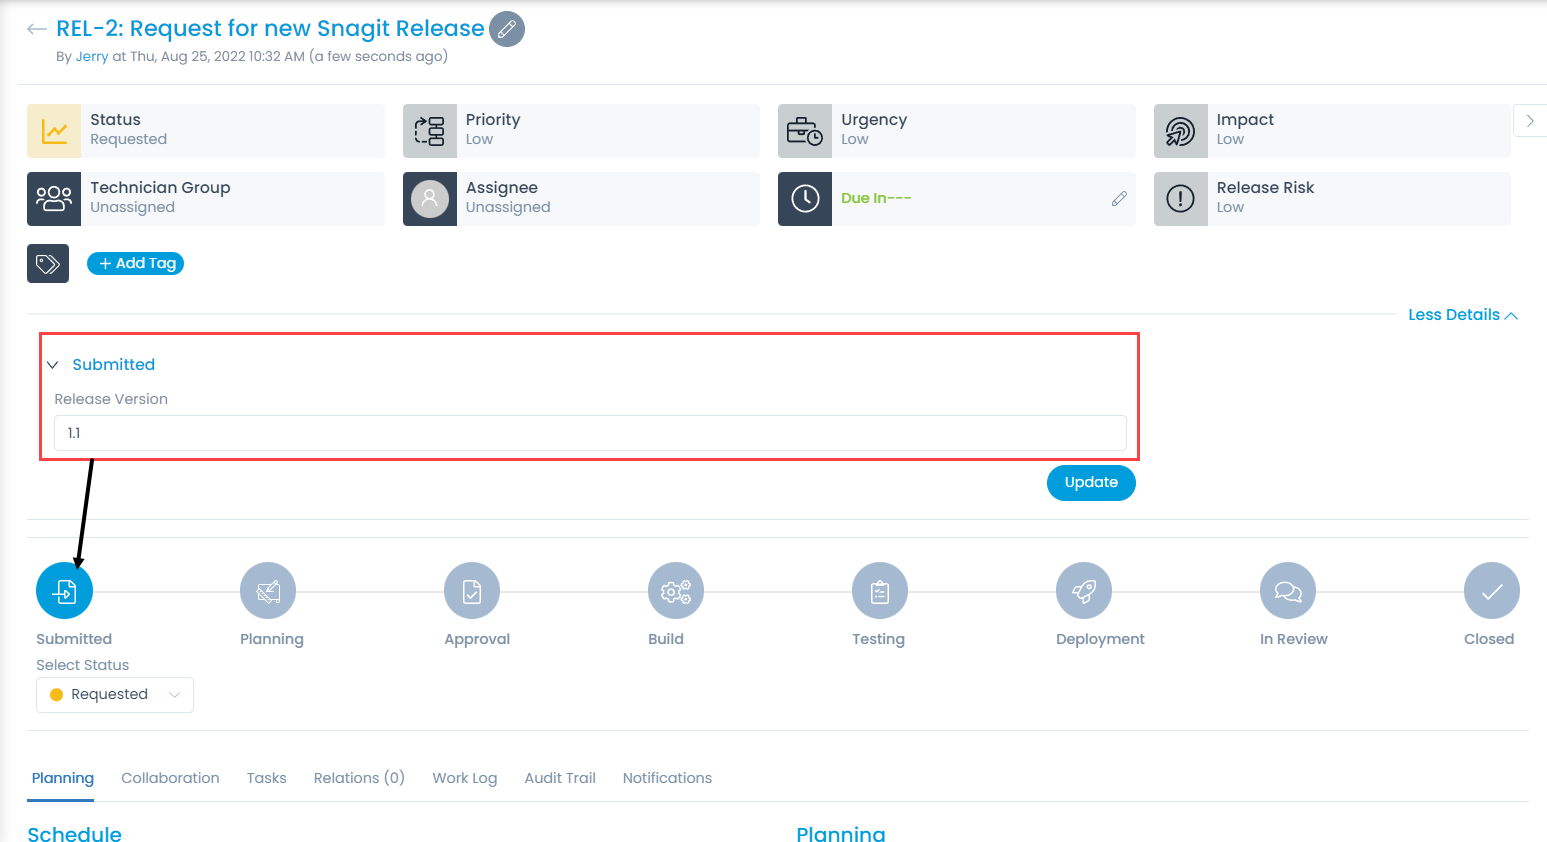
    • Planning: If selected you can edit the field only in the Planning stage as shown in the below figure. During other stages the field will be non-editable.
    • Build: If selected you can edit the field only in the Build stage. During other stages it will be non-editable.
    • Testing: If selected you can edit the field only in the Testing stage. During other stages it will be non-editable.
    • Deployment: If selected you can edit the field only in the Deployment stage. During other stages it will be non-editable.
    • Review: If selected you can edit the field only in the Review stage. During other stages it will be non-editable.
Fields Available as per the Release Stage

Once done, click Add. You can then re-arrange its location, create a duplicate field, edit, or delete it if required. Similarly, you can add other custom fields. For more details on other fields, refer to the link Request Form.

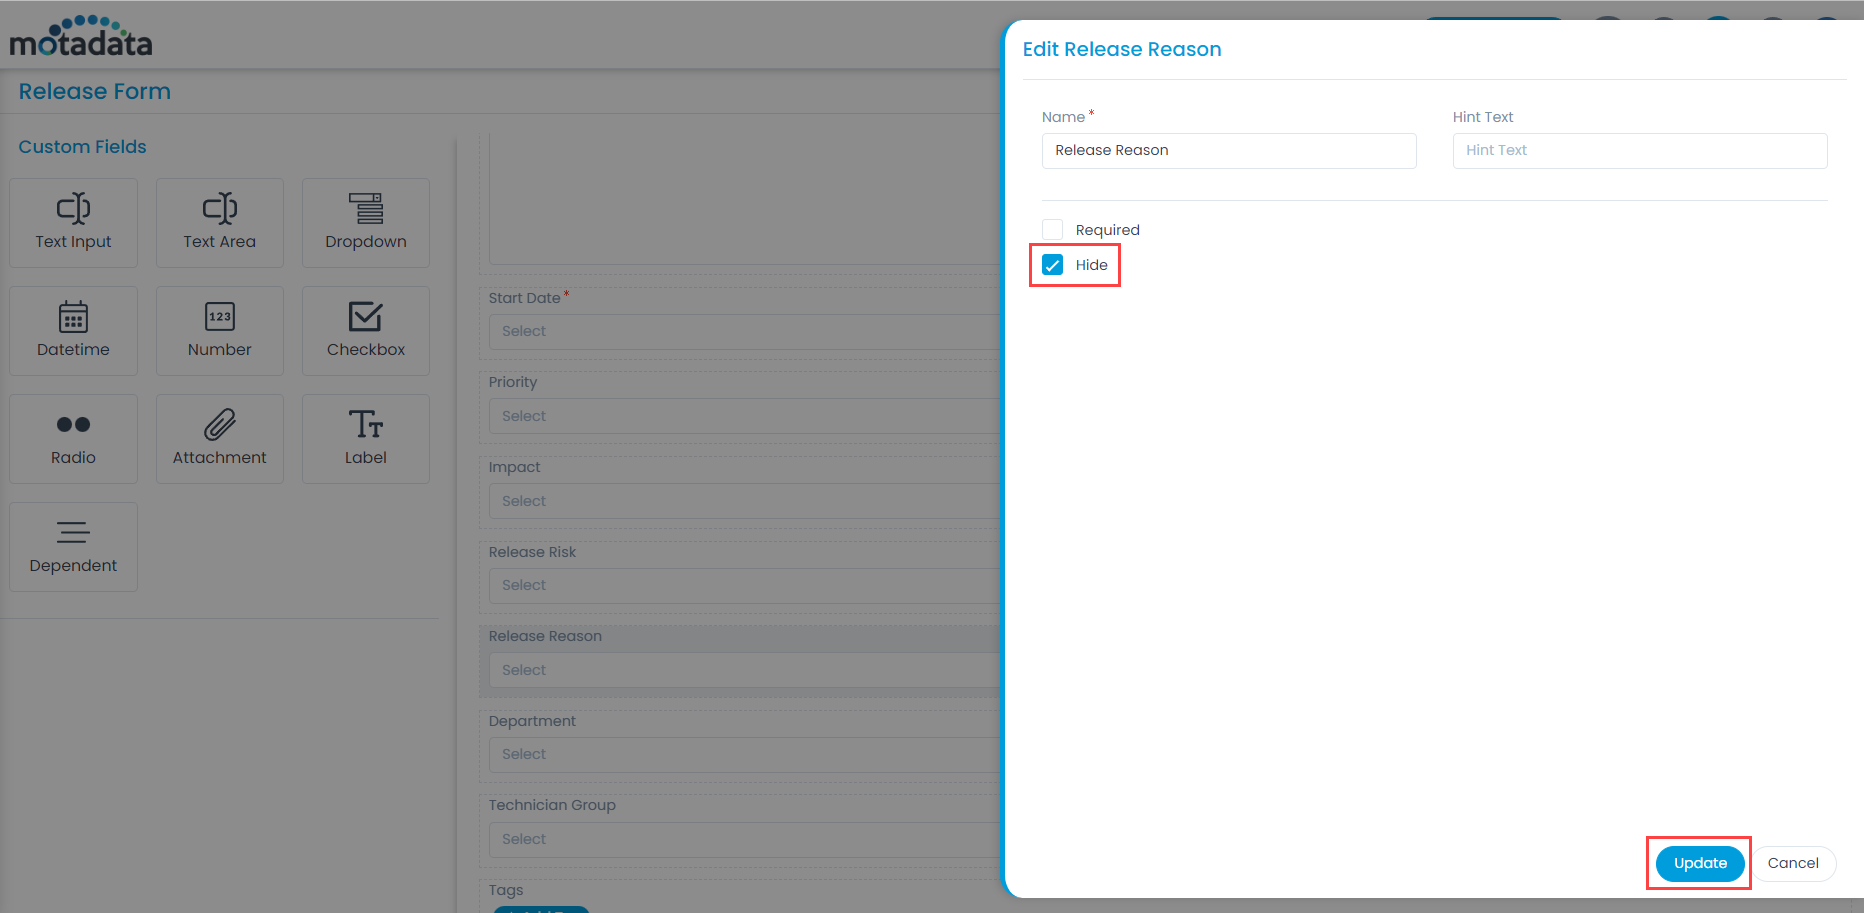
System Fields like Location, Category, Department, Release Reason, and Business Services can be hidden, by enabling the Hide option as shown below. Once enabled, the field will not be available at the time of release creation.

Hiding System Fields

Change Reason

Change can be defined based on a specific reason which leads for the improvement in existing instances. This development or improvement can be called as a Reason for the Change.

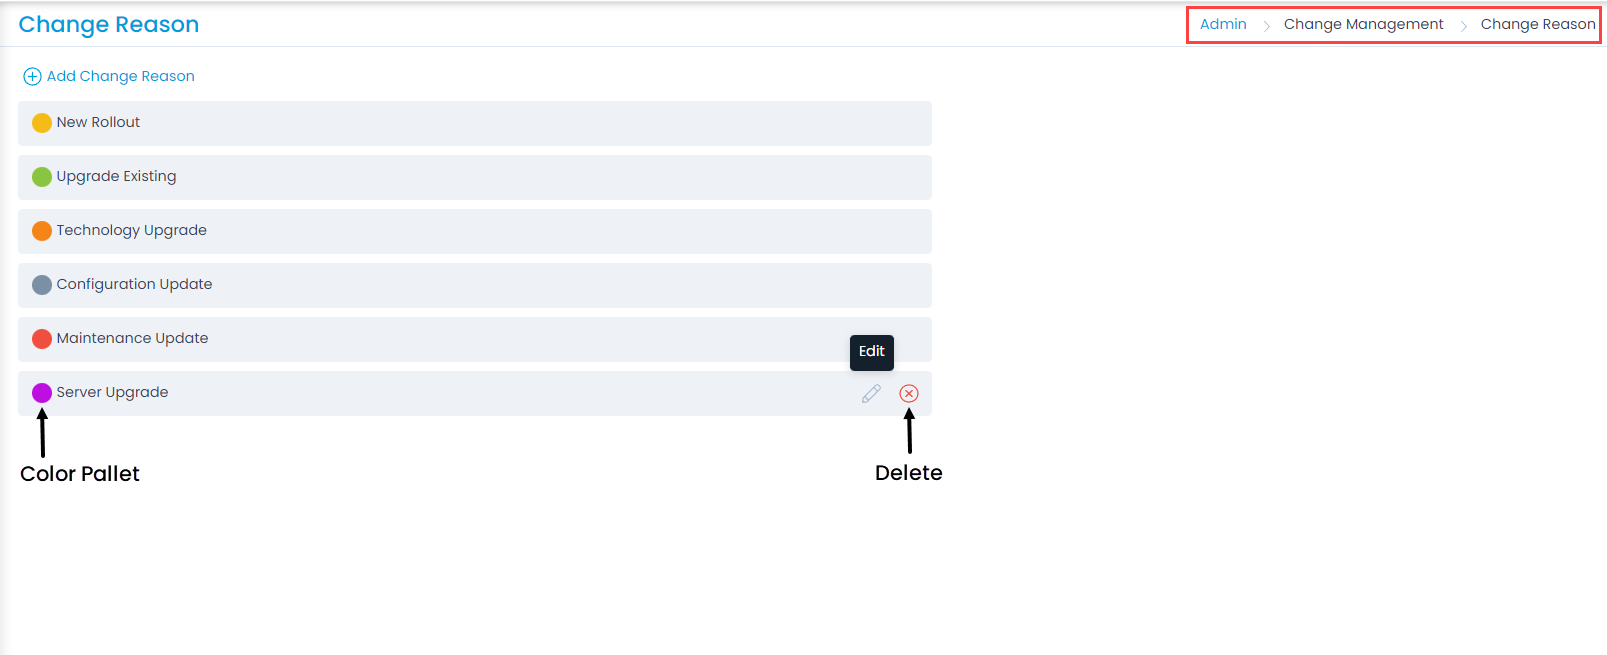
To view the Change Reason page, navigate to Admin > Change Management > Change Reason.

Here, you can do the following:

  • View and edit the default reasons.
  • Add and manage the custom reasons.
Change Reason
Change Reason

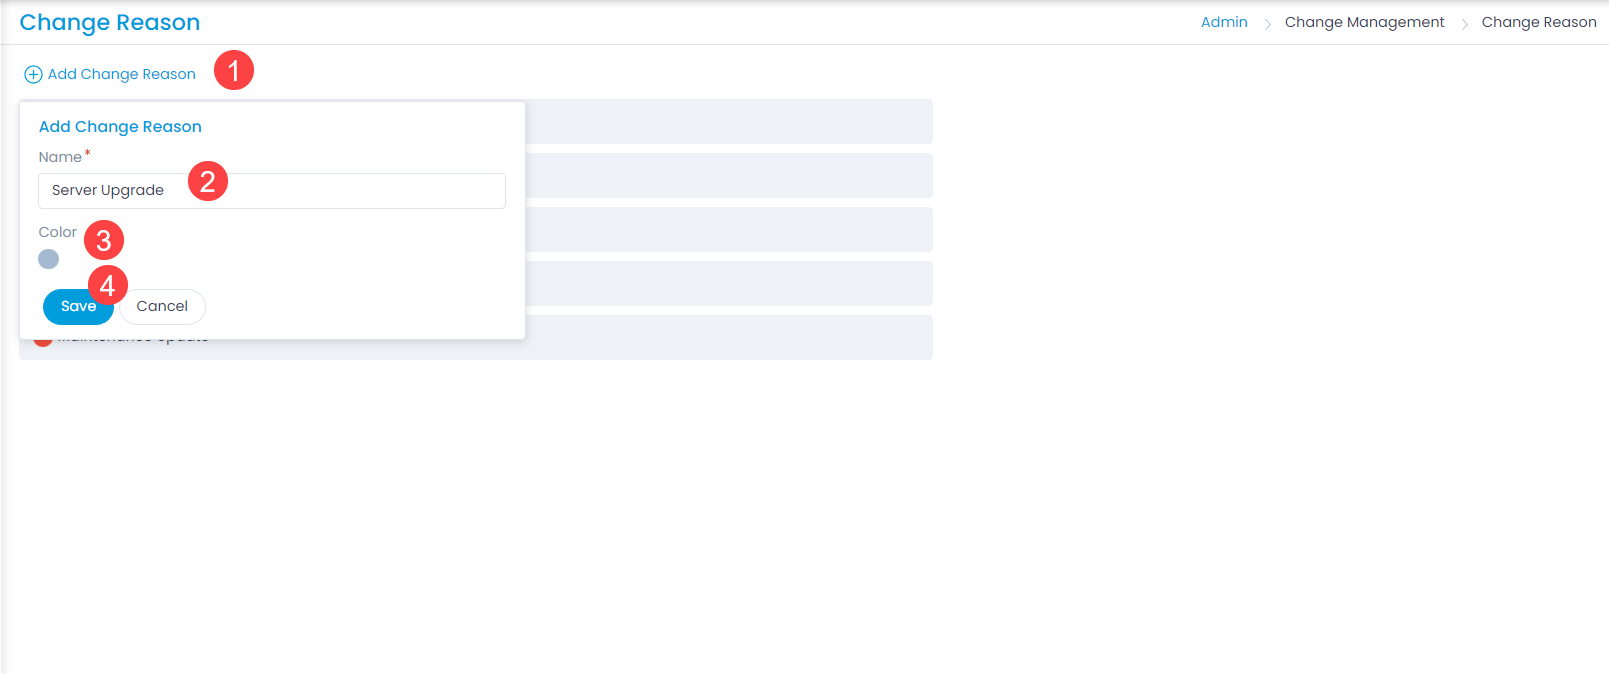
Add Change Reason

To add a custom change reason,

  1. Click the Add Change Reason link.
  2. Enter the Name of the risk.
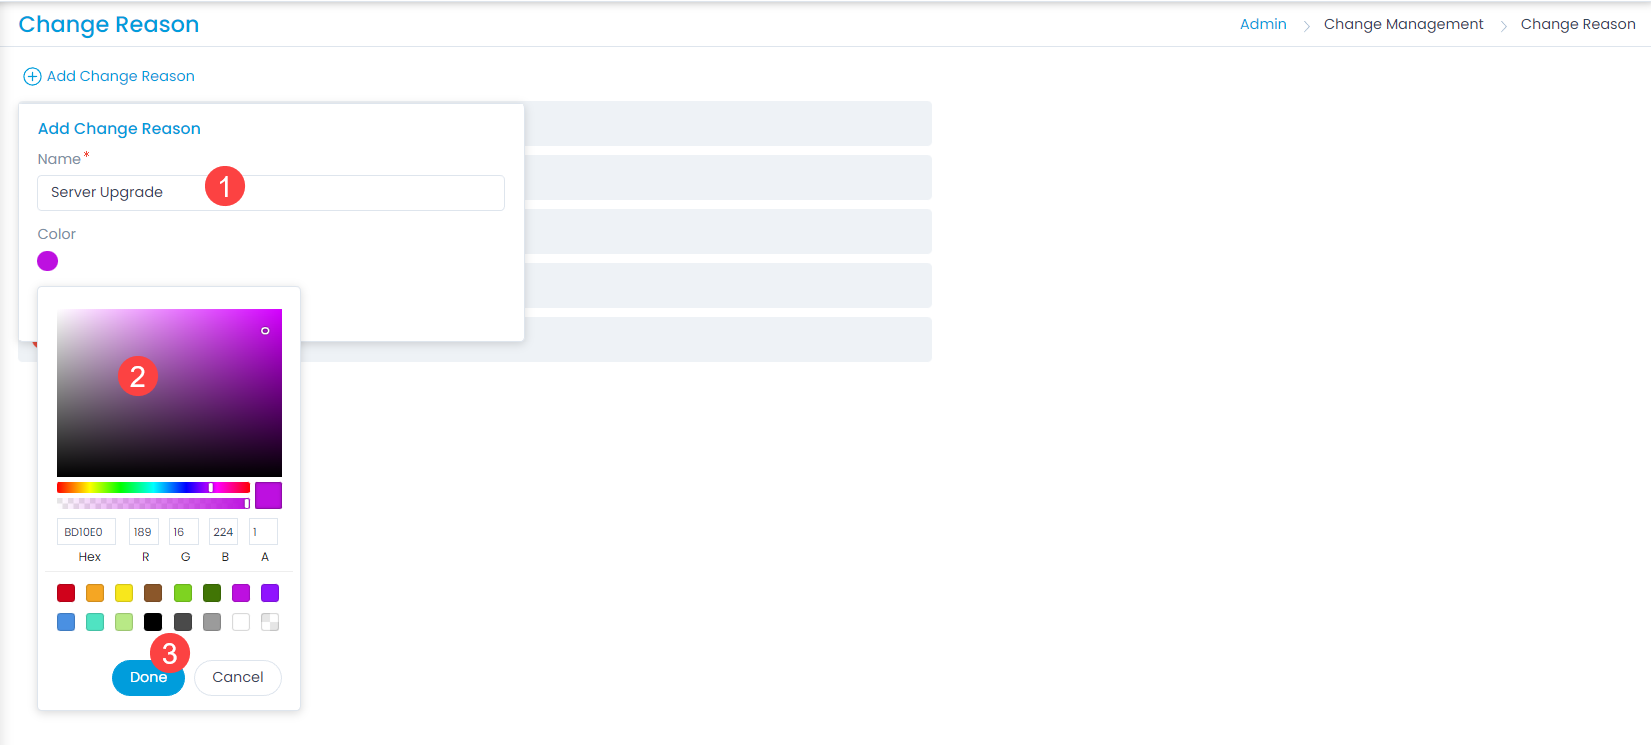
  3. Select the color or enter the hexadecimal code by clicking the color pallet icon.
  4. Click Save.
  5. Once added, you can edit or delete the custom reason. You can only edit the default reasons and not delete.
Adding a Change Reason
Selecting Color of the Change Reason

Change Risk

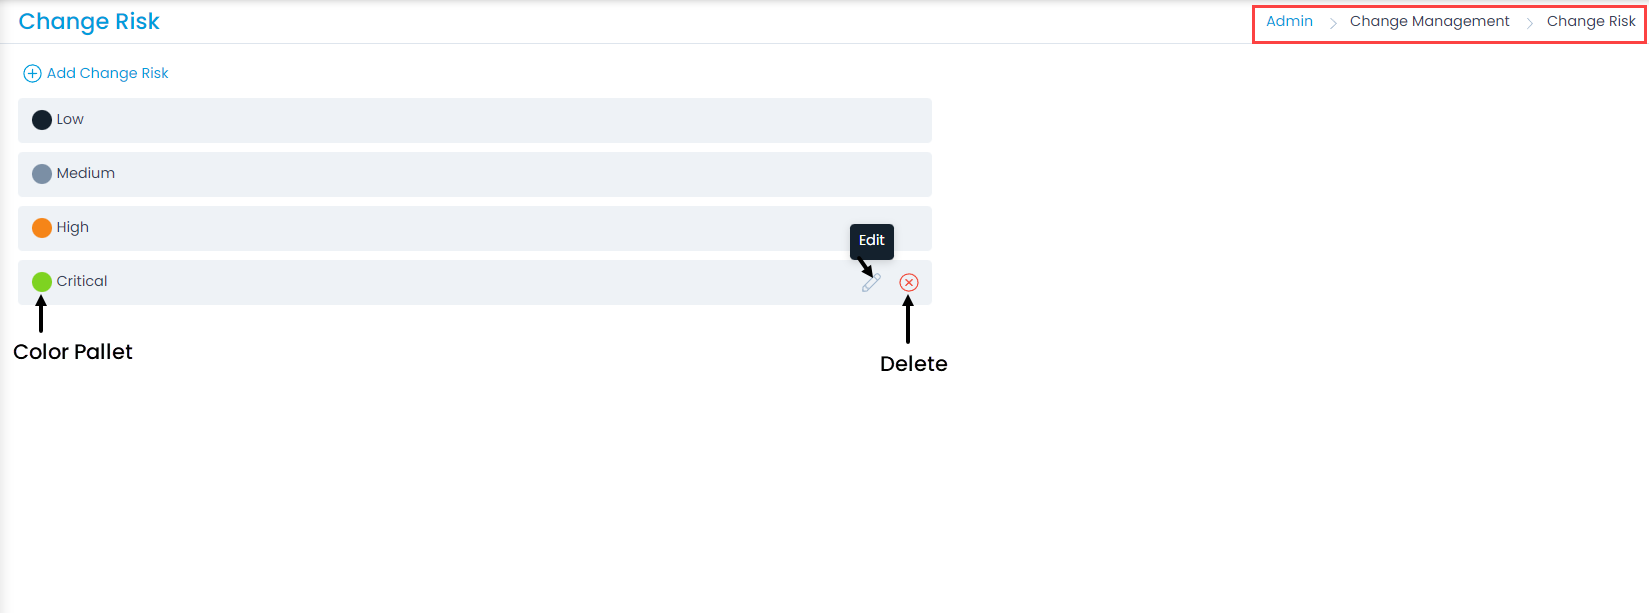
Change Risk shows the risk factor involved which would affect the change adversely. There are pre-defined levels of risk mentioned in the system by default which cannot be removed.

To view the Change Risk page, navigate to Admin > Change Management > Change Risk.

Here, you can do the following:

  • View and edit the default risks.
  • Add and manage the custom risks.
Levels of Change Risk

Add Change Risk

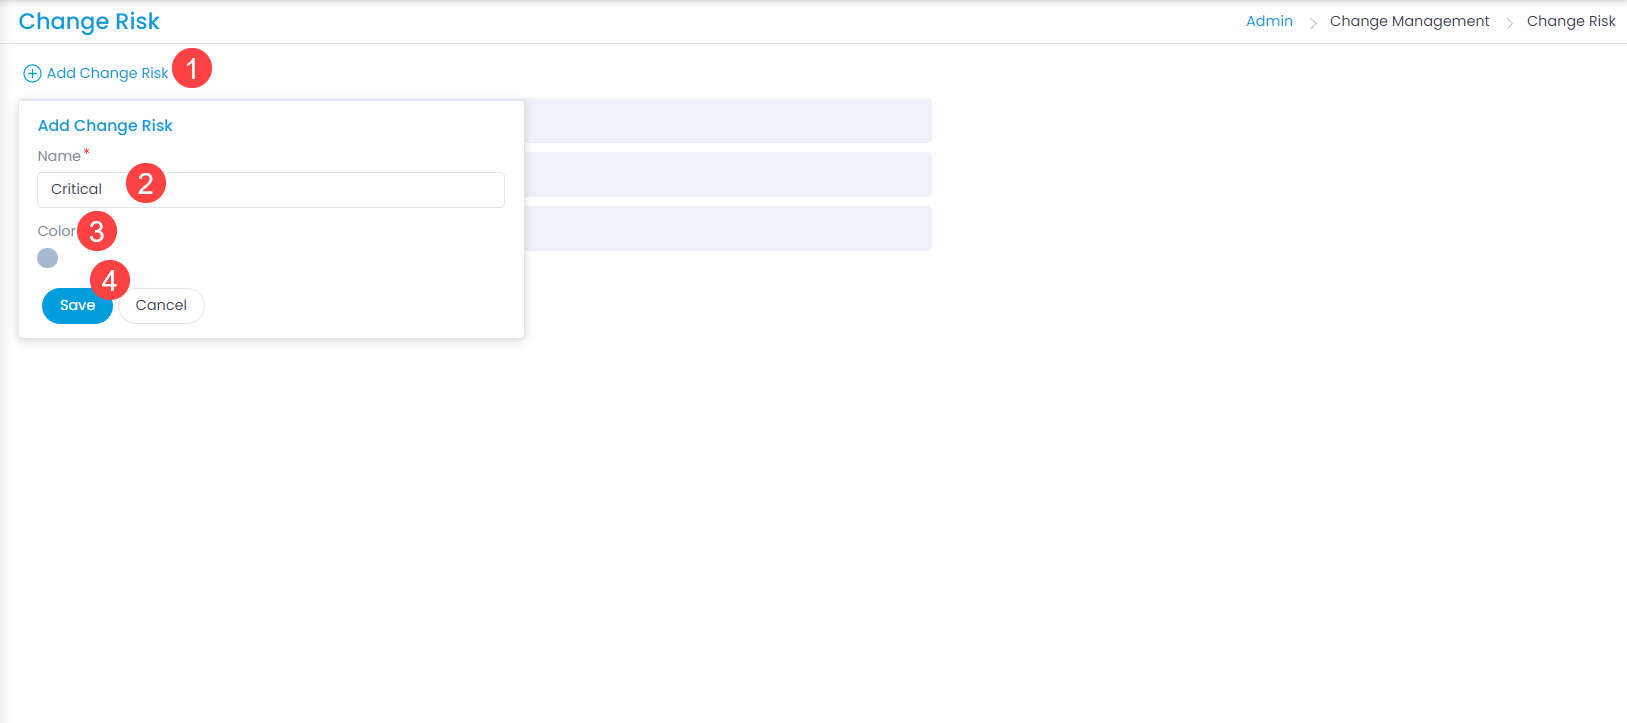
To add a custom change risk,

  1. Click the Add Change Risk link.
  2. Enter the Name of the risk.
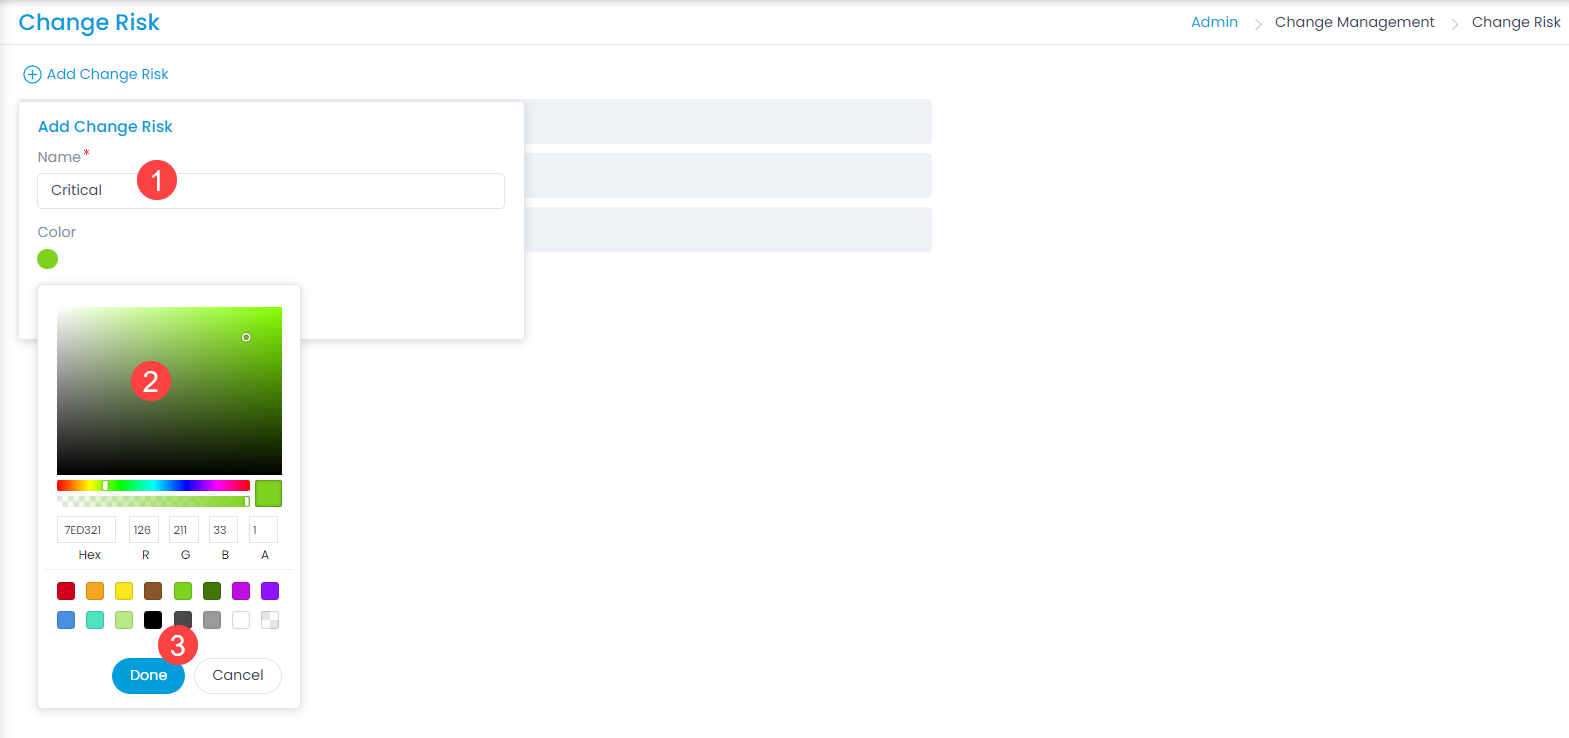
  3. Select the color or enter the hexadecimal code by clicking the color pallet icon.
  4. Click Save.
  5. Once added, you can edit or delete the custom risk. You can only edit the default risks and not delete.
Adding a Change Risk
Selecting Color of the Risk

Change Templates

Templates are readymade forms which can be used while filling up the change form. The user only needs to select them and the form will get automatically filled. These are convenient when a change is of standard or recurring type. The advantages of using a template are:

  • Creating a change using template saves a lot of time.
  • The templates ensure that proper and sufficient information is available in the change.
  • The change parameters like priority, urgency, assignee can be predefined in the template.

To view the Change Templates, navigate to Admin > Change Management > Change Templates > Change tab.

Change Templates
Change Templates

Here, you can create and manage templates for Request, Problem, Change, and Release modules.
Also, it has the below options:

  • Create Template: You can create a template from the scratch.
  • Duplicate: You can create a duplicate copy of a template to make some changes in it and use. This has two benefits: 1) If you are creating a new template similar to the existing one, you do not need to start from the scratch. 2) If you are modifying the existing one, the original works as a backup in case of errors.
  • Edit: You can edit the template to make changes in it.
  • Delete: You can delete the unwanted templates. A confirmation message appears. Click Yes to continue or Cancel to stop the process.
Create Template
Create Template
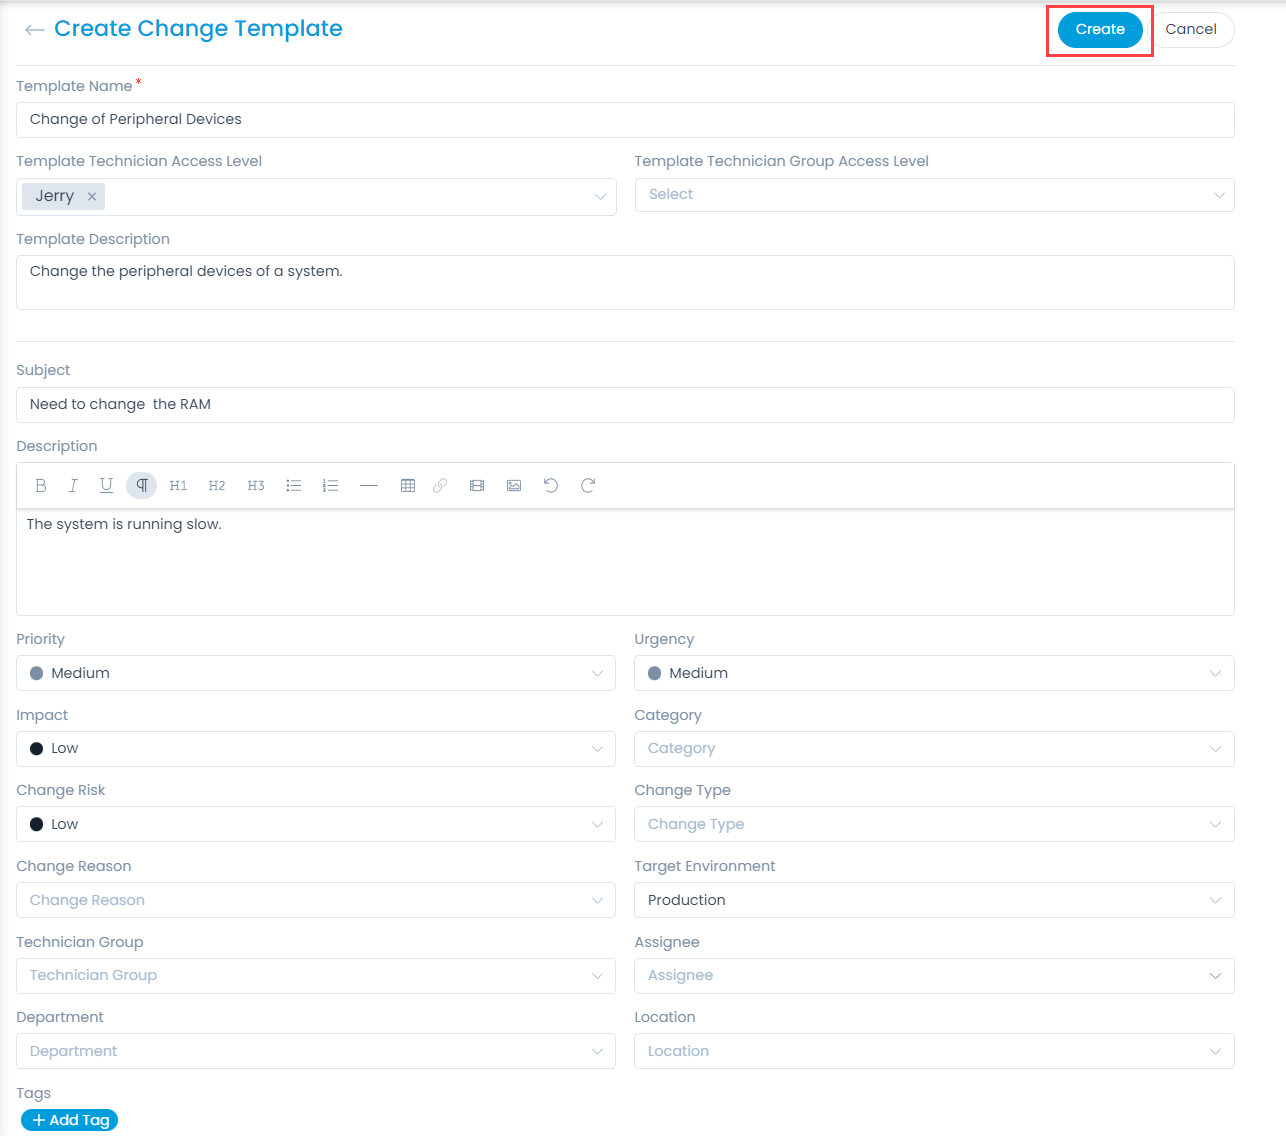
  1. Enter the below details:
    • Template Name: Enter the name of the template.
    • Template Technician Access Level: Select the technician(s) who can access the template.
    • Template Technician Group Access Level: Select the technician group(s) who can access the template.
    • Template Description: Enter a brief description about the template.
    • Subject: Enter the subject of the change.
    • Description: Enter the description of the change.
    • Priority: Select the priority of the change.
    • Urgency: Select the urgency of the change.
    • Impact: Select the impact of the change.
    • Category: Select the category to which the change belongs.
    • Change Risk: Select the risk involved in the change.
    • Change Type: Select the type of change.
    • Change Reason: Select the reason of the change.
    • Target Environment: Select the target environment in which the change is applicable.
    • Technician Group: Select the technician group for the change.
    • Assignee: Select the assignee if you want to assign the change to a specific person.
    • Department: Select the department if you want to assign the change to a specific department. It is optional.
    • Location: Select the location if you can find the location from the dropdown. It is optional.
    • Tags: You can add tags if you want. It will help you in identifying the similar changes. It is optional.
  2. Once all the details are filled, click Create. The template will become available to the users in the Fill From Template dropdown at the time of change creation. Similarly, you can create templates for Request, Change, and Release modules.

Change Category

Categories enable you to bring the similar changes under a single group. This helps the technicians in filtering out the required changes easily and quickly from a huge list. The system provides the below categories by default:

  • General
  • Software
  • Hardware
  • Network
  • IT Administration

To view the Change Category page, navigate to Admin > Change Management > Change Categories > Change tab.

Change Category Menu

Here, you have the below options. All these options are common in Request, Problem, Change, and Release tabs.

  • Add Category: You can add a category. For more details, refer to the link Request Category.
  • Import Categories: You can import a list of categories in bulk. For more details, refer to the link Request Category.
  • Re-Order: You can re-arrange the order of the category in the list using drag and drop. You can also re-order the sub categories.
  • Category Configurations: You can configure the settings for change creation. For more details, refer to the link Request Category.
  • Add Sub Category: You can add a sub-category. For more details, refer to the link Request Category.
  • Edit: You can edit the category name.
  • Delete: You can delete the category if not required. A confirmation message appears. Click Yes to continue or Cancel to stop the process.

Target Environment

There are various environments in an organization. In standard practices, a change is first made in the development environment, then test environment and then production environment. You can manage the list of environments. In a change request, the target environment field is a dropdown and uses this list only.

To view the Target Environment page, navigate to Admin > Change Management > Target Environment.

Here, you can view the default target environments as well as manage the custom ones.
The default environments are:

  • Production
  • Development
  • Test
Target Environment
Target Environment

Adding a Target Environment

To add a target environment,

  1. Click the Add Target Environment link.
  2. Enter the Name.
  3. Click Save. You can then edit or delete it as per requirement. You can delete only the custom environments and not the default.
Adding a Target Environment

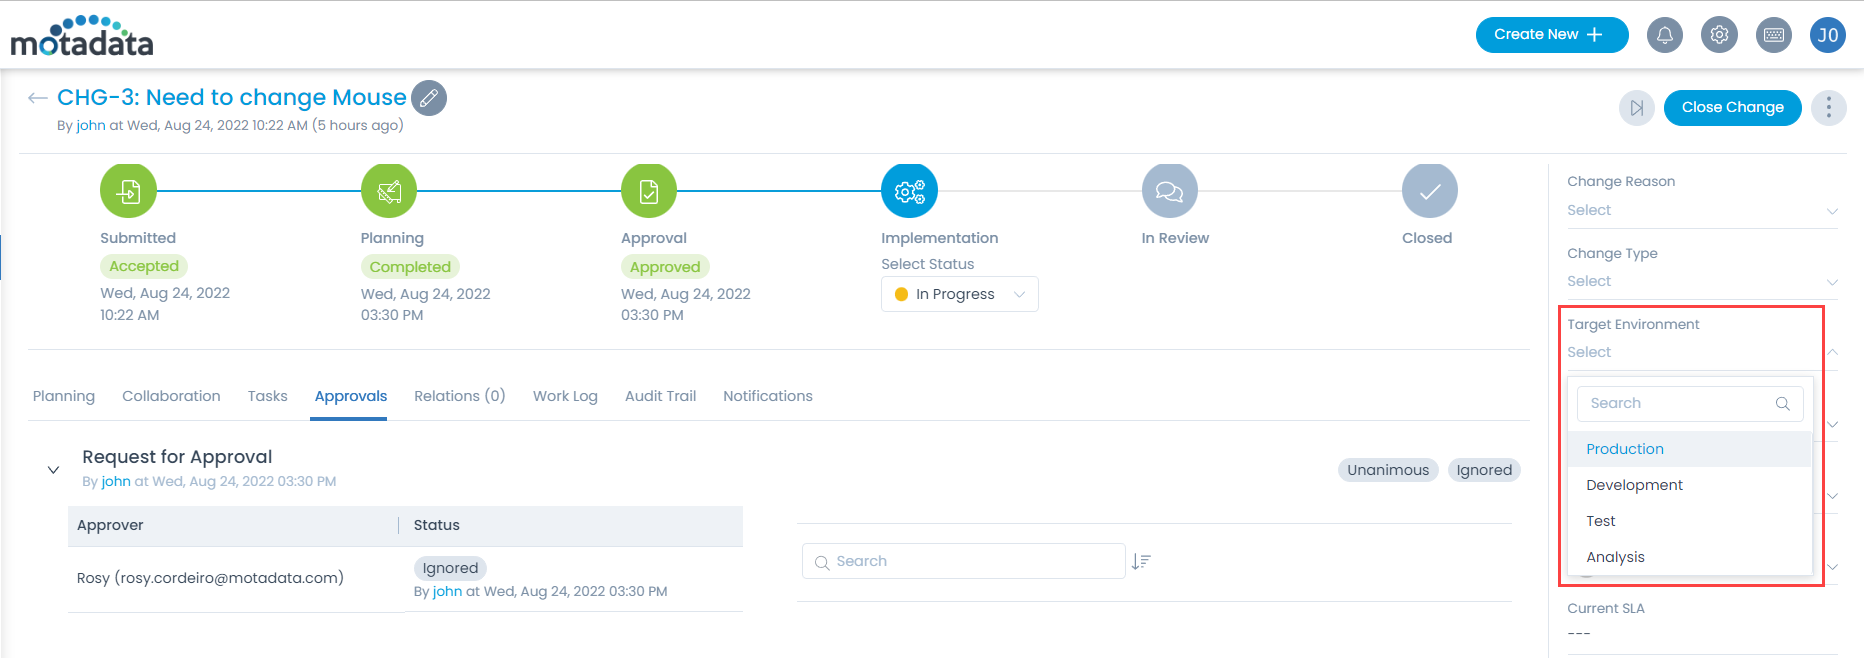
Once the target environment is added, it appears on the Change Details page as shown below.

Target Environment on Change Details Page

Change Types

Change Type determines the kind of change that is requested. It is another set of classification that helps technician filter the changes.

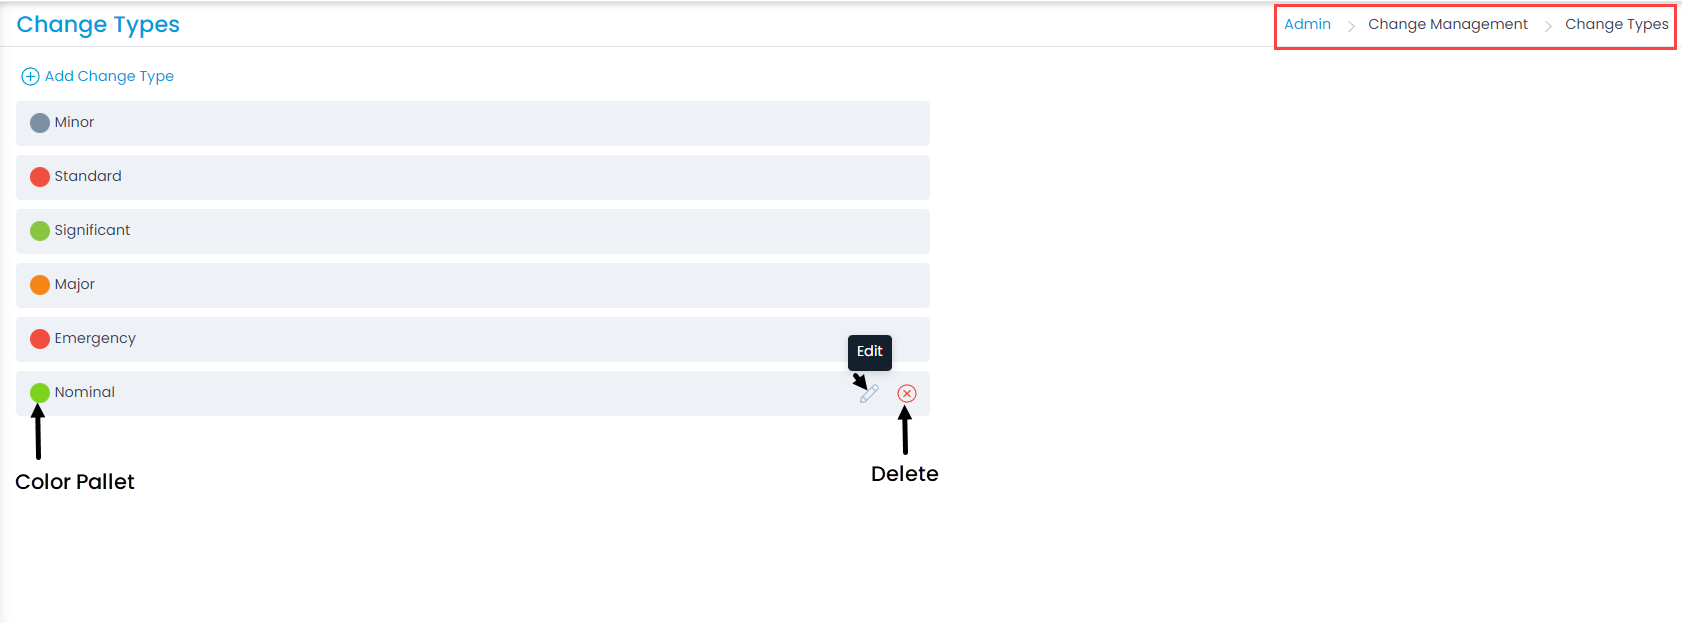
To view the Change Types page, navigate to Admin > Change Management > Change Types.

Here, you can view the default change types as well as add the custom change types. Also, you can edit the type names, and change their color as per the organization’s theme.

The default available types are:

  • Minor
  • Standard
  • Significant
  • Major
  • Emergency
Change Types
Change Types

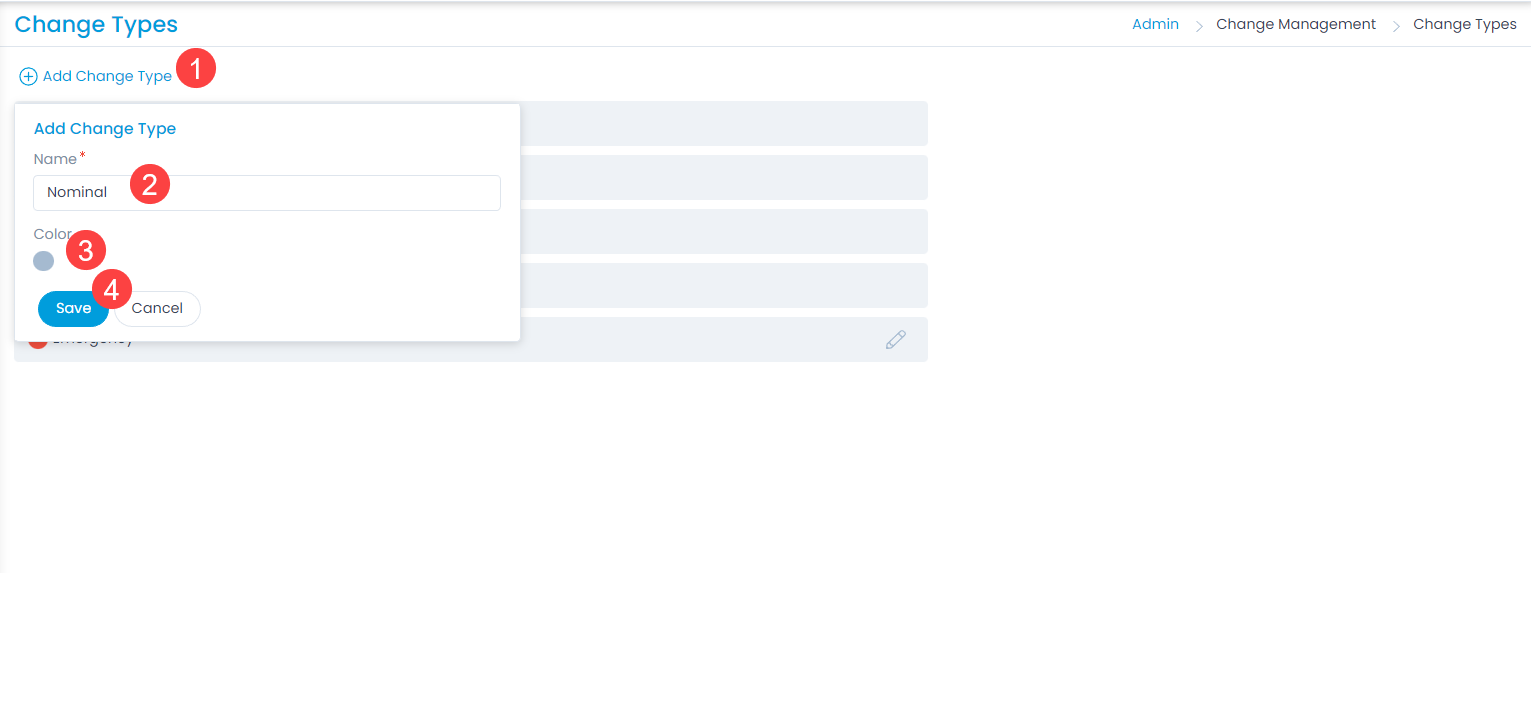
Add Change Type

To add a change type,

  1. Click the Add Change Type link.
  2. Enter the Name of the change type.
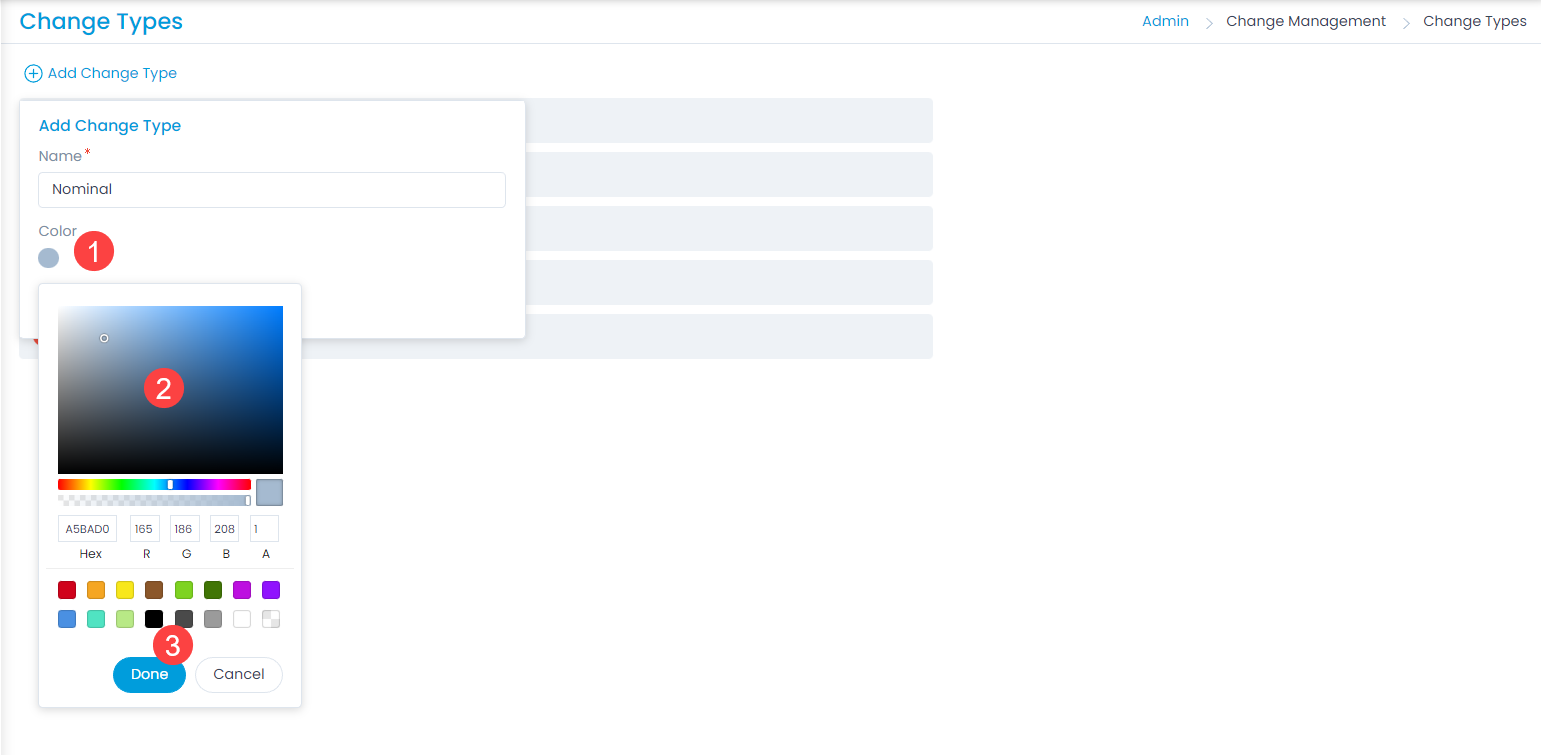
  3. Select the color or enter the hexadecimal code by clicking the color pallet icon.
  4. Click Save.
  5. Once added, you can edit or delete the custom change type. But, the default ones can only be edited and not deleted.
Adding a Change Type
Selecting Color for the Change Type

Change Custom Rules

The custom rules help you to enforce the organization’s compliance while processing a change. Using these rules you can ensure that any change in the change attributes is supported by proper comments or notes. For example, a change should not move to the closed state if there is no technician assigned to the change. Similarly, you can use custom rules to enforce the approval workflows and closing tasks to close a change.

To view the Change Custom Rules page, navigate to Admin > Change Management > Change Custom Rules.

When Should Custom Rules be Enforced

For the change management module, the custom rules are evaluated based on the actions configured at any of the below stages:

  • Submitted Rules: Check the items that should be enforced before submitting a change request.
Rules to Submit a Change Request
  • Planning Rules: Check the items that should be enforced before planning a change.
Rules to Plan a Change
  • Implementation Rules: Check the items that should be enforced before implementing a change.
Rules to Implement a Change
  • Review Rules: Check the items that should be enforced before reviewing a change.
Rules to Review a Change
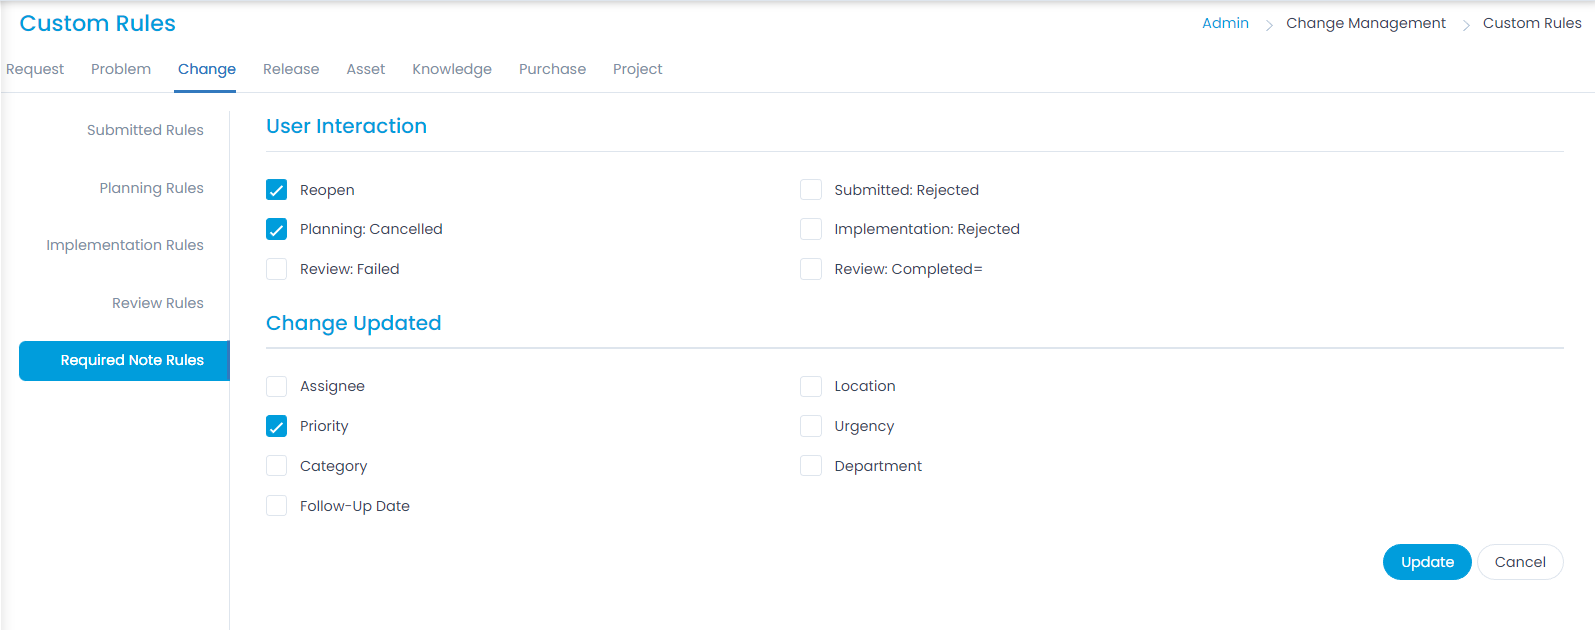
  • Required Note Rules: Check the items that should require a note before changing their values.
Fields that require a note before changing their values

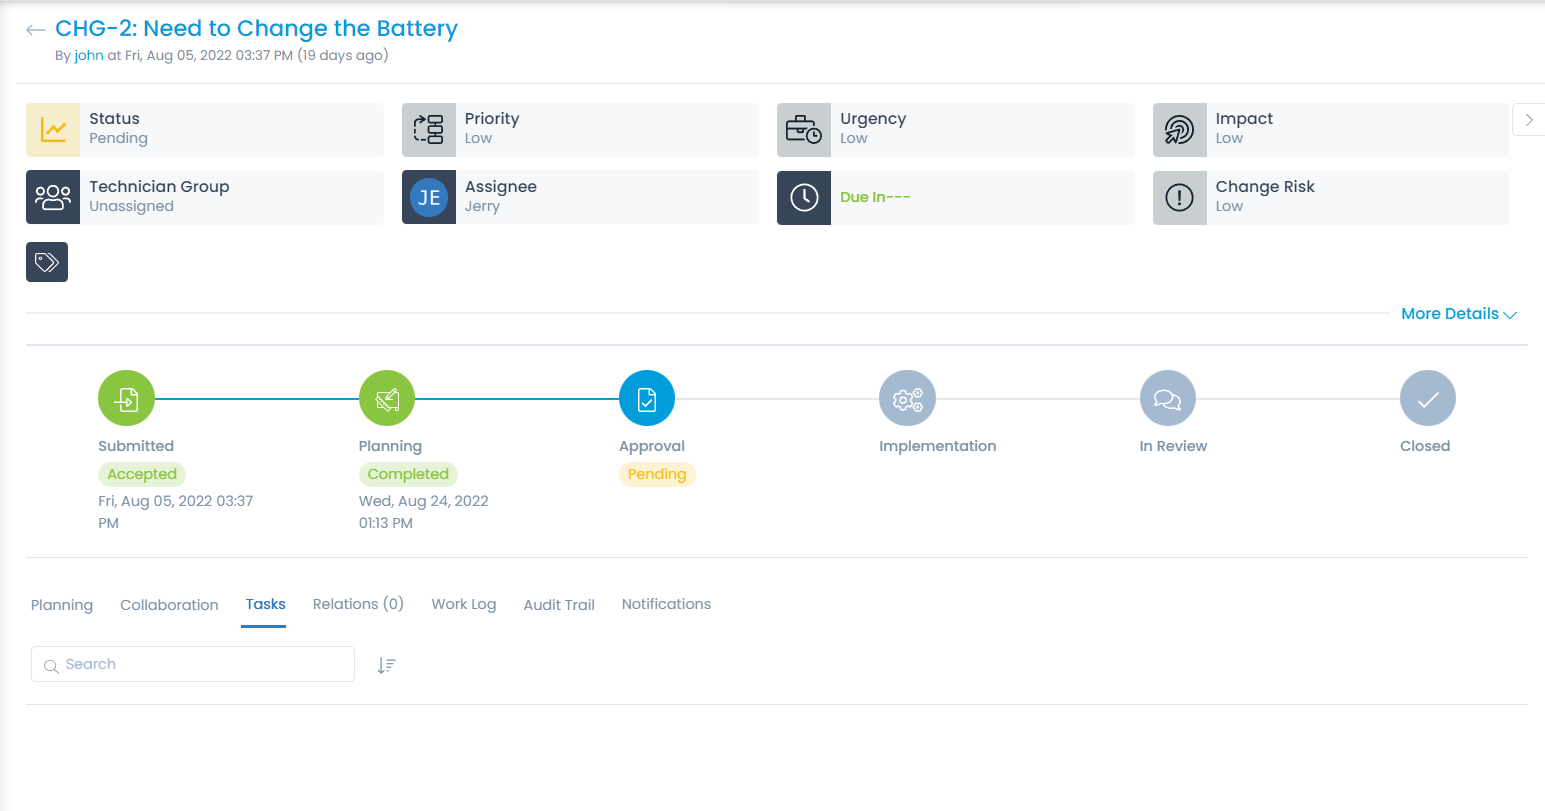
Example Scenario: You cannot create a task when the change is on Approval stage.

Example of Custom Rules in Change Management

Change Status

Change Status determines the progress of the Change tickets at each stage. Using these you can know how much work is done or pending on the ticket and accordingly actions can be taken. The system provides some default status values that are ready for use.

To view the Change Status page, navigate to Admin > Change Management > Change Status > Change tab.

Here, you can manage the status of the tickets at different stages. Also, you can edit the status names, run SLA, and change the color of the status values as per the organization’s theme.

Manage Change Status

Here, you can do the following:

  • Add and manage the Custom status for all the stages.
  • Enable or disable the SLA for the status value using Run SLA.
  • Change the color of the status.

Add Status

To add a custom status,

  1. Click the Add Status link.
  2. Enter the Name of the status.
  3. Select the color or enter the hexadecimal code by clicking the color pallet icon.
  4. Click Save.
  5. Once added, you can edit or delete the custom status. But, the default statuses can only be edited and not deleted.
Adding Status
Adding Status
Selecting Color of the Status