Source

Source determines the origin of the request. And it is a good practice to record this source. Though there are various ways to create a request, it usually happens that the actual source of information is the some form of communication. In a request, the source field is a dropdown and uses this list only.

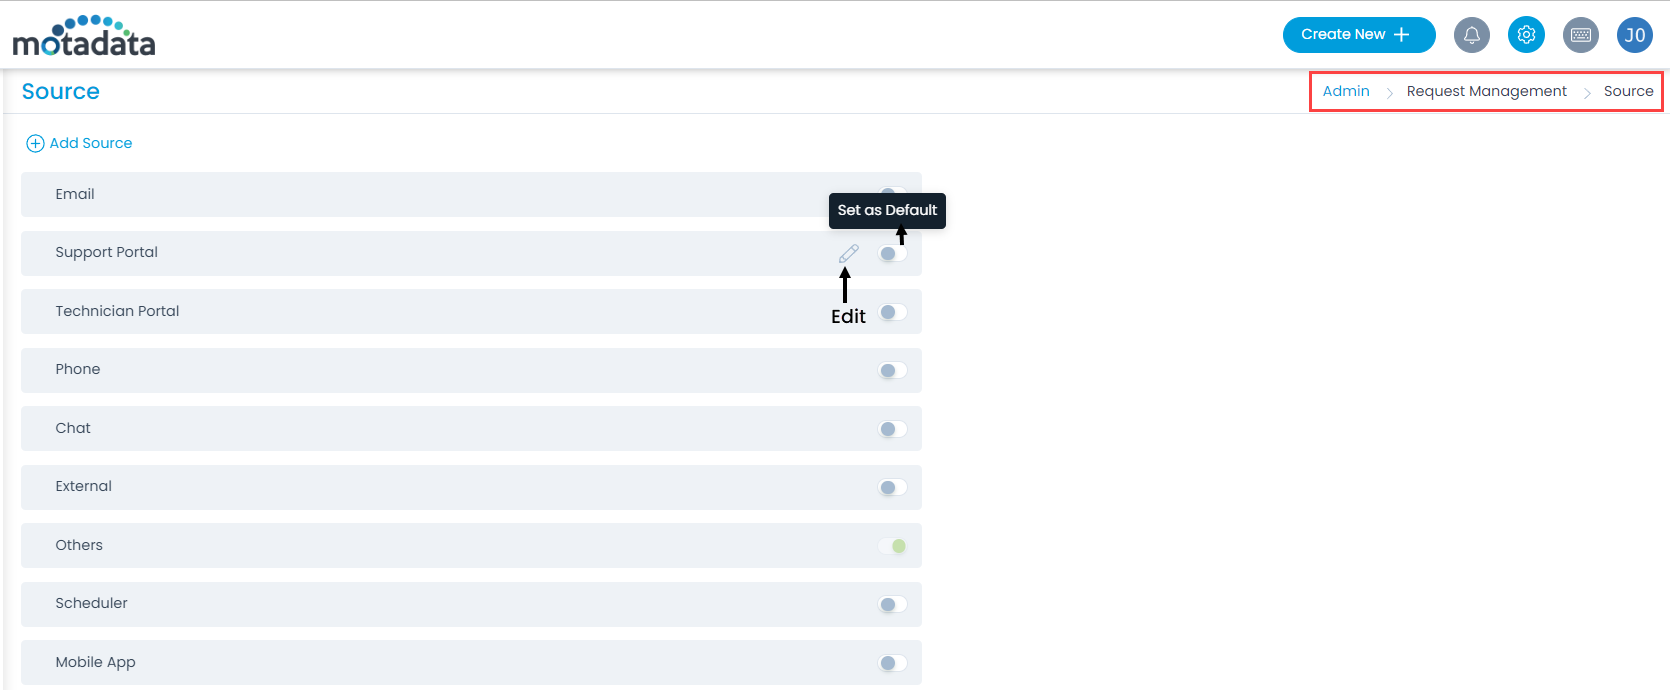
To view the Source page, navigate to Admin > Request Management > Source.

List of Sources
List of Sources

The page provides you the below options:

  • Add Source: You can add a source.
  • Re-order: You can re-order the source using drag and drop.
  • Set as Default: You can set a source as default by clicking on the toggle icon.
  • Edit: You can edit the source name.
  • Delete: You can delete the unwanted sources. A confirmation message appears. Click Yes to continue or Cancel to stop the process.

Add Source

To add a source, follow the below steps:

  1. Click the Add Source link and a dialog appears.
  2. Enter the name of the source and click the green correct symbol.
  3. Click Save Source.
  4. You can also add more source using the Add Source button.
  5. Once added, you can edit or delete it as per requirement.
Adding a Source
Adding a Source

Request Form Rules

The request form rules enable you to make fields (system and custom) mandatory/non-mandatory, show/hide, enable/disable, set/clear value, or show/hide options based on certain conditions in the request form. These rules are applicable at the time of request creation, edit, or both. This helps you to fetch the required details from the user.

To view the Request Form Rules, navigate to Admin > Request Management > Request Form Rules.

Request Form Rules
Request Form Rules

The page displays a list of already created rules along with the below options:

  1. Search: You can search for the required rule using keywords.
  2. Create Request Form Rule: You can create a request form rule.
  3. Enabled: You can enable or disable a request form rule. By default it is enabled. If disabled the rule will not be applied to the Request Form.
  4. Re-order: You can re-order the rule using drag and drop.
  5. Duplicate: You can create a duplicate rule based on the existing one.
  6. Edit: You can edit the rule to make some changes in it.
  7. Delete: You can delete the unwanted rules. A confirmation message appears. Click Yes to continue or Cancel to stop the process.

Create a Request Form Rule

To create a form rule, follow the below steps:

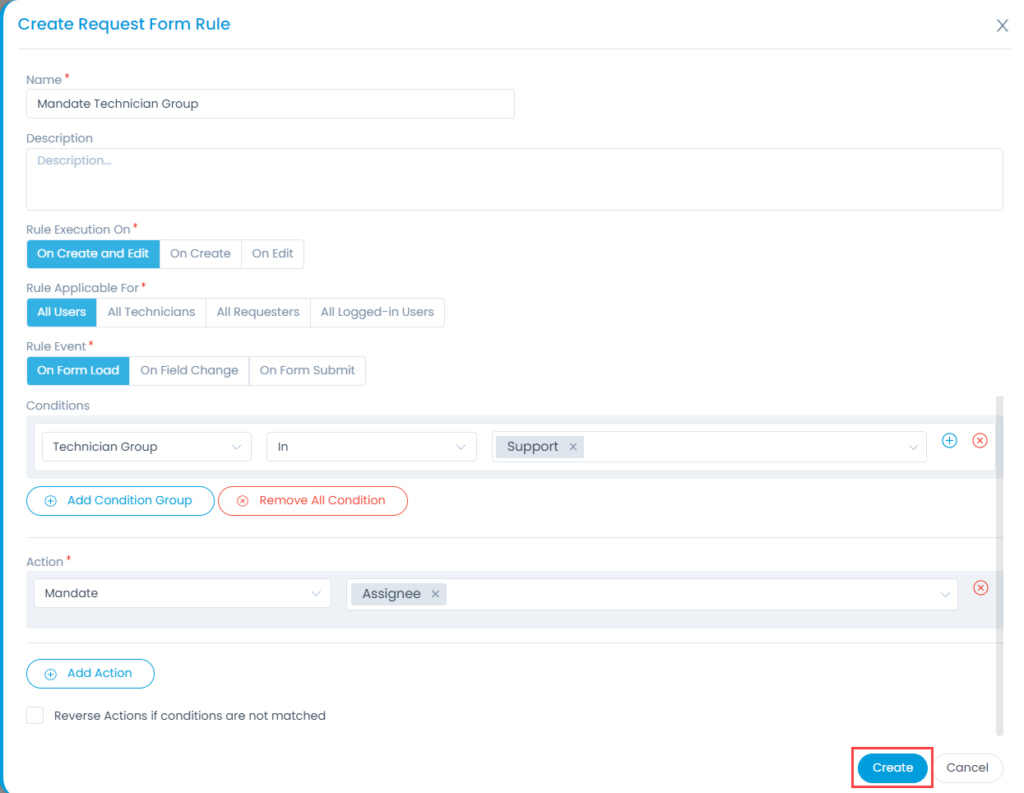
  1. Click the Create Request Form Rule button on the top-right corner of the page. A popup appears.
Create Request Form Rule
  1. Enter the following details:
    • Name: Enter the name of the Request Form Rule.
    • Description: Enter a short description about the Request Form Rule.
    • Rule Execution On: Select when you want to execute the rule. The options are:
      • On Create and Edit: Select if you want the form rule to execute at the time of creating or editing a request.
      • On Create: Select if you want the form rule to execute at the time of request creation only.
      • On Edit: Select if you want the form rule to execute at the time of editing the request.
    • Rule Applicable for: Select for whom the rule should be applicable. The options are: All Users, All Technicians, All Requesters, and All Logged-in Users.
    • Rule Event: Select on which event the rule should get executed. The options are:
      • On Form Load: Select to apply the rule when the form loads.
      • On Field Change: Select to apply the rule when the value of a field changes.
      • On Form Submit: Select to apply the rule when the form is submitted.
    • Conditions: Define the conditions here that will be evaluated in the request form to apply the rule. The conditions are grouped into Request Fields, Requester Fields, and Logged-in Users Fields. You can define multiple conditions here. All the conditions work in AND form. It means the rule is applicable only when all the conditions are true.
Adding Conditions in the Request Form Rule
    • Condition Parameter: Select a condition parameter from the dropdown list.
    • Operator: Select the operator: In/Not In from the dropdown list.
    • Value: Select the value for condition. You can select multiple values of which the first value will be displayed in full, followed by the count of all additional values selected.

You can also click the Add Condition Group button to add more conditions in the Request Form Rule. Click on Remove All Conditions to remove all the conditions of the Request Form Rule.

    • Action: Select the action and its value(s) for the selected conditions from the given list. In the below figure, the priority field will become mandatory if the Support Technician Group is selected in the request form. You can add more actions using the Add Action button.
Note: The Request Form Rule actions like hide, non-mandate, disable, and clear value may not work for System Fields like Subject, Requester, Status, etc. as their default property has higher priority.
Selecting Action and its Value
    • Reverse Actions if conditions are not matched: Enable if you want to reverse the actions when the conditions do not match in the request form. This is available only if Conditions are added.
  1. Once done, click Create.

Request Custom Rules

The custom rules help you to enforce the organization’s compliance while processing a request. Using these rules you can ensure that any change in the request attributes is supported by proper comments or notes. For example, a request should not move to the resolved state if there is no technician assigned to the request. Similarly, you can use custom rules to enforce the approval workflows and closing tasks to close a request.

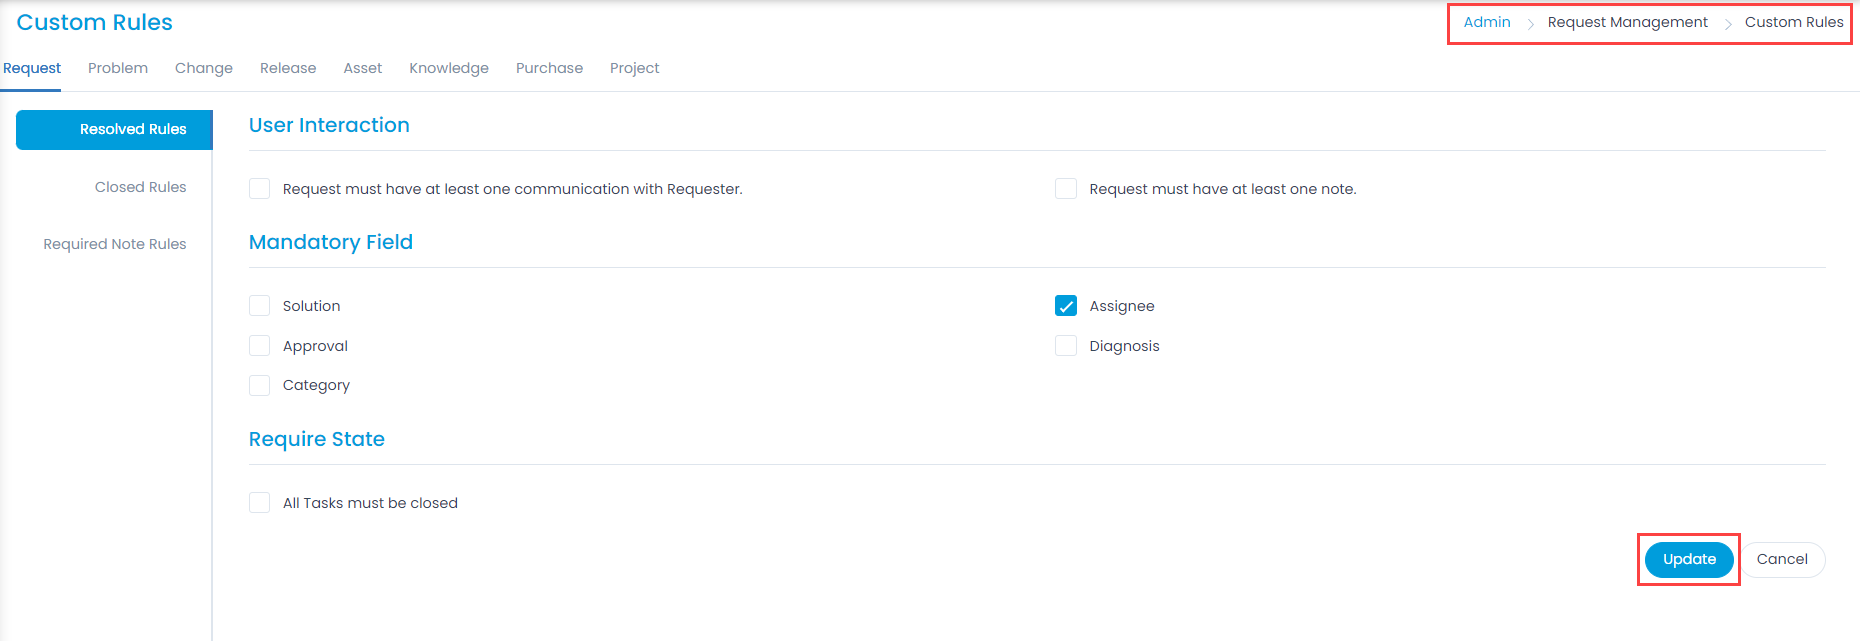
To view the Request Custom Rules page, navigate to Admin > Request Management > Request Custom Rules.

When Should Custom Rules be Enforced

For the request management module, the custom rules are evaluated when a technician tries to:

Resolve a Request: Check the items that should be enforced before resolving a request.

Rules to Resolve a Request
  • Close a Request: Check the items that should be enforced before closing a request.
Rules to Close a Request
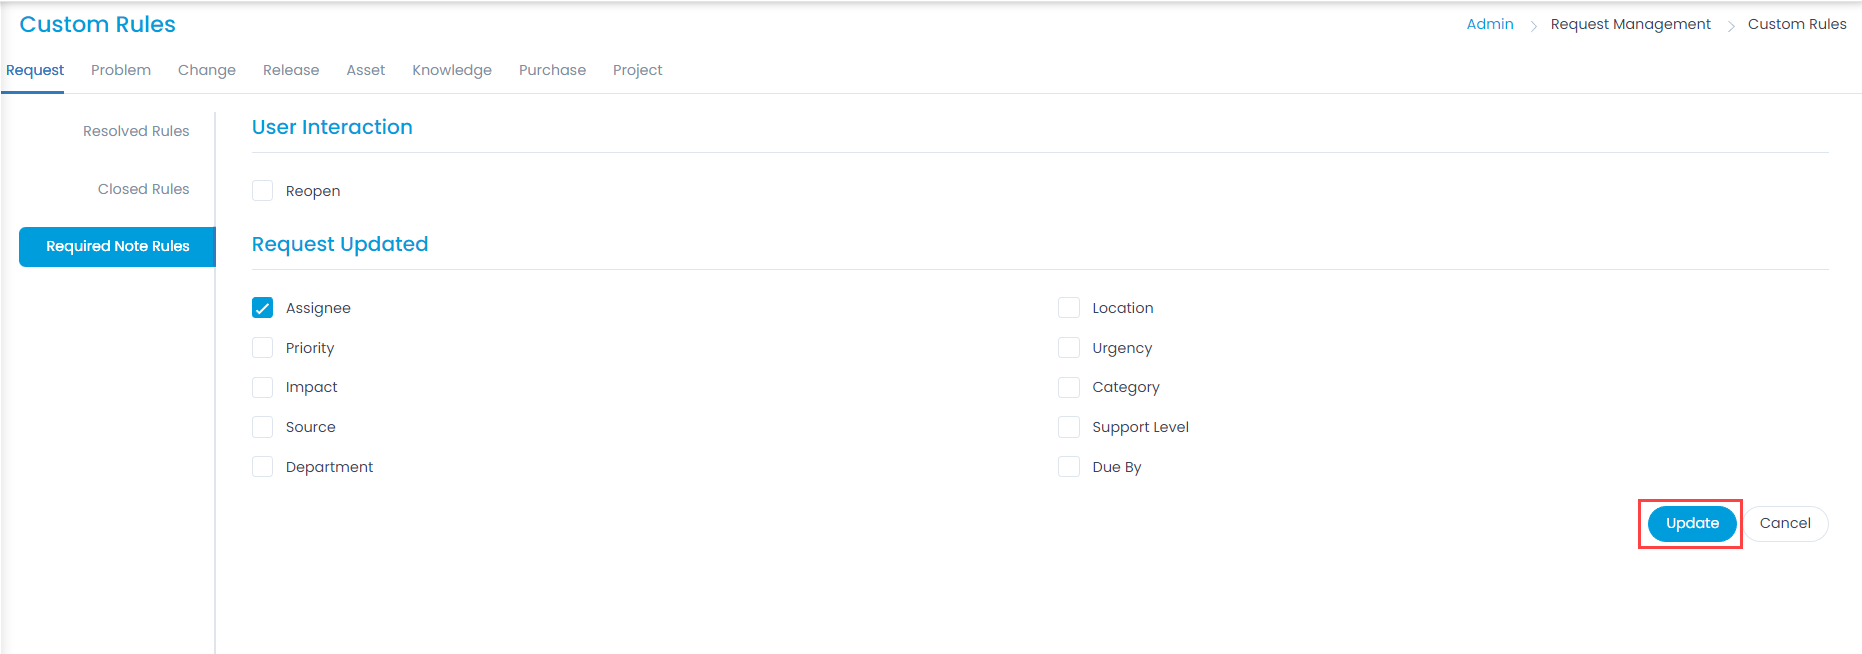
  • Required Note Rule: Check the items that should require a note before changing their values.
Fields that require a note before changing their values

Example Scenario: When there is no technician assigned and someone tries to close the request, the system gives a validation message, and does not allow to close it.

Example of Custom Rule in Request Management

Feedback Form

The feedback form is used to collect reviews about the service from the users. This helps the organization to understand, evaluate, and improve their services accordingly.

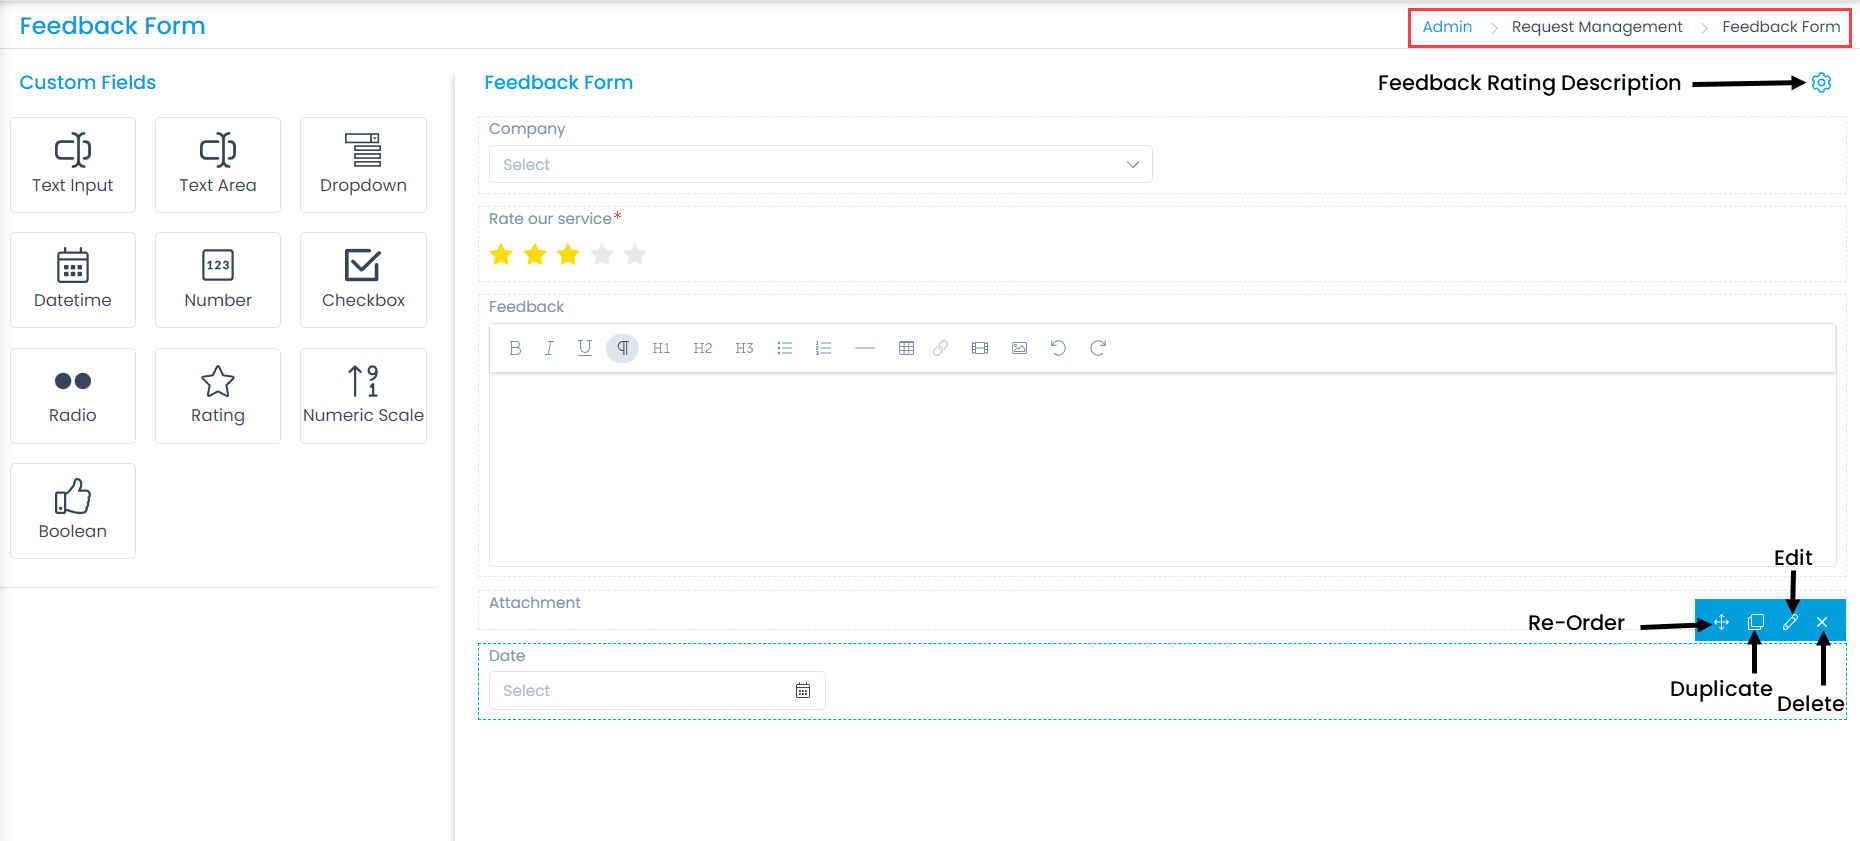
To view the Feedback Form page, navigate to Admin > Request Management > Feedback Form.

Feedback Form
Feedback Form

The page displays two types of fields:

  • Default Fields: These are the primary fields that come with the fresh installation. They can be edited but not deleted.
  • Custom Fields: These are the additional fields added from the pallet. They can be re-ordered, duplicated, edited, and deleted.

Here, you can customize the form using the below options:

  • Field Pallet: You can drag and drop the fields from the pallet to add into the form. Each field has different configurations. Configure the parameters according to your requirement. For more details on the field parameters, refer to the link Request Form.
  • Feedback Rating Description: You can edit the description of the feedback ratings.
  • Re-Order: You can drag and drop the fields to change the order of the form. This option is available for both: default and custom fields.
  • Duplicate: You can create duplicate fields from the custom fields. This option is available only for custom fields.
  • Edit: You can edit the fields, make them mandatory, or change their characteristics. For default fields, some of the options are restricted.
  • Remove: You can delete the custom fields and not the default ones.

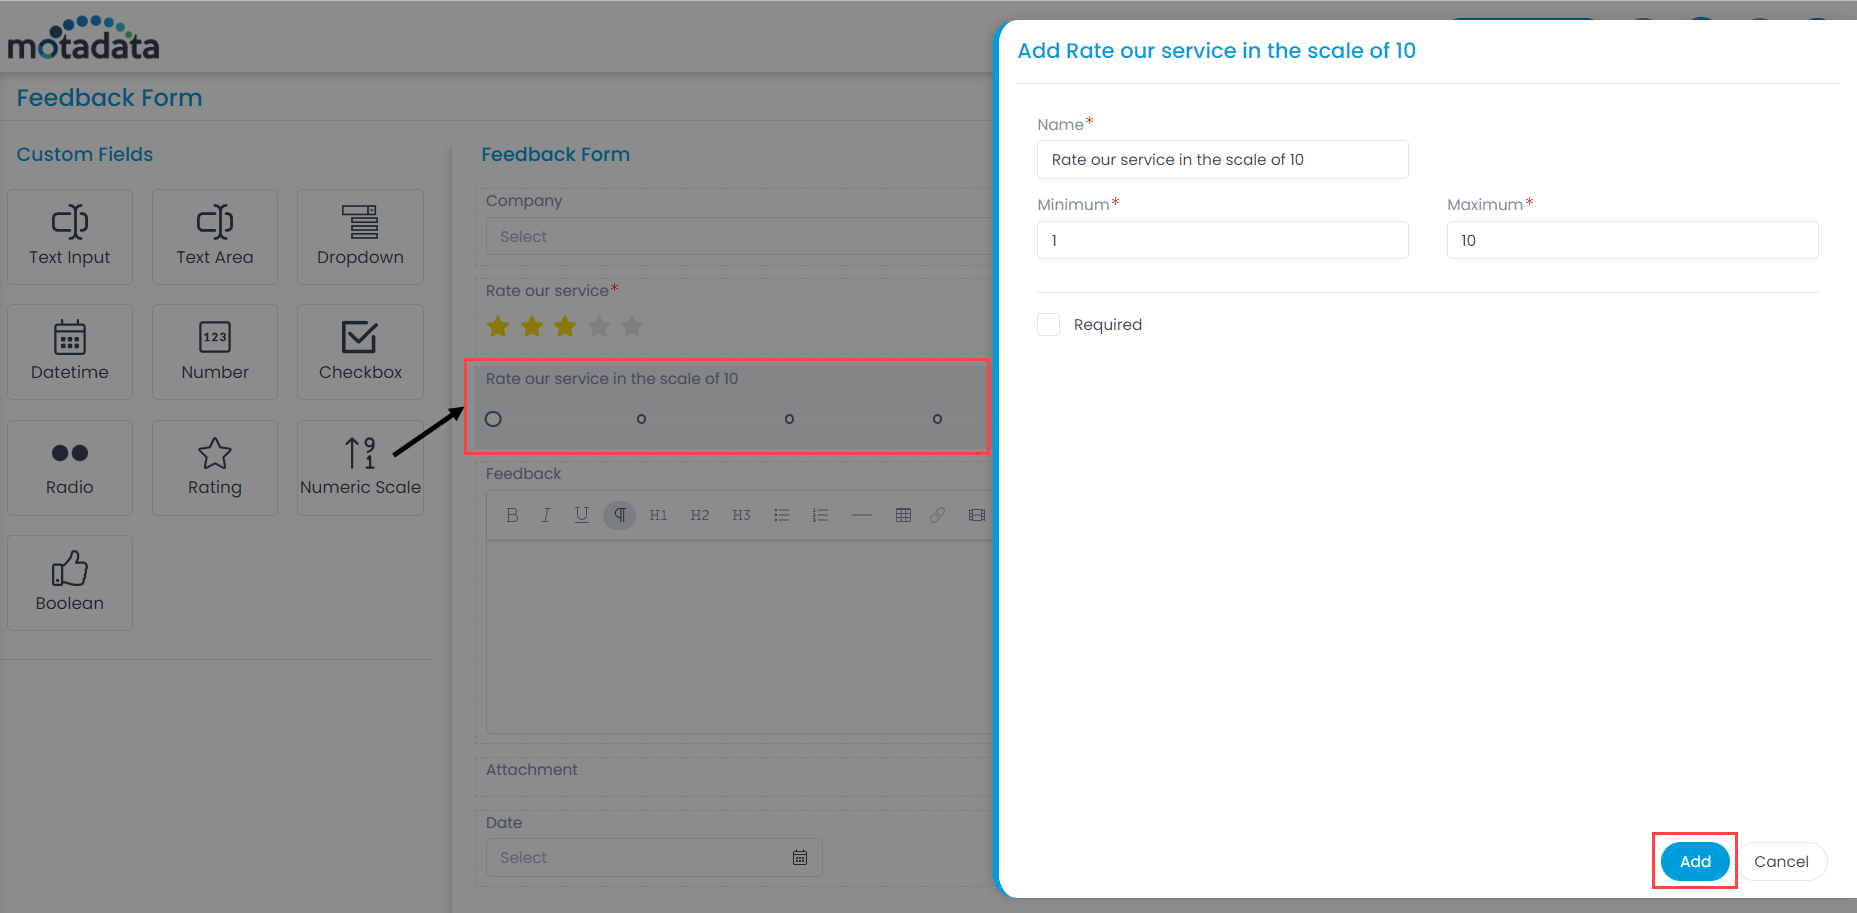
Example Scenario: For example, most of the Feedback Forms require a numeric scale. This is the scale by which a user has to rate the service in the scale of 1 to 10. The product services are improvised based on these types of feedback.

Numeric Scale

To add the Numeric Scale custom field, drag and drop it on the form in the right-hand side, and a popup appears.

Adding Custom Field in the Feedback Form

Enter the following details:

  • Name: Enter the name of the field.
  • Minimum Enter the minimum scale of the feedback.
  • Maximum: Enter the maximum scale of the feedback.
  • Required: Enable to make the field mandatory.

Once done, click Add. You can then re-arrange its location, create a duplicate field, edit, or delete it if required. Similarly, you can add other custom fields.

Rating

Add this field when a rating is required from the user.
The details are:

  • Name: Enter the name of the field.
  • Rate Options Select the number of stars that you want to display in the feedback form to ask for rating. You can select from 1 to 10. For example, If 5 is selected, 5 stars will appear in the feedback form, and the user is required to provide the rating accordingly.
  • Required: Enable to make the field mandatory.

Boolean

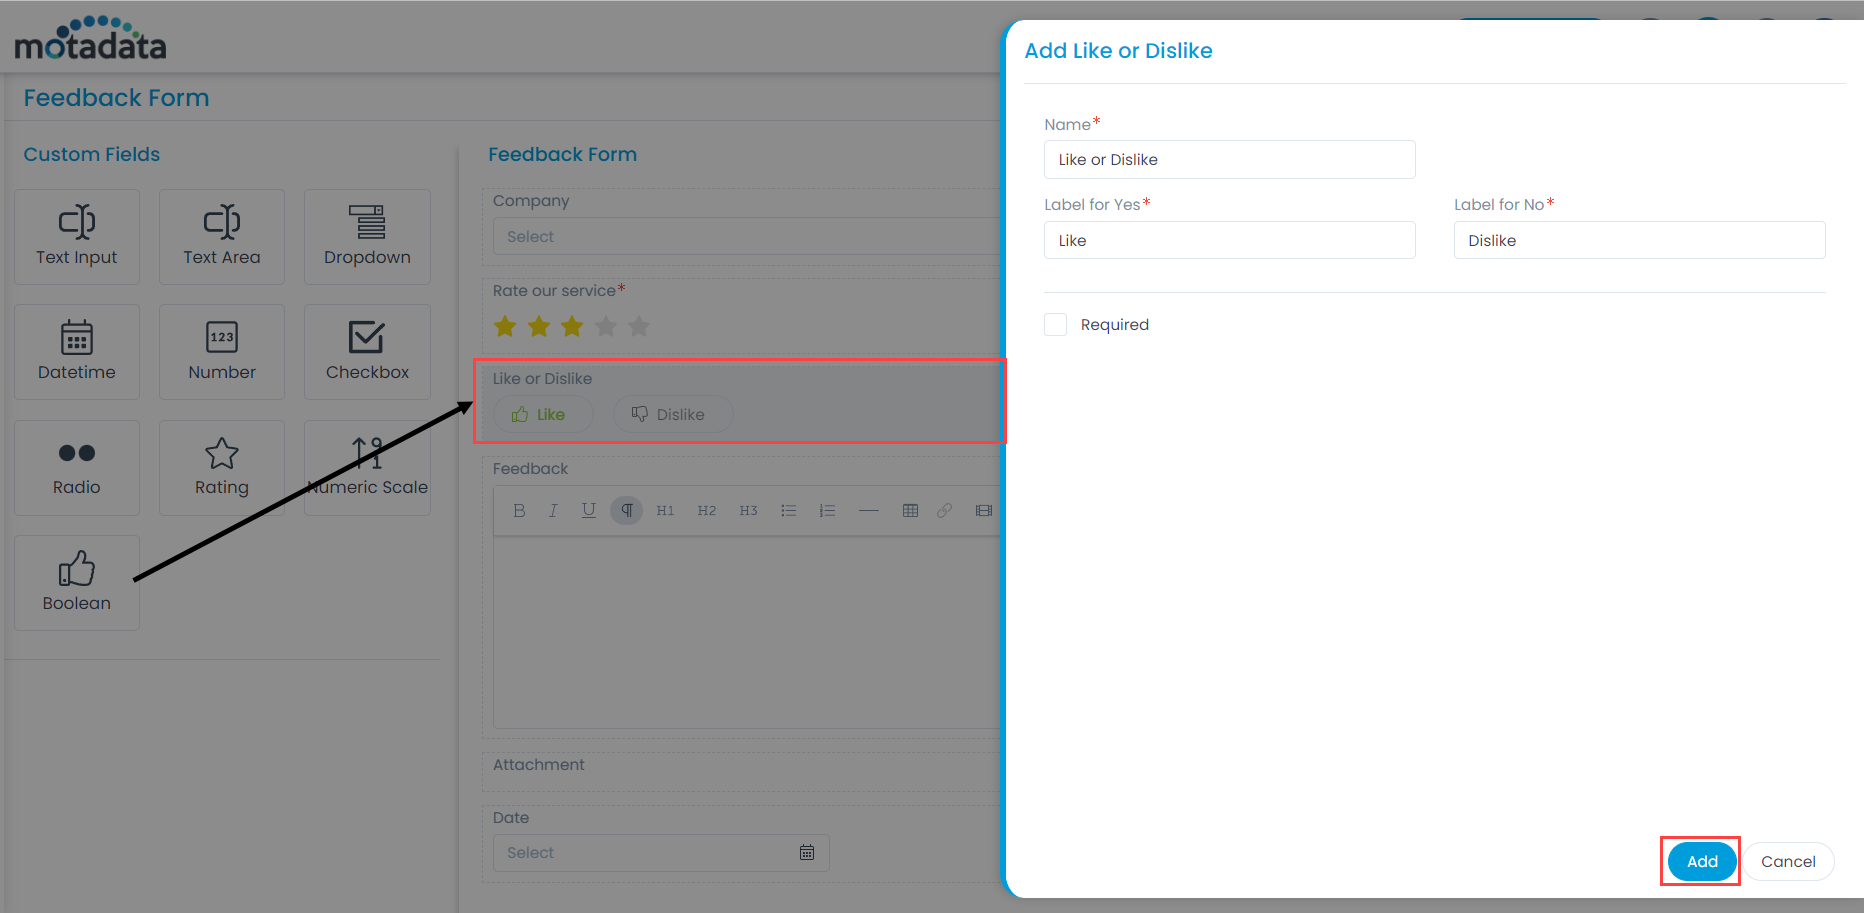
Add this field when yes or no type of feedback is required from the user.
The details are:

  • Name: Enter the name of the field.
  • Label for Yes: Enter the label for yes. For example: Like
  • Label for No: Enter the label for no. For example: Dislike
  • Required: Enable to make the field mandatory.
Adding Boolean Field in the Feedback Form

Feedback Rating Description

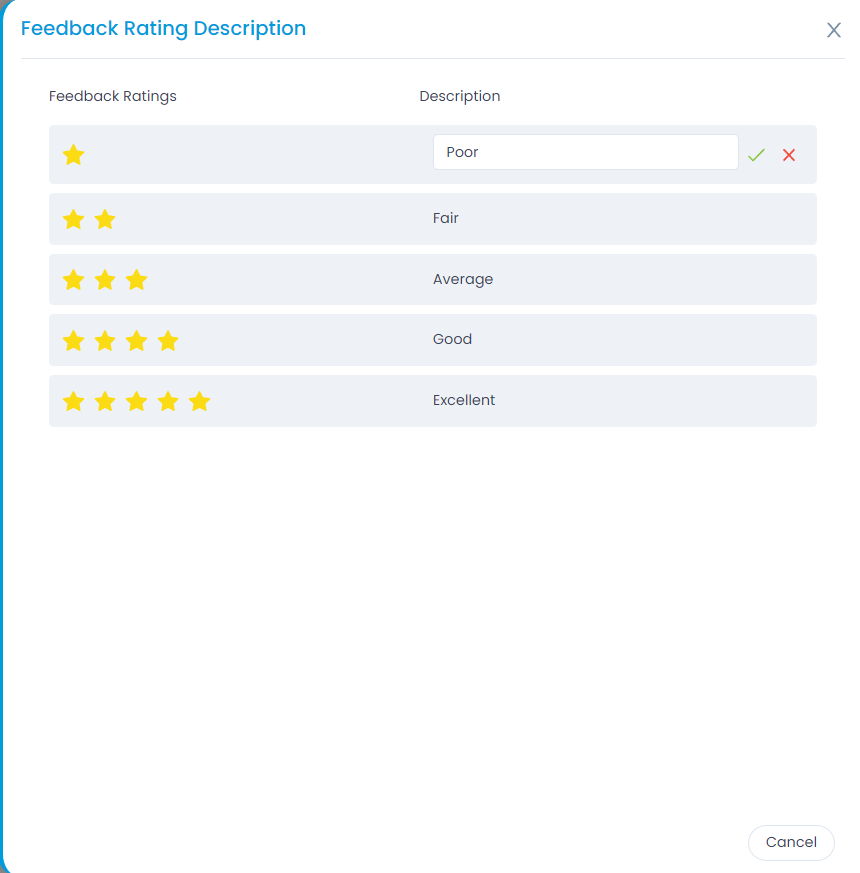
This option enables you to define the description of the ratings. The default descriptions are: Poor, Fair, average, Good, and Excellent. You can edit them as per your requirement.
To edit the description, click the Edit icon, change the description, and click Update (the green correct symbol).

Editing the Feedback Rating Description

Request Templates

Templates are readymade forms which can be used while filling up the request form. The user only needs to select them and the form will get automatically filled. These are convenient when a request is of standard or recurring type. The advantages of using a template are:

  • Creating a request using template saves a lot of time.
  • The templates ensure that proper and sufficient information is available in the request.
  • The request parameters like priority, urgency, assignee can be predefined in the template.

To view the Request Templates, navigate to Admin > Request Management > Request Templates > Request.

Request Templates Menu

Here, you can create and manage templates for Request, Problem, Change, and Release modules.
Also, it has the below options:

  • Create Template: You can create a template from the scratch.
  • Duplicate: You can create a duplicate copy of a template to make some changes in it and use. This has two benefits: 1) If you are creating a new template similar to the existing one, you do not need to start from the scratch. 2) If you are modifying the existing one, the original works as a backup in case of errors.
  • Edit: You can edit the template to make changes in it.
  • Delete: You can delete the unwanted templates. A confirmation message appears. Click Yes to continue or Cancel to stop the process.

Create Template

To create a template, follow the below steps:

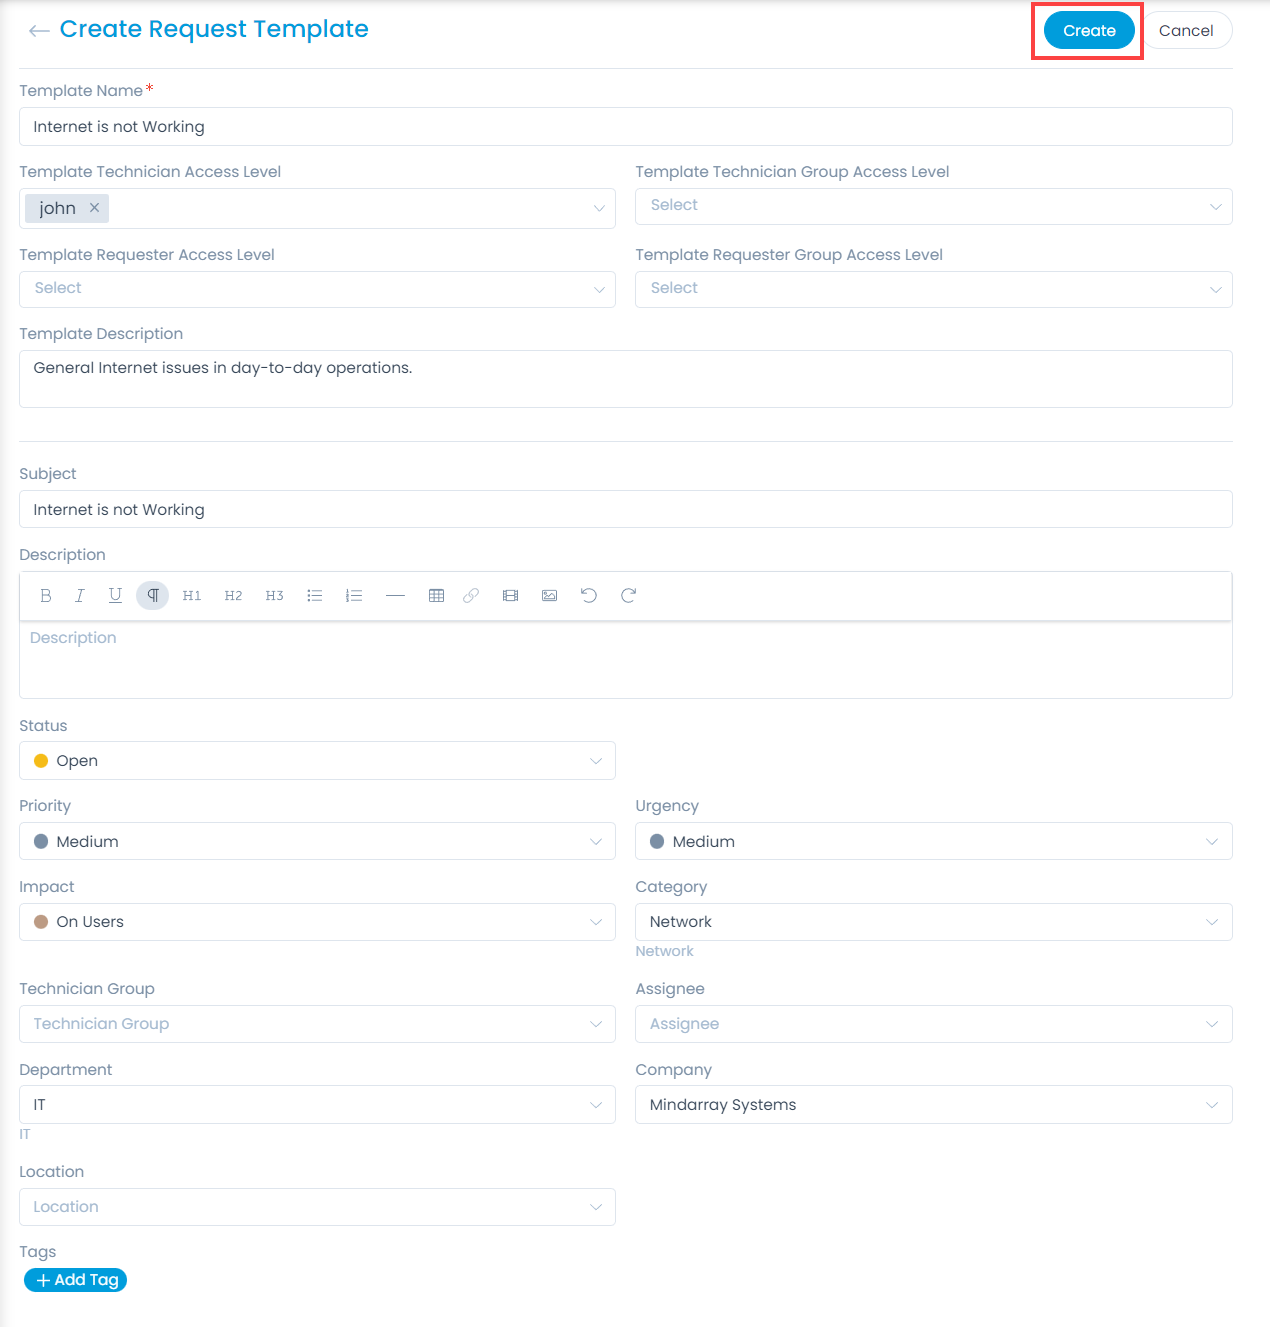
  1. Click the Create Template button on the top-right corner of the page. The Create Request Template page appears.
Create Request Template
  1. Enter the below details:
    • Template Name: Enter the name of the template.
    • Template Technician Access Level: Select the technician(s) who can access the template.
    • Template Technician Group Access Level: Select the technician group(s) who can access the template.
    • Template Requester Access Level: Select the requester(s) who can access the template.
    • Template Requester Group Access Level: Select the requester group(s) who can access the template.
    • Template Description: Enter a brief description about the template.
    • Subject: Enter the subject of the request.
    • Description: Enter the description of the request.
    • Status: Select the status of the request.
    • Priority: Select the priority of the request.
    • Urgency: Select the urgency of the request.
    • Impact: Select the impact of the request.
    • Category: Select the category to which the request belongs.
    • Technician Group: Select the technician group for the request.
    • Assignee: Select the assignee if you want to assign the request to a specific person.
    • Department: Select the department if you want to assign the request to a specific department. Else, leave it blank.
    • Company: Select the company if you want to assign the request to a specific company.
      Note: This field is available only if the Managed Services Provider feature is enabled.
    • Location: Select the location if you can find the location from the dropdown. Else, leave it blank.
    • Tags: You can add tags if you want. It will help you in identifying the similar requests. You can leave it blank.
  2. Once all the details are filled, click Create. The template will become available to the users in the Fill From Template dropdown at the time of request creation. Similarly, you can create templates for Problem, Change, and Release modules.

Request Category

Categories enable you to bring the similar requests under a single group. This helps the technicians in filtering out the required requests easily and quickly from a huge list. The system provides the below categories by default:

  • Software
  • Hardware
  • Network
  • HR
  • Other

To view the Request Category page, navigate to Admin > Request Management > Request Categories > Request tab.

Request Category Menu

Here, you have the below options. All these options are common in Request, Problem, Change, and Release tabs.

  • Add Category: You can add a category.
  • Import Categories: You can import a list of categories in bulk.
  • Re-Order: You can re-arrange the order of the category in the list using drag and drop. You can also re-order the sub categories.
  • Category Configurations: You can configure the settings for request creation.
  • Add Sub Category: You can add a sub-category.
  • Edit: You can edit the category name.
  • Delete: You can delete the category if not required. A confirmation message appears. Click Yes to continue or Cancel to stop the process.

Add Category

To add a category, follow the below steps:

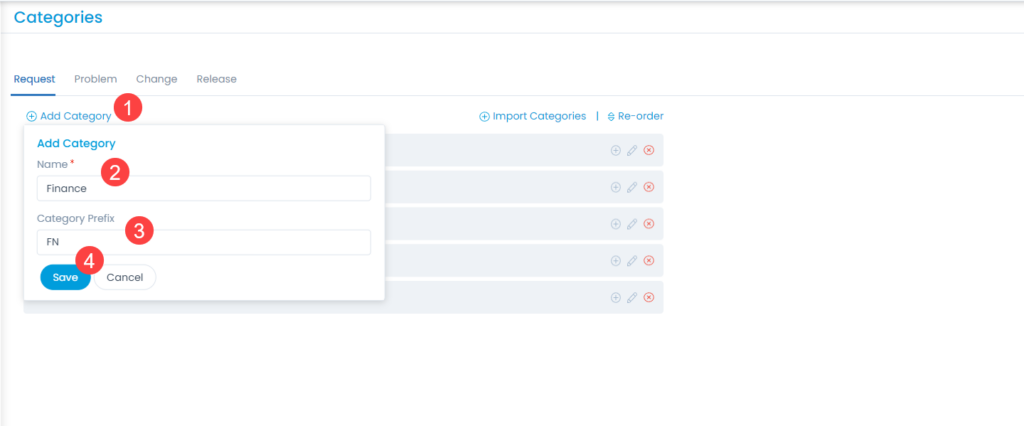
  1. Click the Add Category link and a popup appears.
Adding Category
Adding Category
  1. Enter the Name of the Category.
  2. Enter the Category Prefix.
  3. Click Save. Similarly, you can add problem, change, and release categories as well.

Add Sub Category

To add a sub category, follow the below steps:

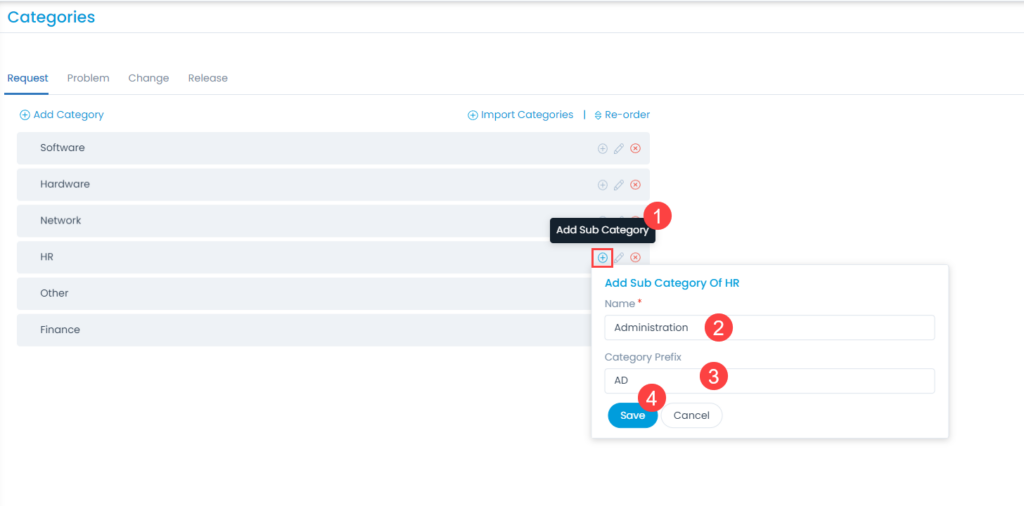
  1. Click the Add Sub Category icon next to the required category and a popup appears.
Adding Sub Category
Adding Sub Category
  1. Enter the Name of the Sub Category.
  2. Enter the Category Prefix.
  3. Click Save. Similarly, you can add problem, change, and release sub categories as well.

Import Categories

This option allows you to import the categories of Request, Problem, Change, and Release modules in bulk. To do so,

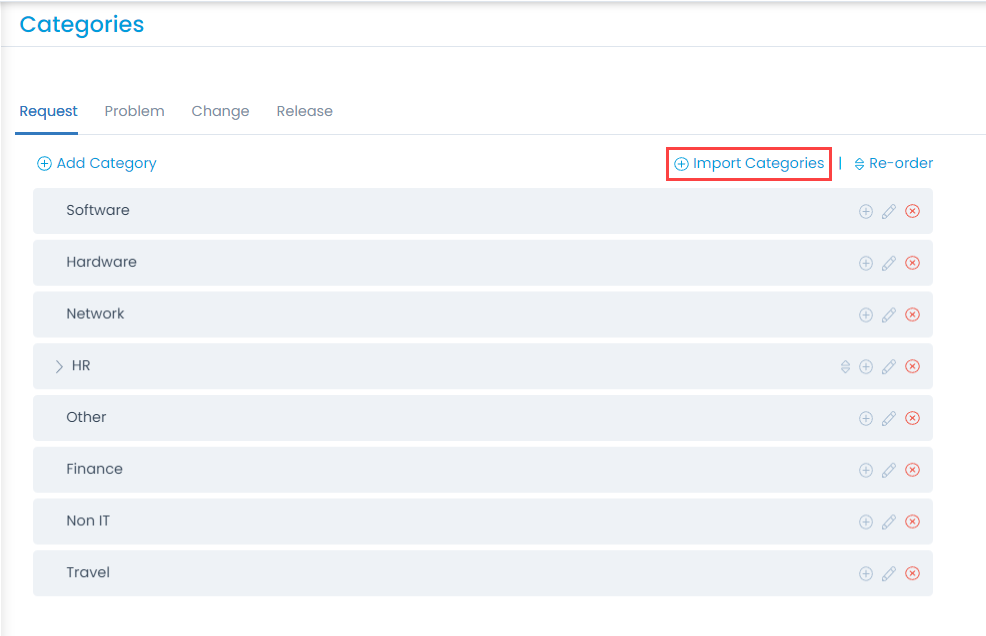
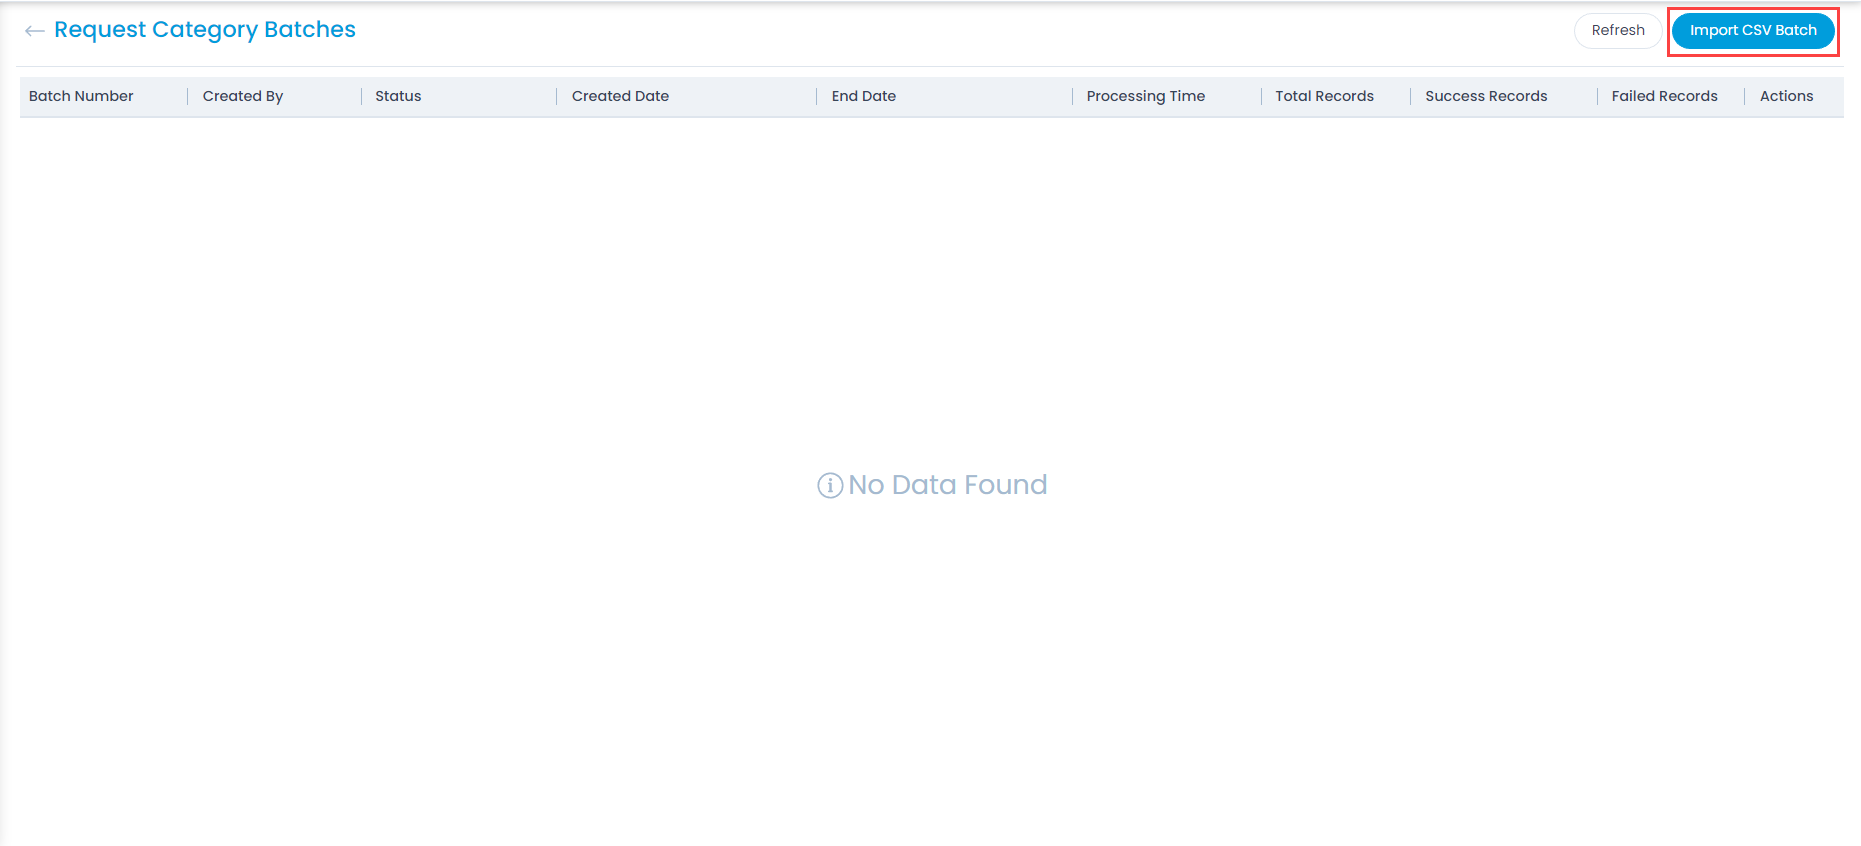
  1. Click the Import Categories link. The Request Category Batches page appears.
  2. Click the Import CSV Batch button.
Import Categories Link
Import CSV Batch
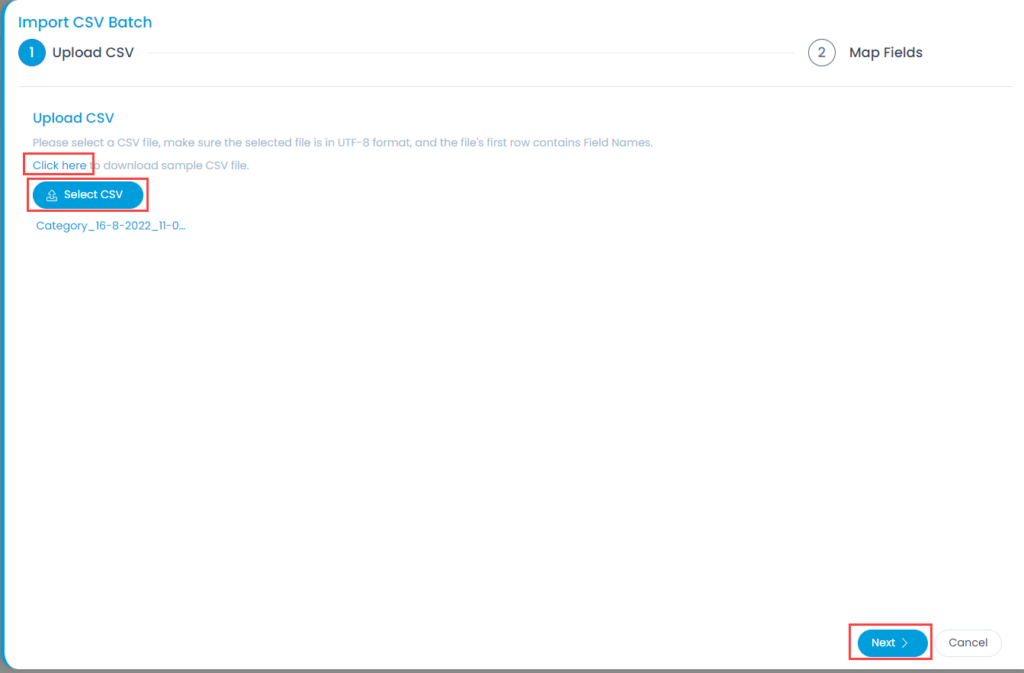
Import CSV Batch
  1. Select the .csv file if you already have it filled with the respective fields. If not, select the new .csv file using Click Here and fill the respective details. Once the file is uploaded, click Next.
Select .CSV File
Select .CSV File
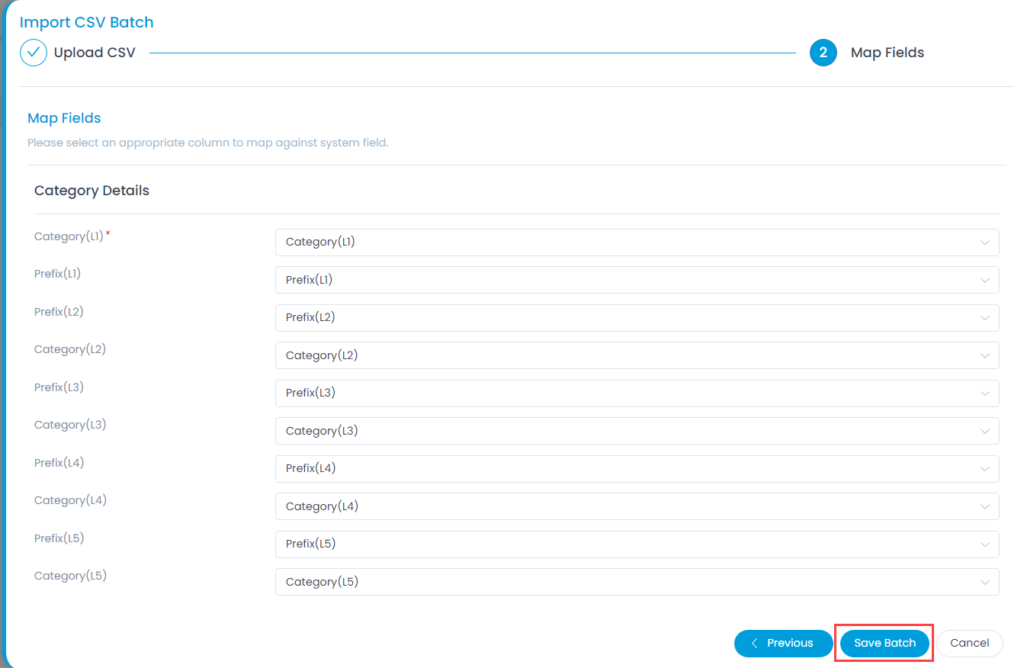
  1. Map the fields as per the requirement. By default it is mapped, only in case of removal/change of some parameters mapping is necessary, and click Save Batch.
Map Fields
Map Fields
  1. The Request Category Batches page appears. It displays the status of the import along with the details like processing time, total records, success records, failed records, etc. as shown below. Once successful, the imported categories will appear in the category list page.
Imported CSV Batches

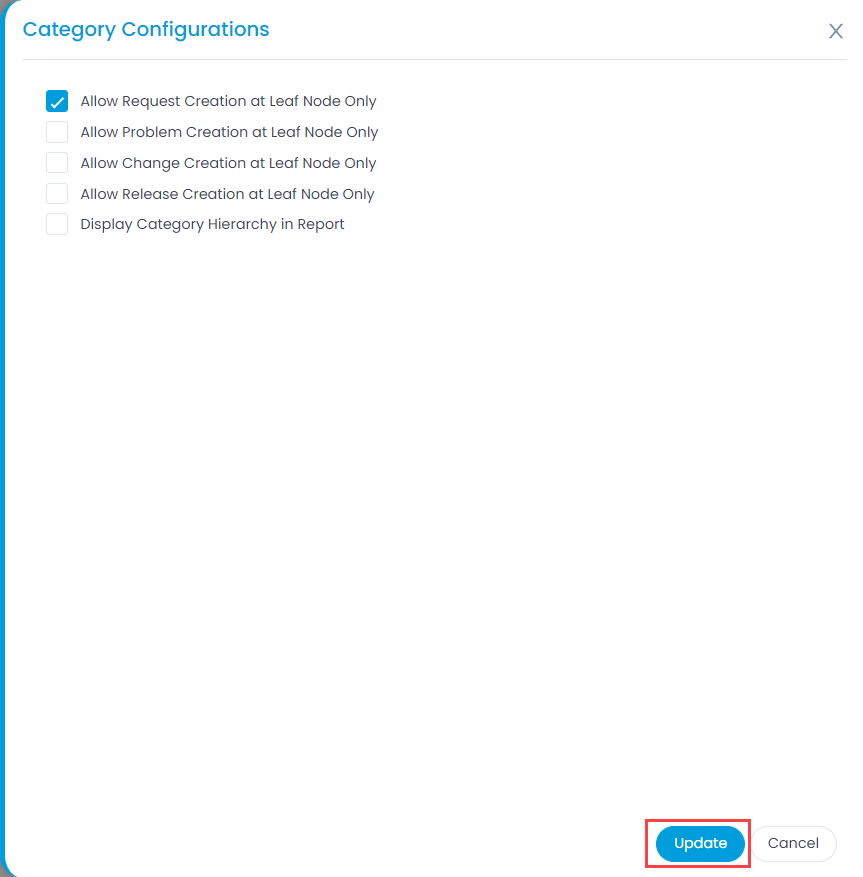
Category Configurations

These are the flags which when enabled helps in the creation of Request, Problem, Change, and Release at the Leaf Node level only.

Here, you can also enable the flag for displaying the Hierarchy of Category in the Report.

Category Configurations

Email Command Settings

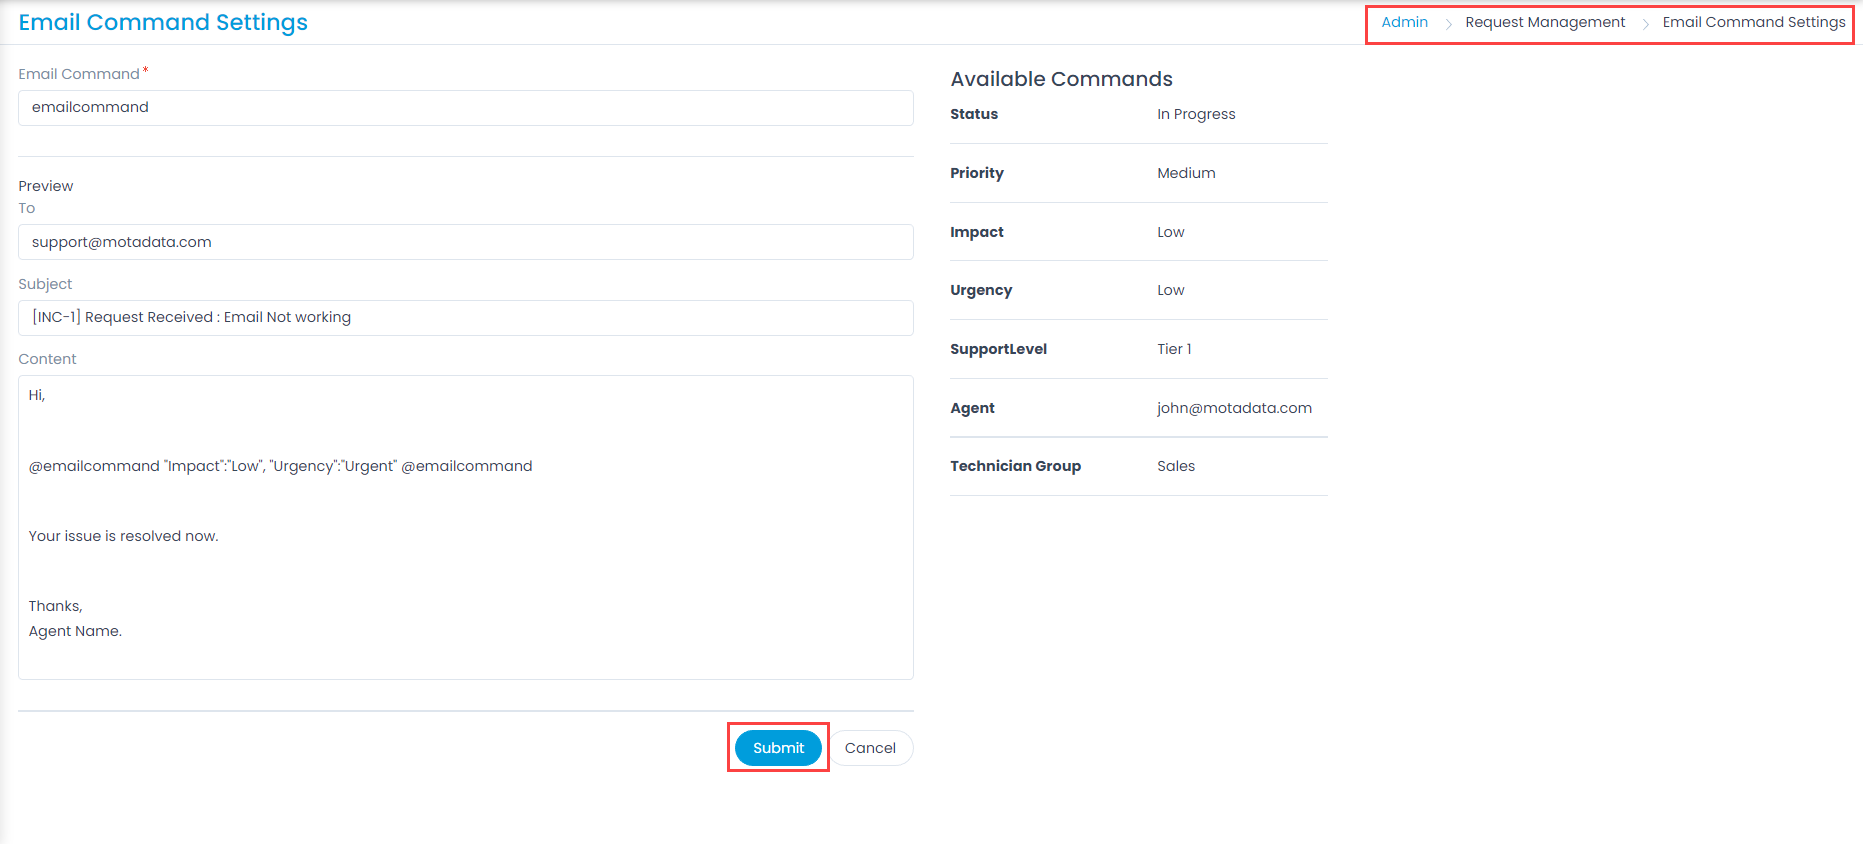
This page enables to set the command using which the technicians can change the request details by sending an email. Using this the technicians do not need to login to the ServiceOps Portal for updating request details. They can change the details that are present in the Available Commands section on the right-hand side.

For example: If a technician “Sam” wants to change the status of a ticket without logging into the SerivceOps Portal, he can do this by using the command in the email content, and sending it over the email address configured in the Incoming Email Servers.

Note: The technician needs to have the required roles and permissions to change any of the parameters.

To view the Email Command Settings page, navigate to Admin > Request Management > Email Command Settings.

Email Command Settings

The Subject and Content section of the page gives you a preview of how to format an email to change a Request. The Request ID is required in the subject section. Whatever you write in the email body, other than the command line, appears under Collaborate in the Request Details page.

Response Templates

Response Templates are used to send standard responses to the requests. Using this you can instantly send the response without wasting time in thinking and typing the email. These kind of templates are generally used in the auto-generated emails of acknowledgement or notification.

To view the Response Templates page, navigate to Admin > Request Management > Response Templates.

Response Templates Page

Here, you can do the below tasks:

  1. Search: You can search for the required template using keywords in the search field.
  2. Create Response Template: You can create a response template as per your requirement.
  3. Enable or Disable the Template: You can enable or disable the required template. If enabled the template will be available for selection in the Request Details page while replying to the request. If disabled, the template will not be available.
  4. Edit: You can edit the response templates.
  5. Delete: You can delete the templates if not required. On clicking, a confirmation message appears. Click Yes to continue or Cancel to stop the process.

Create a Response Template

To create a response template,

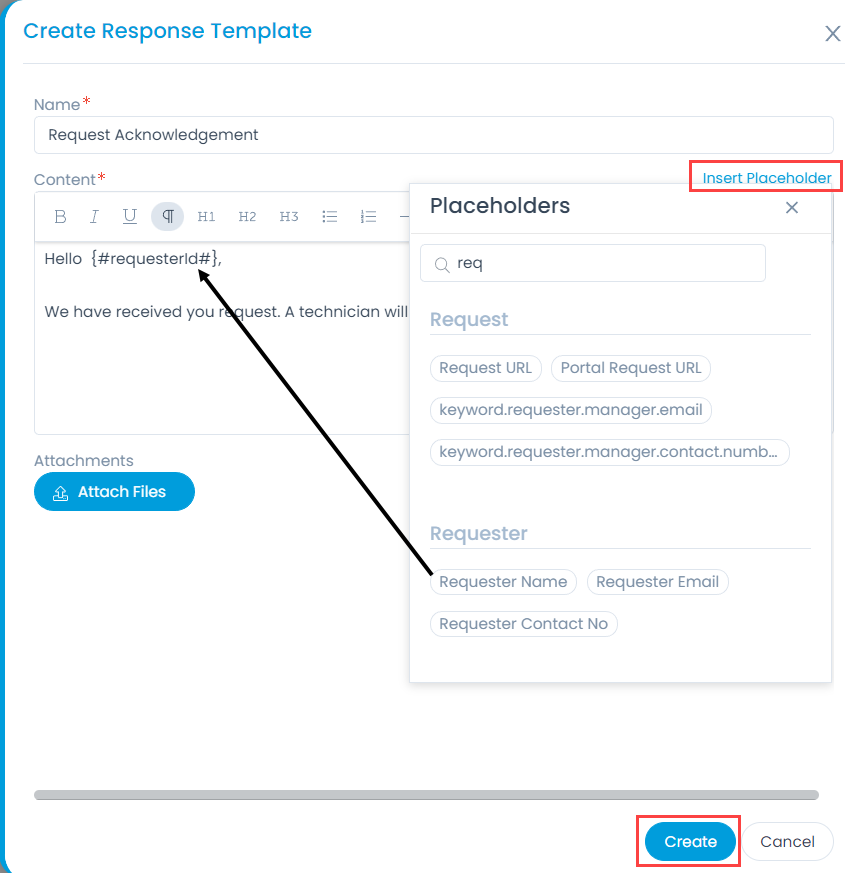
  1. Click the Create Response Template button and a popup appears.
Create Response Template
  1. Enter the below details:
    • Name: Enter the name of the template:
    • Content: Type the content of the template. You can also insert a placeholder in the content using the Insert Placeholder link. By default, all the templates have necessary placeholders available to provide request specific information. As an admin, you can add more placeholders based on the recommendations from the technicians. To add or remove a tag, edit the desired template, and use the insert placeholders.
      Note: You can only use the placeholders available in the list and cannot create the new ones.
    • Attachments: You can also attach any attachments if required.
  2. Once the details are filled, click Create.

Request Feedback Settings

The admin can configure the feedback settings to ask for requester’s comments to measure the quality of service and overall experience of the users. When a request is resolved or closed, the system sends an email to the requester with the feedback form link. This link redirects the requester to the feedback form in the system.

To view the Request Feedback Settings page, navigate to Admin > Request Management > Request Feedback Setting.

Feedback Settings
Feedback Settings

The page provides the below options:

  • Resolved: You can send the feedback link when a request is resolved.
  • Closed: You can send the feedback link when a request is closed.
  • Send Feedback Manually: You can allow the technician to send the feedback link manually and not automatically.

Related Topics

Priority Matrix

Priority is a method to set the importance of a Request ticket. Based on this value, the technicians resolve the tickets. A Technician can set the Priority of a Request manually or automatically using the Priority Matrix feature. Here, you can define the priority based on the urgency and impact values of the request. The priority is set at the time of creating a request when no value is configured.

To view the Priority Matrix page, navigate to Admin > Request Management > Priority Matrix.

Priority Matrix
Priority Matrix

The Priority Matrix is a matrix with the column head having the Urgency values and rows having the Impact values. Based on the urgency and impact set, the matrix defines an appropriate value of the priority field. The priority matrix works when it is left blank while creating a request. For example: When the urgency is ‘Medium’ and impact is ‘On Business’, the system will automatically set the priority of the request as ‘High’. You can override this value, by clicking on it, and choosing a new value.

To set the request priority automatically, enable this feature. Once enabled, the value will get set automatically, and the “Priority” field will be unavailable while creating requests.

To set the request priority manually, disable this feature. Once disabled, the field will be available for configuration while creating requests.