Priority

Priority determines the order of importance in which the tickets should be handled. Higher the priority the higher is the importance of the ticket. Lower the priority the lower is the importance of the ticket.

To view the Priority page, navigate to Admin > Organization > Priority.

Here, you can manage the priority of the tickets. Also, you can edit the priority names, set any value as default, and change the color pallets of the priority values as per the organization’s theme.

Manage Priority
Manage Priority

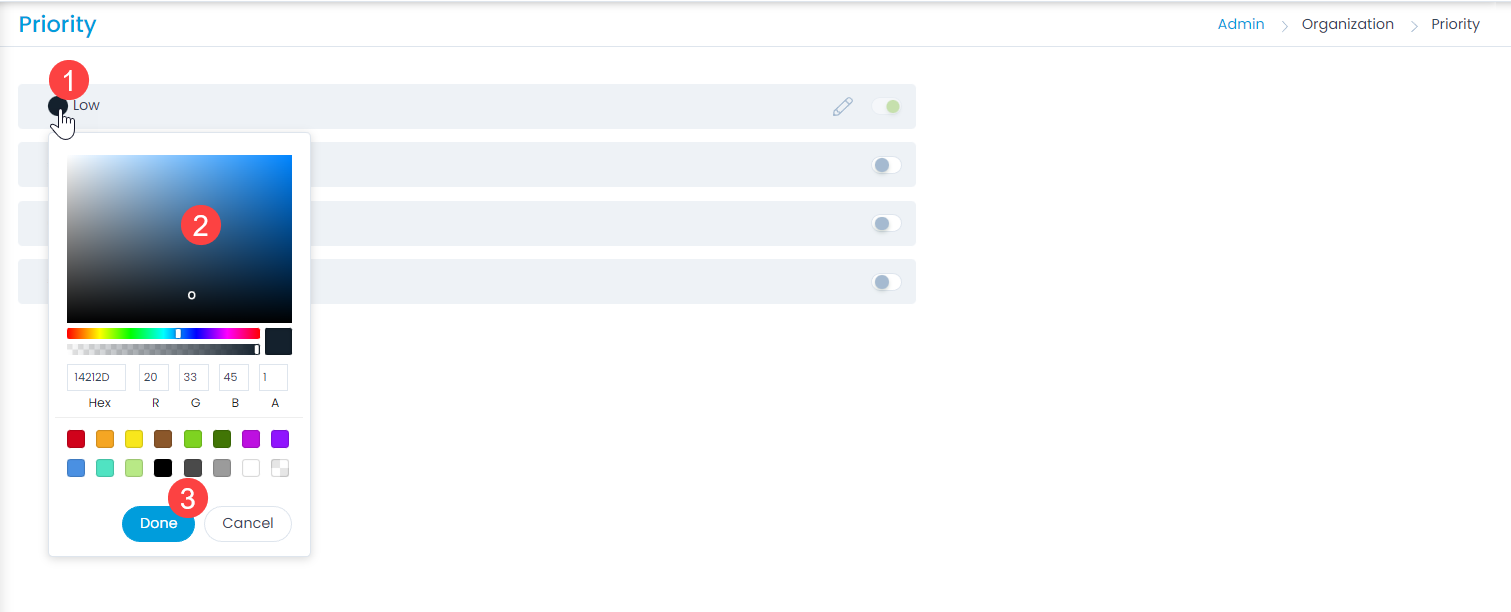
Changing the Color

To change the color,

  1. Click on the color of the desired priority and a color pallet appears.
  2. Select the color or enter the hexadecimal code.
  3. Click Done.
Changing the Priority Color

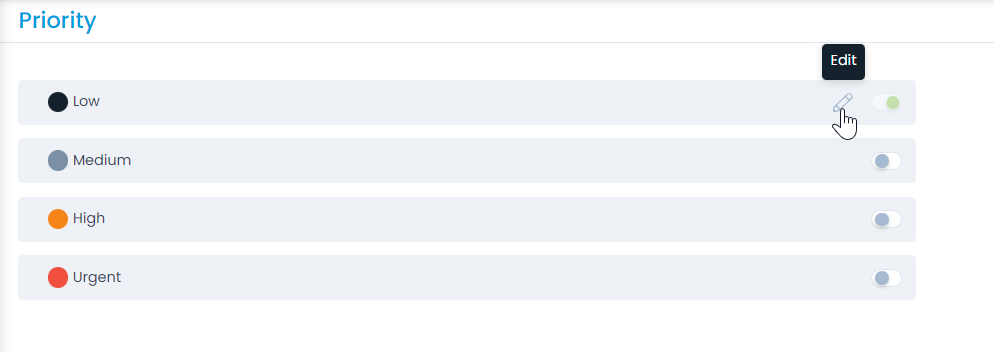
Editing the Priority Value

To edit the Priority value,

  1. Click the Edit icon next to the desired priority.
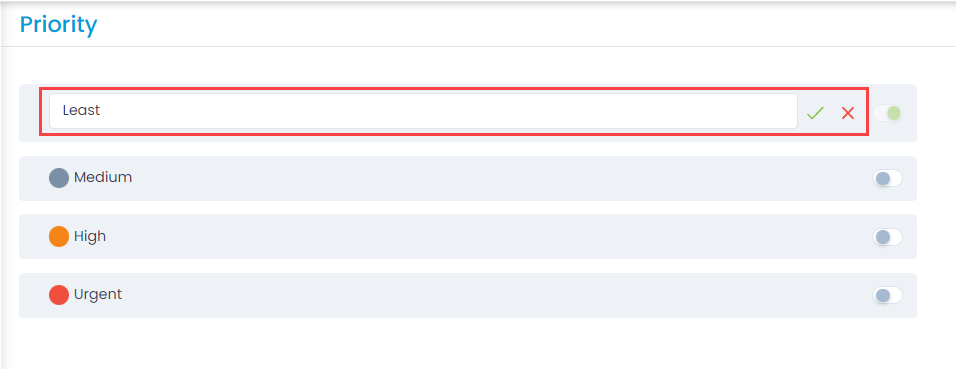
  2. Edit the value.
  3. Click the Correct (Green) symbol.
Edit Priority Option
Edit Priority
Edit Priority

Security

Security deals with securing the application from inside and outside threats. This section enables you to view the different audit logs, user sessions as well as configure the various security policies. You can also blacklist certain IP Addresses from accessing the ServiceOps Portal.

To view the Security page, navigate to Admin > Organization > Security.

It consists of the following tabs:

  • Configuration Audit
  • Tenant Audit
  • Operation Audit
  • Password Policy
  • User Security
  • User Sessions
  • IP Address Restriction

Configuration Audit

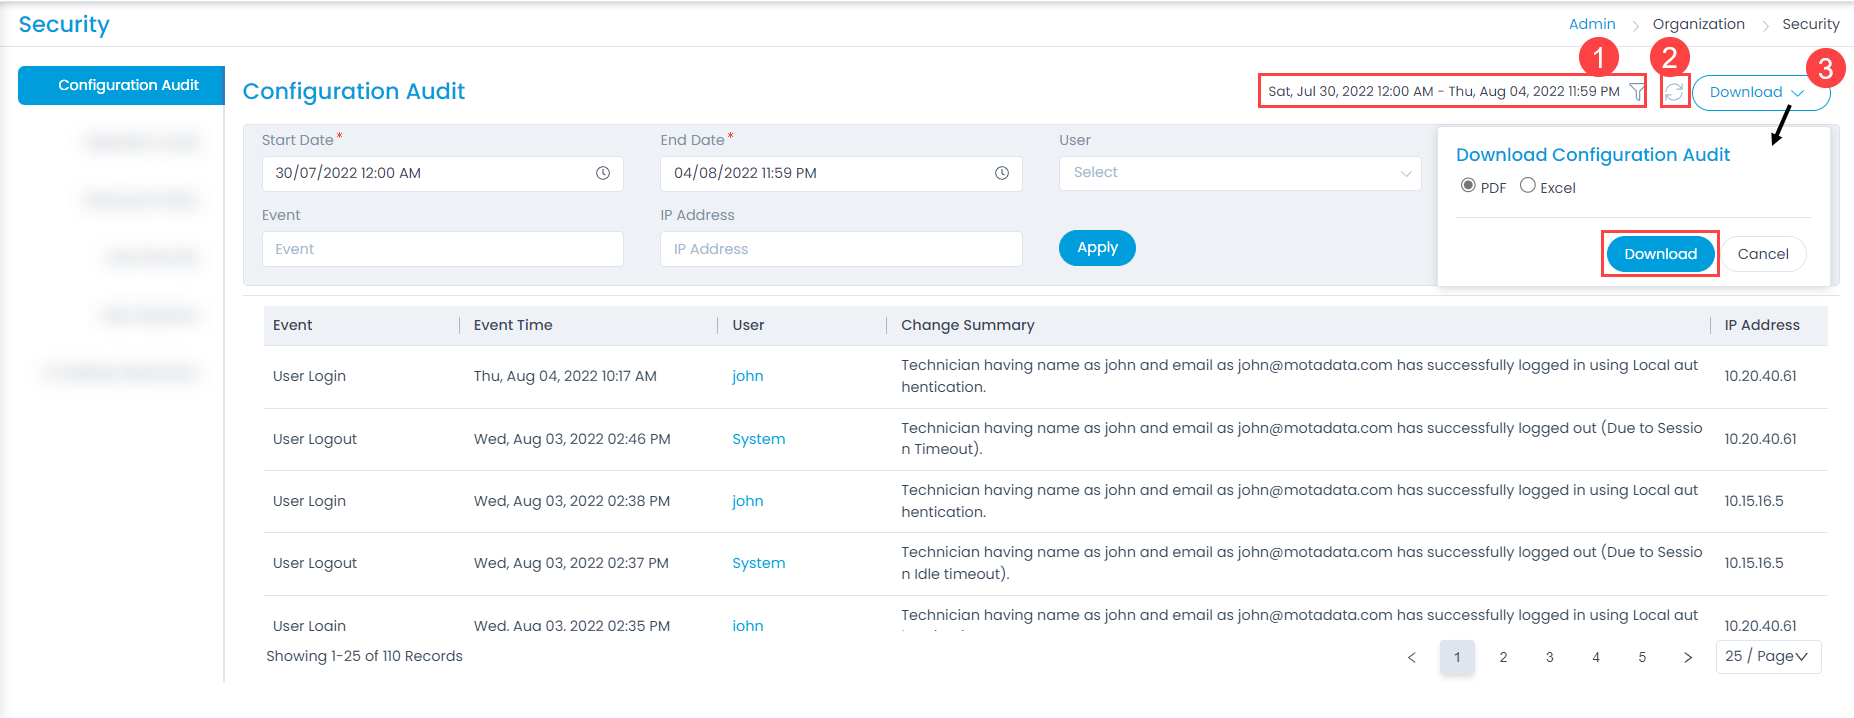
This tab displays the configuration summary along with the audit logs about all the technical changes. You can also download the summary in PDF or Excel format if required.

Configuration Audit
Configuration Audit

From this page, you can perform the below tasks:

  1. Filter: You can select the date range, user, event, and IP Address based on which the log data is to be filtered.
  2. Refresh: You can refresh the log list to sync and get the latest activities.
  3. Download: You can download the summary in PDF or Excel format.

Tenant Audit

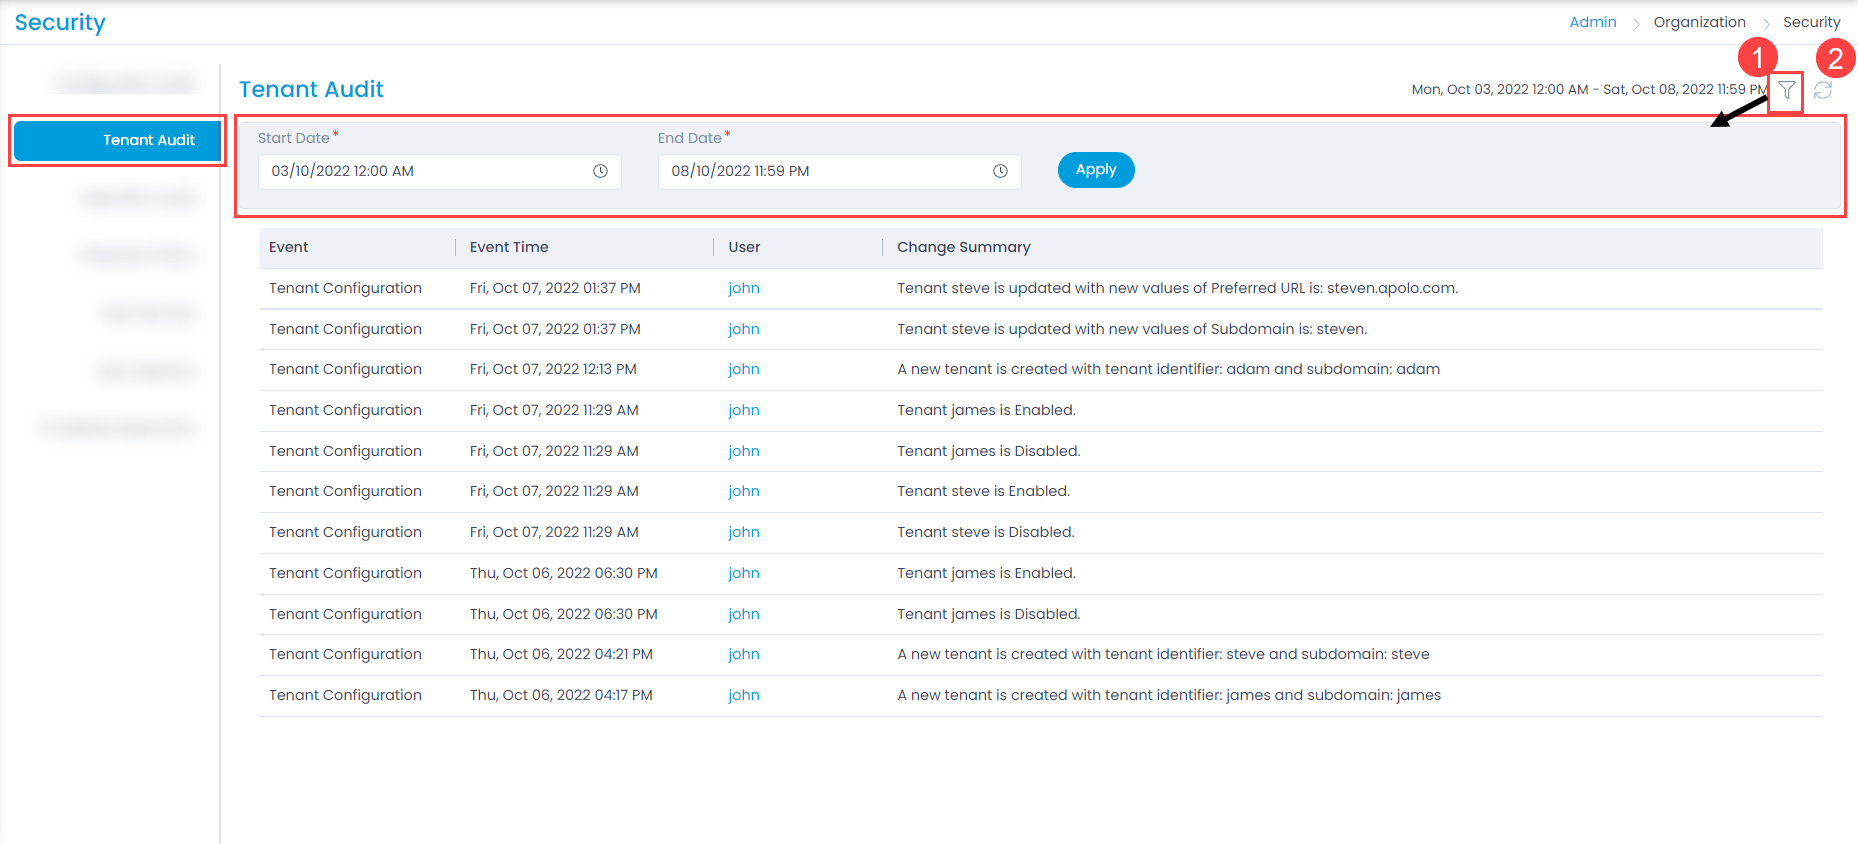
This tab displays the summary of the changes made in the tenant configuration.

Note: This tab is available only if Tenant Management feature is enabled in the license.
Tenant Audit
Tenant Audit

From this page, you can perform the below tasks:

  1. Filter: You can select the date range based on which the log data is to be filtered.
  2. Refresh: You can refresh the log list to sync and get the latest activities performed in the tenant section.

Operation Audit

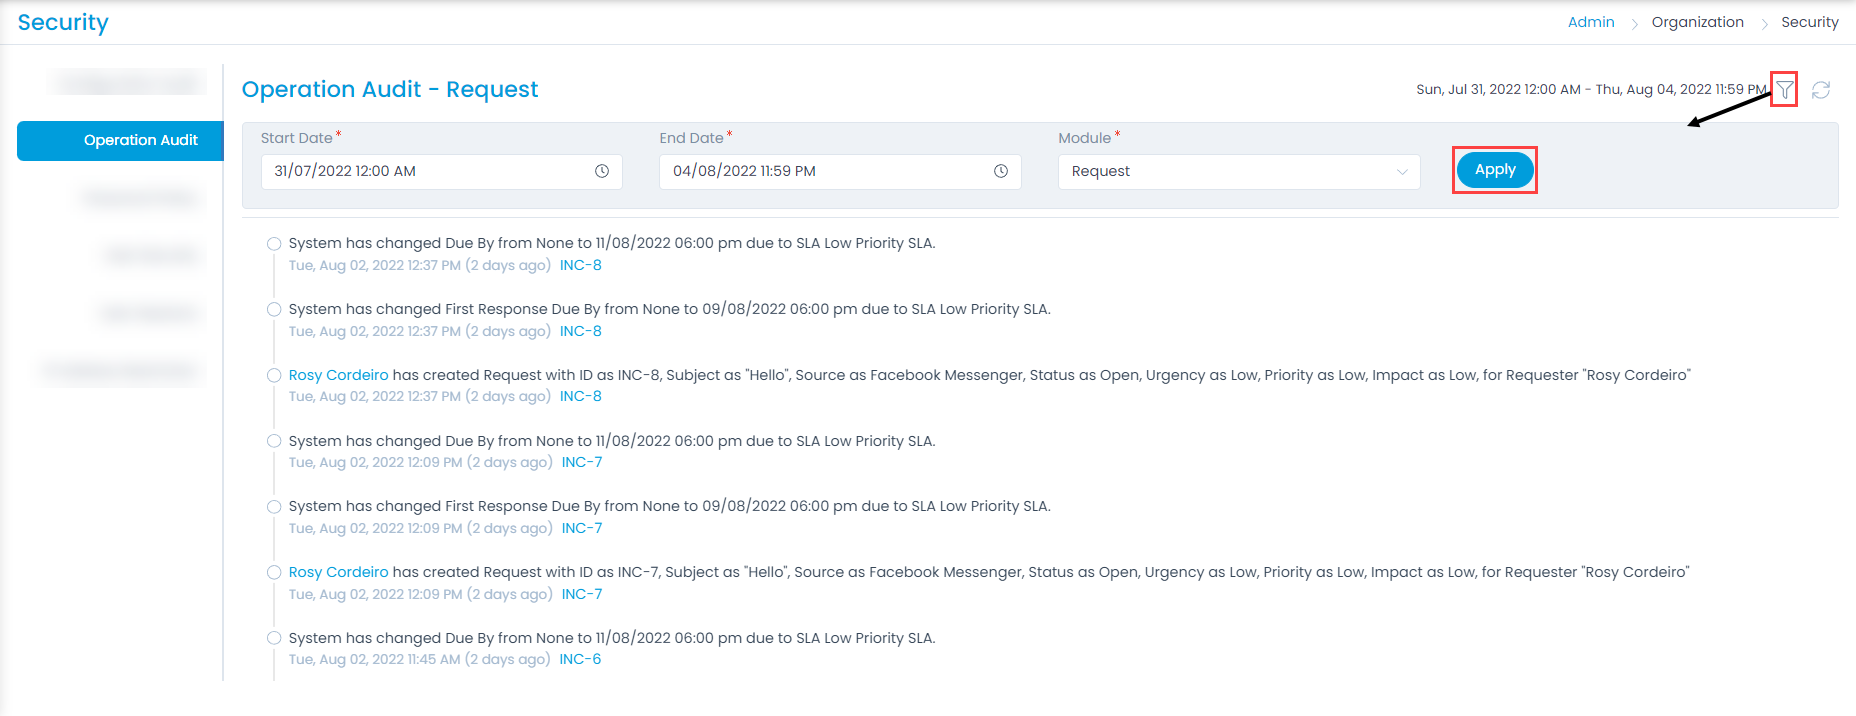
This section displays the changes made in the application along with the details. You can view the logs based on the selected module.

Operation Audit
Operation Audit

Here, you can filter the logs based on the selected module. Also, you can set the number of records to be viewed per page.

Password Policy

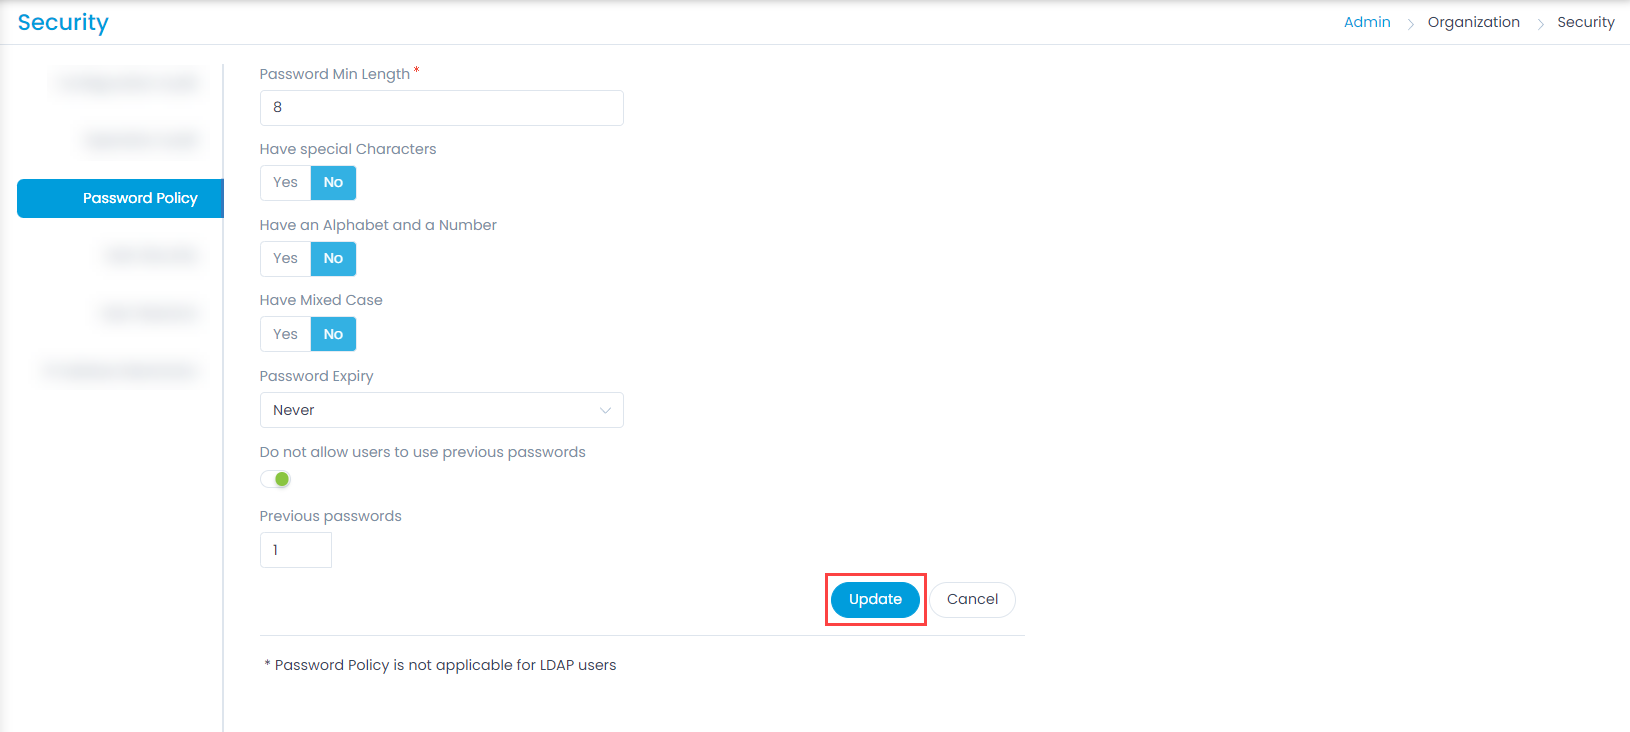
This tab enables you to add validations for the password to increase its security. The Password Policy is a preventive measure to keep the threats off the bay. You can either make it simple or complicated as per the organization’s needs.

Note: You can neither copy anything from the password field nor paste anything into it.
Password Policy
Password Policy

You can configure the below parameters for the password:

Parameter Description
Password Min Length Enter the required minimum length of the password.
Have Special Characters Whether the password should contain special characters or not.
Have Alphabet and a Number Whether the password should contain an alphabet and a number.
Have Mixed Case Whether the password should have a mixture of both the uppercase and lowercase characters.
Password Expiry Select the option when you want the password to expire. The options are:

  • Never
  • Every 15 Days
  • Every 30 Days
  • Every 60 Days
  • Every 90 Days

Based on the selected option, the password will expire and you are required to reset it.

Do not allow users to use previous passwords Enable if you do not want the user to use previous passwords again.
Previous Passwords If the above option is enabled, enter the number of previous passwords which cannot be used. For example, if 2 is entered, the user will not be allowed to set the last 2 previously used passwords.

Once done, click Update to apply the policy.

User Security

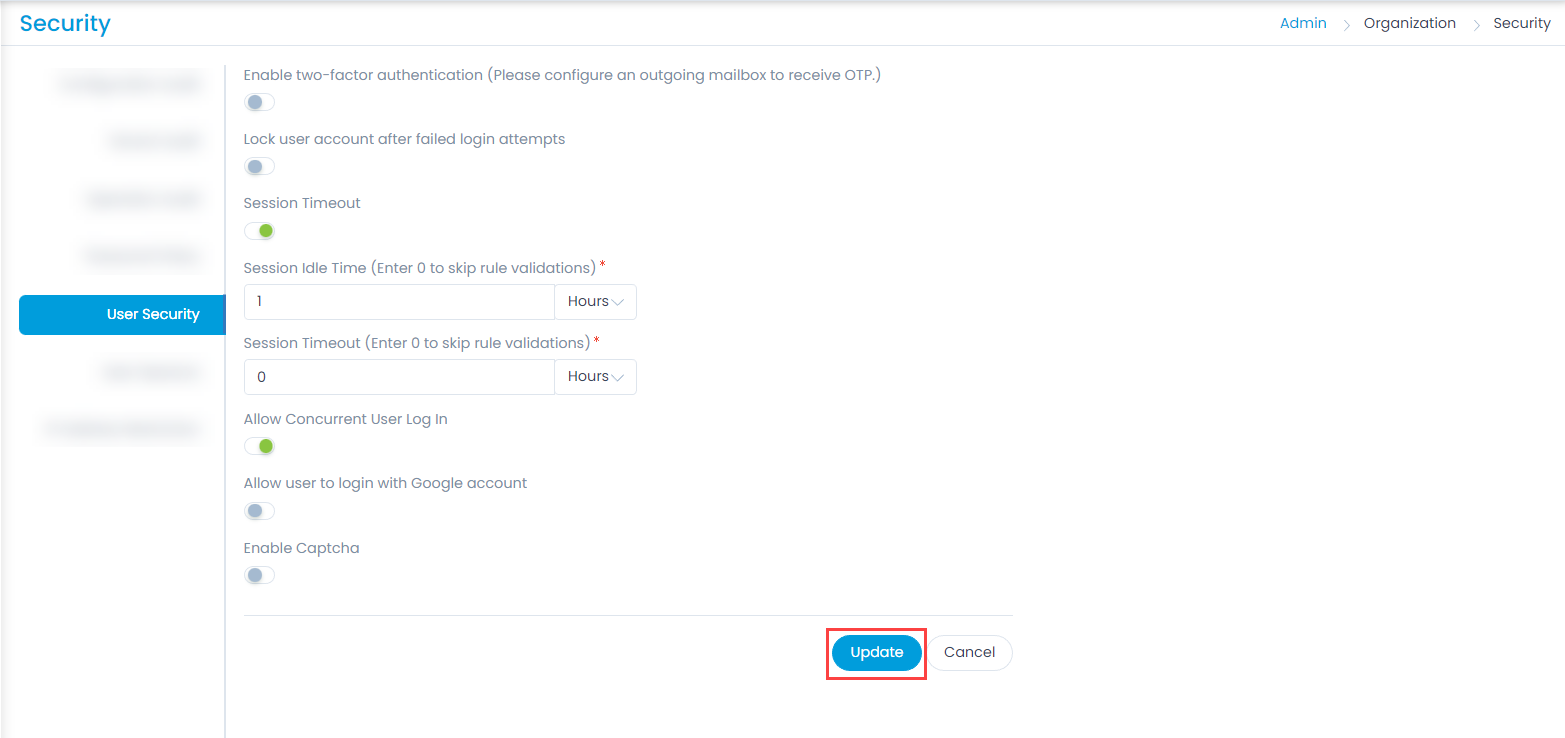
This tab enables you to enhance the security of the user accounts. You can set the two-factor authentication, lock user account, allow concurrent login, allow to use Google account to login, and use captcha. Also, you can set the session timeout parameters.

User Security
User Security

The parameters are:

Parameter Description
Enable two-factor authentication Enable if you want to use the two-factor authentication method to login. Using this method, along with the credentials the user needs to enter the OTP also to login to the portal. To receive the OTP, you need to configure an outgoing mailbox.
Lock user account after failed login attempts Enable if you want to lock the user account once the limit of the failed login attempts exceeds. If enabled, specify the number in the Failed Login Attempts field.
Session Timeout Enable if you want to configure when the session should timeout. If enabled, provide the Session Idle Time and Session Timeout in hours or minutes.
Allow Concurrent User Log In Enable if you want to allow the users to have concurrent sessions.
Allow user to login with Google account Enable if you want to allow the user to use the Google Account to login to the portal. If enabled, enter the unique Google Web Client ID using which the user can login.
Enable Captcha Enable if you want to use the Captcha on the login screen. Once enabled, provide the following inputs:

  • Captcha Type: You can select either Online or Offline type of captcha to be used.
  • Enable Captcha for Guest User Request Creation Form: Enable if you want the Guest user to enter the Captcha while creating a request.

Once all the settings are configured, click Update.

User Sessions

This tab displays the login sessions of the users along with their details. The details include Name, Email, Logon Name, Login Date, and Login IP Address. This helps to keep a track of the users who are logged in to the portal.
Also, you can terminate any session if required using the red Terminate Session icon from the Actions column.

User Sessions
User Sessions

IP Address Restriction

This tab displays a list of IP Addresses configured to allow access to the ServiceOps Portal. If the IP Address of the user is within the configured range, the user will be allowed to sign-in to the portal. If it is outside the configured range, the user will be restricted from signing-in with a message, “You are not allowed to login from current location”.

IP Address Restriction
  • All the activities performed here will be logged and displayed in the Configuration Audit section. Also, if the user fails to sign-in due to the IP Address Restriction, the details will be displayed in the Configuration Audit.
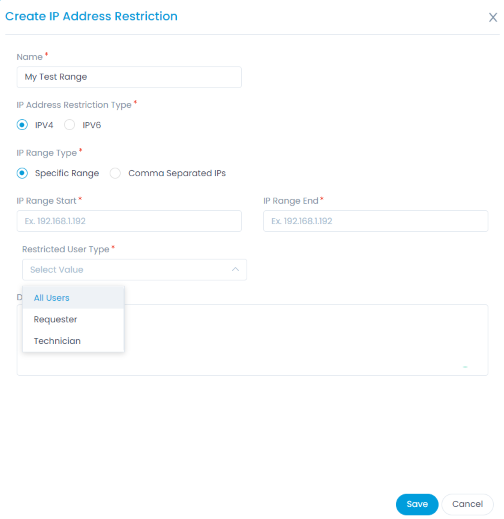
  • You can also create a new IP Address Restriction table configuring the range as well as other details as below:
Create IP Address Restriction button
Create IP Address Restriction Page

Enter the following details:

  • Name: Provide the name of the IP Address Restriction list.
  • IP Address Restriction Type: Select the type of IP Address to be restricted. Options available: IPV4 and IPV6.
  • IP Range Type: Select the IP Range Type as:
    • Specific Range: Provide the IP Address Range by mentioning the IP Range Start and IP Range End.
    • Comma Separated IPs: Provide the list of IP Addresses separated by comma.
  • Restricted User Type: Select the type of users to be restricted. Available Options are: All Users, Requester, and Technician.
  • Description: Provide a brief description about the list.

Click Save and the IP Address Restriction list will be visible.

Enable/Delete/Edit
Enable/Delete/Edit
  • Enable/Disable: Enable or Disable a list for the Restriction. If enabled the list will be applied to the users and accordingly allowed to sign-in.
  • Edit/Delete: You can edit or delete the list from the Actions column.

System Preference

System Preference provides configurations based on the various modules. These can be set and applied to the entire application. The system behaves and displays information according to these settings.

To view the System Preference page, navigate to Admin > Organization > System Preference.

It consists of the following tabs:

  • User Preference
  • Request Preference
  • Asset Preference
  • Agent Preference
  • Survey Preference
  • Project Preference
  • Application Settings

User Preference

This tab enables you to set the preference of the users.

User Preference
User Preference

You can set the following parameters:

  • Send Welcome Email to Guest Requester: You can manage if the welcome Email is to be sent to the Guest Requester or not.
  • Allow Technician to Change Do not Disturb mode: You can allow the technicians to configure the Do Not Disturb Mode.
  • Exclude Users from IP Address Restriction: You can exclude the Users from restricting the IP address.

Request Preference

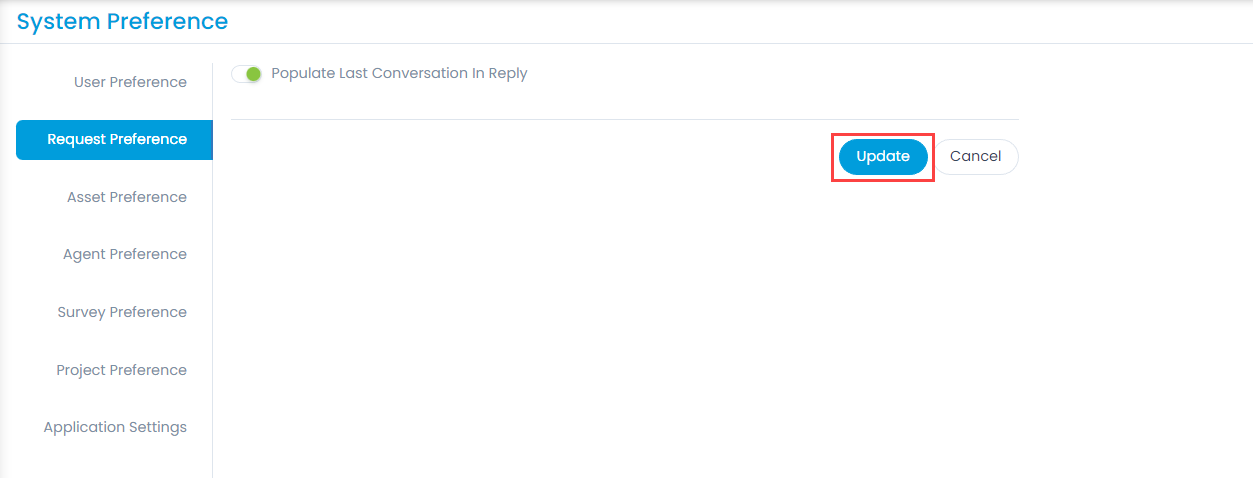
This tab enables you to set the preferences for requests.

Request Preference
Request Preference

You can manage if you want to populate the last conversation in the replies for the request module. This flag will display the last replies in the Request Reply Email.

Asset Preference

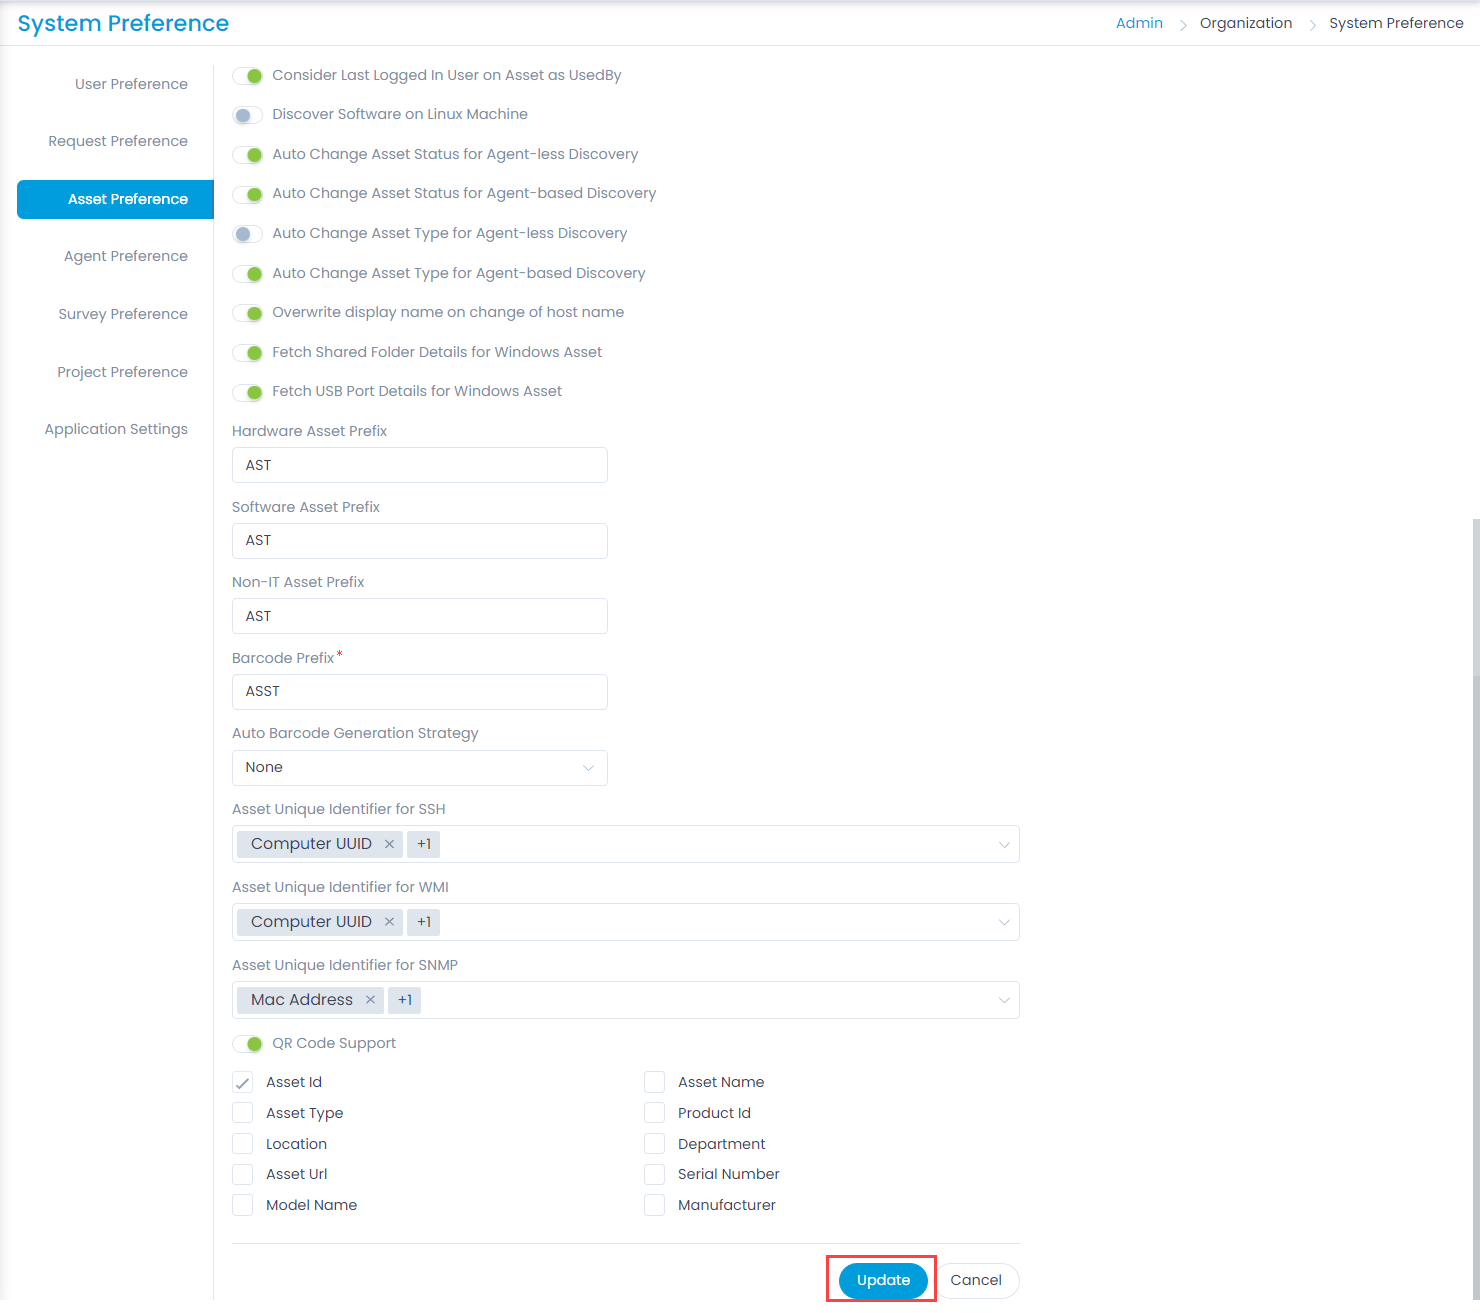
This tab enables you to set the configurations for the asset. You can also set the prefix of the barcode, hardware, software, and Non IT assets.

Asset Preference
Asset Preference
Parameter Description
Consider Last Logged In User on Asset as UsedBy Using this option, the last logged in person on the registered asset will be counted as the last user who used it.
Discover Software on Linux Machine Using this option, the system will discover the software properties along with the Linux machine discovery.
Auto Change Asset Status for Agent-less Discovery This will change the asset status automatically, otherwise no status change will be done if not enabled.
Auto Change Asset Status for Agent-based Discovery This will change the asset status automatically, otherwise no status change will be done if not enabled.
Auto Change Asset Type for Agent-less Discovery This will change asset type automatically, otherwise no type will be selected if not enabled.
Auto Change Asset Type for Agent-based Discovery This will change asset type automatically, otherwise no type will be selected if not enabled.
Overwrite display name on change of host name If you enable this flag, as soon as the host name will be edited and changed, it will reflect on the display name as per the changes done. By Default: Disabled.
Fetch Shared Folder Details for Windows Asset You can fetch the details of the shared folder for Windows Asset. If enabled the Shared Folder tab appears in the Hardware tab of the Asset Details page.
Fetch USB Port Details for Windows Asset You can fetch the details of the USB Ports for Windows Assets. If enabled, the USB Hub and USB Controller tabs will be available in the Hardware tab of the Asset Details page.
Hardware Asset Prefix You can set the prefix for hardware assets. The default prefix is AST. For example, for Hardware you can set the prefix as HW.
Software Asset Prefix You can set the prefix for software assets. The default prefix is AST. For example, for software you can set the prefix as SW.
Non IT Asset Prefix You can set the prefix for Non IT assets. The default prefix is AST. For example, for Non IT assets you can set the prefix as NIT.
Barcode Prefix You can set the prefix of the Barcode Number generated. Numerals and more than ‘4’ characters are not allowed.
Auto Barcode Generation Strategy This parameter indicates whether Barcode Prefix overriding is supported or not and if is supported then it is based on Asset Type or based on Location value of asset. The options are:

  • None: This is the default value.
  • Asset Type Wise: Select if you want to generate the barcode based on asset type. If selected, Asset Type option is available while generating the barcode.
  • Location Wise: Select if you want to generate the barcode based on location. If selected, Location option is available while generating the barcode.
Asset Unique Identifier for SSH Select the Identifiers from the dropdown for the SSH protocol.
Asset Unique Identifier for WMI Select the Identifiers from the dropdown for the WMI protocol.
Asset Unique Identifier for SNMP Select the Identifiers from the dropdown for the SNMP protocol.
QR Code Support Enable if you want to support the QR code feature. If enabled, you can select the various details or parameters that can be printed in the QR code.

Once the required parameters are configured, click Update.

Agent Preference

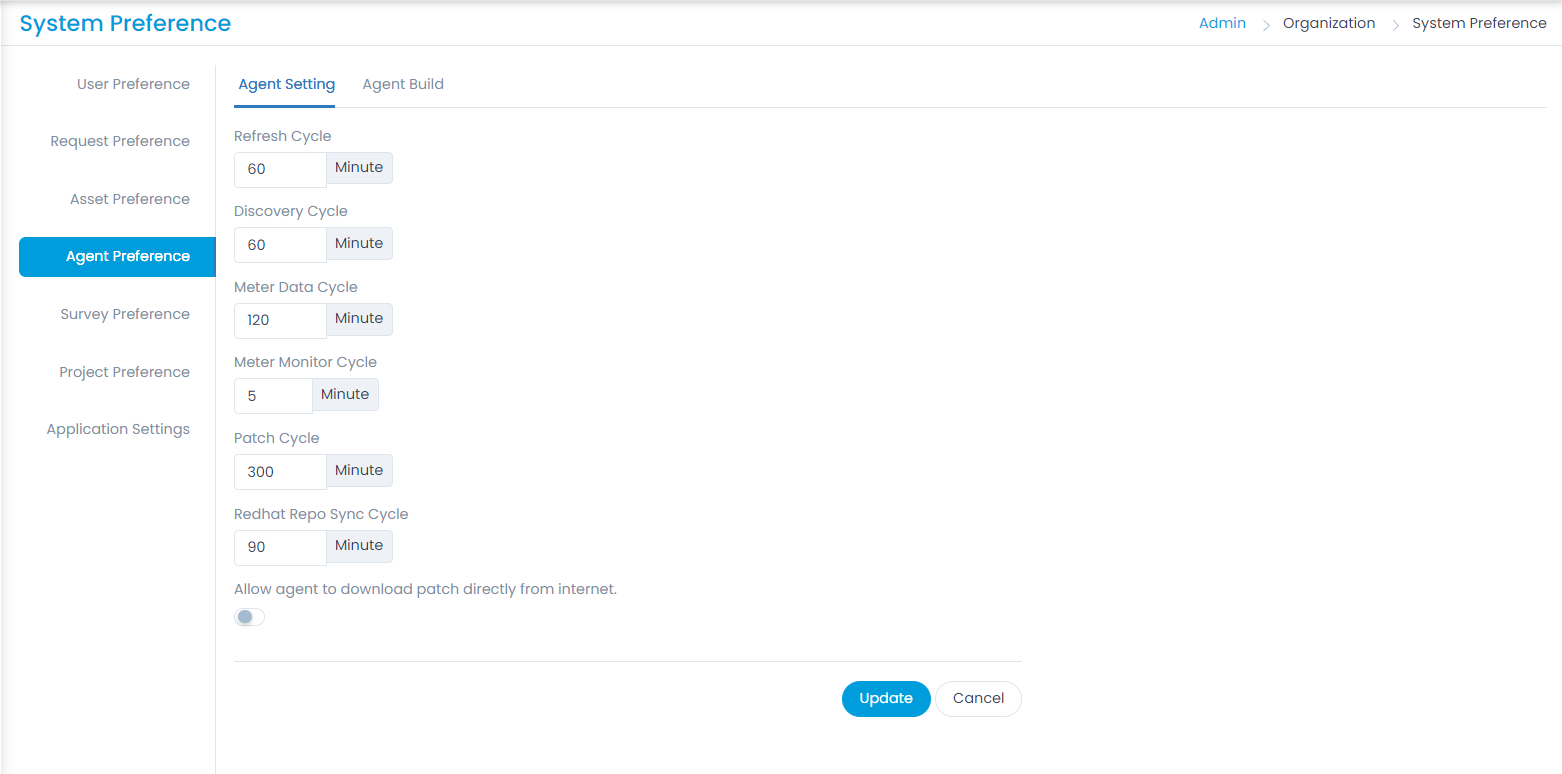
This tab enables you to set the intervals for running the agent discovery cycle as well as upload or download the agent build.

Agent Settings

This provides the options for setting the agent with respect to the Discovery. The settings are according to the minutes/cycle scale. Also, for the Patch download, when you enable the flag the agent can directly download the patch from the Internet instead of the server. Thus, saving the bandwidth.  By default, it is disabled.

Agent Preference > Agent Setting

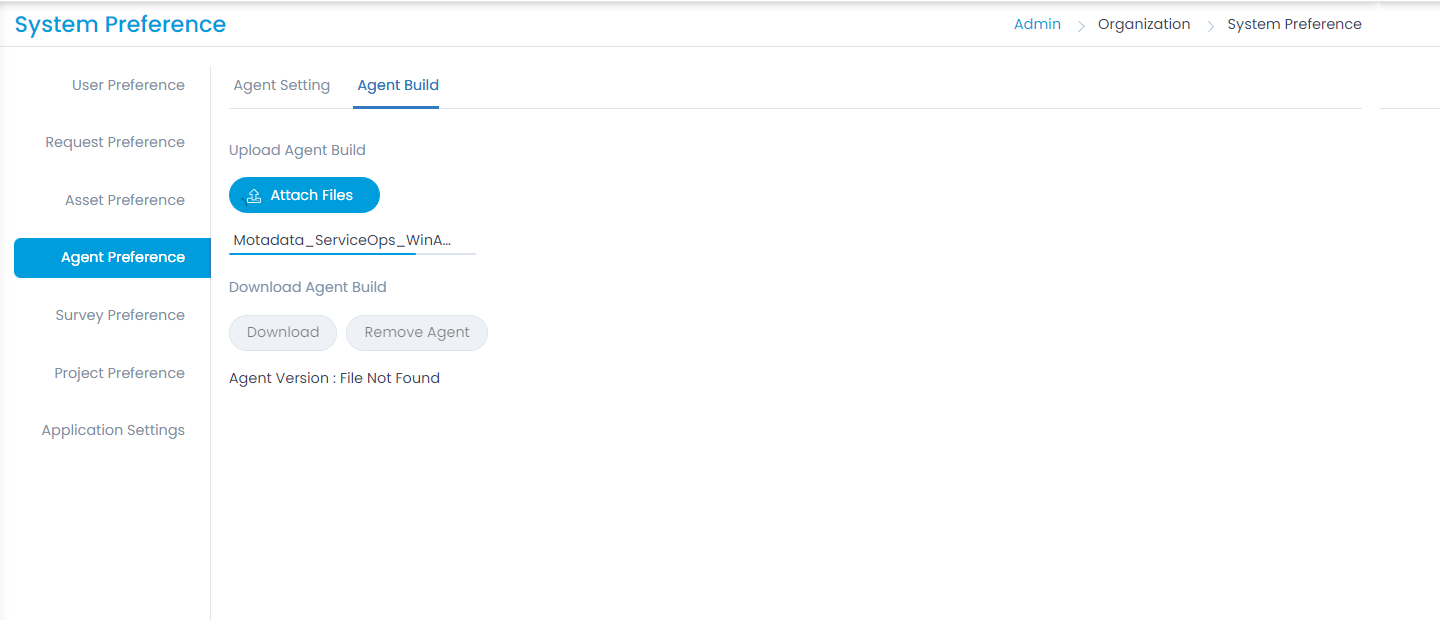
Agent Build

This enables you to upload as well as download the Agent build file.

Note: This will only be available if the agent is already installed.
Agent Preference > Agent Build

Survey Preference

This tab enables you to set the minimum questions and audience size limit in the survey. For more details on Survey, refer to the link User Survey.

The options are:

  • Minimum Questions in a Survey: You can set the minimum number of questions in a survey. The default value is 5. The maximum questions can be 30.
  • Minimum Audience Size: You can select the minimum size of the audience in a survey. i.e. Number of Requesters to be selected. The size can be from 3 to 100.

Once set, click Update to apply the setting.

Note: A user with Super Admin role and holding Manage User Survey permission can access this module.
Survey Preference
Survey Preference

Project Preference

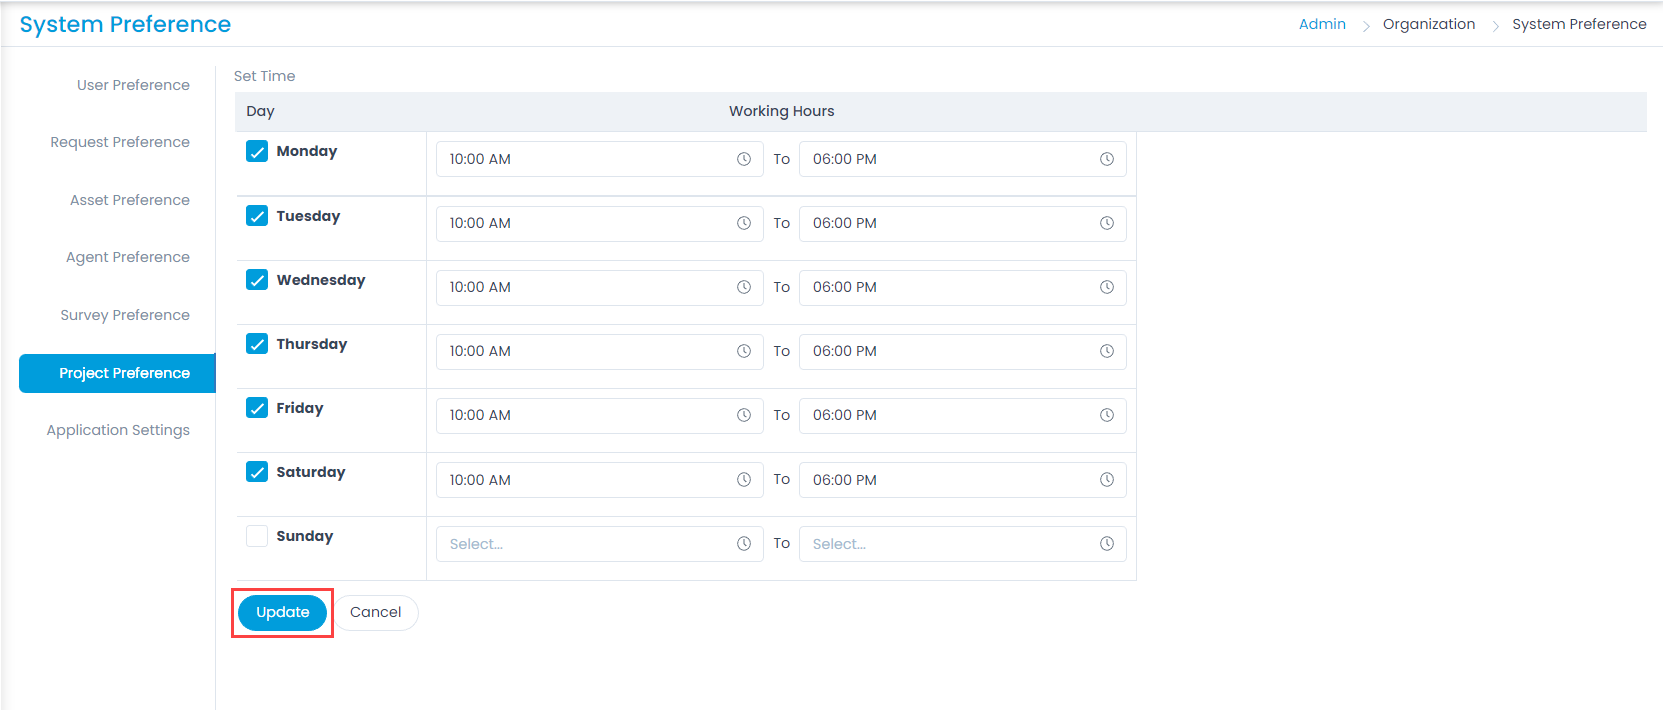
This tab enables you to set the timing as per the requirement for the complete week and working hours.

Project Preference
Project Preference

Application Settings

This tab enables you to configure the settings applicable for the entire application. The settings are:

  • Base URL: Specify the URL of the installed application page where the GUI needs to be accessed. This field is read-only in the SaaS application.
  • Max Upload Size (MB): Specify the maximum size of the file which a user can upload. File should not exceed 25MB. This field is read-only in the SaaS application.
  • Enable Application Accessibility: Enable to resize the font of the content in the application. You can increase, decrease, and reset the font size. If enabled, the font size icon will appear next to the Create New + button at the top of the screen.
  • Blocked File Extensions: Specify the file extensions which you want to block. To block the file, click the + Add Extensions button, enter the extension, and click the green (right) symbol.

Once configured, click Update and the settings will get applied to the entire application.

Application Settings

Business Service

A service is that business units deliver to the business customers. For example, the delivery of financial services to the customers of a bank, or goods to the customers of a retail store. The successful delivery of business services often depends on one or more IT services.

A problem is associated with a business service. You can manage the list of business services. Also, in the Problem Details page, you can select, and associate a business service to the problem.

To view the list page, navigate to Admin > Organization > Business Service and the page appears.

Business Service Page

Here, you can search, view, add, edit, and delete the required business services.

Add Business Service

To add a business service,

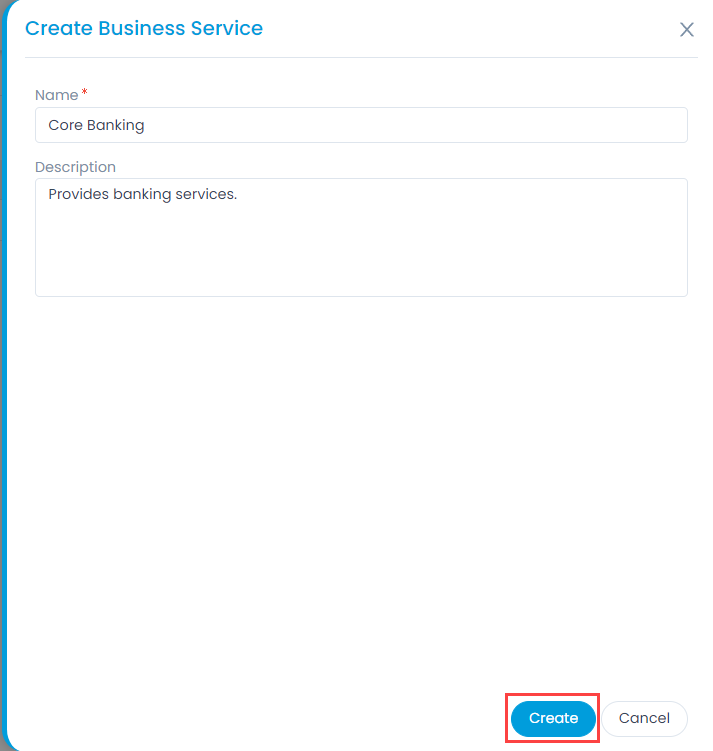
  1. Click the Create Business Service button on the top-right corner of the page and a popup appears.
Create Business Service
  1. Enter the Name and Description of the business service.
  2. Click Create. Once created, you can associate this business service to the problem from the Problem Details Page. You can also associate the business service to the Release at the time of creation or update.
  3. To edit, click the edit icon next to the desired business service, make the changes, and click Update.
  4. To delete, click the delete icon, a confirmation message appears. Click Yes to continue or Cancel to stop the process.

Announcements

Announcements are the formal statements intended for all the system users or for a specific group of people. These messages appear for a defined period of time. Announcements can be used to inform about something important or upcoming activities. People will see the announcements on their Dashboard. Only active and running announcements are displayed.

Announcements on dashboard

View Announcements

To view announcements, navigate to Admin > Organization > Announcements, and the list page appears.

Announcements List Page

Here, you can do the following:

  1. Search: You can use the keywords to search for the required announcement from a long list.
  2. Create Announcements: You can create a new announcement.
  3. Grid: You can view the details of the announcement in the table.
  4. Enable: You can enable or disable the desired announcement. To enable the announcement, click the grey slider once and it will become active (green). To disable, click the green slider and it will get disabled (grey). Also, a confirmation message will be displayed.
  5. Edit: You can edit the announcement.
  6. Delete: You can delete the announcement if not needed anymore. Once clicked, a confirmation dialog appears. Click Yes to continue or Cancel to stop the process.

Create Announcement

To create an announcement,

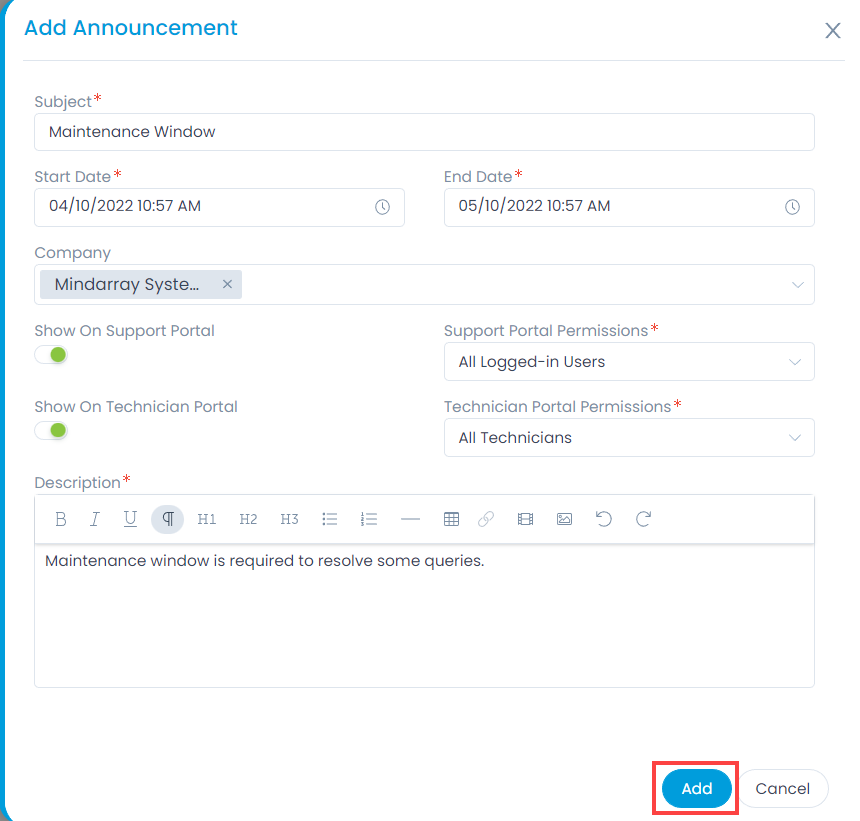
  1. Click the Create Announcement button and the popup appears.
Add Announcement
Add Announcement
  1. Enter the following details:
    Parameter Description
    Subject Enter the subject of the announcement.
    Start Date Select the start date of the announcement.
    End Date Select the end date of the announcement.
    Company Select the company for which you want to display the announcement. You can select multiple companies from the list. Once selected, the Support Portal associated with this company will be able to view this announcement. If no company is selected, the announcement will be available for all.

    Note: This field is available only if the Managed Services Provider feature is enabled.
    Show on Support Portal Enable if you want to view the announcement on the Support Portal.
    Support Portal Permissions Select who all can view the announcement on the Support Portal. The options are:

    • Public: Everyone accessing the Support Portal will be able to view the announcement.
    • All Logged in Users: Only the logged in users can view the announcement.
    • Requester Group: The users in the requester group can only view the announcement.
    Show on Technician Portal Enable if you want to view the announcement on the Technician Portal.
    Technician Portal Permissions Select who all can view the announcement on the Technician Portal. The options are:

    • All Technicians: All the technicians can view the announcement.
    • Technician Group: All the users in the technician group can view the announcement.
  1. Once done, click Add and the announcement appears in the grid. By default, the announcement is enabled.

Business Hours

Business hour(s) are the working hours that determine the available response and resolution time of a Request (holidays are subtracted from the calculation). These calculations are done to check whether any SLA has been violated. The SLAs have to be configured to use the business hours. For more details, refer to the SLA section.

To view the Business Hours page, navigate to Admin > Organization > Business Hours.

This section enables you to configure the business hours based on which the response and resolution time of a request can be calculated. Also, separate working hours for each department can be added along with the holidays in a year.

Business Hours Page
Business Hours Page

Types of Business Hours

The business hours are classified in 2 broad categories:

  • 24×7: Mainly used for the support team, this category does not consider breaks or weekly offs. This means that the office or team is operational all the time round the clock.
  • Custom: Custom working hours are created for a typical office culture. It includes office shifts, breaks, and public holidays.

Add Business Hour

To add a business hour,

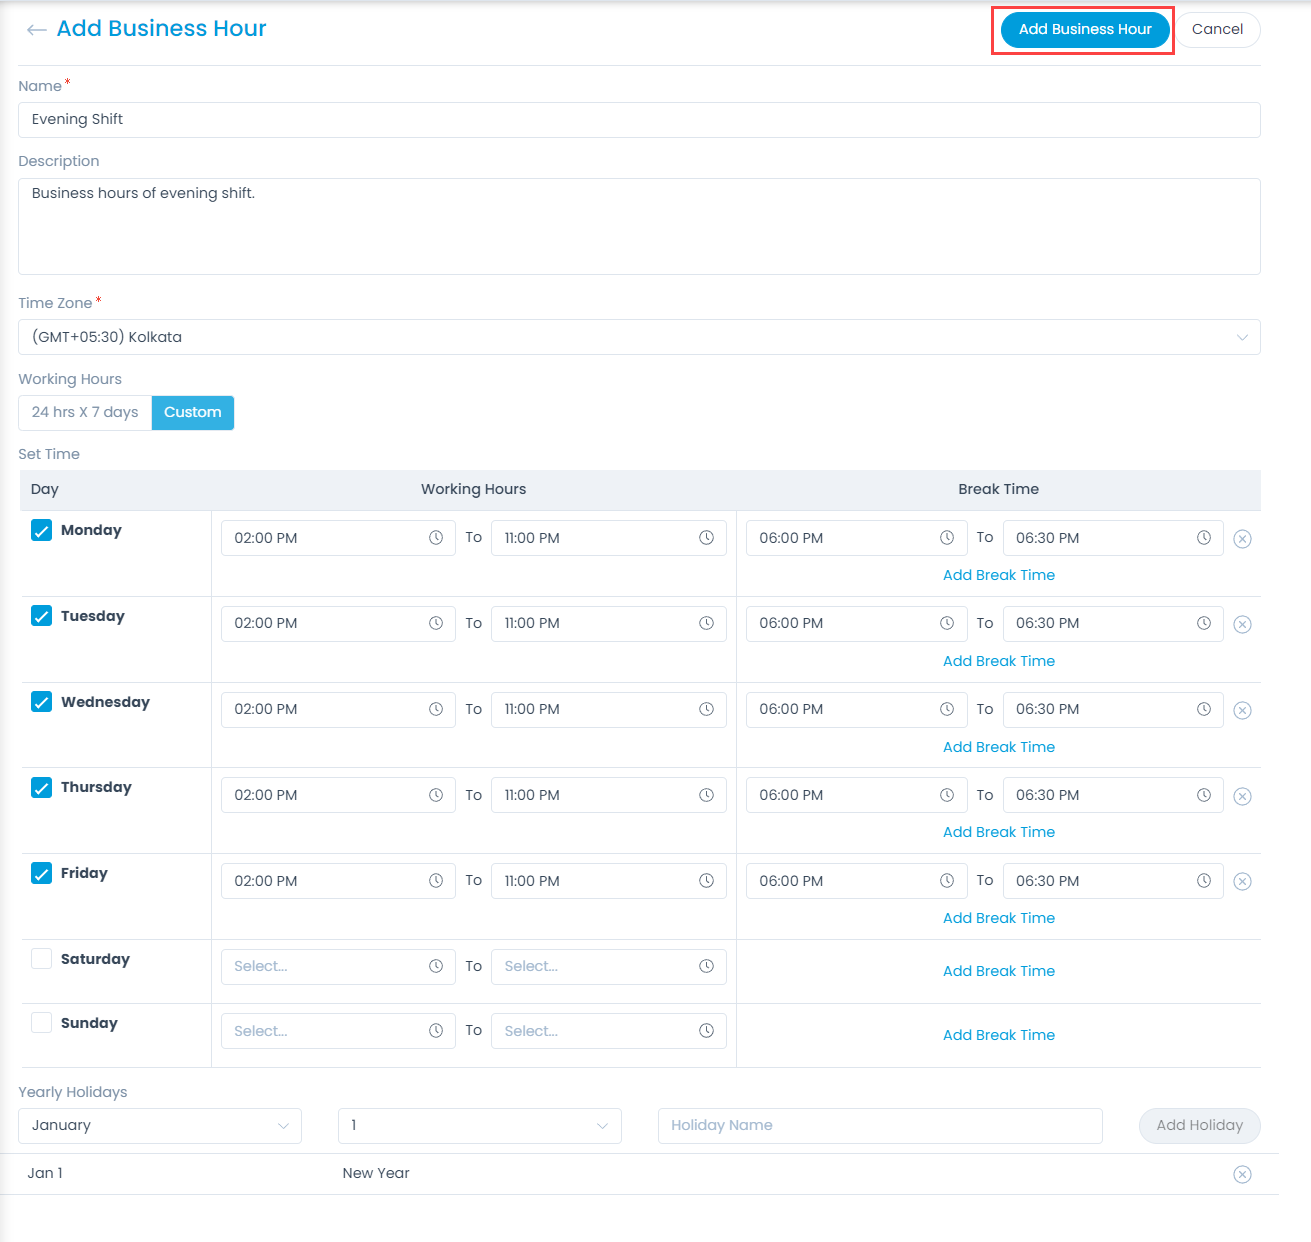
  1. Click the Add Business Hour button and the following page appears.
Add Business Hour Page
  1. Enter the following details:
    • Name: Enter the name of the business hour.
    • Description: Enter a brief description of the business hour.
    • Time Zone: Select the time zone.
    • Working Hours: Select the type of working hours. The options are:
      • 24 hrs X 7 days: If selected you can define the yearly holidays which will be excluded from the business hours.
      • Custom: If selected, you can define the office hours, breaks, and yearly public holidays.
  2. Once done, click Add Business Hour.
  3. You can edit the business hour by clicking the edit icon.
  4. You can also delete it if required by clicking the delete icon. Once clicked, a confirmation message appears, click Yes to continue or Cancel to stop the process.

Locations

The location is a classifier that helps to organize the requests and people based on their geographical presence. The location is an N-level dependent hierarchy which means you can create as many child locations as you want. You can assign the location with a user and the request. Hence, it can act as a security filter that technicians of one location can manage requests of that particular location only.

To view  the Locations page, navigate to Admin > Organization > Locations.

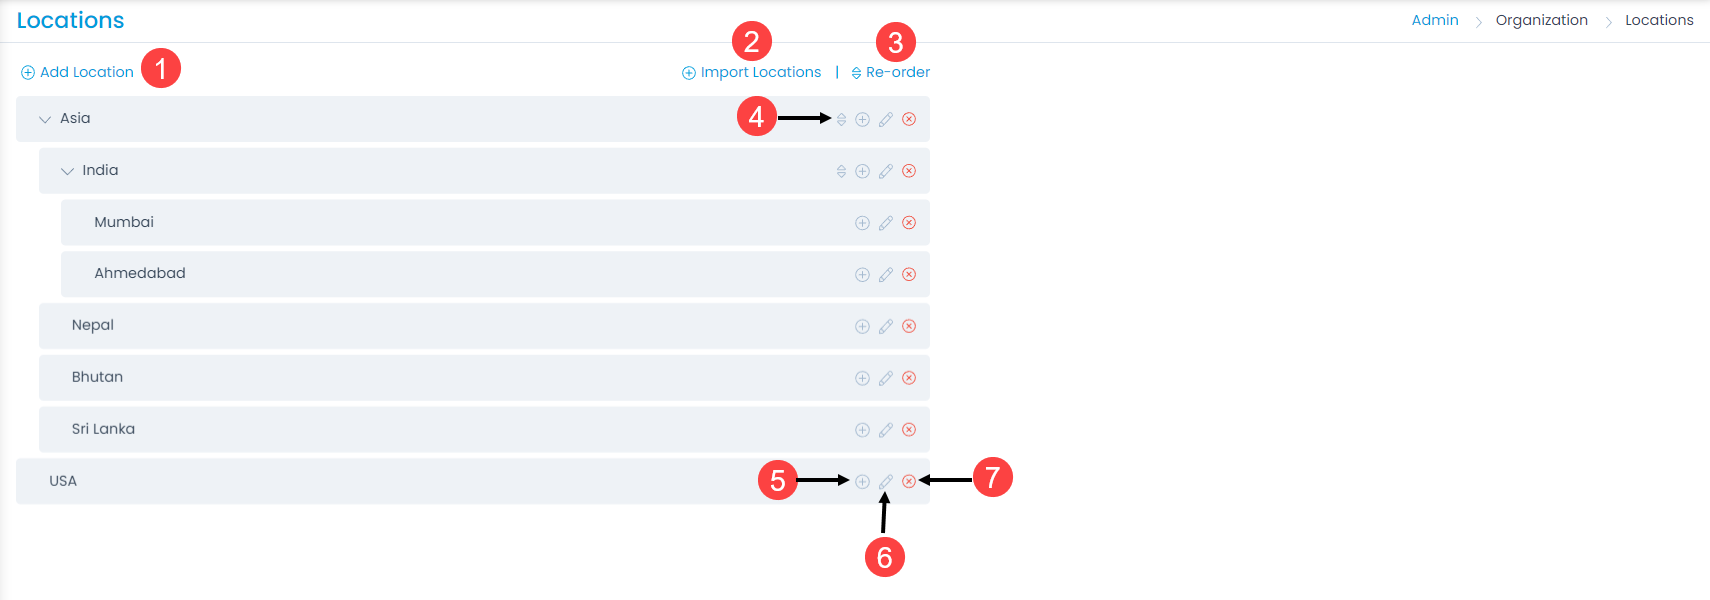
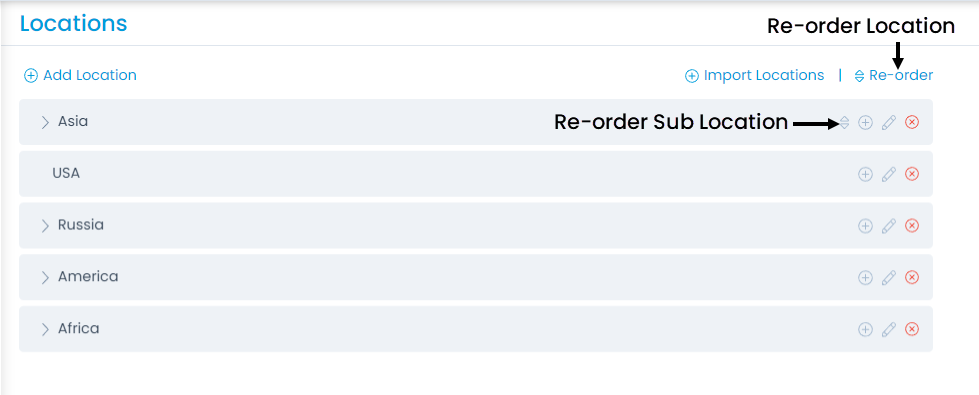
The list page displays all the available locations. Here, you can add, edit, delete, import, and re-order location and sub-location.

Locations Page
Locations Page

The page provides the following features:

  1. Add Location: You can add a location.
  2. Import Locations: You can import a list of locations in bulk.
  3. Re-order Locations: You can change the order of the locations. You can move it up or down.
  4. Re-order Sub Locations: You can change the order of the sub locations. You can move it up or down.
  5. Add Sub Location: You can add sub location.
  6. Edit: You can edit the desired location.
  7. Delete: You can delete the location if not required anymore.

Add Location and Sub Location

To add location,

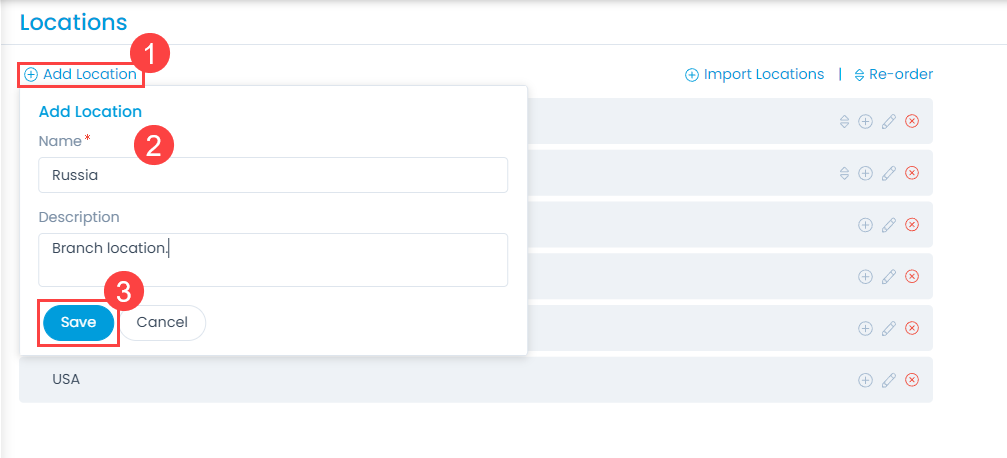
  1. Click the Add Location link and a dialog appears.
  2. Enter the Name and Description of the location.
  3. Once done, click Save.
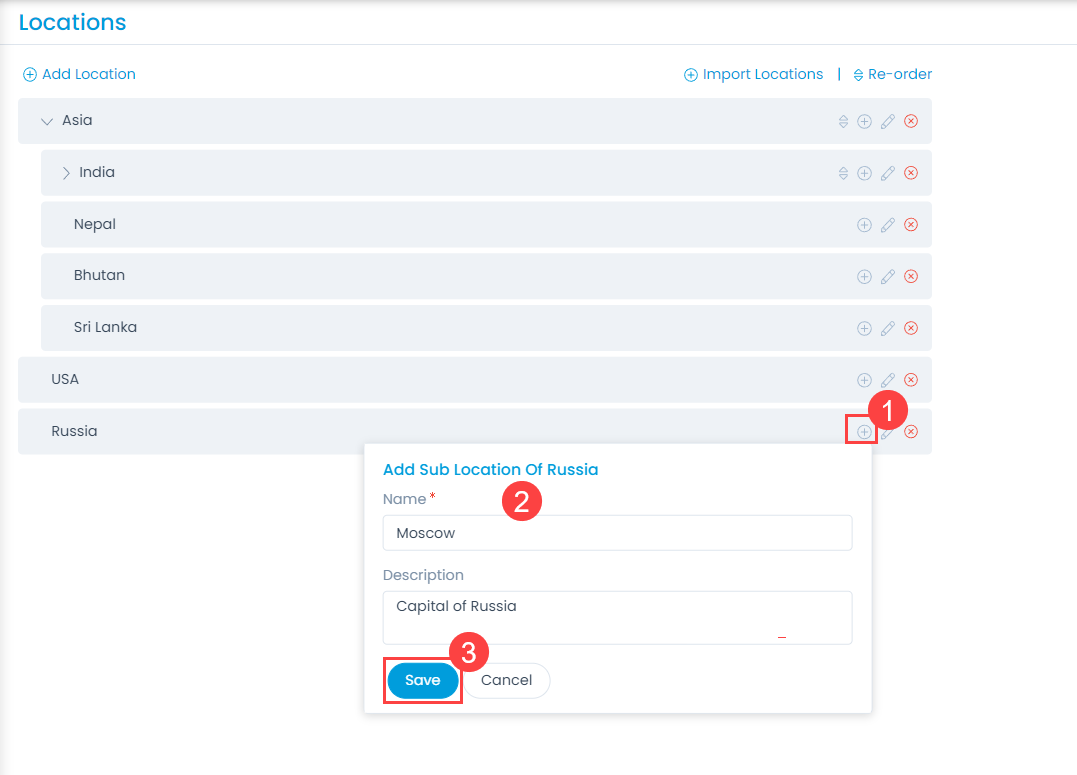
  4. Similarly, you can add sub location also by clicking the Add Sub Location icon.
Add Location
Add Location
Add Sub Location
Add Sub Location

Import Locations

To import locations,

  1. Click the Import Locations link and the Location Batches page appears.
  2. Click Import CSV Batch and a popup appears.
Location Batches
Location Batches
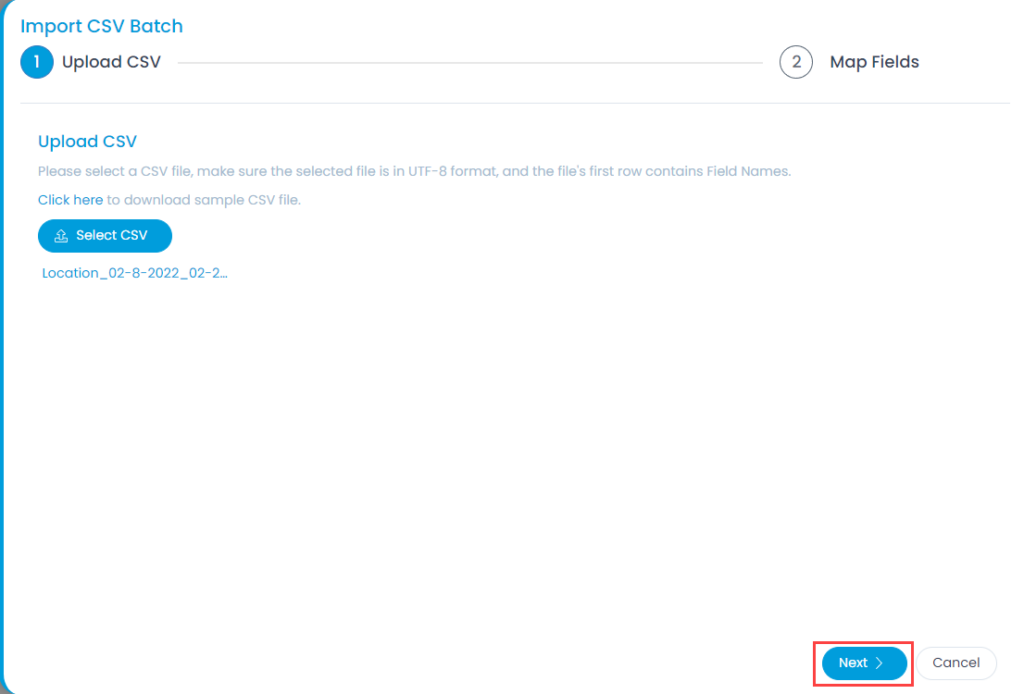
  1. Select the .csv file if you already have it filled with the respective fields. If not, select the new .csv file using Click Here and fill the respective details. Once the file is uploaded, click Next.
Select .CSV File
Select .CSV File
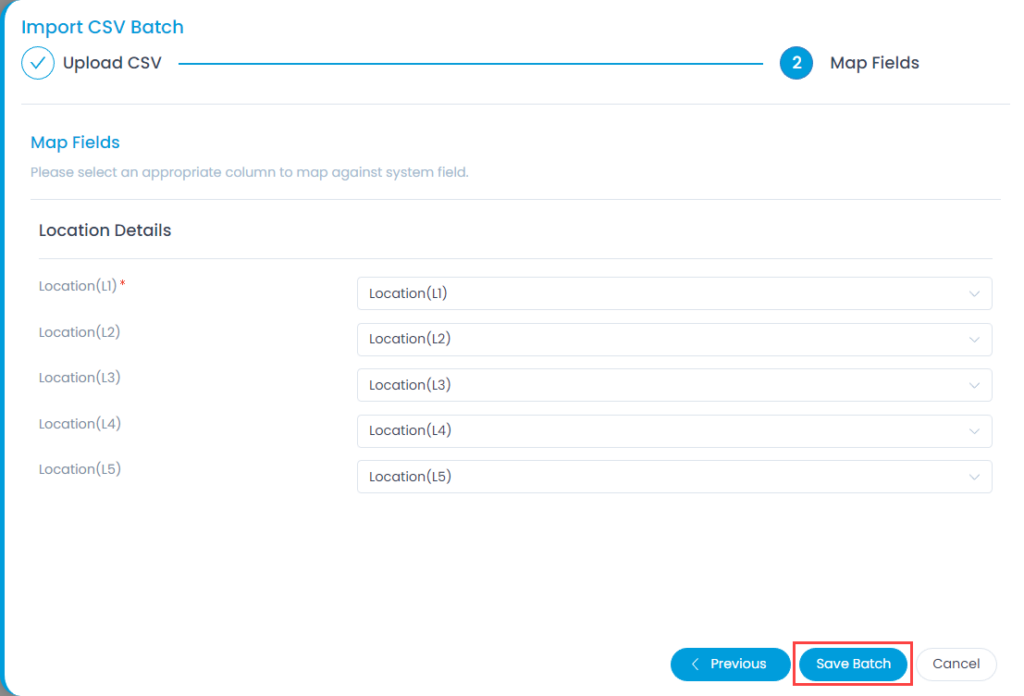
  1. Map the fields as per the requirement. By default it is mapped, only in case of removal or change of some parameters mapping is necessary, and click Save Batch.
Map Fields
Map Fields
  1. The Location Batches page appears. It displays the status of the import along with the details like processing time, total records, success records, failed records, etc. as shown below. Once successful, the imported departments will appear on the list page.
Import CSV Batches
Import CSV Batches

Re-Order Locations

To re-order the placement of locations,

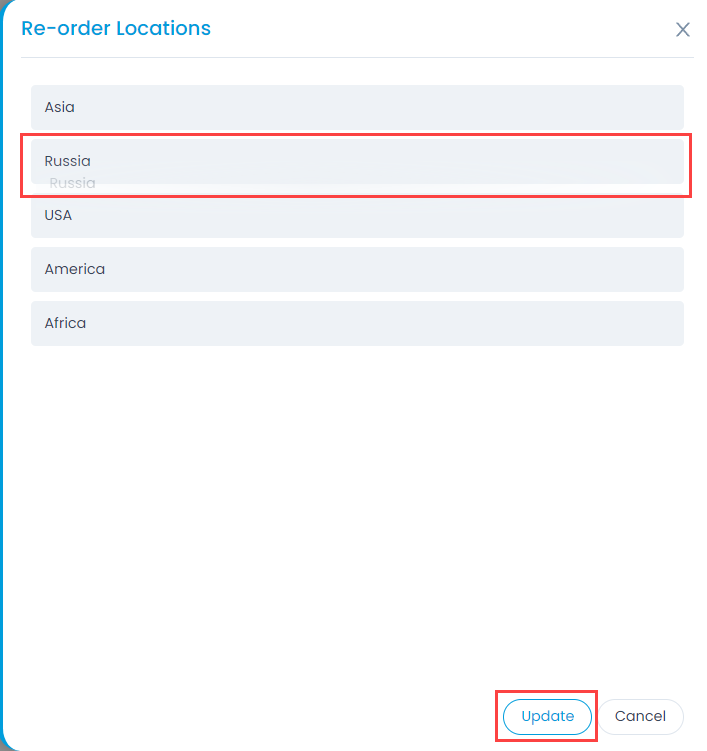
  1. Click the Re-Order link and a popup appears.
  2. Select the desired location, drag, and drop it to the desired location up or down. The order is reflected while working on the requests.
  3. Once done, click Update. Similarly, you can re-order the sub-locations as well.
Options to Re-order Location and Sub Location
Re-order Locations
Re-order Locations

Departments

Motadata allows you to add your organization’s department names and sub-departments in the product. Each department can have sub-departments up to level five.

The benefits of having department names in the product are:

  • You can classify tickets, Assets, Projects and users by department.
  • You can create automated workflows using department as a condition.
  • You can create Requestor Groups by using department names.
  • You can generate department specific reports.

To view the Departments page, navigate to Admin > Organization > Departments.

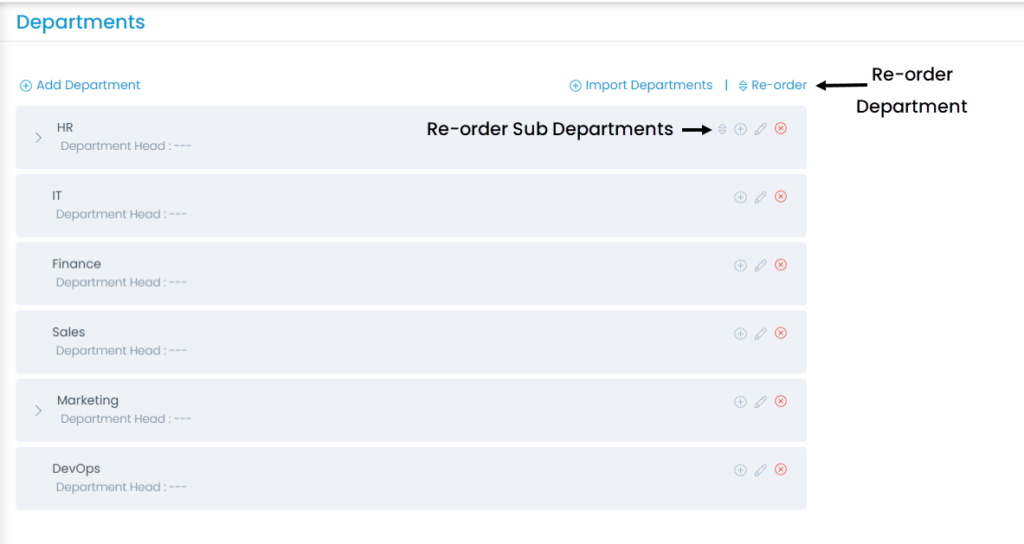
The list page displays all the available departments. Here, you can add, edit, delete, import, and re-order the departments and sub-departments. Also, you can set the department configurations.

Departments Page
Departments Page

The page provides the following features:

  1. Add Department: You can add a new department.
  2. Import Departments: You can import a list of departments in bulk.
  3. Re-order Departments: You can re-order the departments as per your requirements.
  4. Department Configurations: You can configure the settings for ticket creation at leaf node.
  5. Re-order Sub-Departments: You can re-order the sub-departments as per your requirements.
  6. Add Sub-Department: You can add a sub-department.
  7. Edit Department: You can edit the desired department.
  8. Delete Department: You can delete the department if not required anymore.

Add Department and Sub-Department

To add a department or sub-department,

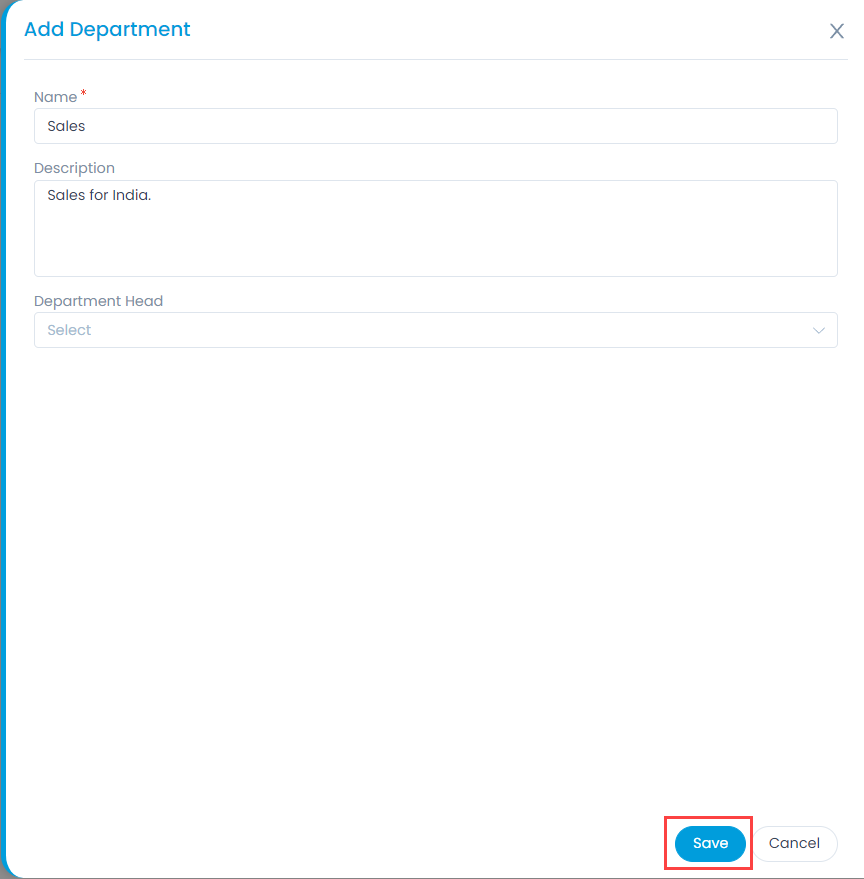
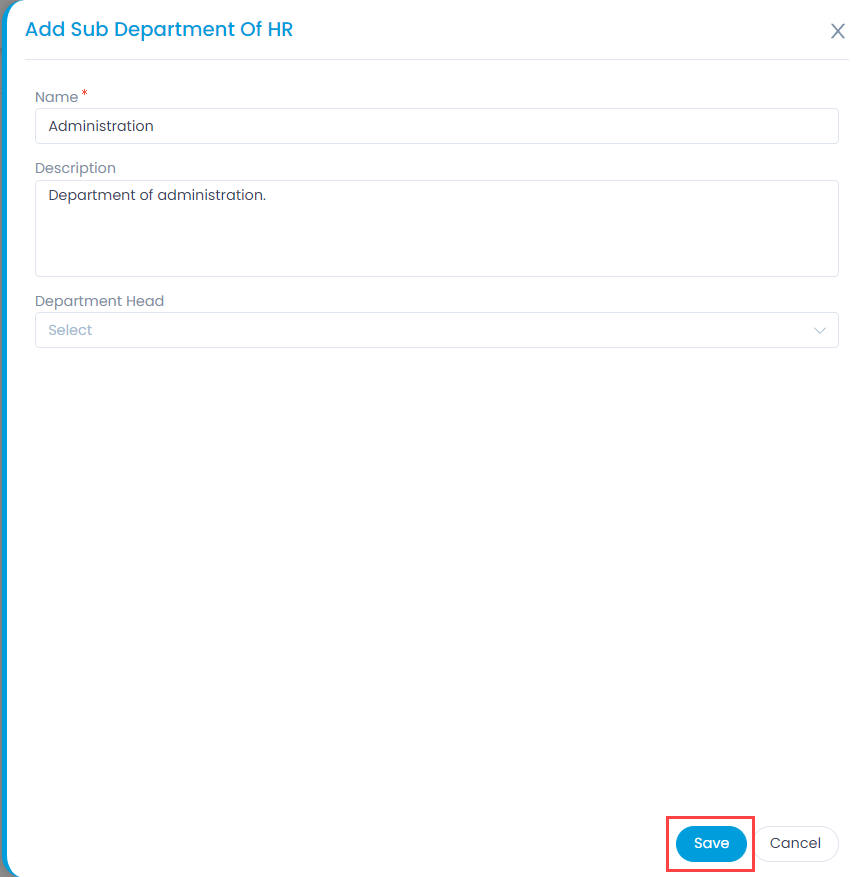
  1. Click the Add Department/Sub-Department link and a popup appears.
Add Department
Add Department
Add Sub-Department
Add Sub-Department
  1. Enter the following details:
    • Name: Enter the name of the department.
    • Description: Enter a brief description about the department.
    • Department Head: Select the head of the department from the dropdown list.
  2. Once done, click Save and the department gets added.
  3. Similarly, you can add a sub-department by clicking the round plus icon next to the edit icon of the respective department.

Import Departments

To import a list of departments in bulk,

  1. Click the Import Departments icon and the Department Batches page appears.
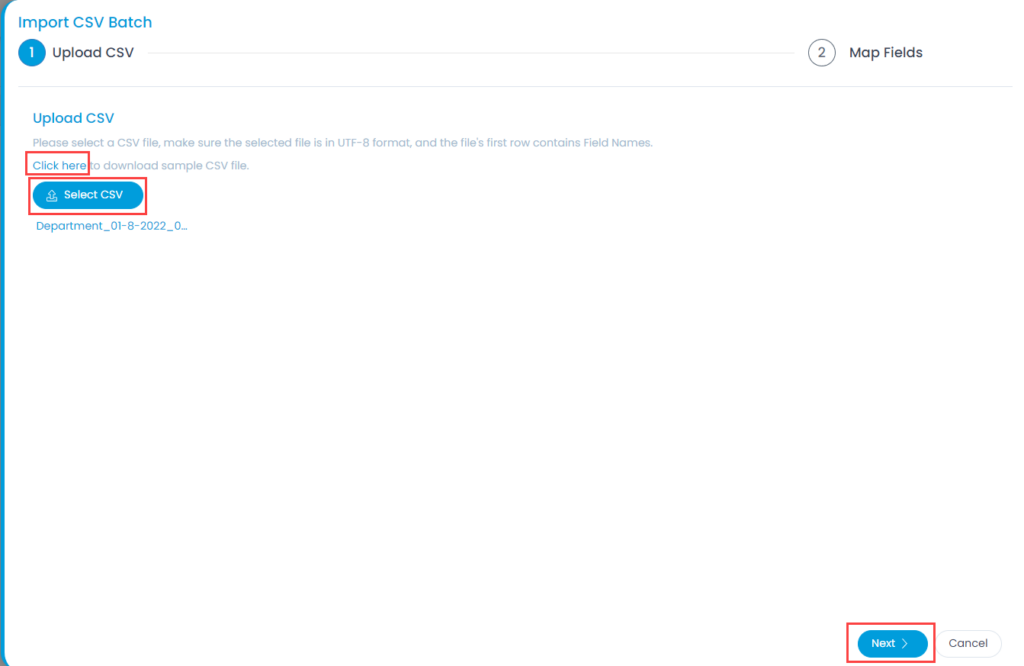
  2. Click Import CSV Batch and a popup appears.
Department Batches
Department Batches
  1. Select the .csv file if you already have it filled with the respective fields. If not, select the new .csv file using Click Here and fill the respective details. Once the file is uploaded, click Next.
Select .CSV File
Select .CSV File
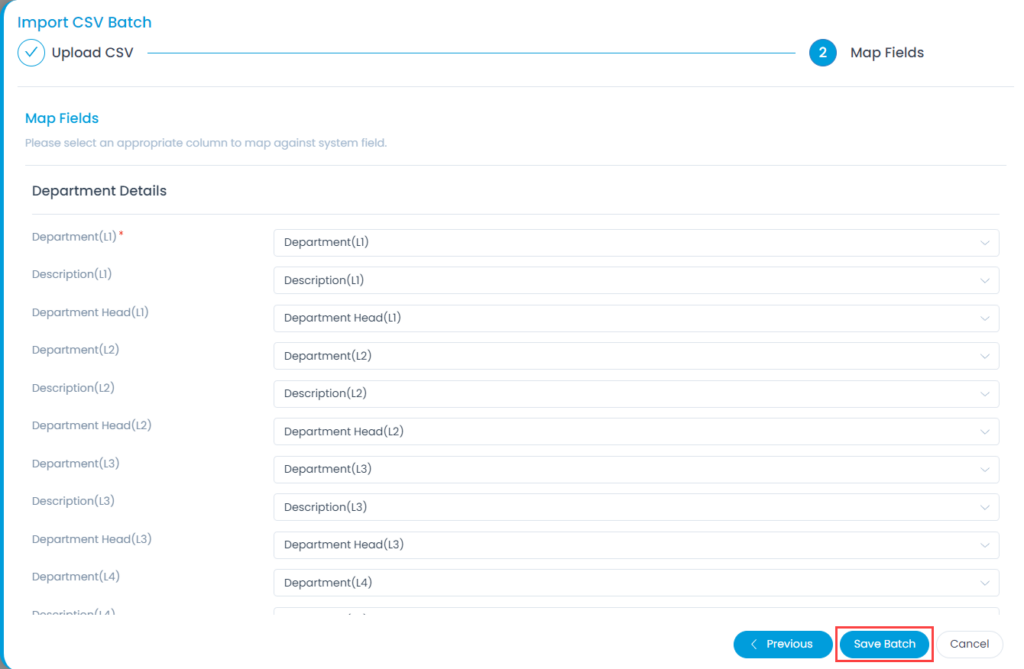
  1. Map the fields as per the requirement. By default it is mapped, only in case of removal or change of some parameters mapping is necessary, and click Save Batch.
Map Fields
Map Fields
  1. The Department Batches page appears. It displays the status of the import along with the details like processing time, total records, success records, failed records, etc. as shown below. Once successful, the imported departments will appear on the list page.
Import CSV Batches
Import CSV Batches

Re-Order Departments

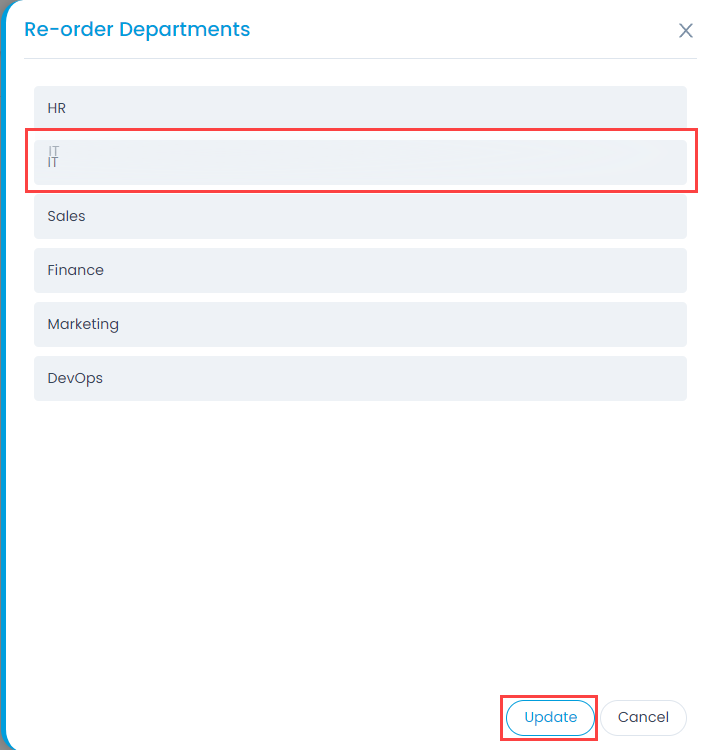
To re-order the placement of departments,

  1. Click the Re-Order icon and a popup appears.
  2. Select the desired department, drag, and drop it to the desired location up or down. The order is reflected while working on the requests.
  3. Once done, click Update. Similarly, you can re-order the sub-departments as well.
Options to Re-Order Departments and Sub Departments
Re-ordering the Departments

Department Configurations

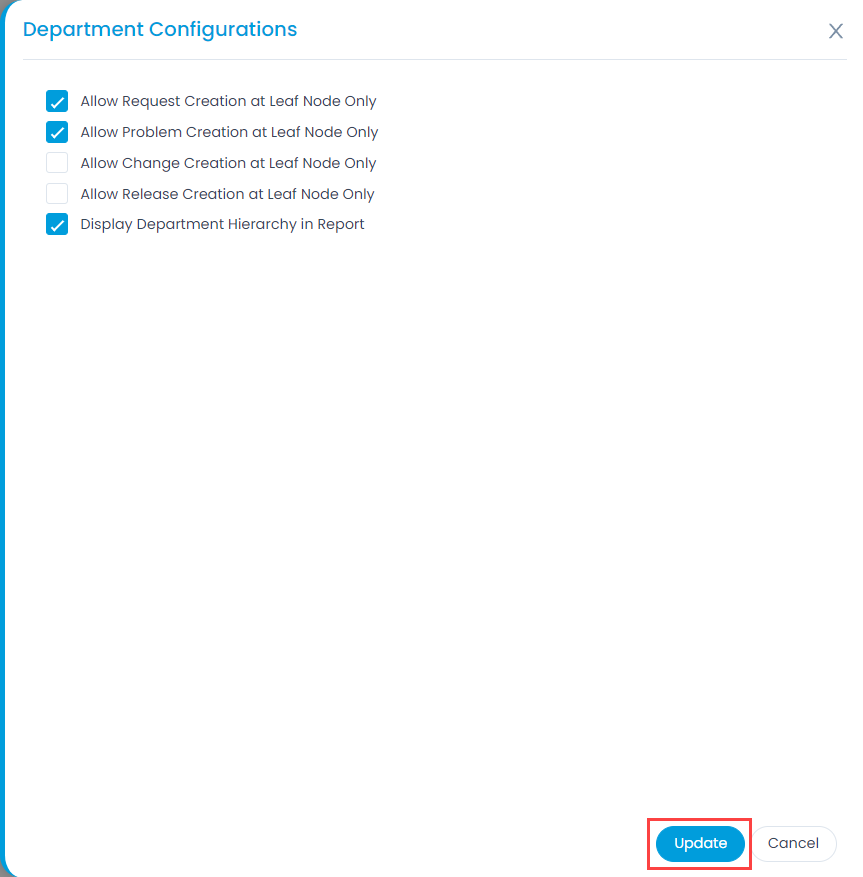
The configuration page enables you to allow or restrict the users from creating tickets at leaf node.

Department Configurations
  • Allow Request Creation at Leaf Node Only: Enable if you want to allow the user to create or update requests only at the leaf node department. For example: If HR is the parent department and Operations is the sub-department. You will be allowed to create request with Operations department only. You will not be able to select HR.
  • Allow Problem Creation at Leaf Node Only: Enable if you want to allow the user to create or update problems only at the leaf node department. For example: If HR is the parent department and Operations is the sub-department. You will be allowed to create problem with Operations department only. You will not be able to select HR.
  • Allow Change Creation at Leaf Node Only: Enable if you want to allow the user to create or update changes only at the leaf node department. For example: If HR is the parent department and Operations is the sub-department. You will be allowed to create change with Operations department only. You will not be able to select HR.
  • Allow Release Creation at Leaf Node Only: Enable if you want to allow the user to create or update releases only at the leaf node department. For example: If HR is the parent department and Operations is the sub-department. You will be allowed to create release with Operations department only. You will not be able to select HR.
  • Display Department Hierarchy in Report: Enable if you want to display the department hierarchy in the generated report.

Once configured, click Update.

Branding

Every organization needs its own logo and branding. Motadata ServiceOps provides this facility to its users. It allows the users to customize the portal as per their requirement.

To view the Branding page, navigate to Admin > Organization > Branding.

This section provides you with two tabs: Details and Theme.

Details

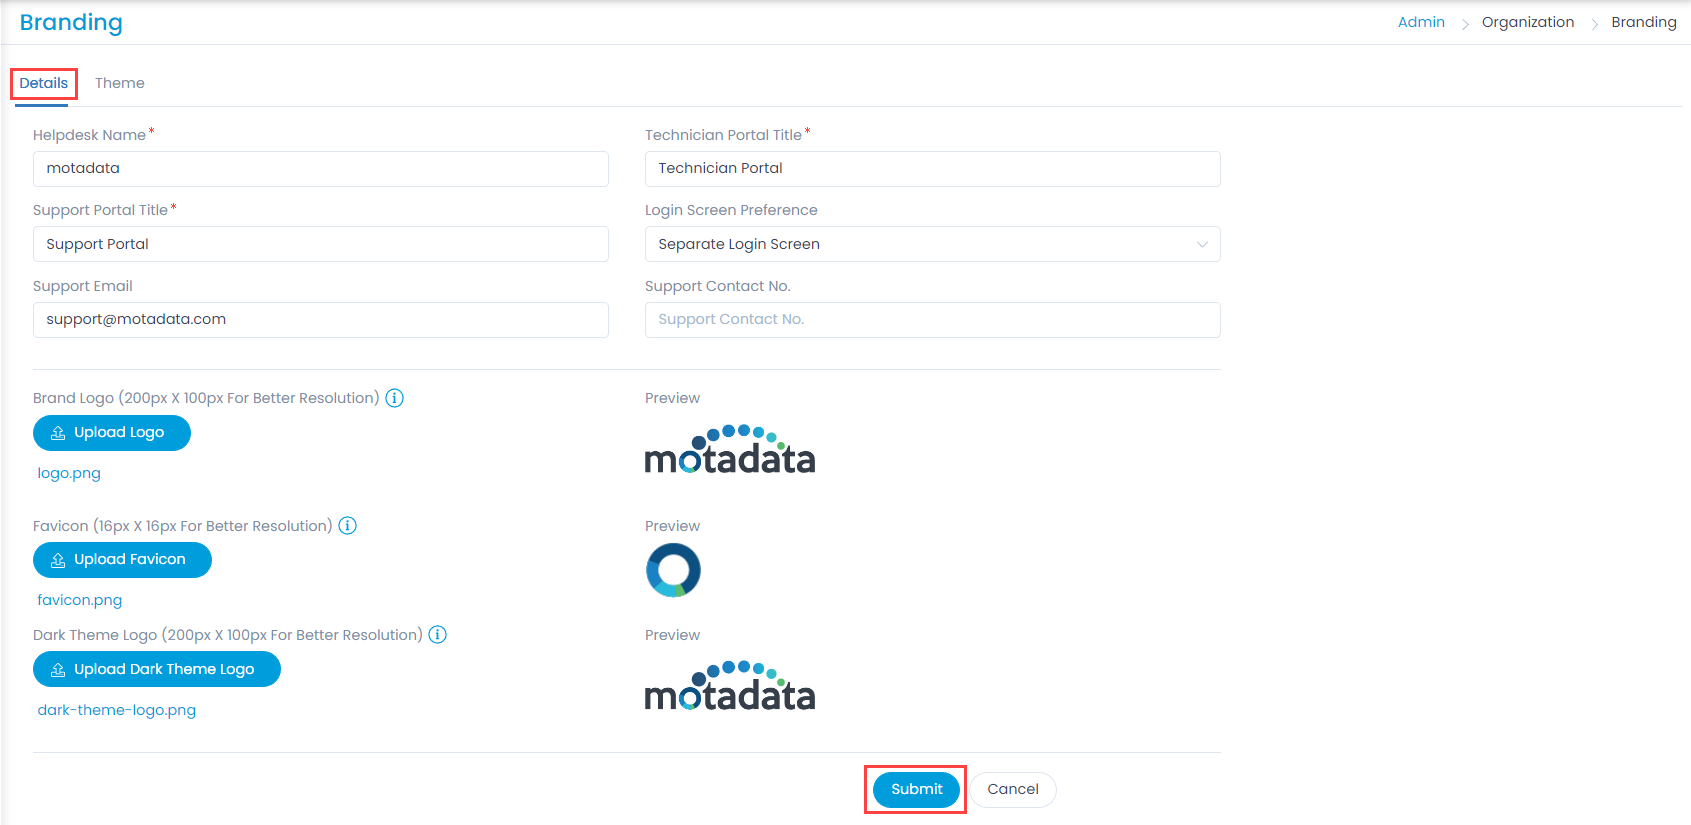
The details tab enables you to change the following details of the portal:

  • Helpdesk Name
  • Technician Portal Title
  • Support Portal Title
  • Login Screen Preference
  • Support Email
  • Support Contact No.
  • Brand Logo
  • Favicon
  • Dark Theme Logo
Details tab
Details tab

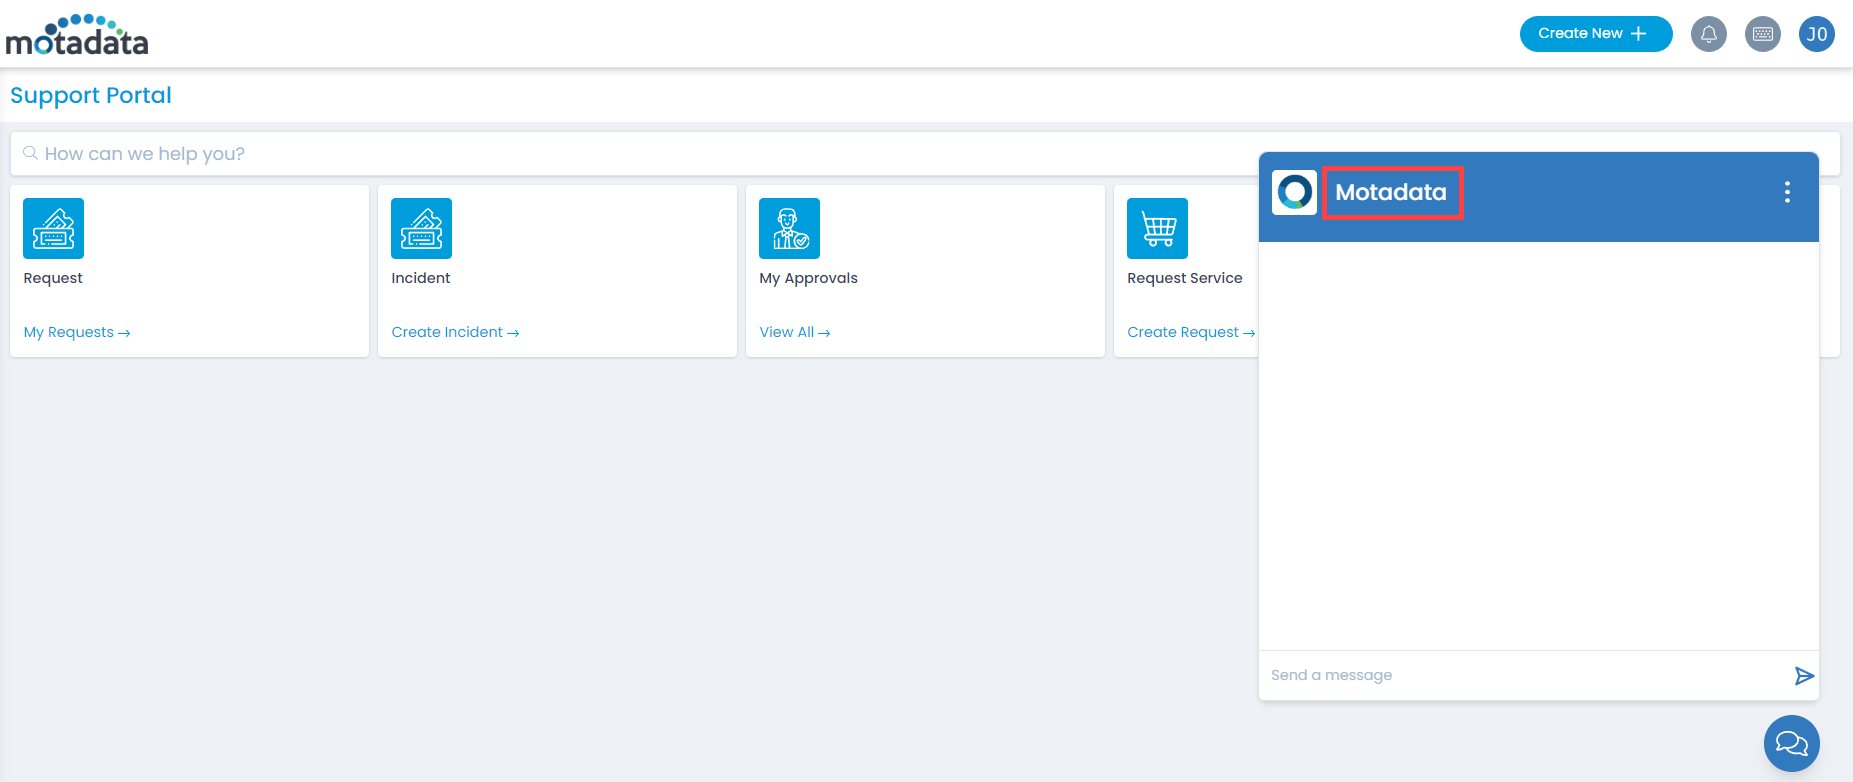
Helpdesk Name: The name configured here will be available on the Chatbot of the Support Portal.

Helpdesk Name
Helpdesk Name

Login Screen Preference
This parameter enables you to set the login screen that you want to view. By default, the Single Login Screen option is selected.
The options are:

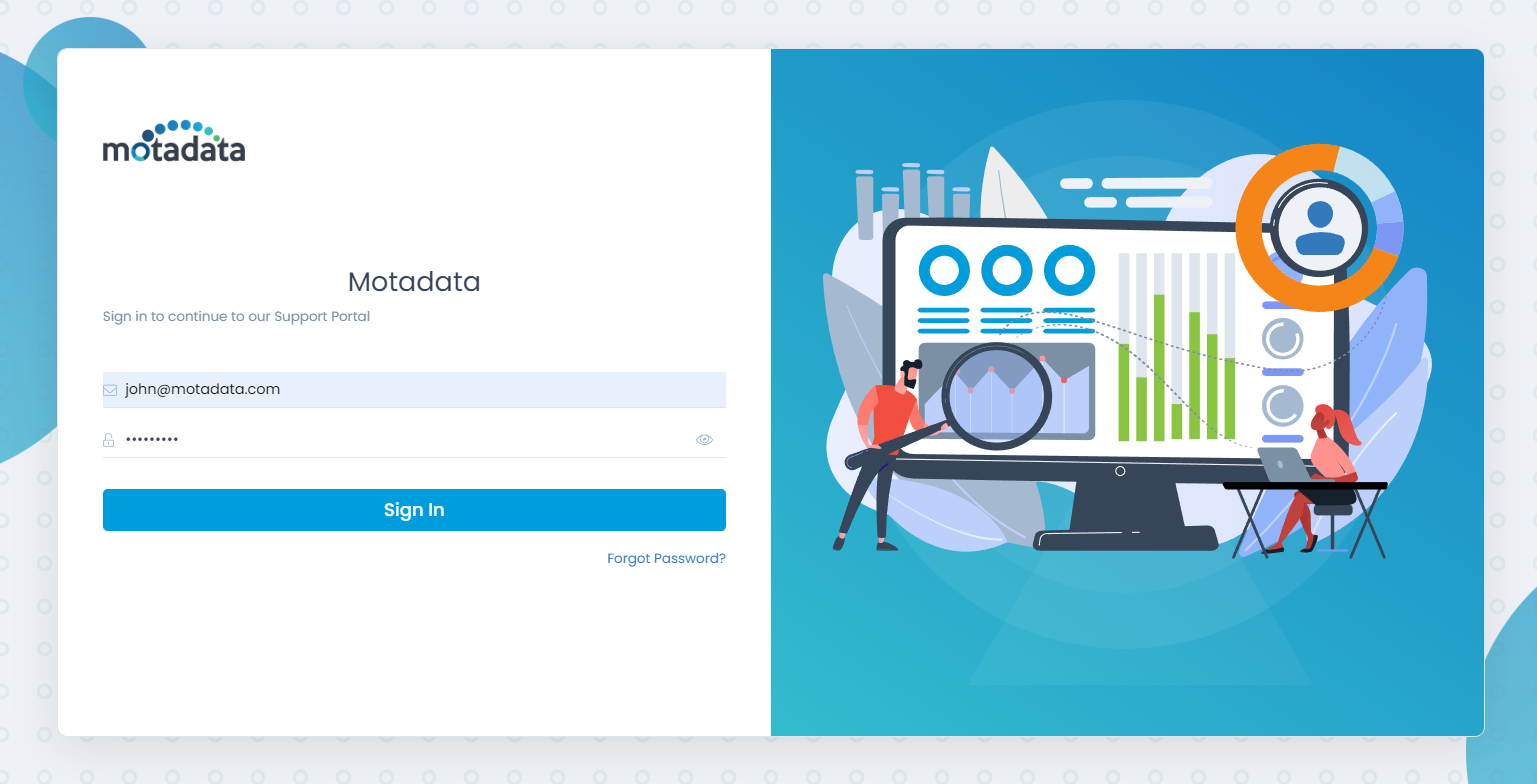
  • Single Login Screen: You can login to the Support Portal only.
Single Login Screen
Single Login Screen
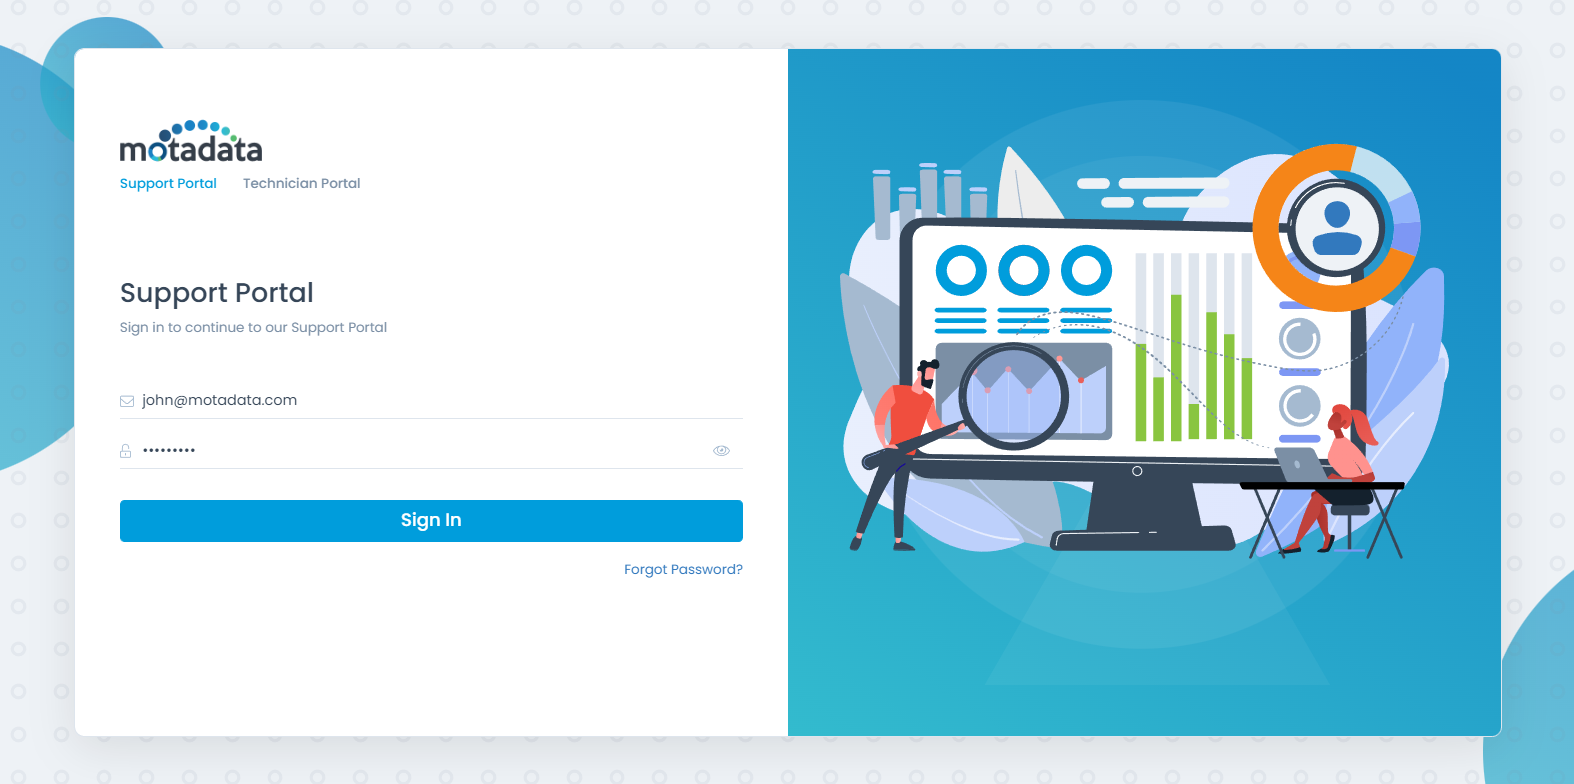
  • Separate Login Screen: You can login to both the Support and Technician portals.
Separate Login Screen

Also, you can preview the uploaded logo and favicon.

Once the changes are submitted, they will get reflected the next time when you login.

Theme

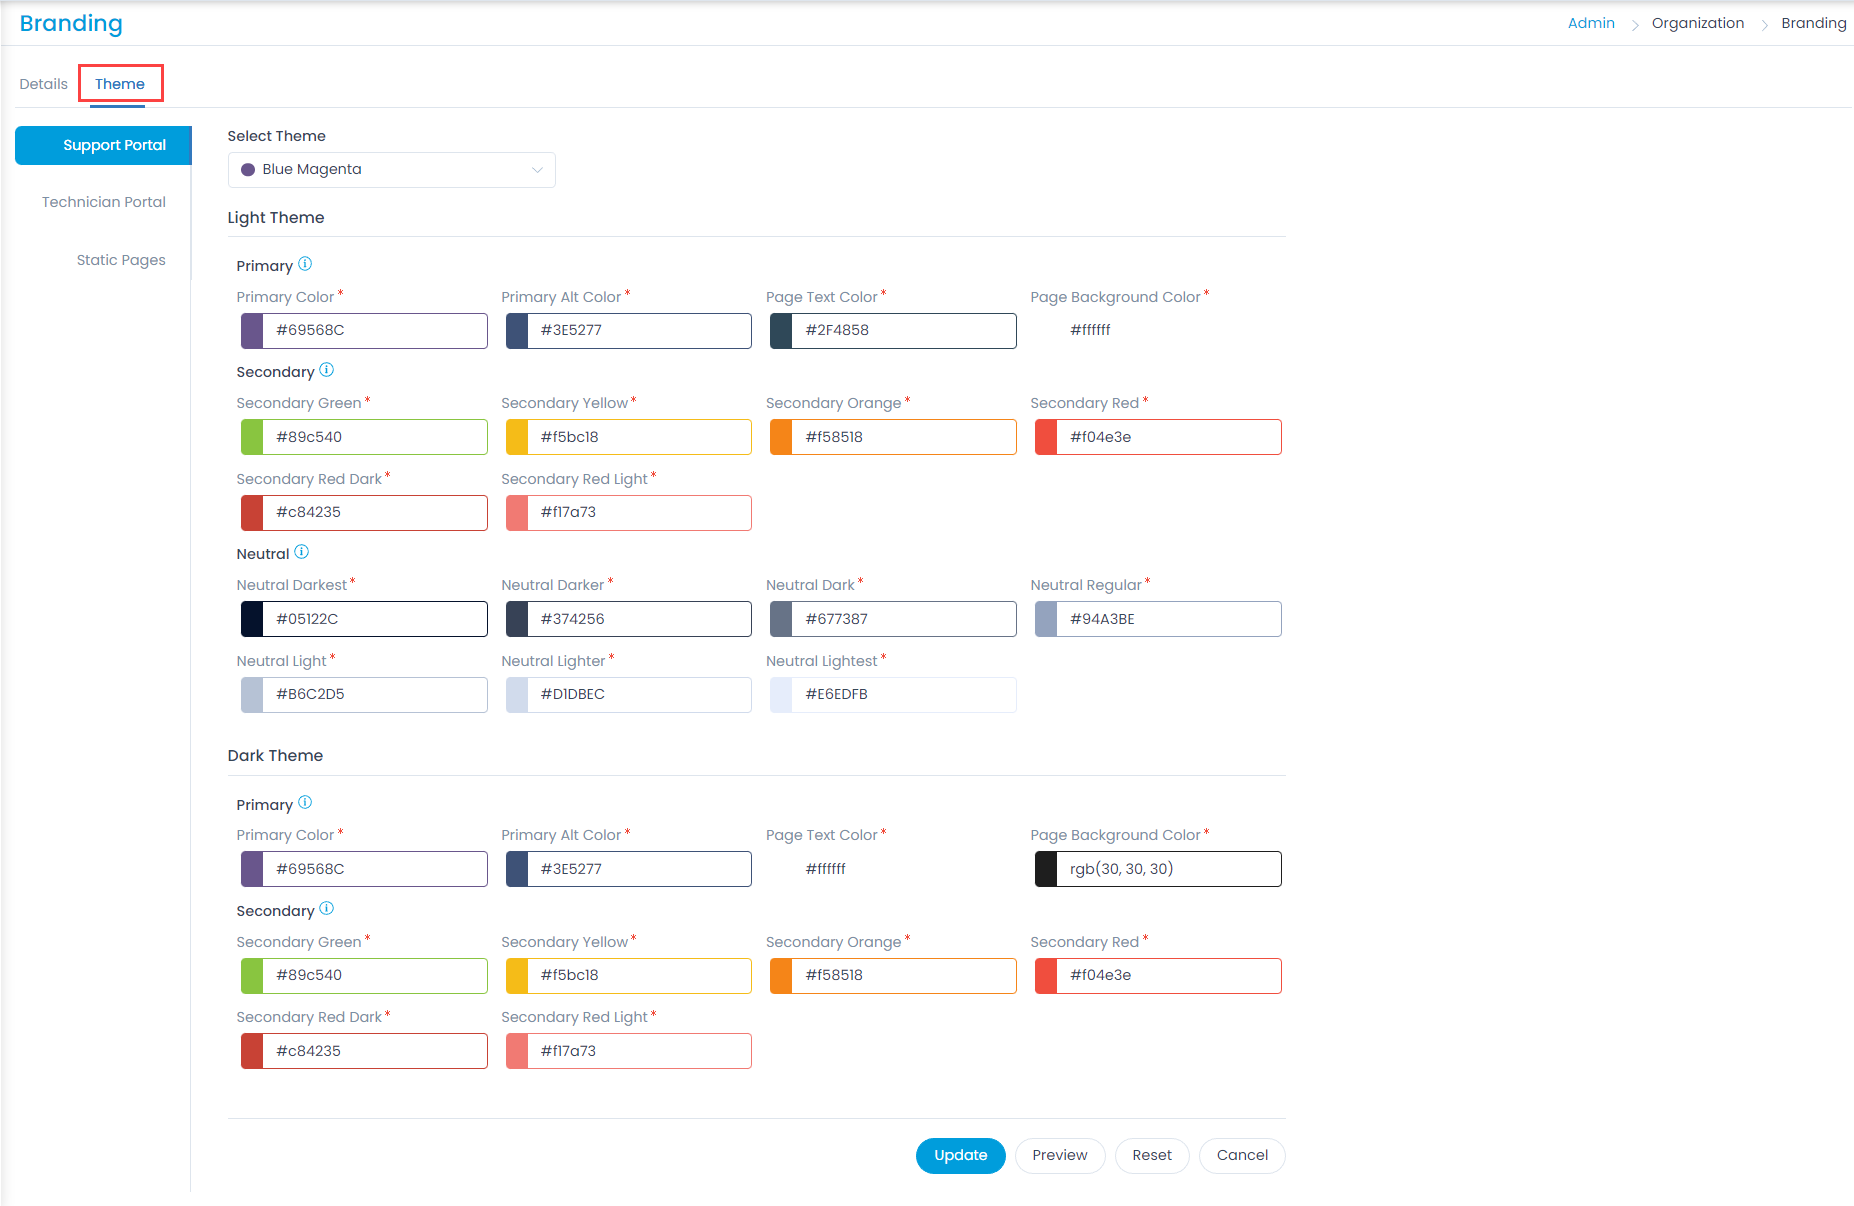
This tab enables you to customize the look and feel of the Support Portal, Technician Portal, and Static Pages of the application. You can change them to match your branding requirements. From here, you can define the dark and light theme colors for the portals as well as design the static pages using the HTML code.

Support Portal tab
Support Portal tab

Support and Technician Portal

To change the theme of the portals,

  1. Select the theme.
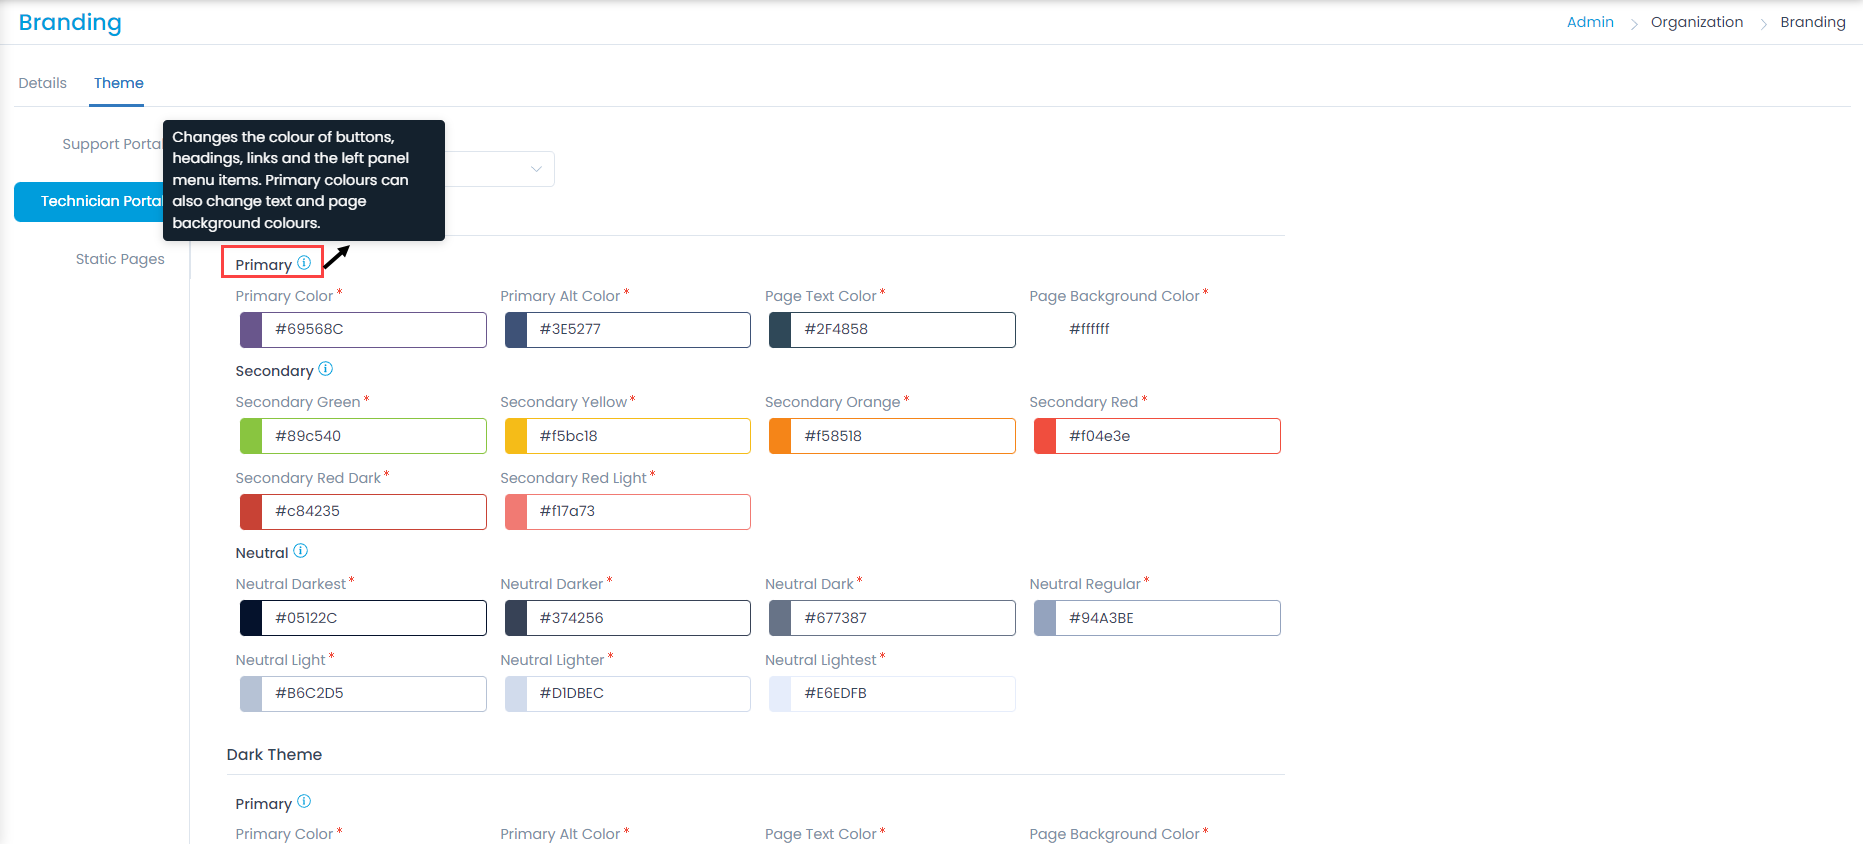
  2. Select the colors of the portal:
    • Primary: Changes the color of the buttons, headings, links, and the left panel menu items. You can also change the text and page background colors.
    • Secondary: Changes the color of the error/warning messages, alerts, and notifications including information and success banners.
    • Neutral: Changes the color of the buttons other than the ones changed by primary colors. Search tags, three-dot menu, the header of the grid or table, and the area highlighted on-hover can be changed.
  3. Once done, click Update to apply the theme. You can also preview the changes using the Preview button. To reset the theme to default, click the Reset button.
Tooltip for each color

Static Pages

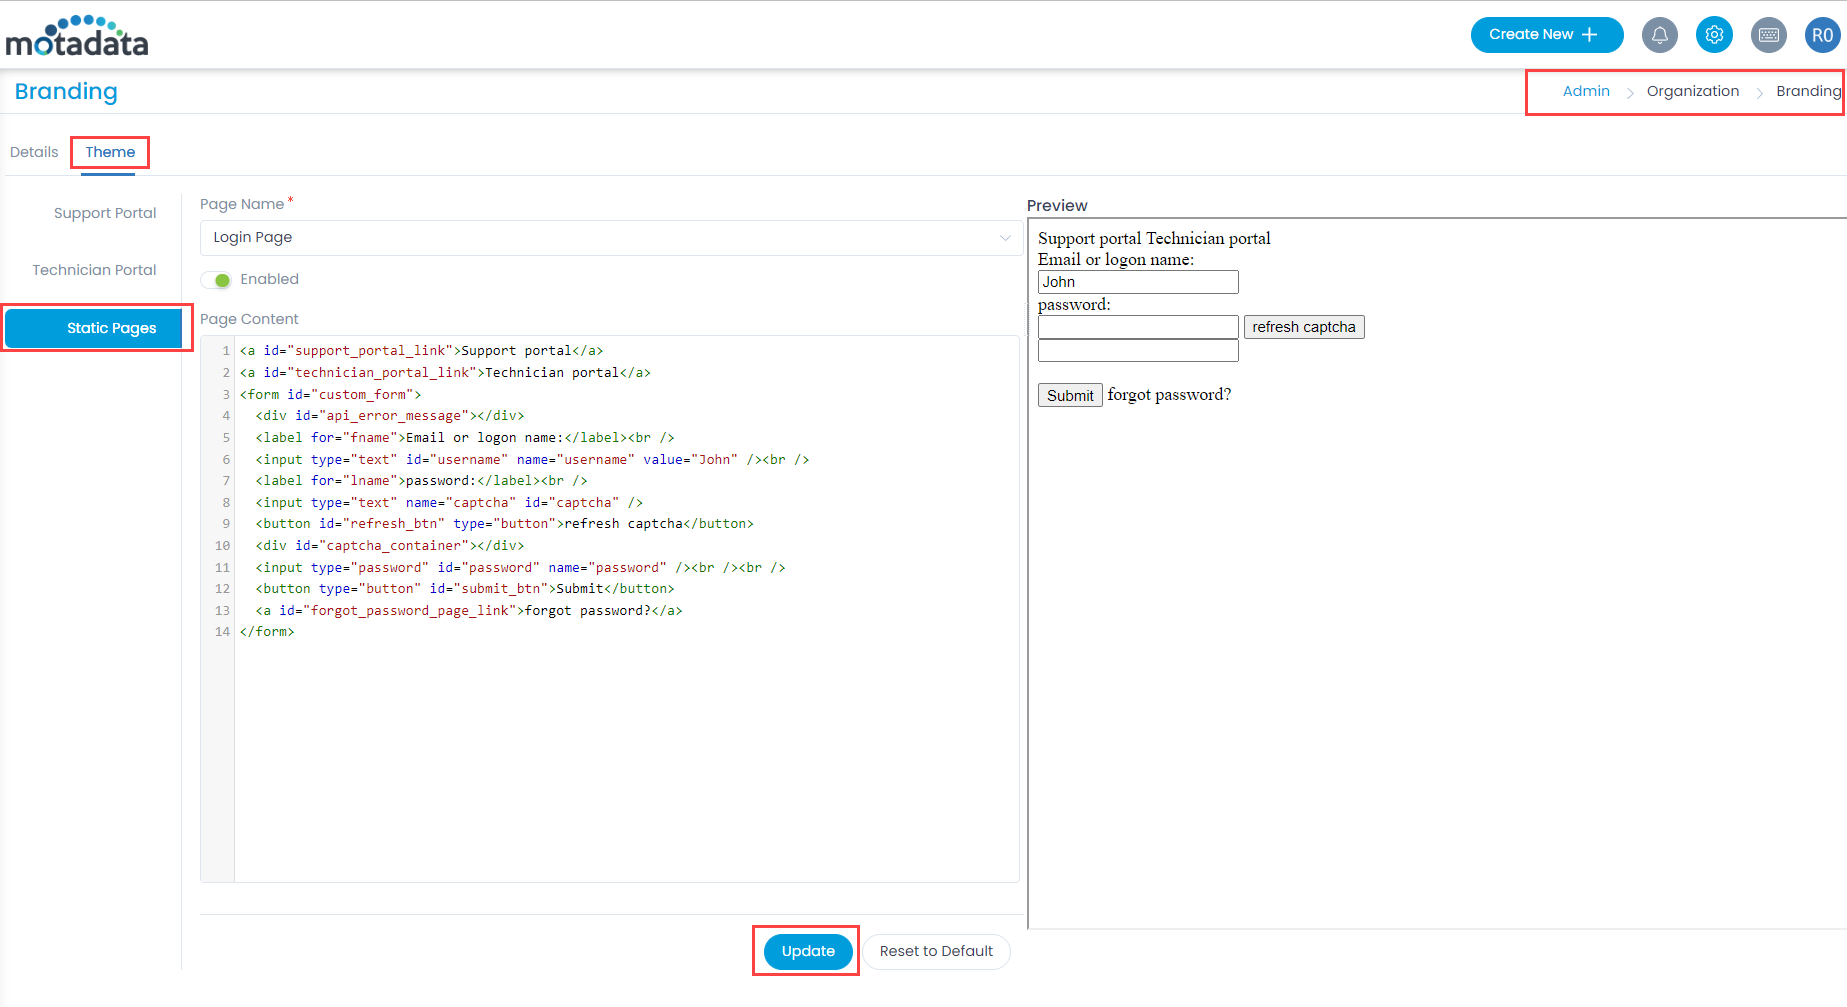
This tab enables you to customize the static pages like login page.

Static Page
Static Page

To customize, configure the desired settings as below:

  1. Page Name: You can select the desired Page Name from the drop-down. For example you wish to fix the the OTP Page select OTP Page.
  2. Enable: Enable the flag to save the selected changes.
  3. Page Content: Put the desired content for the selected page in the box. Here, the pages can be customized using html code.

Once you are done with the above input, you can Update the changes. Also, you can reset all the settings to the default using the Reset to Default button.

Account

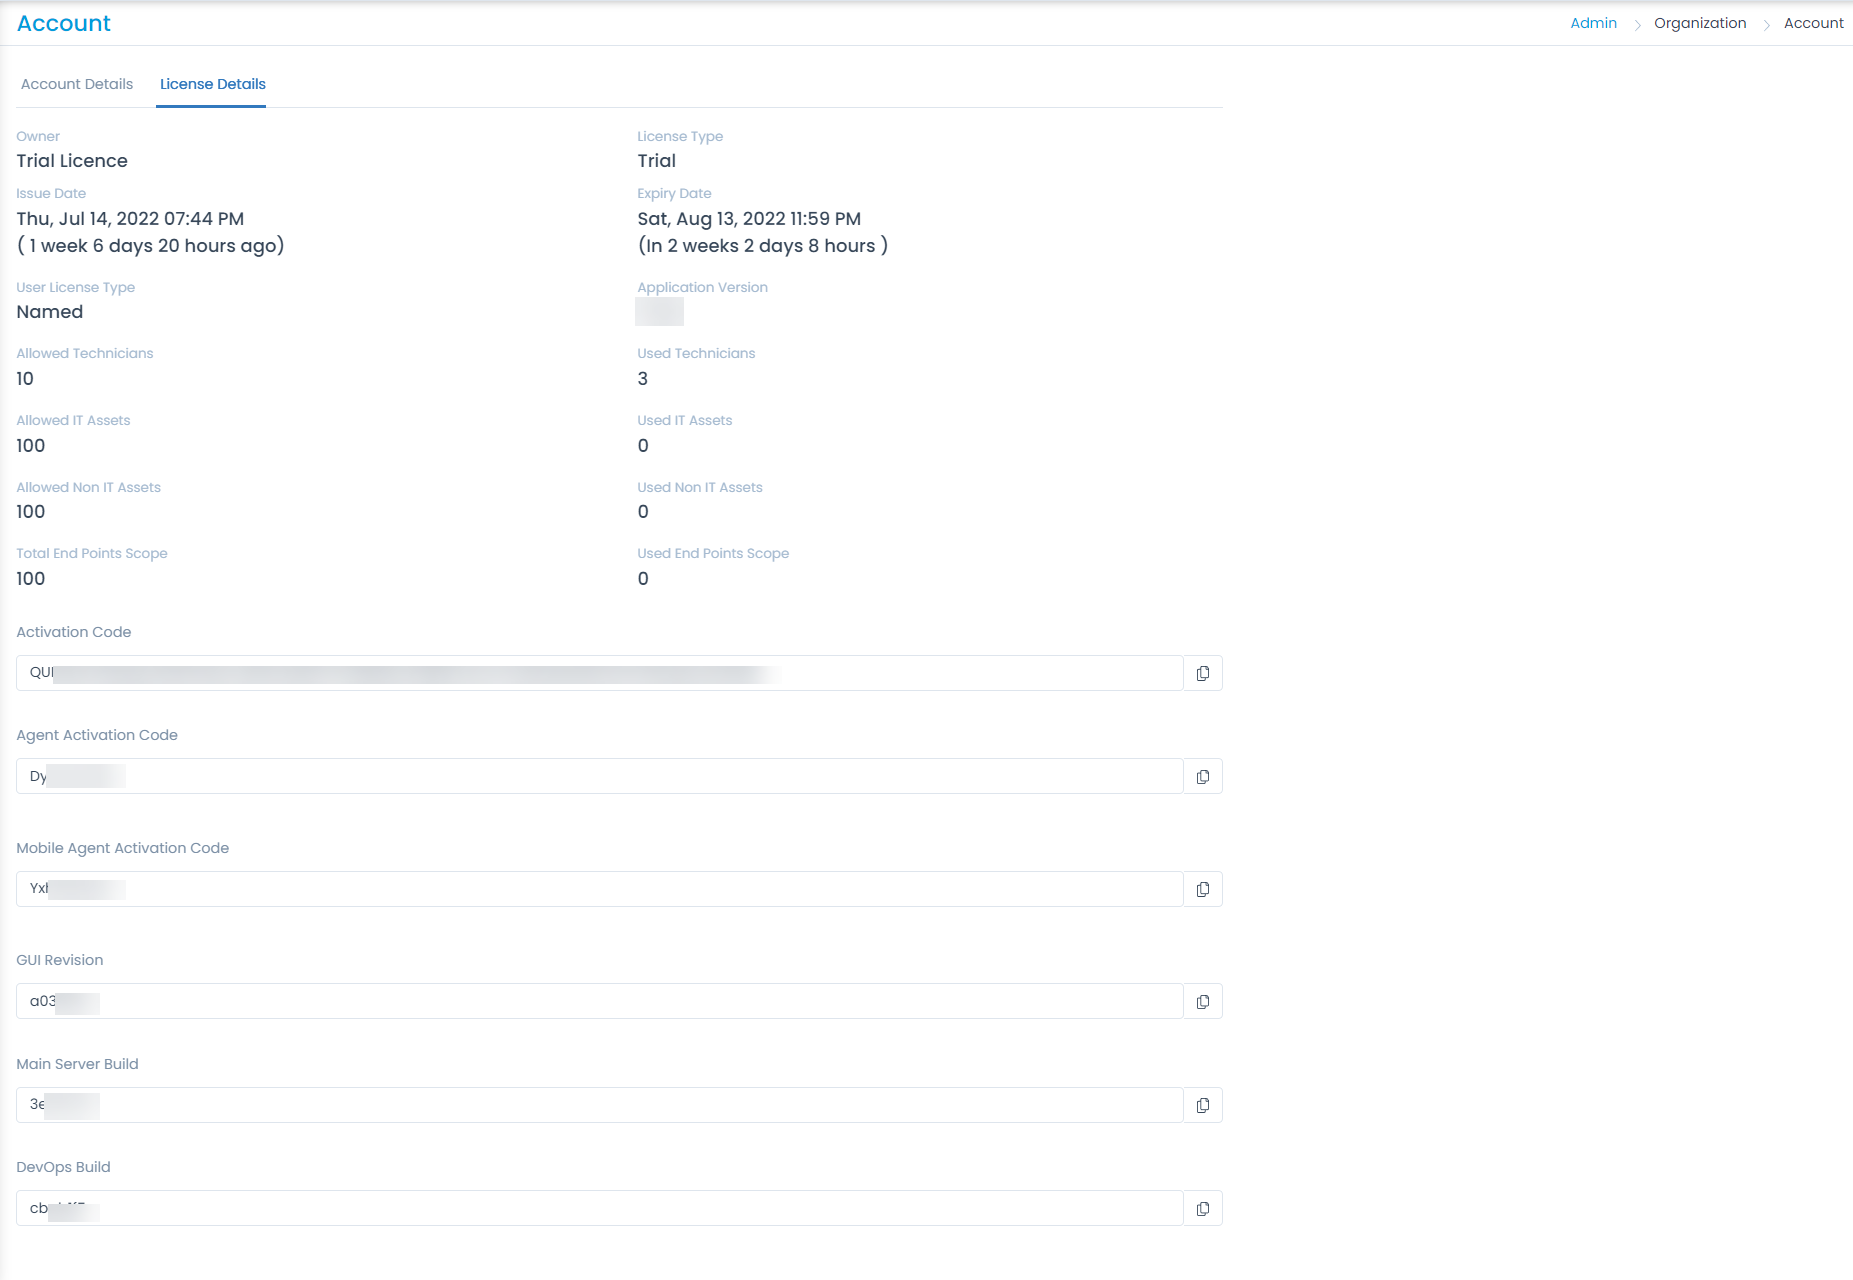
The account page displays the details of the company registered with Motadata. Also, it displays the license details.

To view the Account page, navigate to Admin > Organization > Account.

Account Details tab
Account Details tab
License Details
License Details