DMZ Server Installation

Installation link for Motadata DMZ Server

For Ubuntu 20Download Link

DMZ Setup

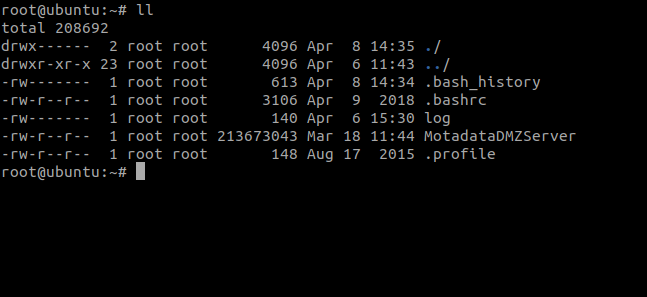
Step 1: Download DMZ- Server on ServiceOps Server.

Download
Download

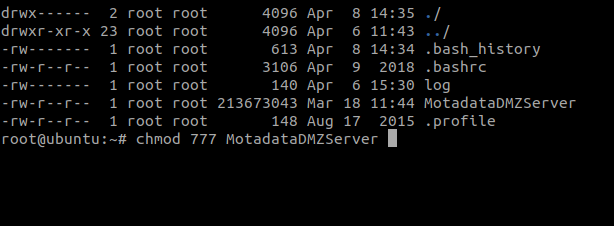
Step 2: Provide the execution permission to the file using the below command:
chmod 777 MotadataDMZServer

Permission
Permission

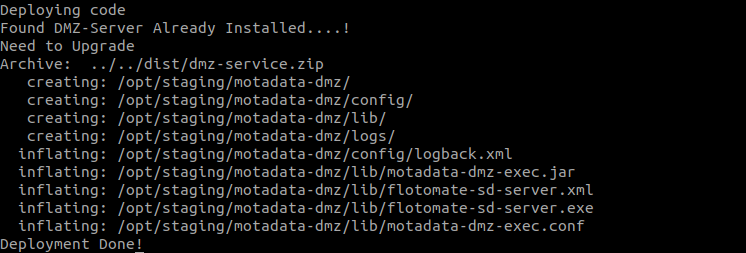
Step 3: Run the executable file using the below command:
./MotadataDMZServer

Execute Patch
Execute Patch
Status
Status
Status
Status
Status
Status

Step 4: Check service status using the below command:
systemctl status ft-dmz-server

Status
Status

File Server Installation

The File Server works as a File Storage for Patch and Package Management. It can be installed on the same machine where the main server is installed or on another machine which is reachable by the main server. The File Server is mandatory for Patch/Package Management. Thus the installation of File Server is required if the Patch Management license is enabled.

If the Patch/Package Management is running for multi location based organization then for each location we need to install one File Server on separate machine at respective locations and reachable to the main server. This is a preferable solution for multi location based organization. But, it can be managed by single File Server for a Single location based organization, where only one File Server is required to install.

Installation link for Motadata File Server

Ubuntu 20

Download Link

Redhat

Download Link

What is a File Server?

A file server is a computer responsible for central storage of data. A file server works in conjunction with our main server, and it’s the backbone for Remote Deployment. A file server is a must in the following usage scenarios:

  • Deployment of Patches.
  • Deployment of Packages.
  • Self-upgrade of Motadata Agent application.

Installation Steps

Step 1: Download the Motadata File Server.

Download
Download

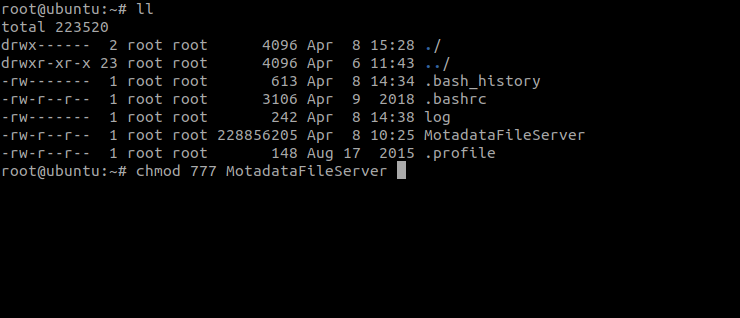
Step 2: Provide the execution permission to the file using the below command:
chmod 777 MotadataFileServer

Permission
Permission
Permission
Permission

Step 3: Run the executable Patch package file using the below command:
./MotadataFileServer

Execute Patch
Execute Patch

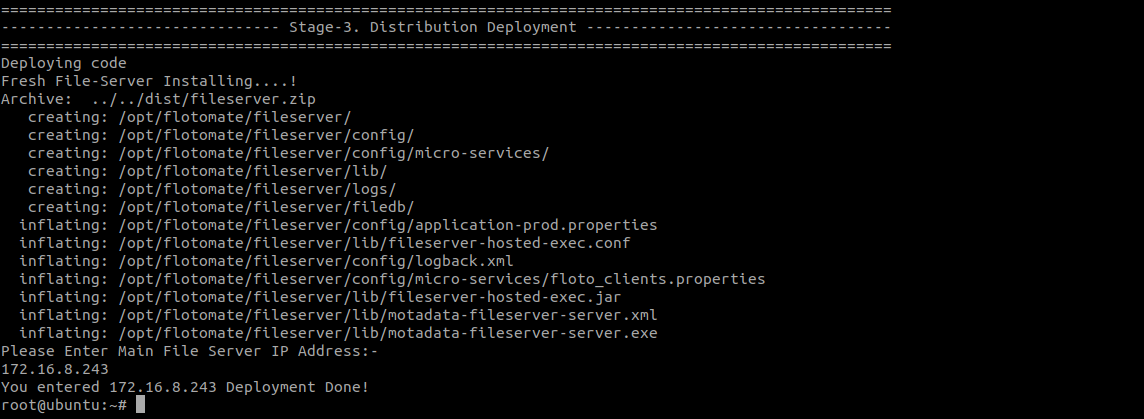
Step 4: Enter the Main-server(ServiceOps) IP address during installation.

Executed Patch
Executed Patch
Executed Patch
Executed Patch
Executed Patch
Executed Patch

Step 5: Check the Motadata File Server Service using the below command:
systemctl status ft-file-server

Status
Status

Motadata File Server Windows

The File Server works as a File Storage for Patch and Package Management. It can be installed on the same machine where the main server is installed or on another machine which is reachable by the main server. The File Server is mandatory for Patch/Package Management, thus is mandatory if Patch Management license is enabled.

If Patch/Package Management is running for multi location based organization then for each location we need to install one File Server on separate machines at respective locations and reachable to the main server. This is a preferable solution for multi location based organization. But, can be managed by single File Server for a Single location based organization, where only one File Server is required to install.

This installation setup is for the Windows machine. Please follow the below steps:

Installation link

Windows

Download Link

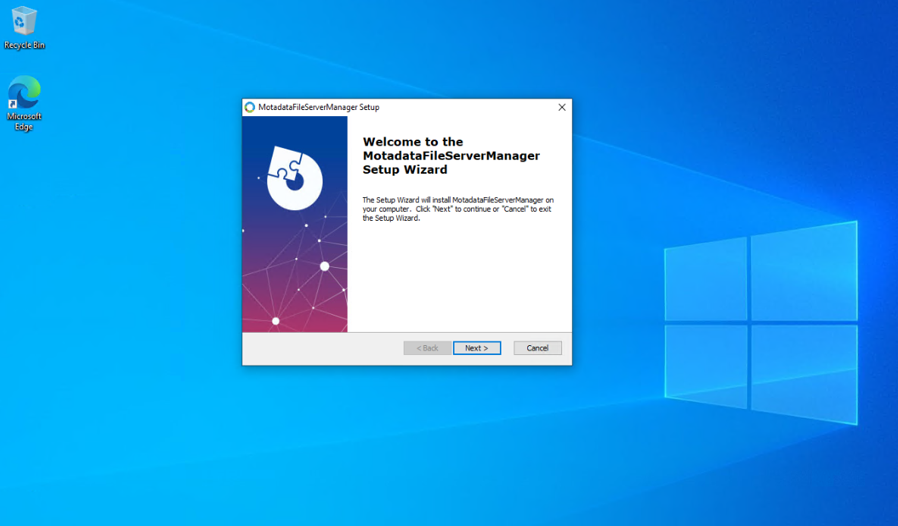
After installing the Windows server from the above link, click next for the further installation.

Step 1: Download the Motadata File Server.

File Setup Wizard
File Setup Wizard

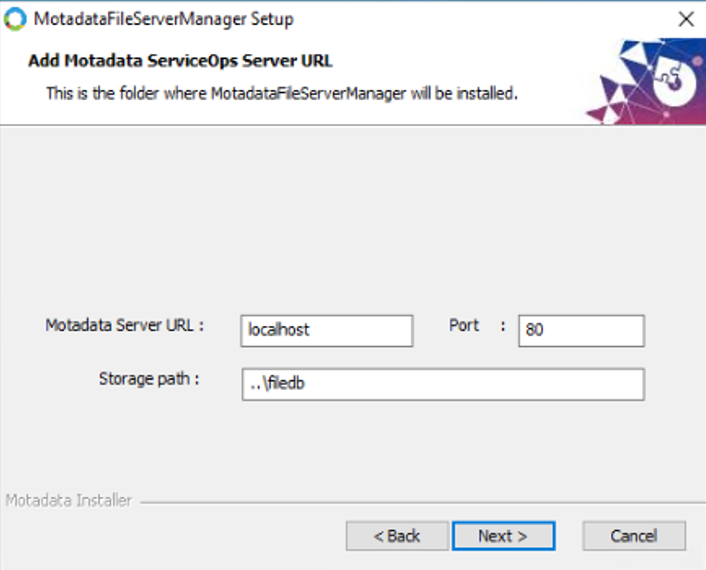
Step 2: Provide the Server URL, Port, and Storage path as shown below. Click ‘Next’ once done.

Server URL, Port
Server URL, Port

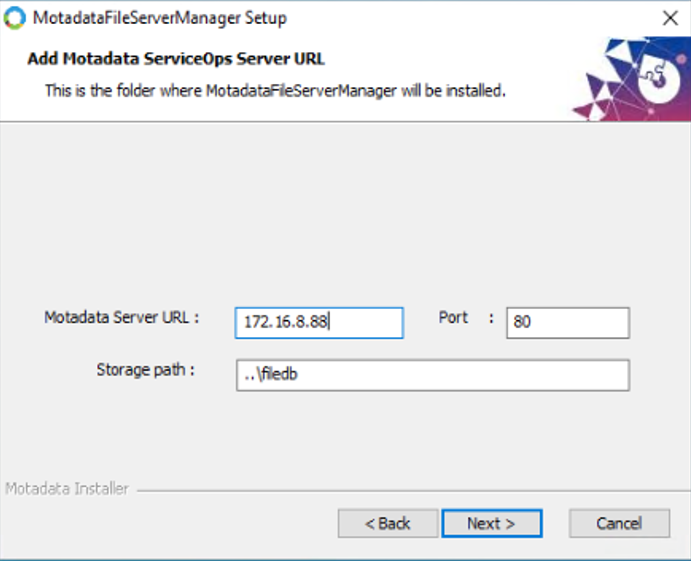
Step 3: Replace the Localhost in Server URL with the IP address as shown below. Click ‘Next’ once done.

Replace with IP
Replace with IP

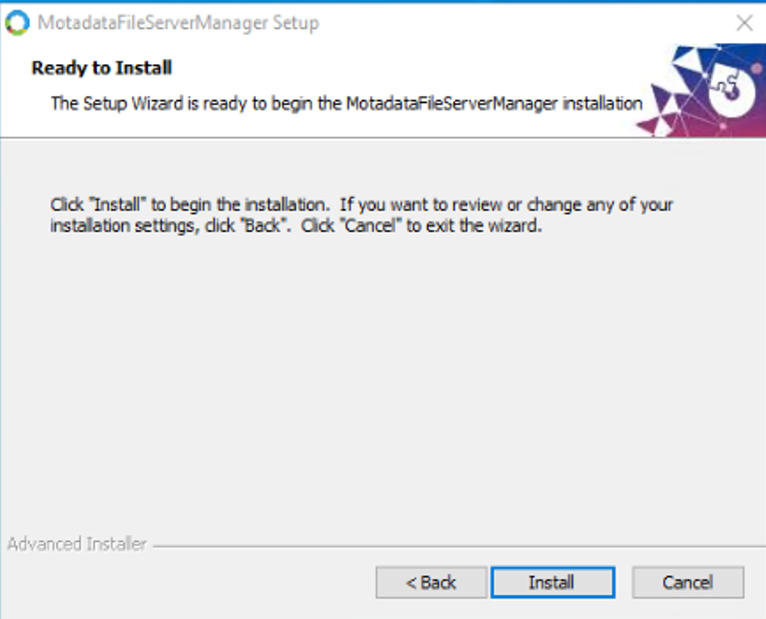
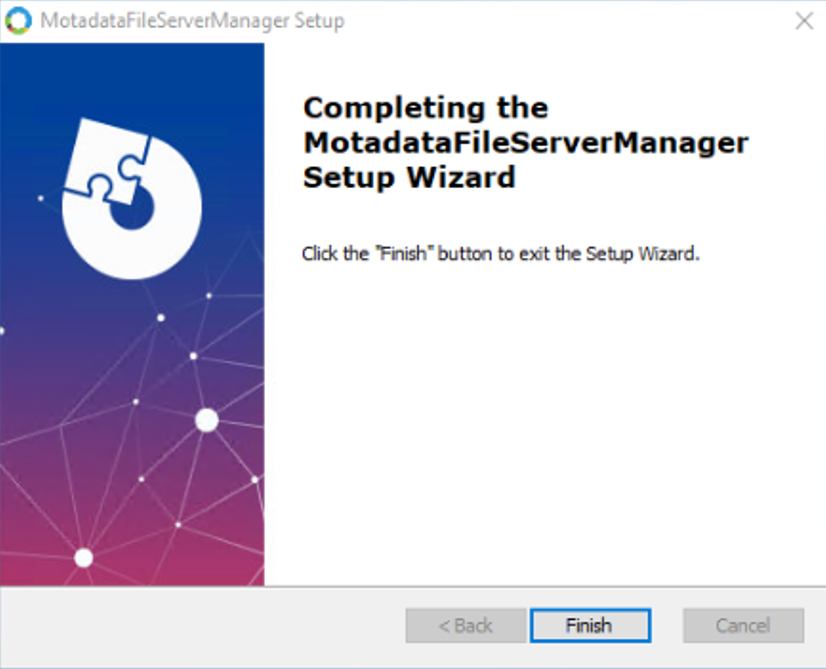
Step 4: The installation steps are completed, thus click Install. And, then click on ‘Finish’ to end the process.

Install
Install
Finish
Finish
Note: Motadata File Server Windows Setup needs Dot Net 3.5 Framework.

Patch Installation

A patch is a piece of software designed to update a Computer program and its supporting data. Basically it is used for improvement the existing working capability and performance of any software of application. Fixing Patch includes fixing security vulnerabilities and other bugs which is usually called as bug fixes

Here, we can divide Patch for ServiceOps in two different ways:

  1. Front-End Patch
  2. Back-End Patch

Notes:

  • Patch fix can be applied for the same version of ServiceOps only. For example. ServiceOps 1.0 patch cannot be applied to ServiceOps 1.1.
  • Please Use Sudo command or Root User for execution.

Front-End Patch

Step 1: Download the file in the ServiceOps Main Server.

Step 2: Provide the execution permission to the file using the below command:
chmod 777 frontend_patch

Permission
Permission

Step 3: Run the executable Patch package file using the below command:
./frontend_patch

Execute Patch
Execute Patch

Step 4: After applying the patch successful, check nginx service status using the below command:
systemctl status nginx

Status
Status

Back-End Patch

As a part of Back-End patch there are in total 3 files which needs to be executed for a successful operation.

Note: If both the Frontend and Backend patches are to be applied at the same time, initially you need to apply the Frontend Patch and later apply the Backend Patch.

Step 1: Download the file in the ServiceOps Main Server.

Step 2: Provide the execution permission to the files using the below commands:
chmod 777 main_server_patch
chmod 777 discovery_service_patch
chmod 777 cm-analytics_patch

Permission
Permission
Permission
Permission
Permission
Permission

Step 3: Run the executable Patch package files using the below command:
./main_server_patch
./discovery_service_patch
./cm-analytics_patch

Execute Patch
Execute Patch
Execute Patch
Execute Patch
Execute Patch
Execute Patch

Step 4: After applying the patch successful, check the status of services using below commands:
systemctl status ft-main-server
systemctl status ft-discovery-service
systemctl status ft-analytics-server

Status
Status
Status
Status
Status
Status

Reactivate License using API

The license of Motadata ServiceOps is binded with the MAC address of the server. In an event where an admin decides to migrate the product to a different server, it will throw an error of license not being enough. This error is due to the change in MAC address.

In order to resolve the issue, the admin has to make an api call to http//server-ip/api/public/activationcode which will yield an activation key. Client will provide the activation key to Motadata Team and then they would use it to generate a new license.

License Activation
License Activation

How to Update Product License ?

Server should possess the latest build installed.

Installation Setup

After downloading the license.lic file, follow the below steps to set up the license file in the Product Server:

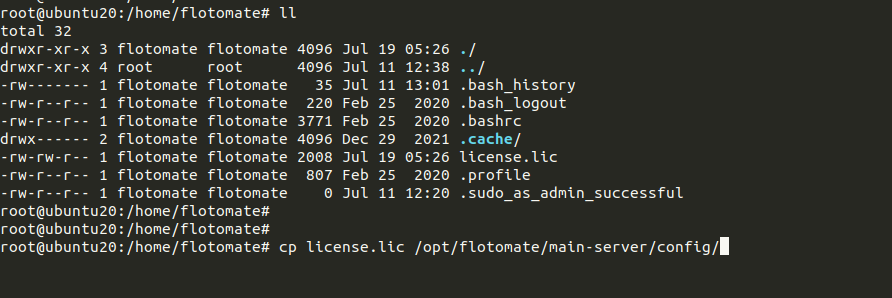
  1. Copy lic file on config using the below command:
    cp license.lic /opt/flotomate/main-server/config/
Copying lic file on Config
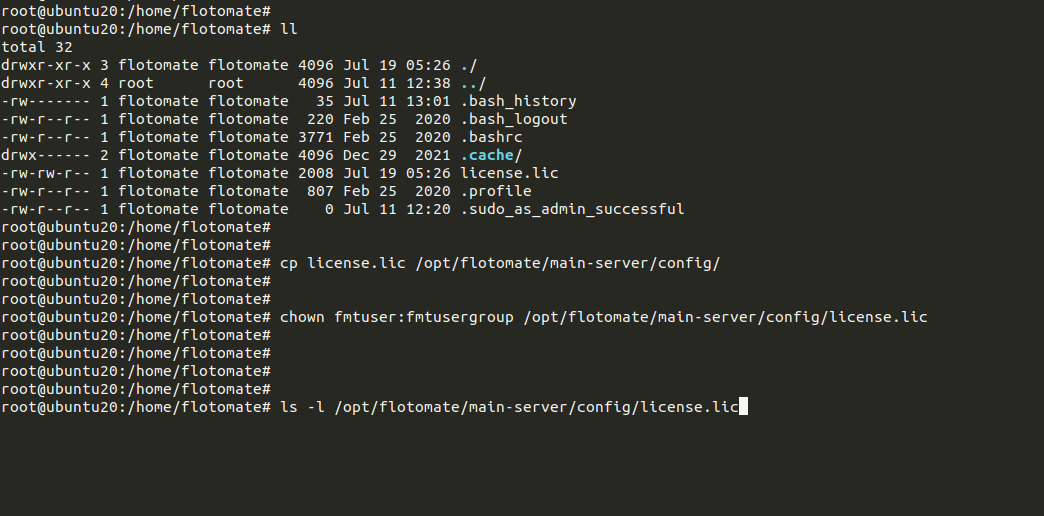
  1. After successfully copying, assign ownership using the below command:
    chown fmtuser:fmtusergroup /opt/flotomate/main-server/config/license.lic
Assigning Ownership
Assigning Ownership
  1. Verify and check the copied file, and the assigned ownership.
    ls -l /opt/flotomate/main-server/config/license.lic
Verify the Copied File and Assigned Ownership
  1. Stop and Start the services using the below command:
    systemctl stop ft-main-server
    systemctl stop ft-analytics-server
Stop and Start the Main Server Service
Stop and Start the Analytics Server Service

systemctl start ft-main-server
systemctl start ft-analytics-server

  1. Check the Status of server using the below commands:
    systemctl status ft-main-server
Checking the status of server

systemctl status ft-analytics-server

Checking the status of server
  • License file can be upgraded via Portal using the below steps:
  1. Login to the Technician Portal.
  2. Go to Admin > Organization > Application Maintenance.
Uploading Product License
  1. Go to Product License and select the License.lic file stored in the Local PC.
  2. Once the file gets uploaded, the License gets Upgraded.

Motadata Service Desk – Server Upgrade Guide

Notes:

  • The upgrade of the server has to be done incrementally. Meaning, from build 1.0 you cannot jump to 1.2; you have to download the in between version.
  • Kindly perform a DB backup before doing an upgrade.
  1. It is recommended that you take the snapshot of your existing virtual machine before proceeding with upgrade.
  2. Download the required release build from the below links:
  3. Copy release build installer (service_desk_master_CI) to target machine.
  4. Make sure you have the execute permission to build the file. If you do not have the execute permission then you can change it by using the below command:
    sudo chmod 777 service_desk_master_CI
  5. Run Installer using the following command:
    sudo ./service_desk_master_CI
Run Installer
Run Installer

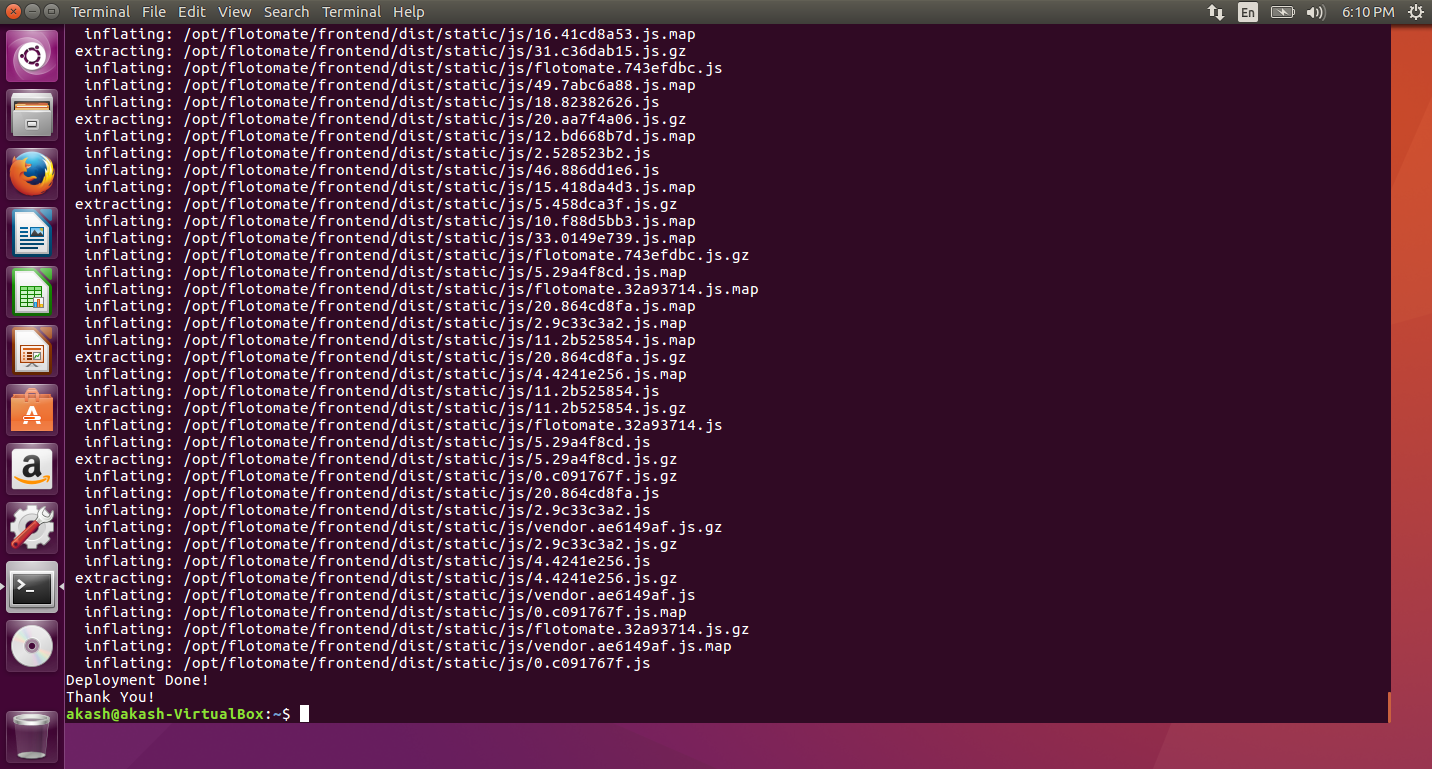
Once you see the below screen, that means you have successfully upgraded the product.

Deployment Done
Deployment Done
  1. Now wait for at least 5 Minutes to allow restart of all the Motadata services.
  2. Now, you can login to Motadata as usual and start using the product.
Login
Login

Agent Bulk Installation Using GPO

What is a Group Policy?

A group policy contains configurations that help the network administrators to control the environment of Active Directory users and computers.

What is a Group Policy Object?

Group Policy Objects (GPOs) are a group of policy settings based on which certain actions can be enforced on all users and computers in the Active Directory Domain. Using this you can deploy software packages for multiple users, thus saving time and money.

Microsoft provides a simple way to deploy software and also a quick solution to uninstall it when needed.

For example: If you want to install agents in bulk for all the users and computers, you can create a GPO policy.

Configuring the Group Policy Object

To create a Group Policy Object, follow the below steps:

Note: To apply a Group Policy, either Domain or Local administrator rights are required.
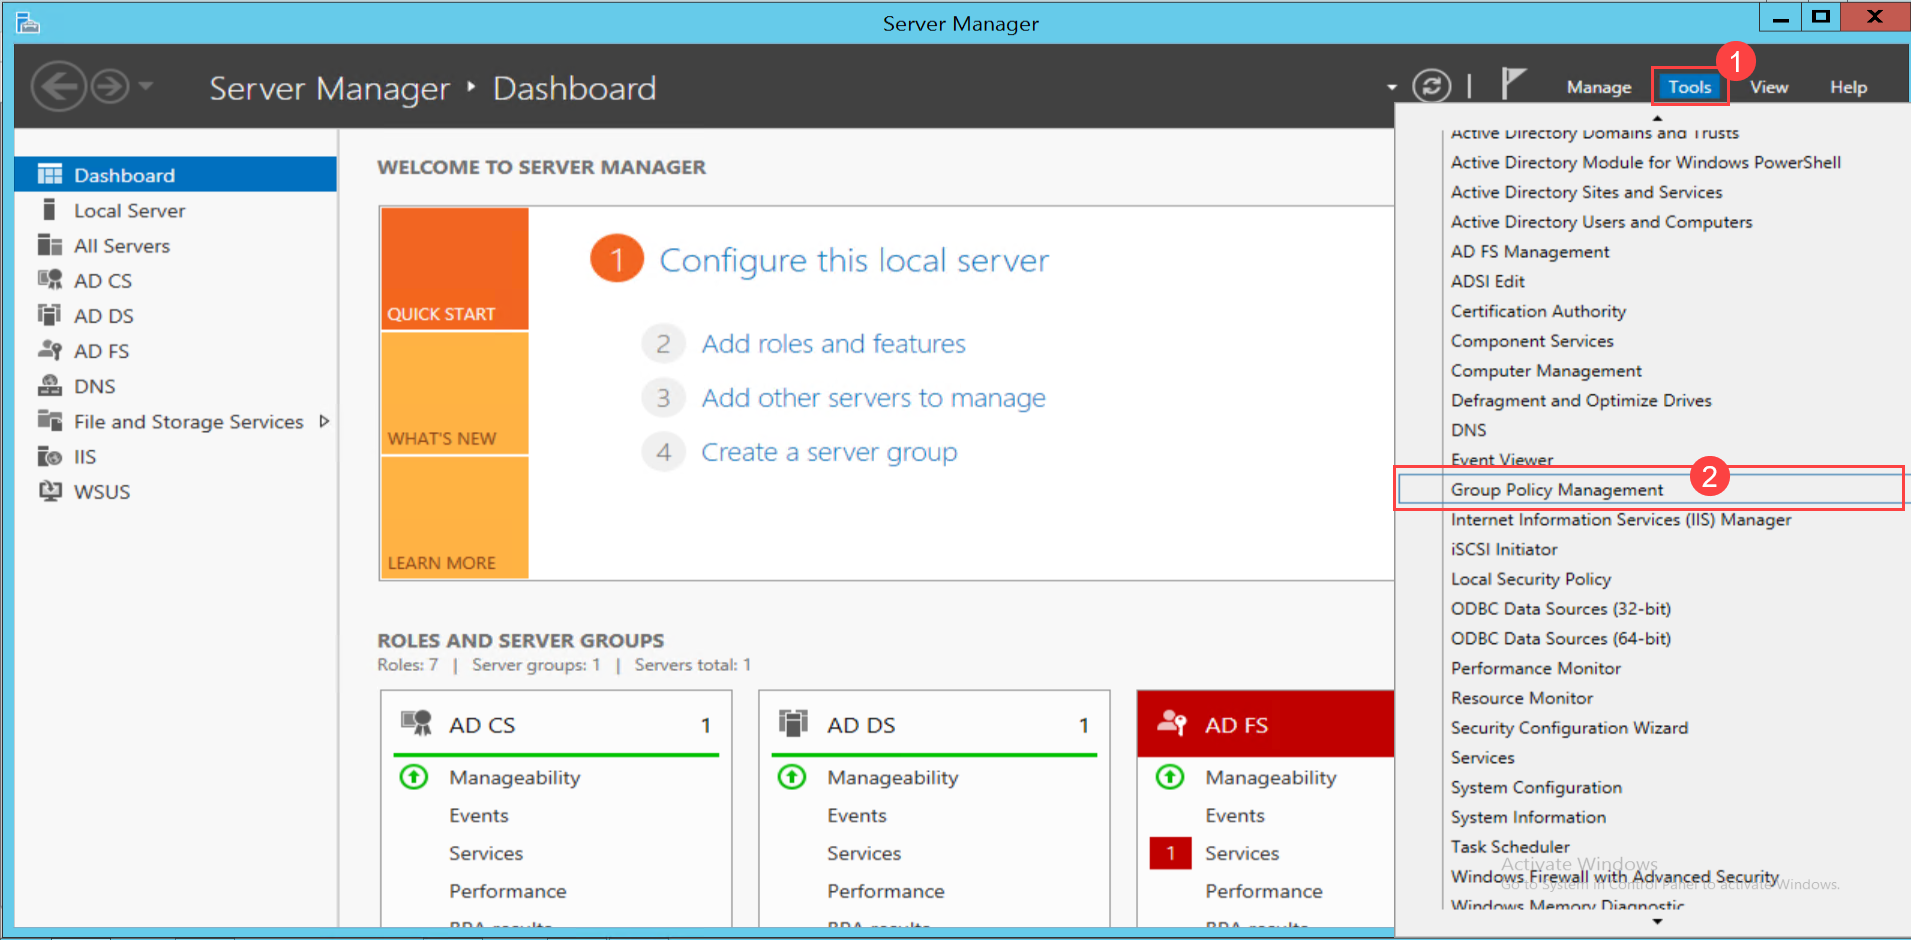
  1. Open the Server Manager from the menu and navigate to Tools > Group Policy Management.
Server Manager
Server Manager
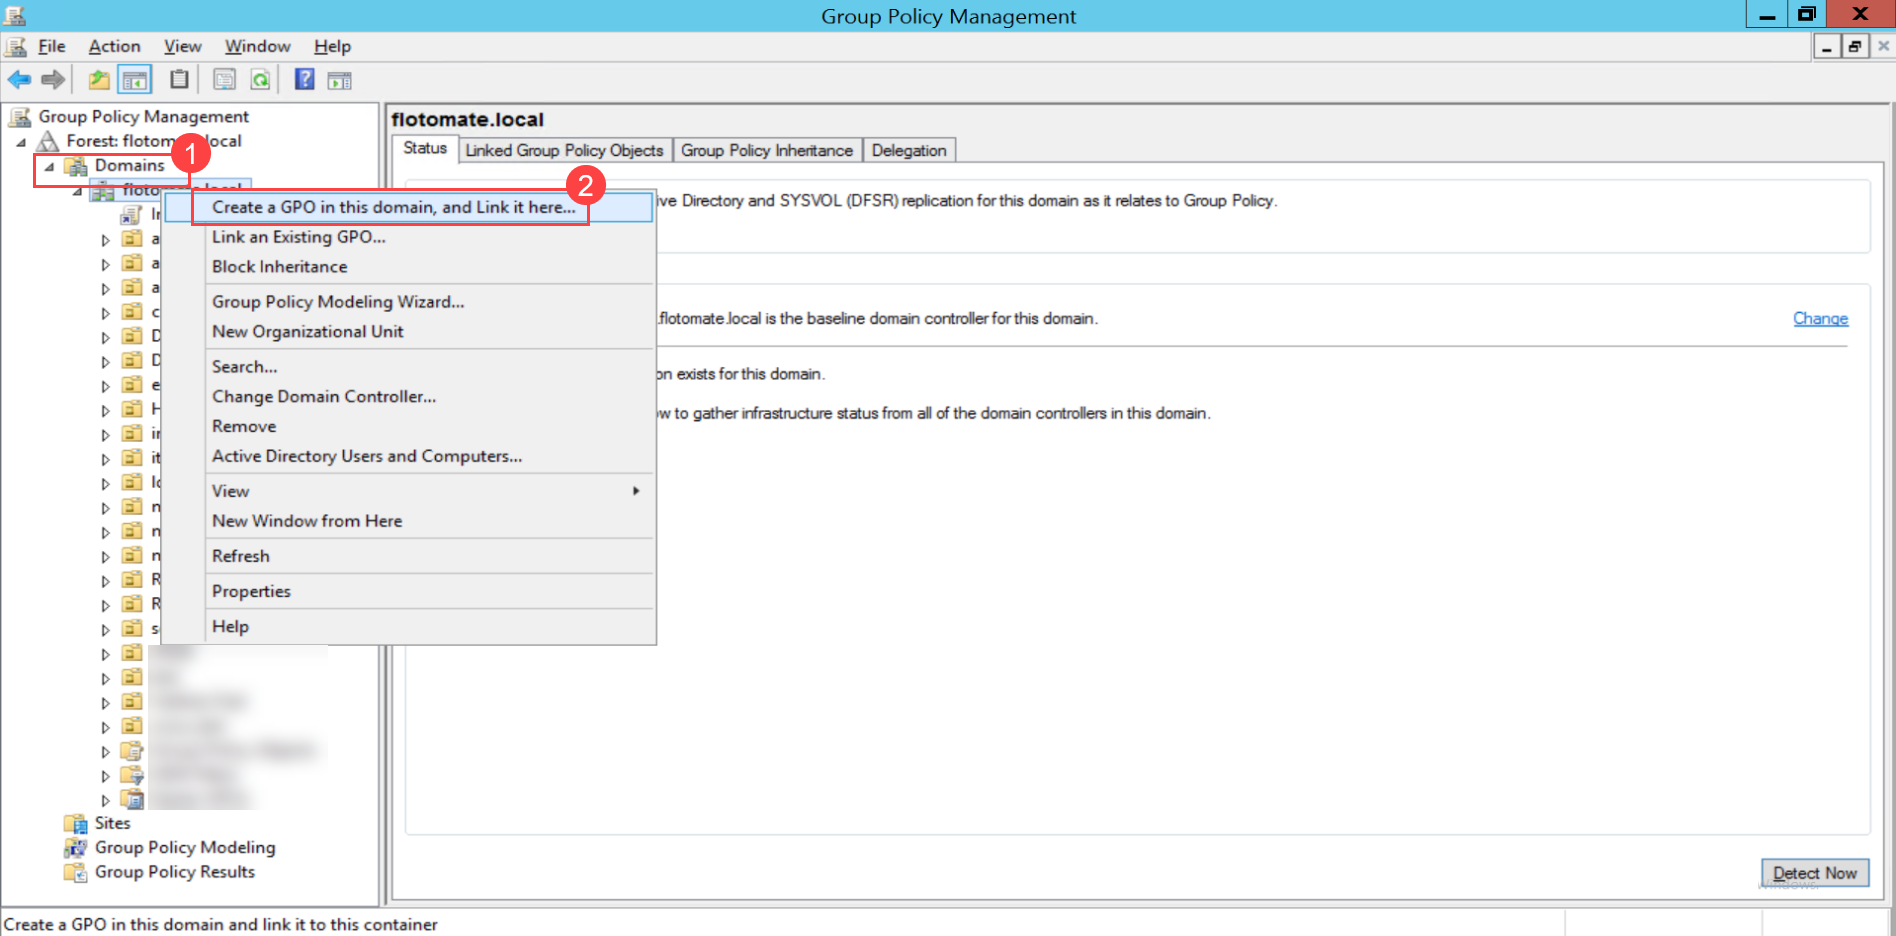
  1. Expand the Domains tree, select the desired domain, right-click, and select the option Create a GPO in this domain and Link it here.
Group Policy Management

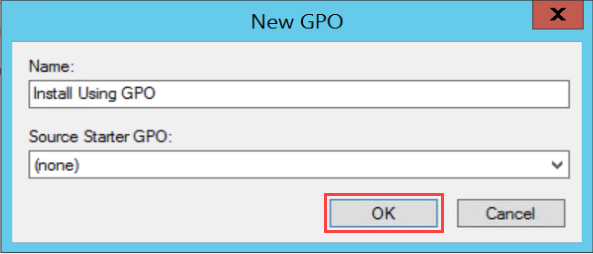
The following popup appears.

  1. Create a new GPO policy by entering the name and clicking OK.
Create a new GPO Policy
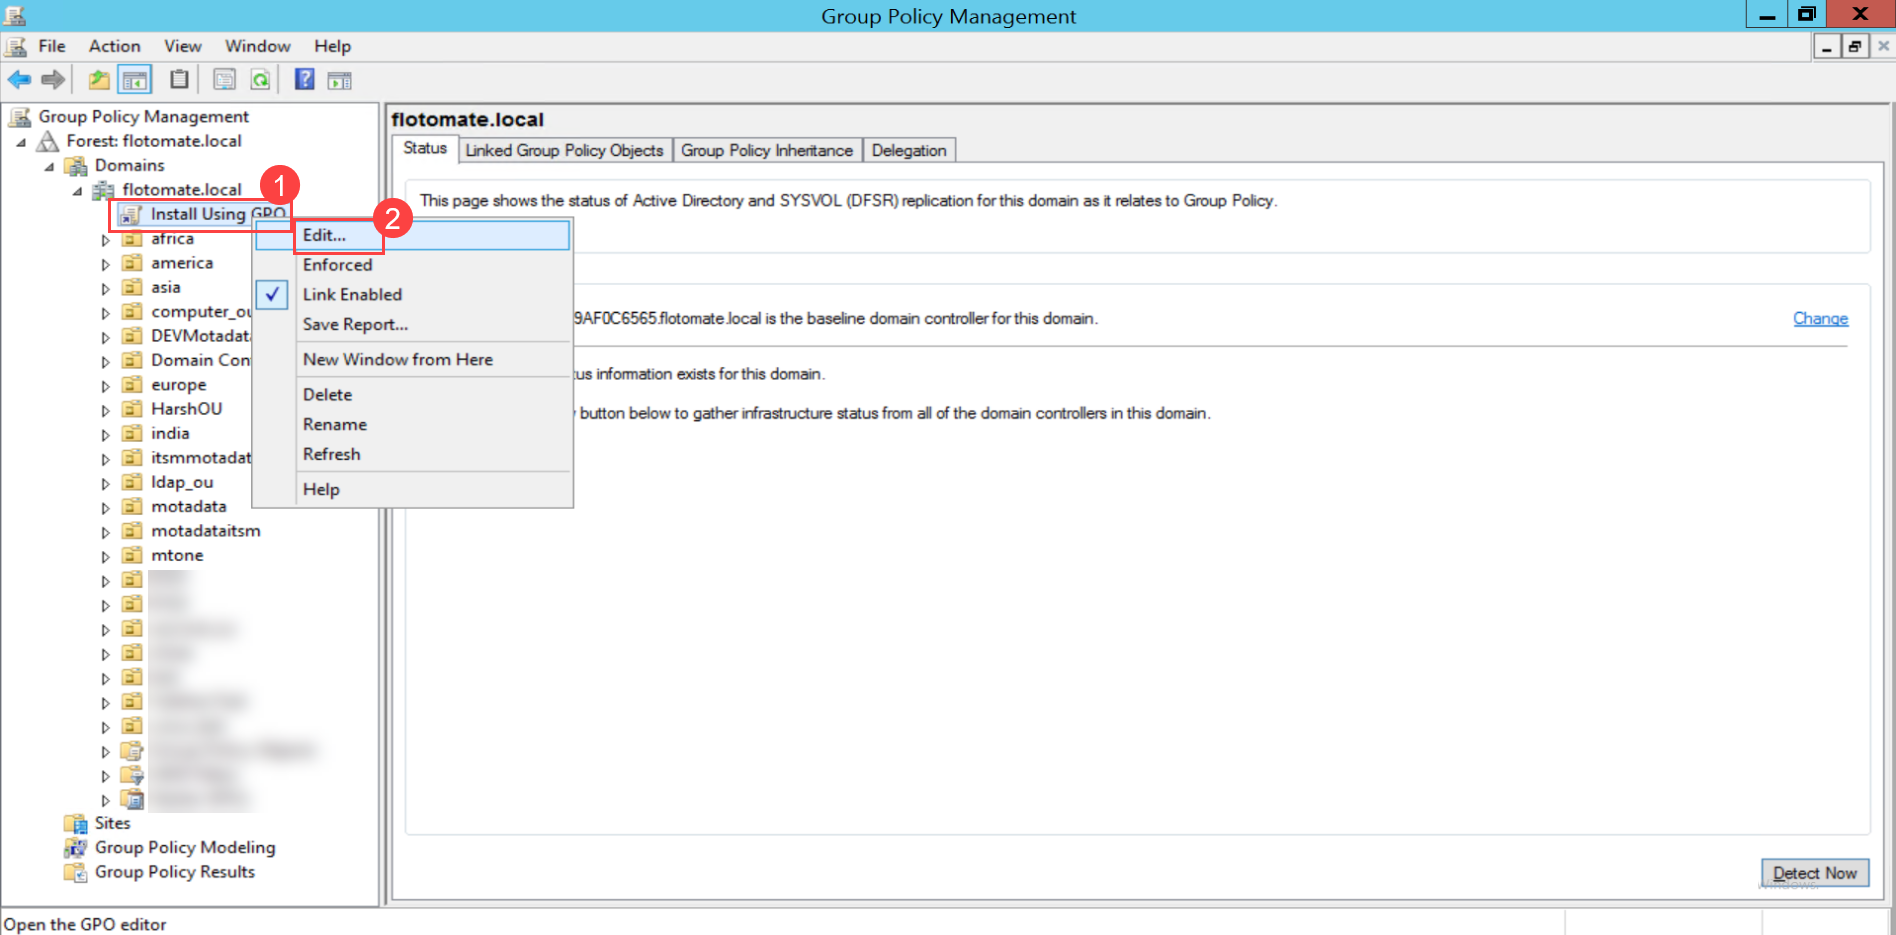
  1. Right-click the created policy (Install Using GPO) and select Edit.
Edit GPO Policy
Edit GPO Policy
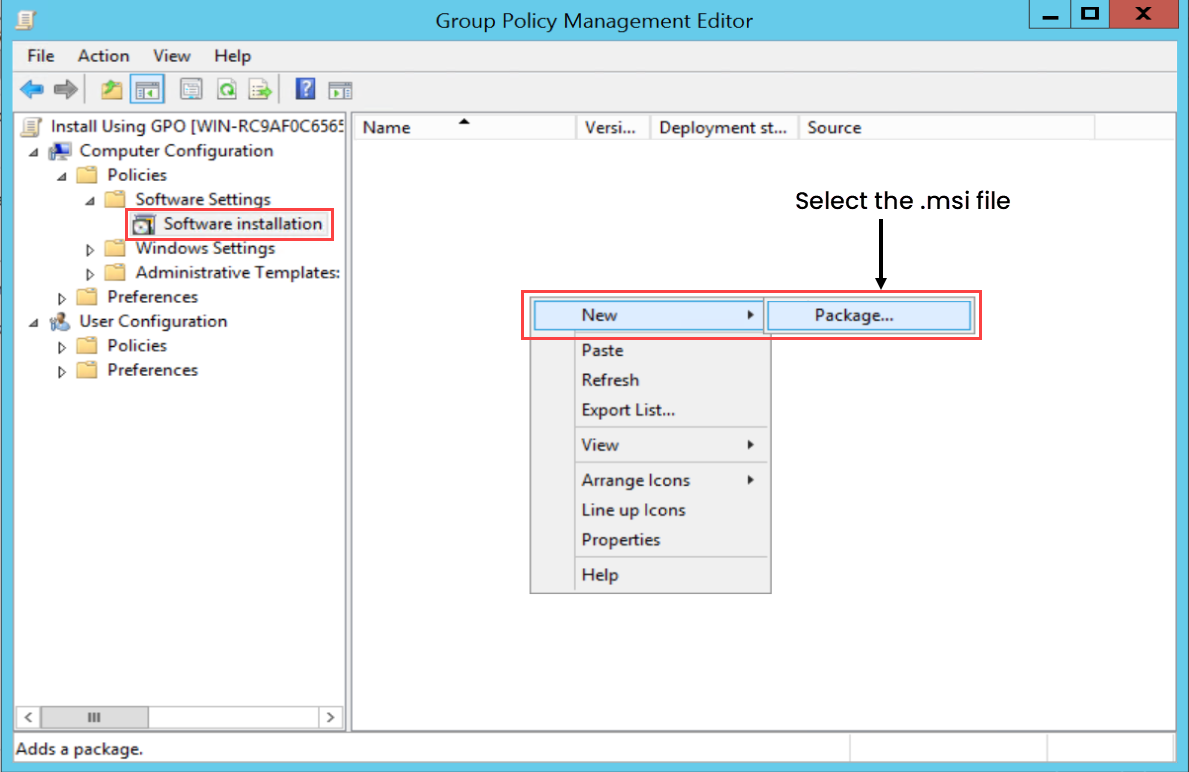
  1. In the Group Policy Management Editor, navigate to Computer Configuration > Policies > Software Settings > Software Installation. In the right pane, right-click and select New > Package.
Create a new Package

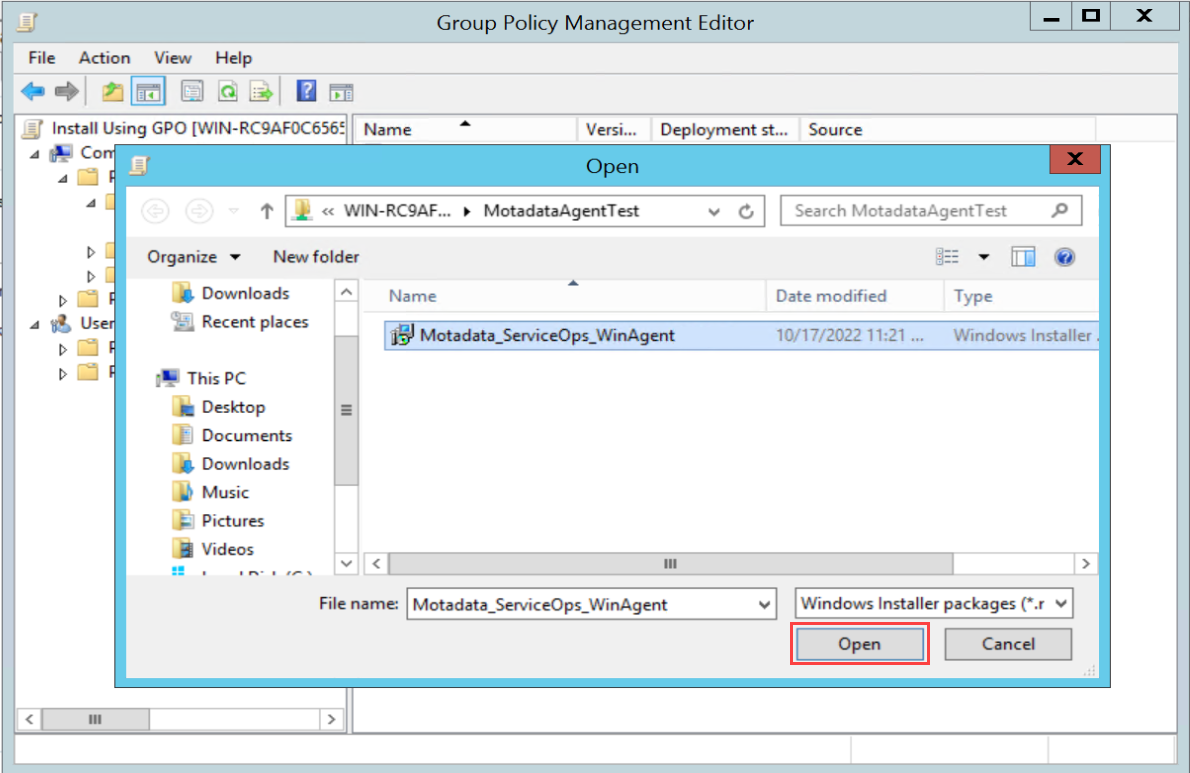
A dialog appears. Select the pre-defined agent setup file and click Open.

Select the Agent setup file

Notes:

  • To get the pre-defined agent setup file, contact the Motadata Support or Implementation team.
  • This file must be publicly accessible from the target machine.

The agent file gets added.

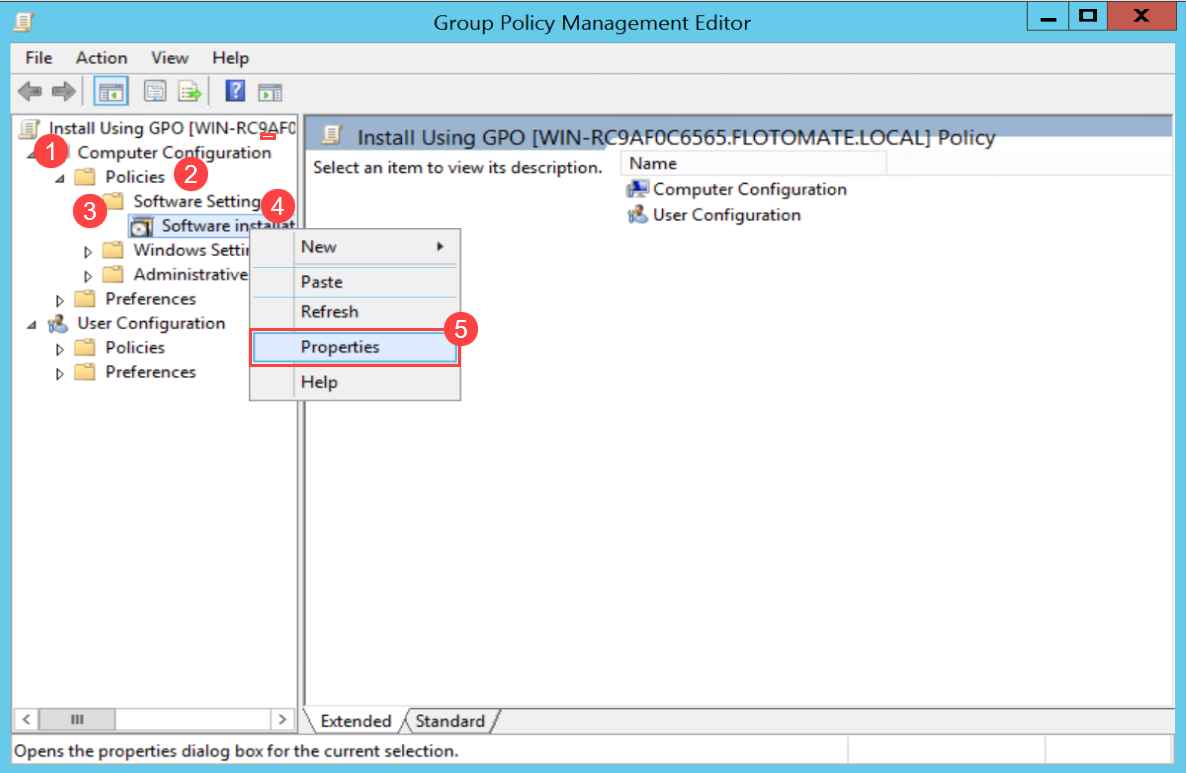
  1. Next, navigate to Computer Configuration > Policies > Software Settings > Software Installation, right-click, and select Properties.
Group Policy Management Editor
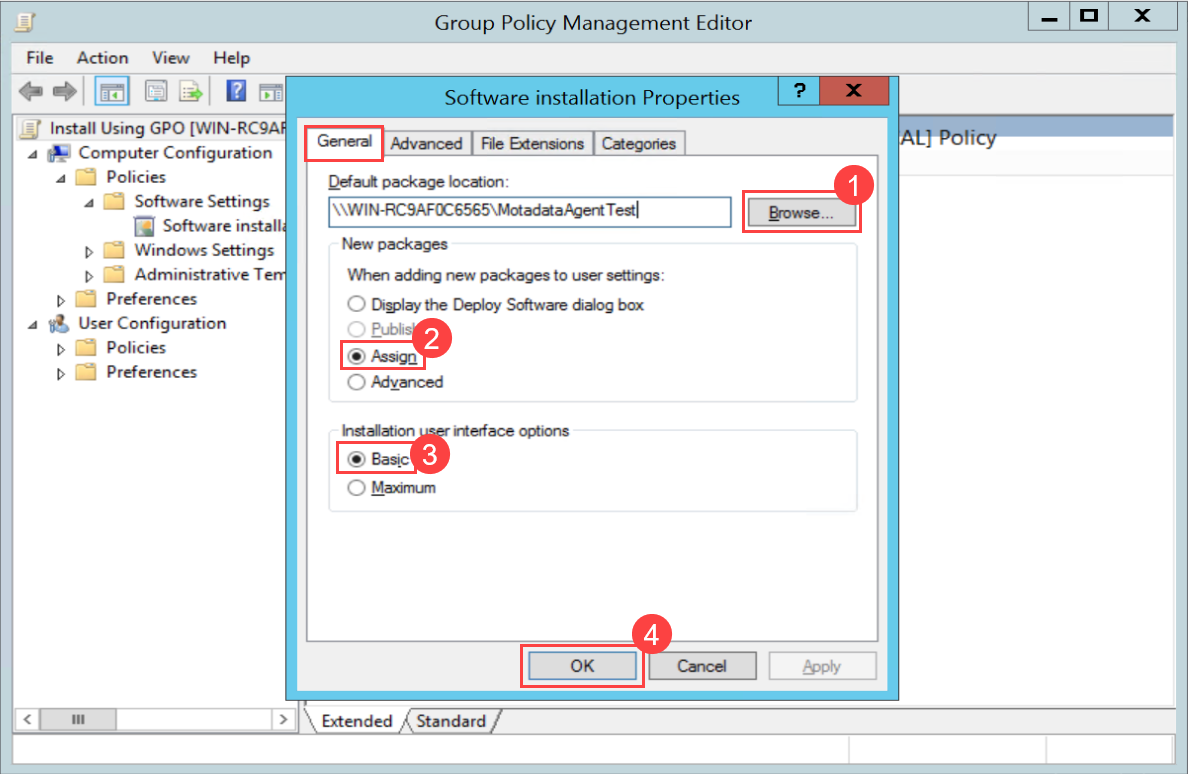
  1. In the Software Installation Properties window, select the General tab, browse, and select the default package location. Also, select the options: Assign and Basic, as shown below.
Software Installation Properties – General tab
Note: The shared folder path given in the Default Package Location must be publicly accessible from the target machines.

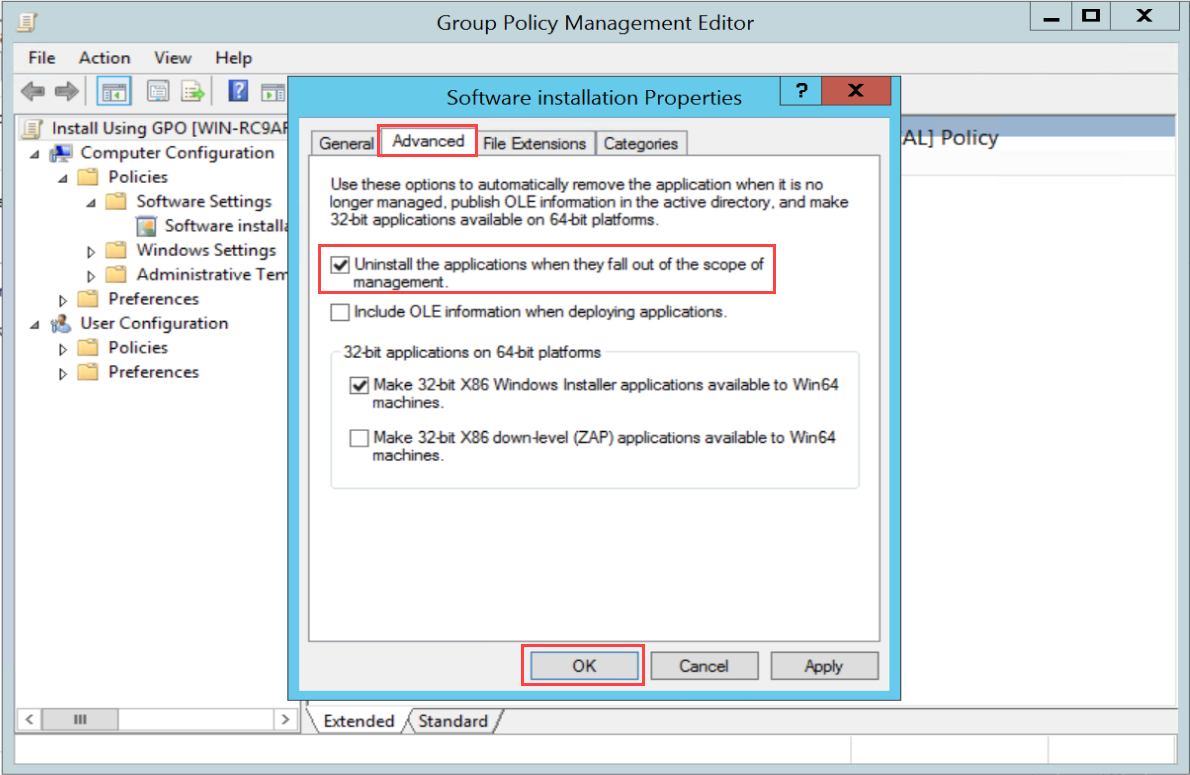
Once done, click OK, and select the Advanced tab.

  1. In the Advanced tab, enable the option “Uninstall the applications when they fall out of the scope of management.”.
Software Installation Properties – Advanced tab

Once done, click OK, and set the properties of the agent.

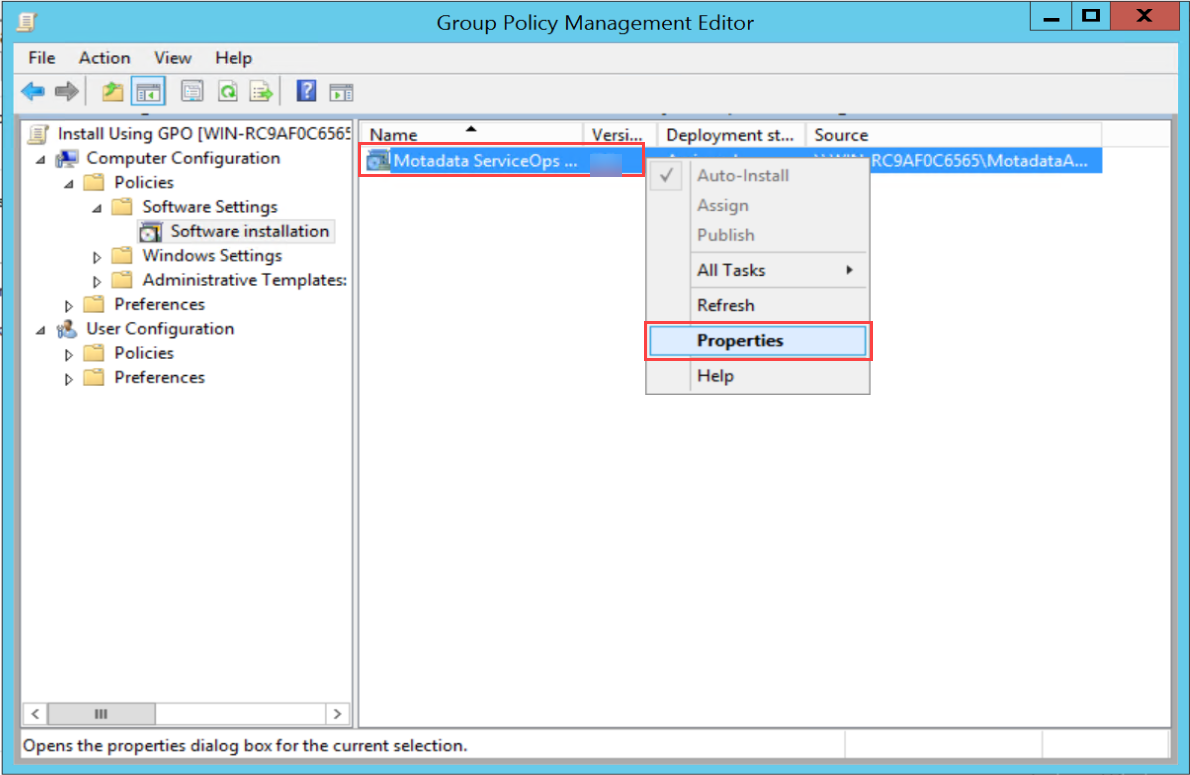
  1. Right-click on the agent and select Properties.
Select Properties of Agent
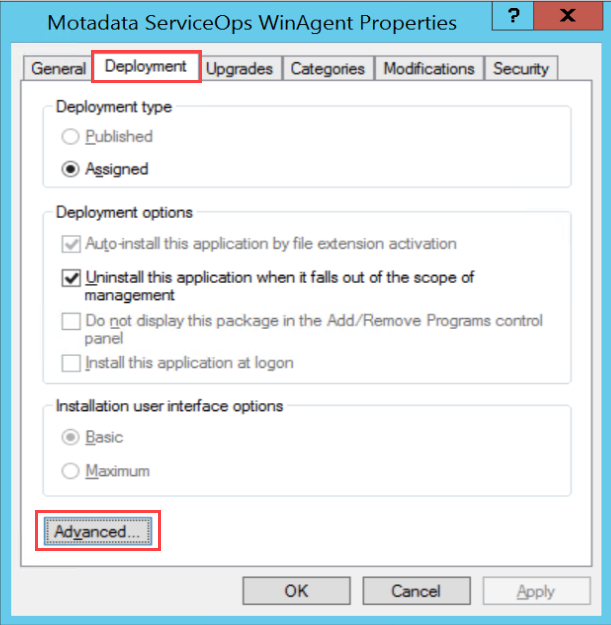
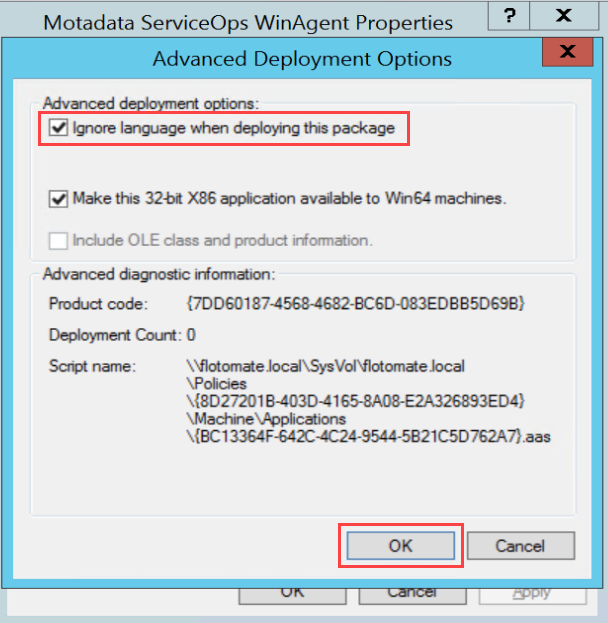
  1. In the Properties window, select the Deployment tab, click Advanced, and enable the option Ignore language when deploying this package.
Deployment tab
Deployment tab
Advanced Deployment Options

Once done, click OK, and your GPO policy is created.

  1. Once the GPO policy is created, the Software Installation process begins when a system restarts, or you can start it manually by typing the following command in the CMD of a node.

gpupdate /force

In ServiceOps, the agents installed using this policy will appear on the Hardware Assets list page and the Discovery Agent tab of Admin > Asset Management > Asset Discovery, respectively.

Notes:
In case of failure in installation, change the rules, and make the changes. To do so, Open Group Policy Management and change the below configurations:

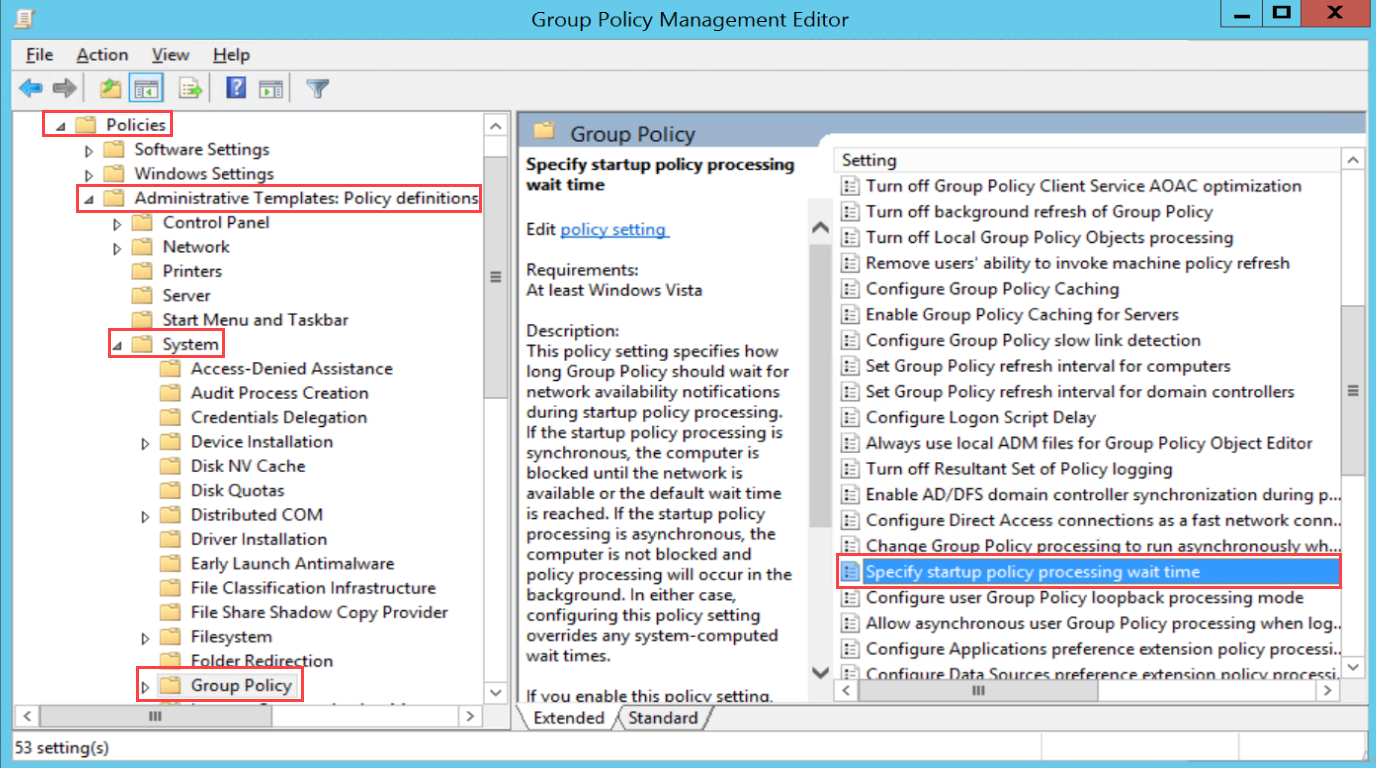
  • In the Computer Configuration > Policies > Administrative Templates > System > Group Policy, enable the option Specify startup policy processing wait time. Set the Amount of time to wait (in seconds) as 600. It is the approximate average time taken to install the agent on the target machine. You can increase it if the target machine is slower or, due to latency in the network, the agent is not installed.
Enable the Group Policy Setting
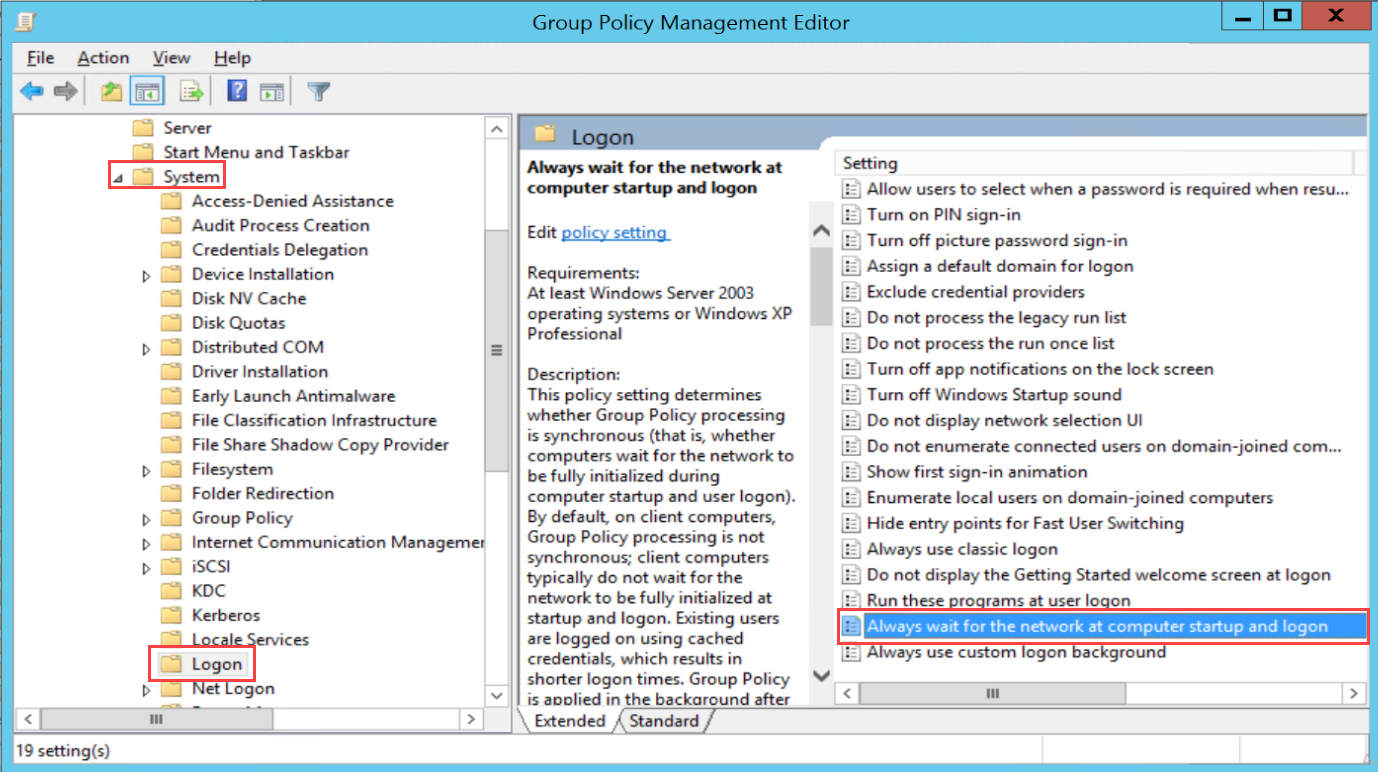
  • In the Computer Configuration > Policies > Administrative Templates > System > Logon, enable the parameter Always wait for the network at computer startup and logon.
Enable the Logon Policy Setting

Motadata High Availability Server Setup

What is High Availability Setup?

High availability refers to the systems that are durable and likely to operate continuously without failure for a long time. HA aims to ensure an agreed level of operational performance, usually uptime, for a higher than normal period by ensuring service and data recovery during an unplanned disruption.

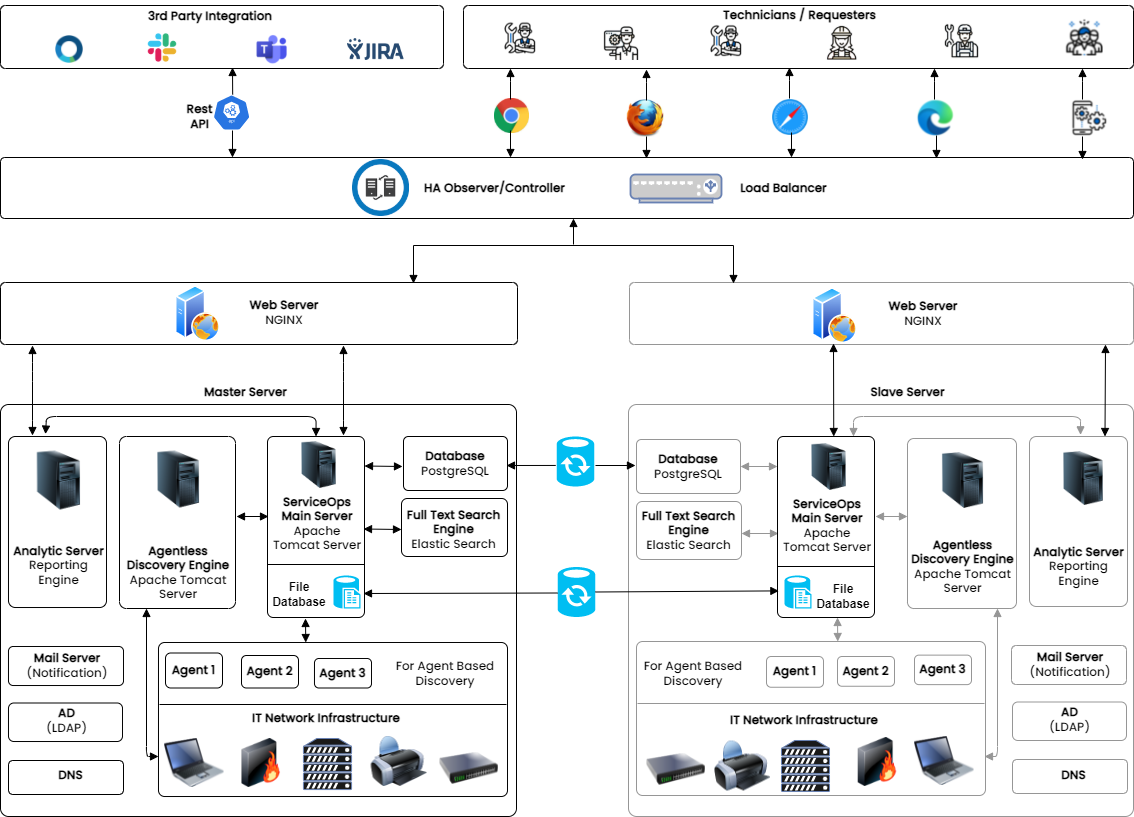
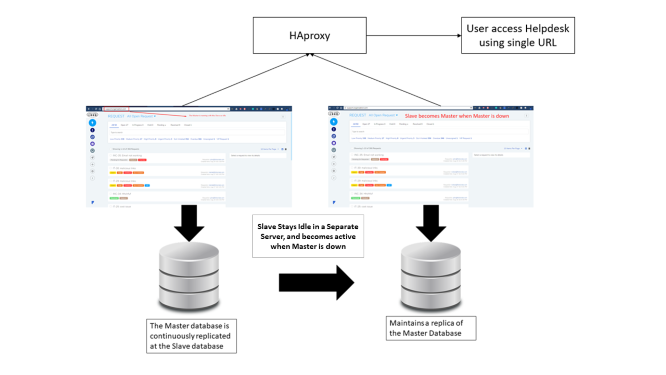
In a High Availability setup, there are mainly 3 servers such as, the main server which is called as ‘Master’, the secondary server which is called as Slave and the other is an HA-proxy Server.

Master is the main (IT Service Desk) server which is accessed by the users, and the Slave remains idle. The data of the Master’s database is continuously replicated in the Slave side’s database. During downtime, Slave becomes the Master with its synced Database same as the Master (Main Server).

Both Master and Slave are connected to the HA-proxy server. The proxy server acts as a load balancer that redirects traffic to the Slave when the Master is down.

For example, An organization maintaining an HA has to have two separate Servers, one for Master and other for Slave, this is to ensure that in an unforeseen event like a fire, natural calamity, etc. when the Master is down, the Slave can be kept alive from the last point of recovery.

  • High Availability setup can be used for a planned outage of the Service Desk for the purpose of maintenance.
  • High Availability can be used in the event of a disaster recovery of data.

Minimum Hardware Requirements HA Observer and HA Proxy

You have to install the product build in two separate servers (with different environments), one as the Master and other as the Slave. Both the servers have to have separate IP addresses.

  • Minimum 4GB of System RAM.
  • Minimum Four Core Processor.
  • Minimum 100 GB of Hard disk space.

Download of Base OS:

You need Ubuntu-18.04 Server OS for this setup. Follow the link to download the OS: Download Link

Installation of Master and Slave

  1. Copy release build installer (service_desk_master_CI) to target machine.
  2. Open terminal and navigate to the directory where the build is.
  3. Make Sure you have the permission to execute the file. If there’s no permission then you can change it using the following command:
    sudo chmod 777 service_desk_master_CI
  4. Run Installer by using the following command:
    sudo ./service_desk_master_CI
  5. Enter the password when prompted. The password will be the same as the system admin password.
  6. Enter the file where the key needs to be saved. Here, just press enter and it will auto-add the key path.
  7. After adding the ssh key, it will prompt to enter the username for the server ssh

Setting up HA Observer Server

Notes:

  1. PLEASE DO NOT USE “sudo” TO INSTALL ‘INSTALLER PACKAGE’
  2. PLEASE INSTALL ONLY AFTER TWO I.E MASTER AND SLAVE MACHINES ARE READY
  3. PLEASE USE SAME USERNAME ON SSH MASTER AND SLAVE MACHINE
  4. PLEASE USE COMMON PASSWORD ON SSH MASTER AND SLAVE MACHINE
HA Observer
HA Observer

Step 1: Download HA Observer build on HA machine: Download Link

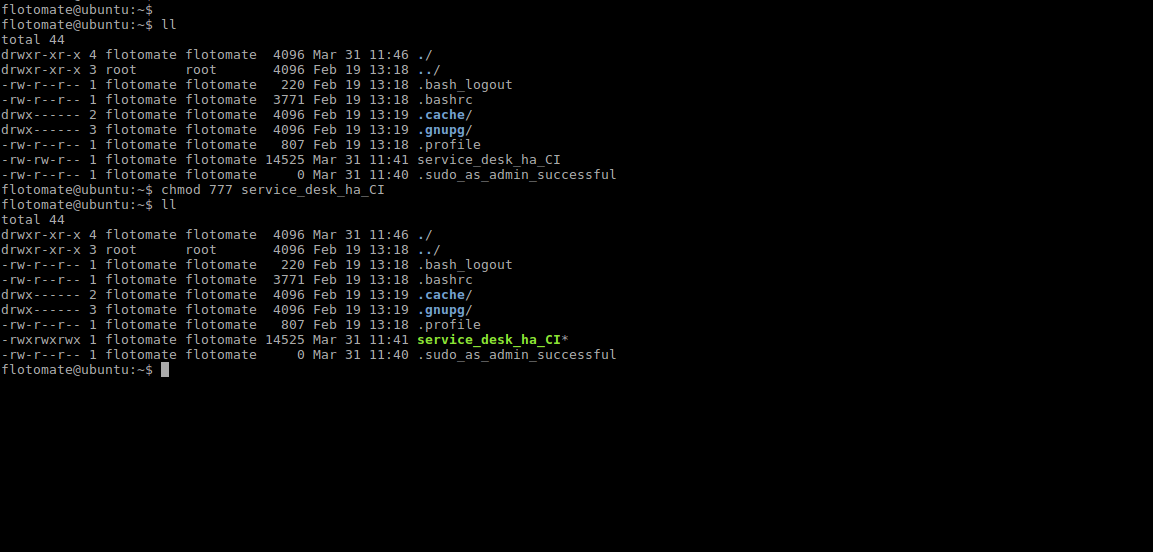
Step 2: Assign Execute permission using below command:

chmod 777 service_desk_ha_CI

HA Observer
HA Observer

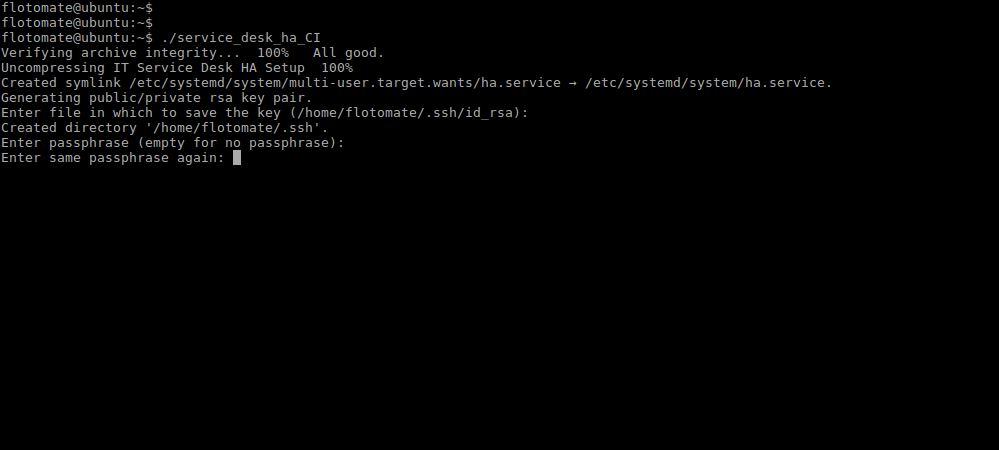
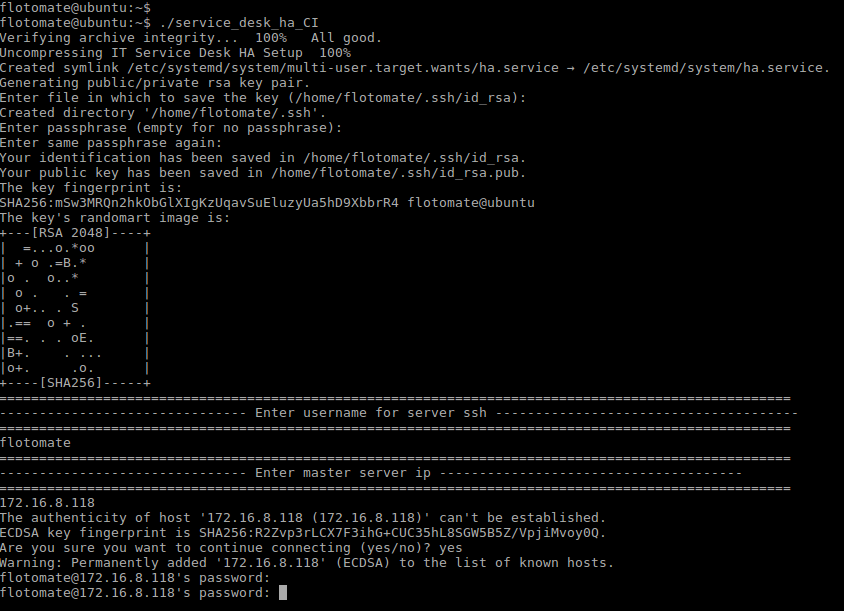
Step 3: Run HA observer build ./service_desk_ha_CI

Run Observer
Run Observer

Step 4: It will prompt for generation of the public key. Press Enter for generating the Key.

Run Observer
Run Observer

Step 5: After generating public key, it will prompt to enter the Passphrase twice. Press Enter for both the prompts.

Run Observer
Run Observer

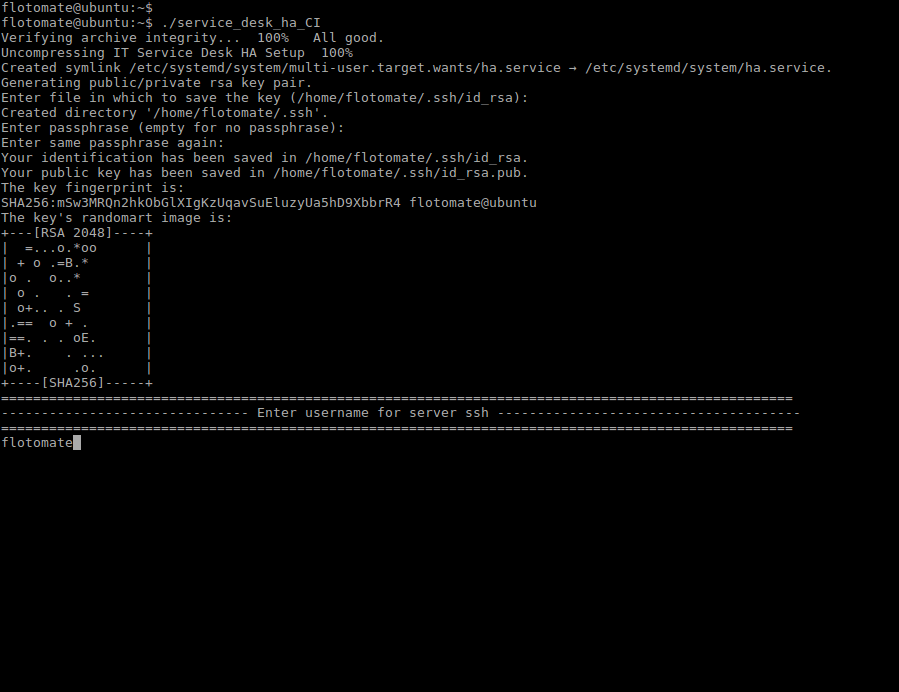
Step 6: It will prompt to “Enter username for server ssh”. This Username will be Common for both the machines i.e Master and Slave.

Note: Here *flotomate* is entered just for example. User needs to enter respective Machines Username.
Run Observer
Run Observer

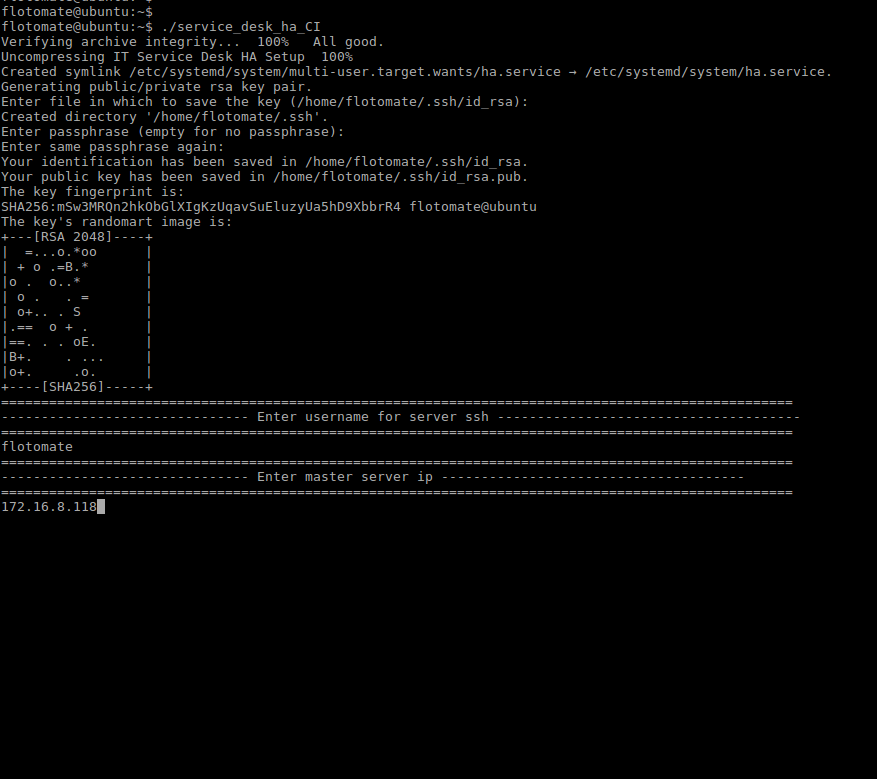
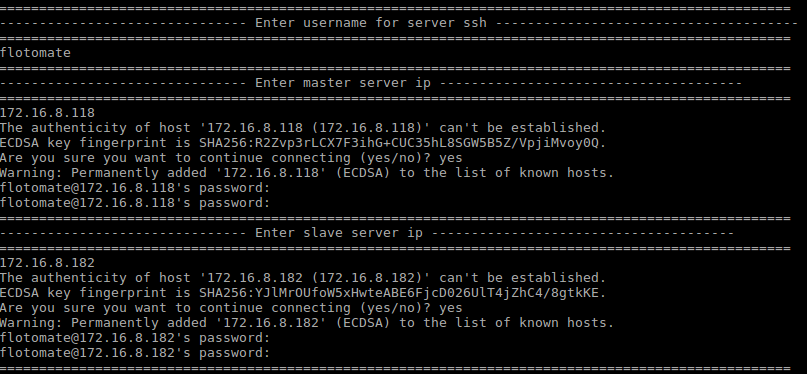
Step 7: Enter the “Master server IP Address”.

Note: Here entered IP is just for example. User needs to enter respective Master’s IP.
Run Observer
Run Observer

Step 8: After entering the IP Address, it will prompt for Password twice. Here, the password will be respective machines password.

Run Observer
Run Observer

Step 9: It will then prompt to Enter Slave’s Server IP and password.

Run Observer
Run Observer

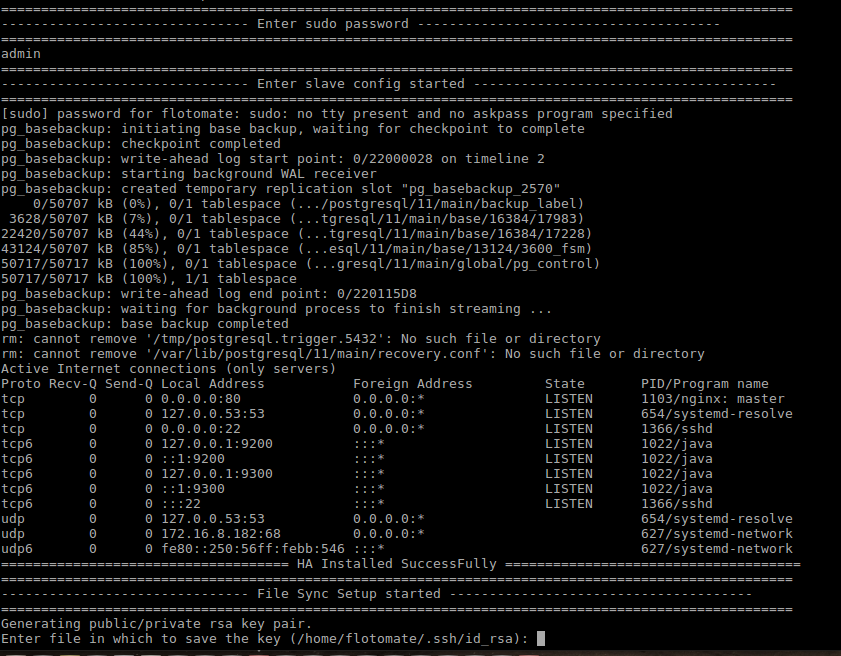
Step 10: It will then prompt to “Enter sudo password”. This password will be the same as the common password entered in Step 8.

Note: Because this will be Root i.e. Sudo Login, the password will be visible.
Run Observer
Run Observer

Step 11: After entering the sudo password, it will automatically start configuration of Slave and will show message as “Enter slave config started”.

Run Observer
Run Observer

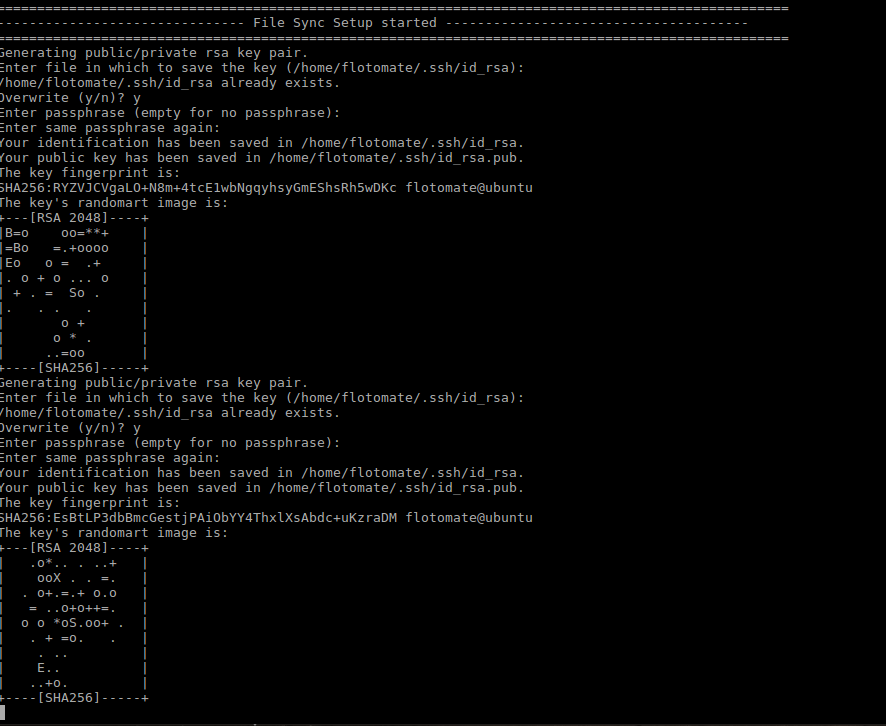
Step 12: After finishing the above step it will show message “HA Installed SuccessFully”. It will then automatically start the mechanism of file sync showing the message “File Sync Setup Started”.

Run Observer
Run Observer

Step 13: After the File Sync Setup started, it will prompt for “Entering Key” for generating public/private rsa key pair. Press Enter in response.

Run Observer
Run Observer

Step 14: After entering the Key, File Sync Installation Setup finishes. With this HA Observer Installation also finishes.

Run Observer
Run Observer

Setting Up HA-Proxy Server

High Availability
High Availability
Note: HA-Proxy is a popular open source load balancer. You can use any other load balancer.

A HA-Proxy (also known as a Load Balancer) is a solution to distribute a web application across multiple servers. In the HA setup, a HA-Proxy routes the traffic to the Slave server (after becoming a Master) when the Master is down.

Note: HA-proxy requires a separate IP. HA-Proxy is a separate server from the Master and Slave.

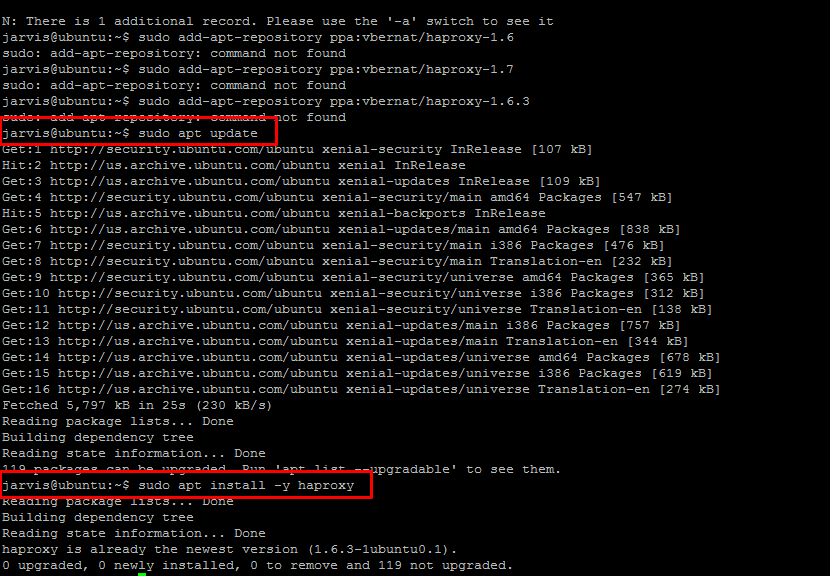
We will be using HAProxy stable version for HA setup. Your server needs to have an internet connection. Run the below commands from the terminal:
apt-get update
apt-get install haproxy

HA Proxy
HA Proxy

Step 1: Log into the HAproxy server and open a terminal as root.

Step 2: Now you need to configure the Configuration file of HAproxy using the following command.

sudo nano /etc/haproxy/haproxy.cfg

Step 3: Copy paste the following at the end of the file and save it.

defaults
log global
mode tcp
option httplog
option dontlognull
timeout connect 5000
timeout client 50000
timeout server 50000
errorfile 400 /etc/haproxy/errors/400.http
errorfile 403 /etc/haproxy/errors/403.http
errorfile 408 /etc/haproxy/errors/408.http
errorfile 500 /etc/haproxy/errors/500.http
errorfile 502 /etc/haproxy/errors/502.http
errorfile 503 /etc/haproxy/errors/503.http
errorfile 504 /etc/haproxy/errors/504.http
frontend http_front
bind 172.16.8.100:80
stats uri /haproxy?stats
default_backend http_back
backend http_back
balance roundrobin
mode tcp
option tcp-check
server ubuntu 172.16.8.241:80 check port 80
server ubuntu 172.16.8.240:80 check port 80

  1. Now you need to restart the HA proxy using the below command:

sudo systemctl restart haproxy

Restart Server
Restart Server
Important: The passive server takes approximately 5-8 minutes to come up when the active server goes down.

DC – DR

DC DR
DC DR

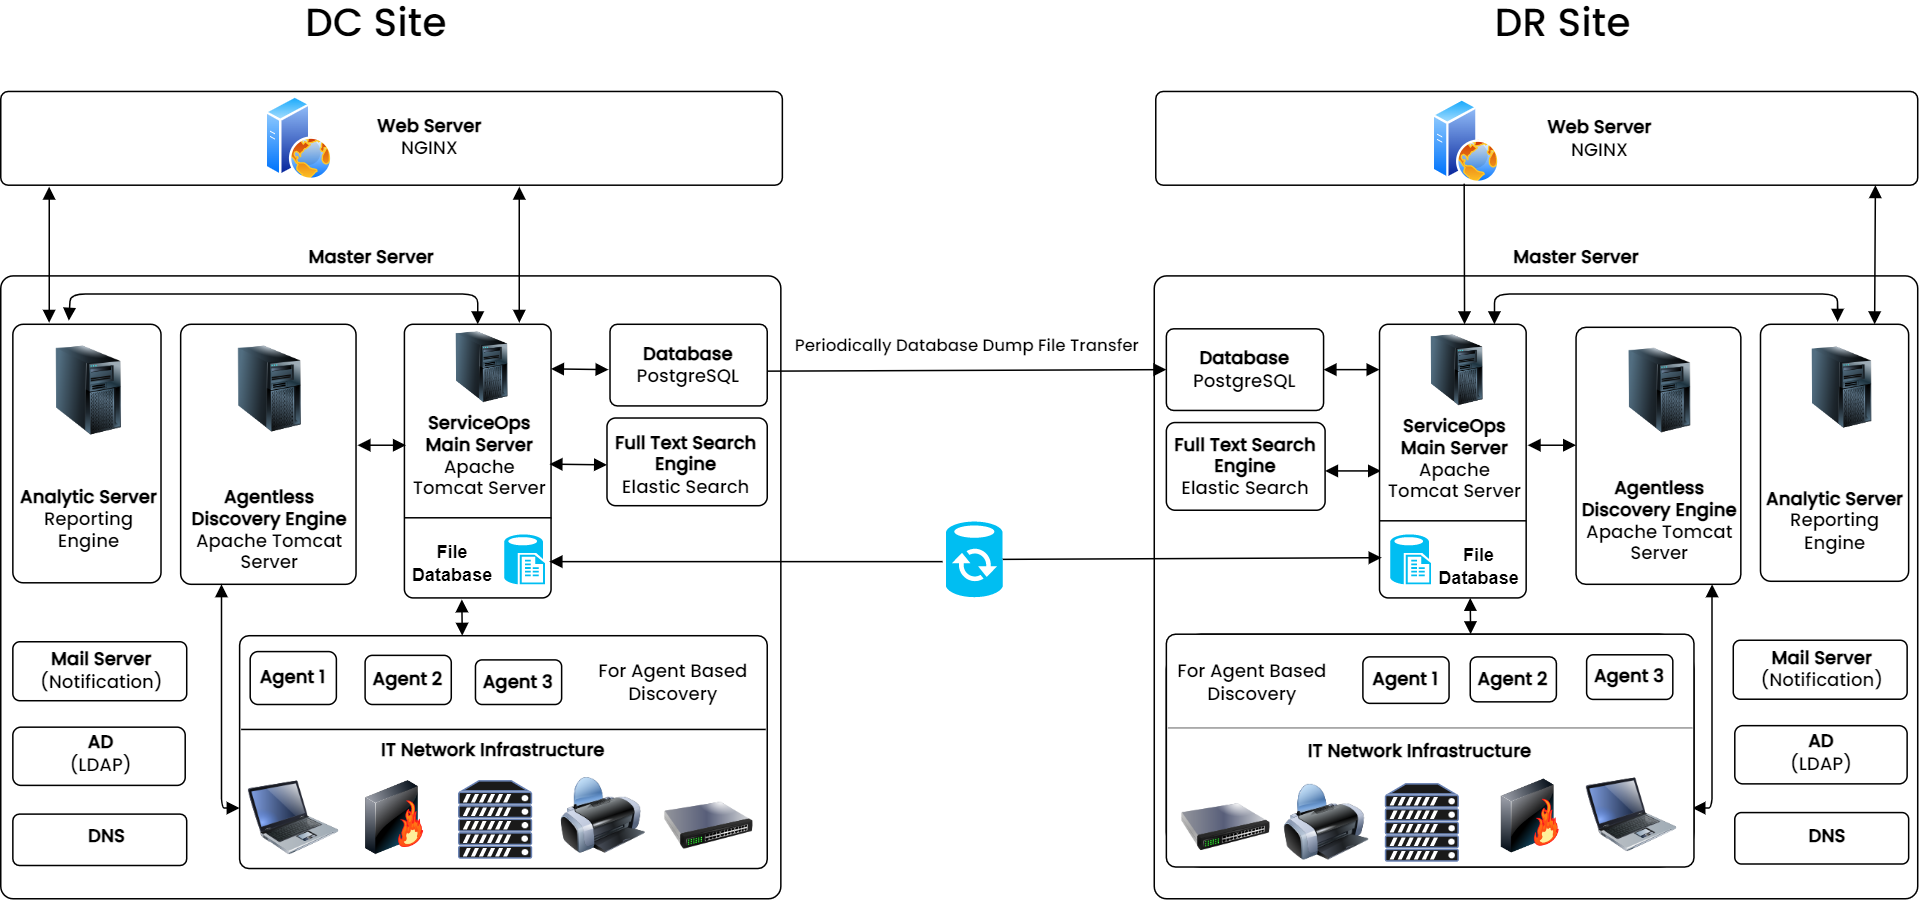
The DC-DR site will have the high availability setup. There will be a continuous transaction between the primary server and the secondary server. Both the servers will be deployed in the same geographical location.

When the DC site is down, someone can turn on the DR site. It includes the following steps:

  1. Restore the config DB files.
  2. Restore the alert related files.
  3. Configure the IP addresses to access your network.
  4. Turn on the motadata service.

The whole activity takes approx. 30 minutes.

Note: The monitoring data collected by DR site is not transferred back to DC site. When the DC site is up, there will be no instance of DR data.

Plugin Server Setup Guide

What is a Plugin?

A plug-in is a piece of code that integrates with our main server to perform a specific function. In the context of our product, a plugin is nothing but a .fp bundle (i.e. Kind of app, zip).

What is a Plugin Server?

Plugin server is a server which hosts/runs plugins. It is like our main server with a specialized purpose of running plugins. The main server will call a plugin server to execute specific plugin and get the desired output.

Plugin Server Setup

Enabling plugin capabilities in the server is a two step process:

Step 1: Install plugin server build

Step 2: Setting up a plugin server

Note: The plugin server can be setup in the main server or separately.

Install Plugin Server Build

Start your server and install the plugin server build into a directory:

For Ubuntu 20: Download Link

Plugin Server Configuration

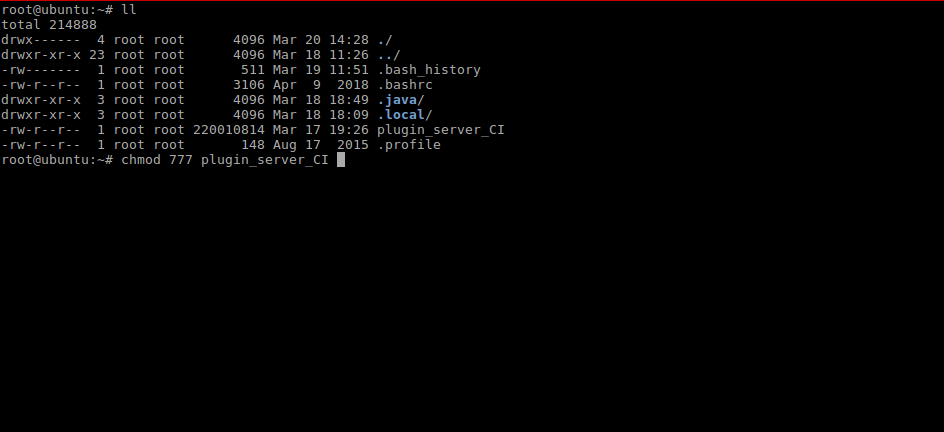
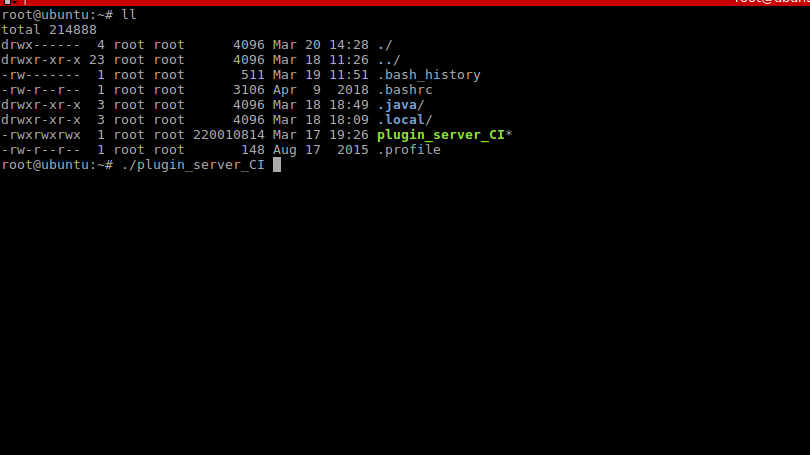
  1. Open server terminal and go to the directory containing plugin_server_CI. First change permission with the following command.

sudo chmod 777 plugin_server_CI

Plugin Server
Plugin Server
  1. Initiate installation of the plugin server with the following command:
    sudo ./plugin_server_CI
Run Plugin installer
  1. Wait for the installation to finish. You will get the below screen.
Installation Complete
  1. Check the services of the installed Plugin using following command:
    systemctl status ft-plugin server
Services
Services