Product ISO Link for Ubuntu 18.04

System Hardware Requirements

Download product ISO containing Ubuntu 18.04 from following link:

Download Link

Installation Process

  1. Boot ISO. in your target machine.
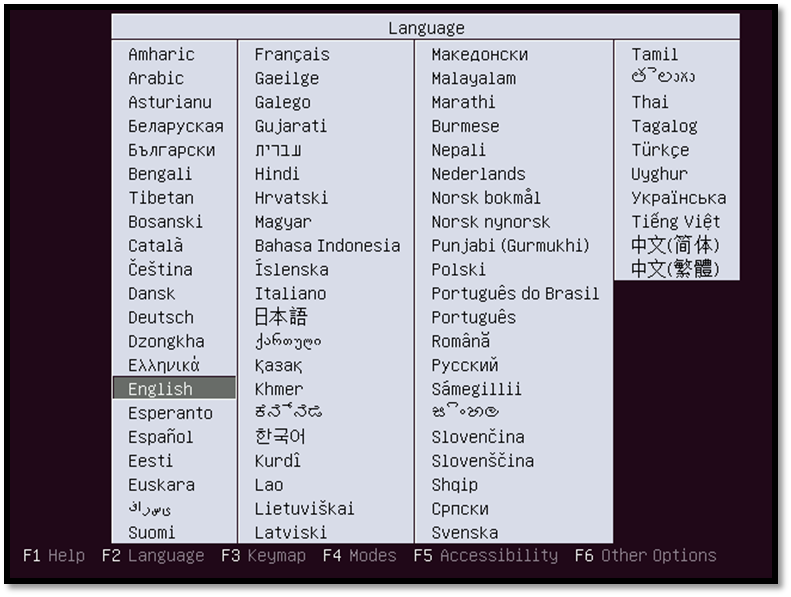
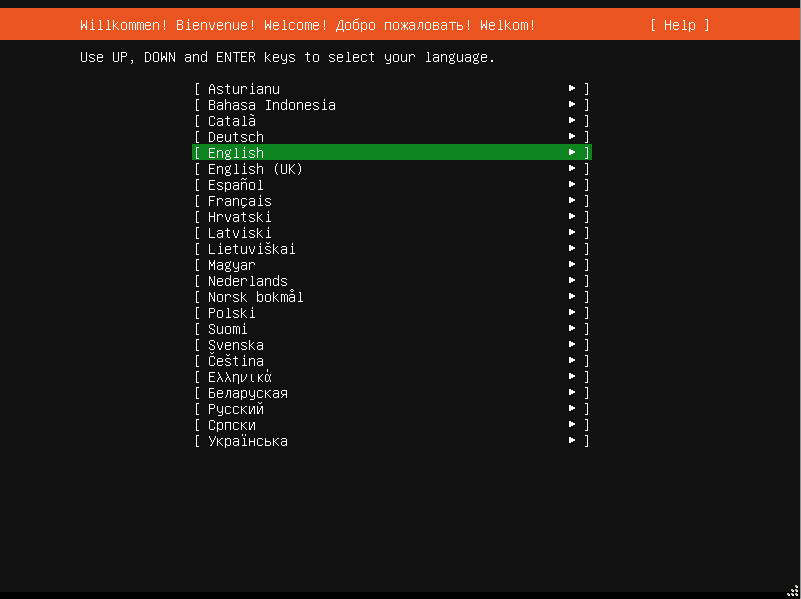
  2. Select language:
Language Selection
Language Selection
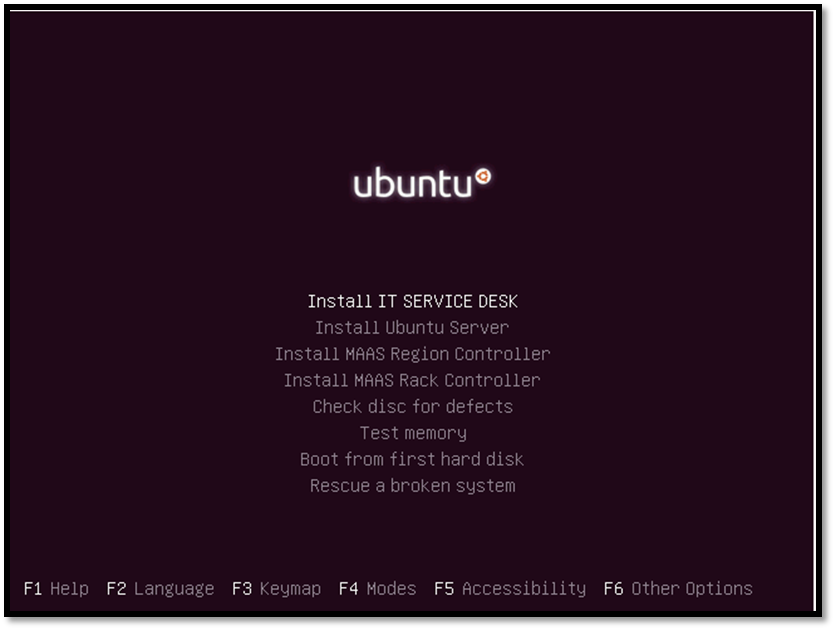
  1. Select installation type, “Install IT Service Desk”.
Installation
Installation
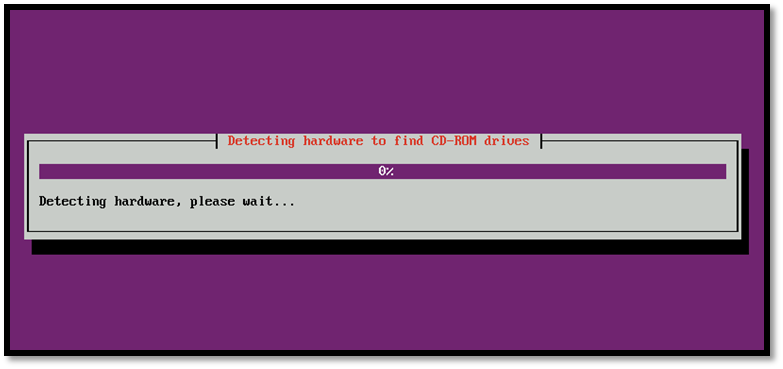
  1. The installation process will start.
Installation Process
  1. After installation is completed, log in with the credentials mentioned below:
    Username: jarvis
    Password: marvel
  2. Go to product directory using the below command:
    cd /opt
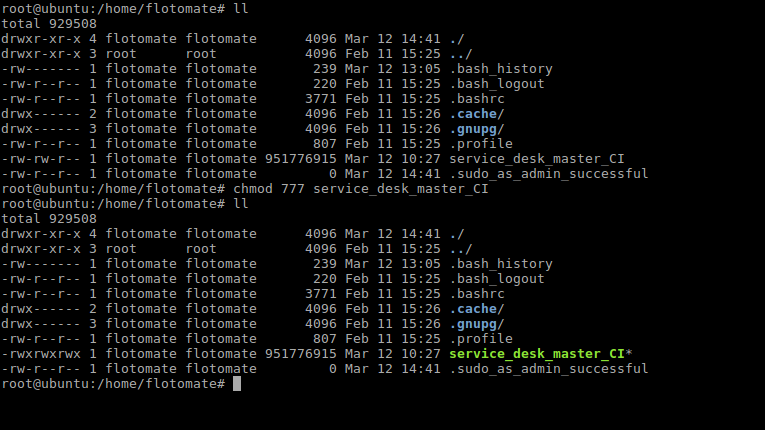
  3. Make Sure you have execute permission to build file. If it does not have execute permission then you can change it by following command.
    sudo chmod 777 service_desk_master_CI
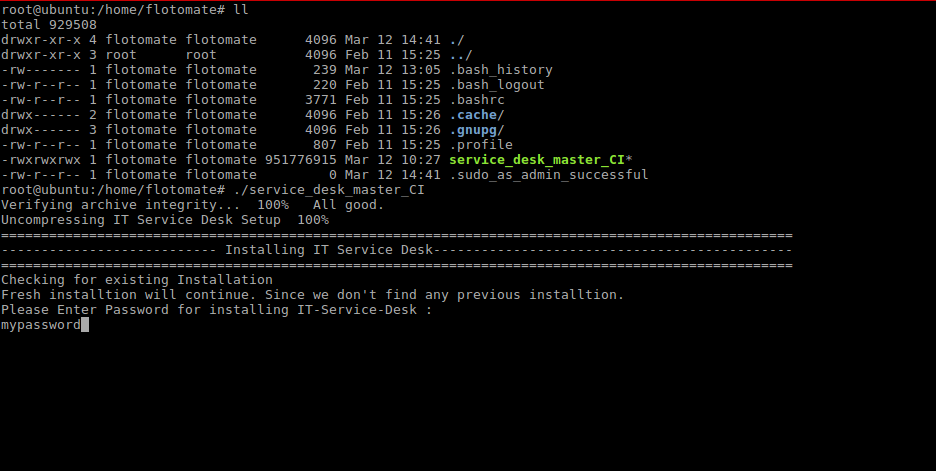
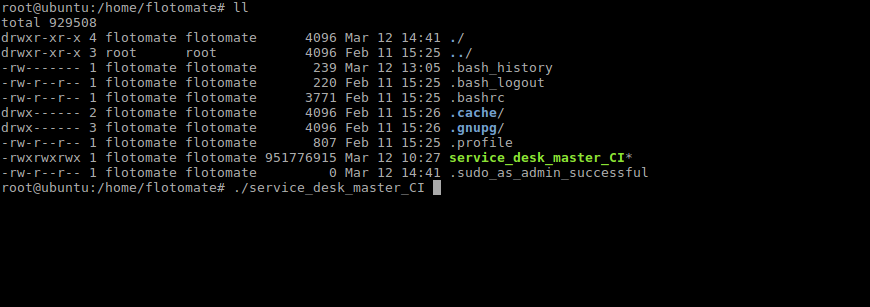
  4. Run Installer using the following command:
    sudo ./service_desk_master_CI
Installer
Installer
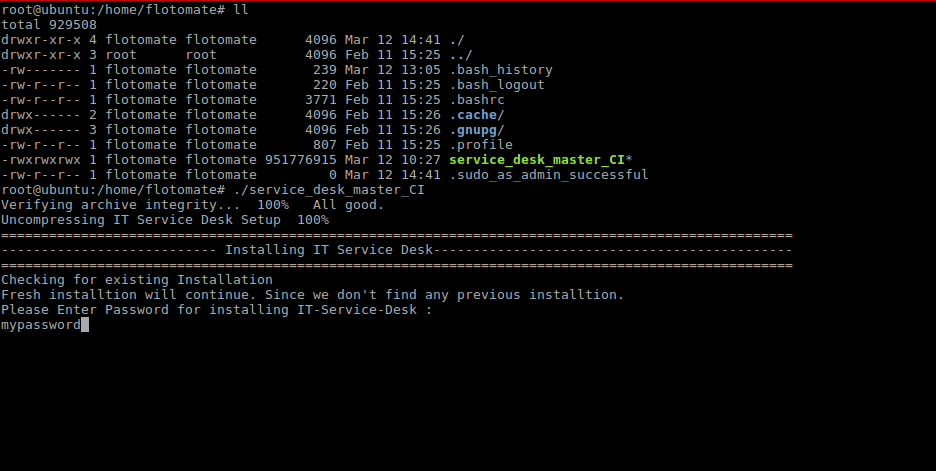
  • During Installation, the Installer will prompt for Password. Please provide the following password : mypassword.
Password Prompt
Password Prompt
  1. Once you see the below screen, that means you have successfully installed the product.
Successful Installation
  1. After Installation, wait for five minutes.
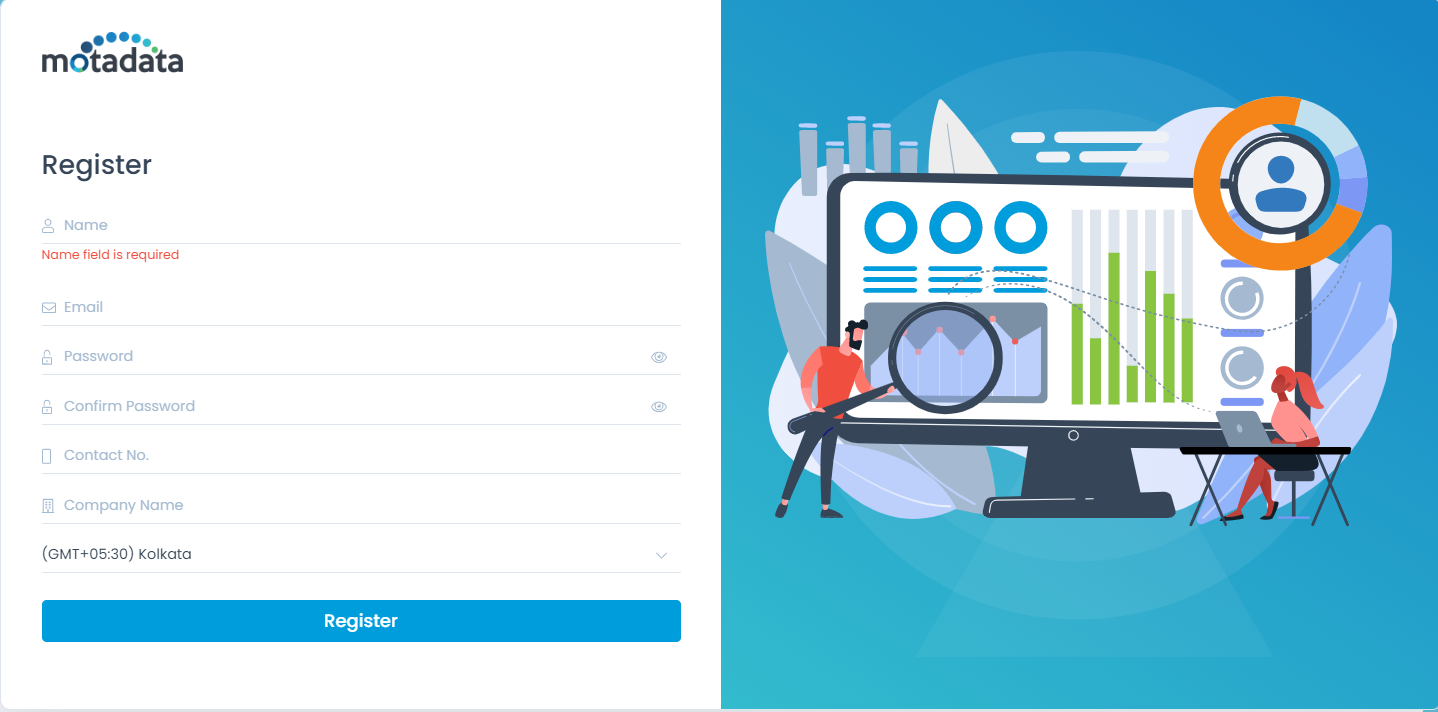
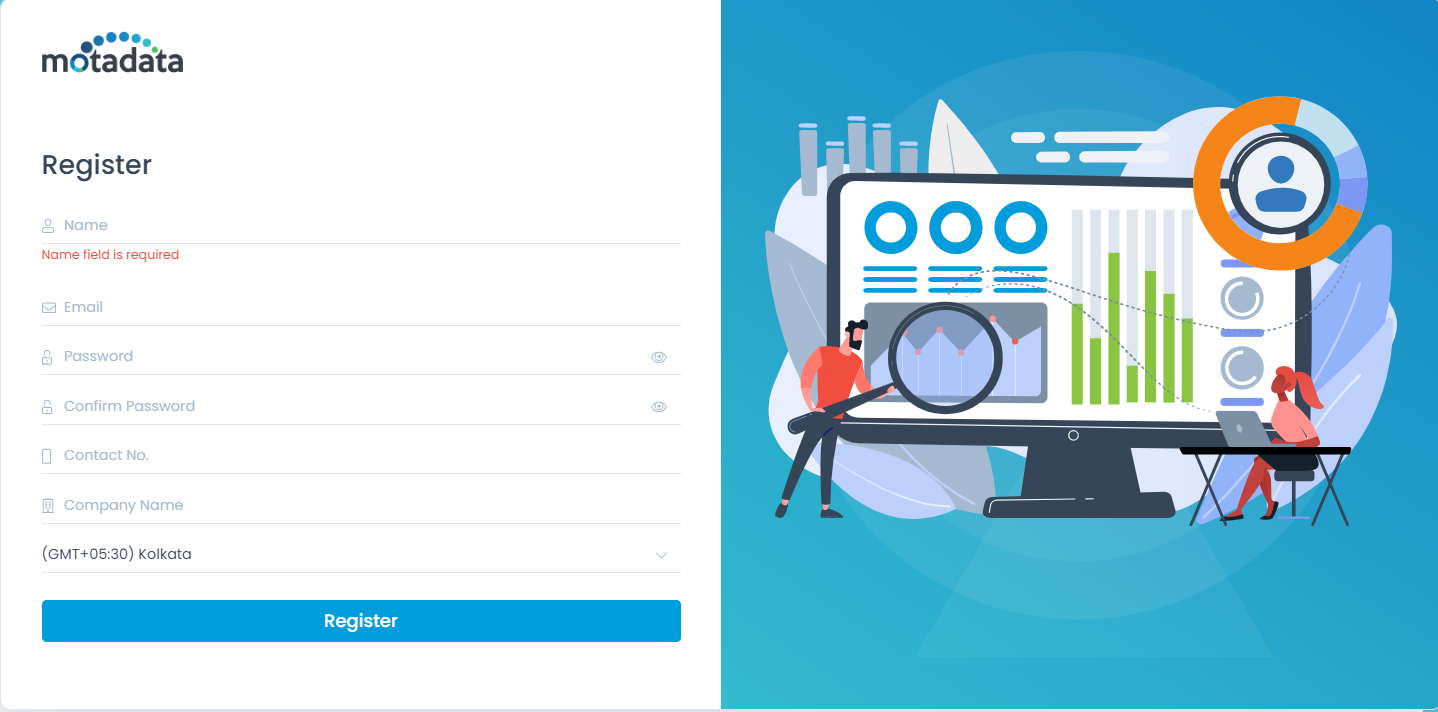
    Navigate to http://{server_IP}/register, it will open the Registration form as below :
Registration Form
Registration Form
  1. Please provide the Super Admin user details there.
  2. Click on ‘Register’ once the form is filled. It will redirect you to the Login Page. Use the tab to switch between the Support and Technician Portal.
  3. Note that:
    1. You can login to Technician Portal by selecting ‘Technician Portal Login’ tab.
    2. You can login to Support Portal by selecting ‘Support Portal Login’ tab.

Product ISO Link for Ubuntu 22.0.4.1 and 20.0.4.3

System Hardware Requirements

Download product ISO containing Ubuntu 22.0.4.1 and 20.0.4.3 from the following links:

Ubuntu 22.0.4.1: Click here

Notes:

  • The partition must be of LVM type.
  • Do not install other features listed in the OS Installation steps.
  • You need to reinstall the VM again if any LVM default partition is not shown after installation.

Installation Process

  1. Boot ISO. in your target machine.
  2. Select the language. The preferred language is English.
Language Selection
Language Selection
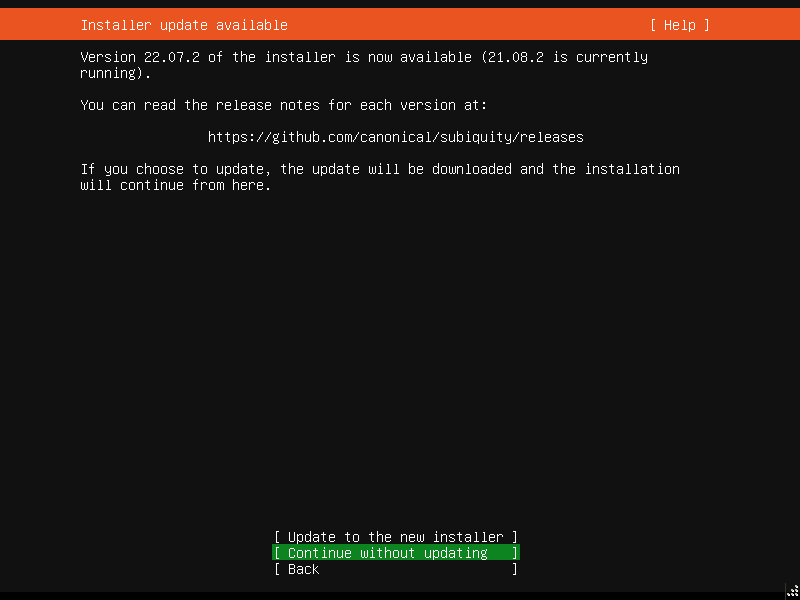
  1. In the Installer update available, select the option Continue without updating.
Installer Update Available
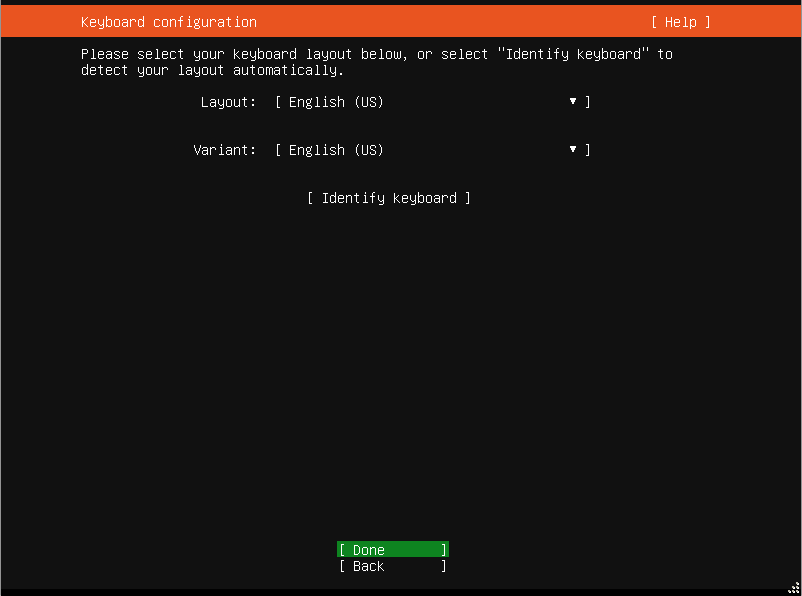
  1. In the Keyboard Configuration, select Done. The default value is English US.
Keyboard Configuration
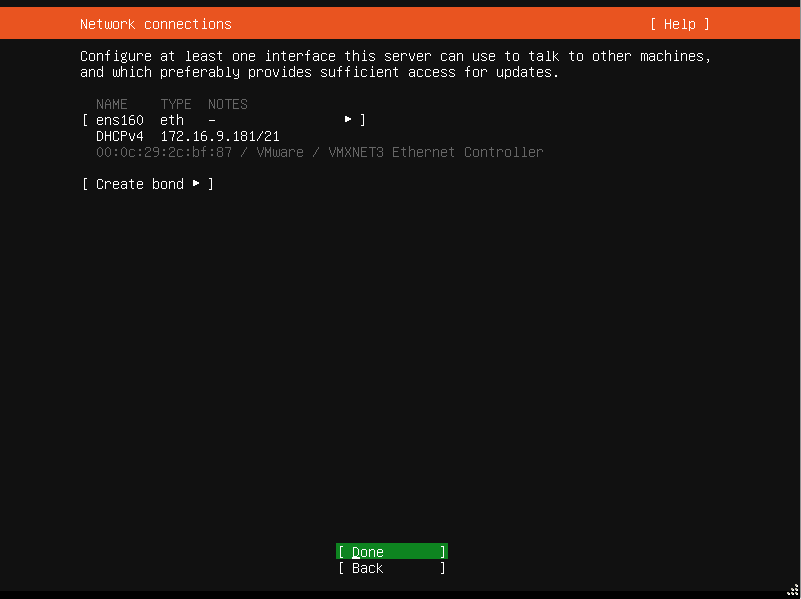
  1. In the Network Connections, if you have the DHCP network environment, select Done else configure the static network by adding the IP address, Subnet Mask, and Gateway details.
Configure Proxy
Configure Proxy
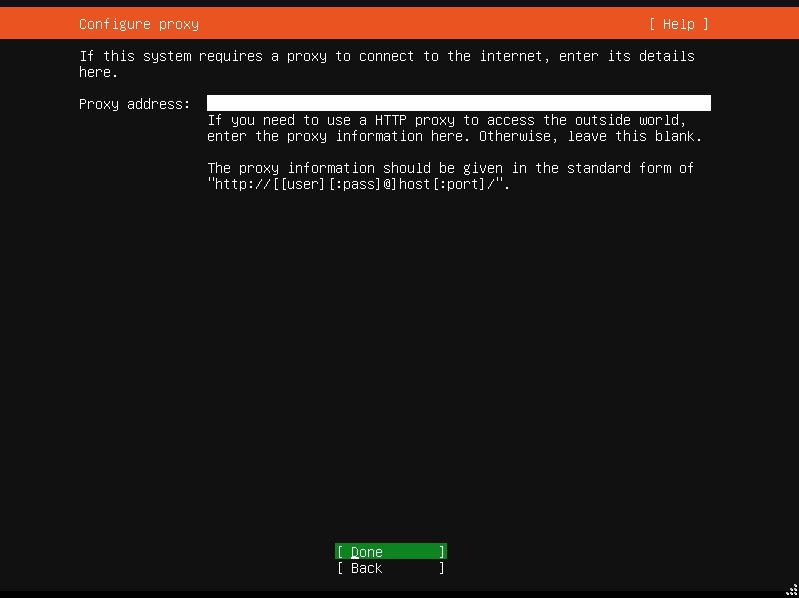
  1. In the Configure Proxy, enter the Proxy address if a proxy is required to be connected else select Done. You can configure the proxy after installation also.
Configure Proxy
Configure Proxy
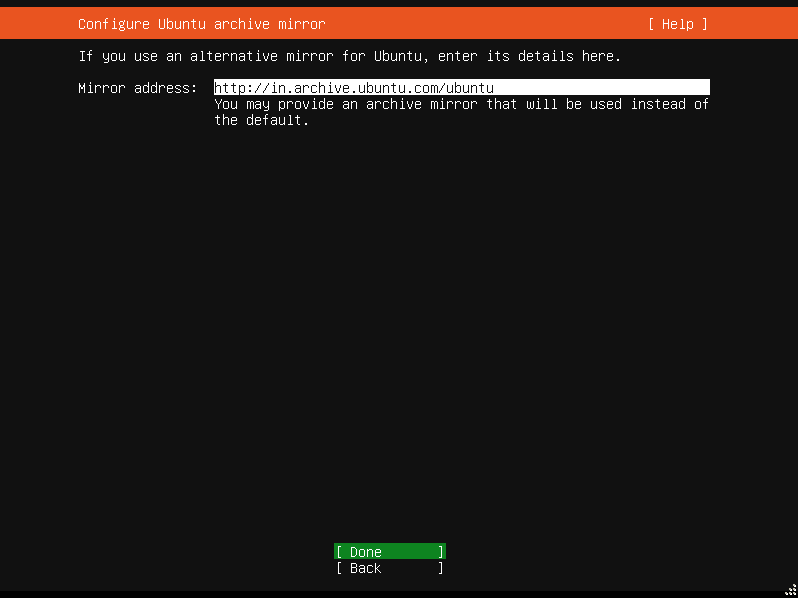
  1. In the Configure Ubuntu archive mirror, select Done.
Configure Ubuntu archive mirror
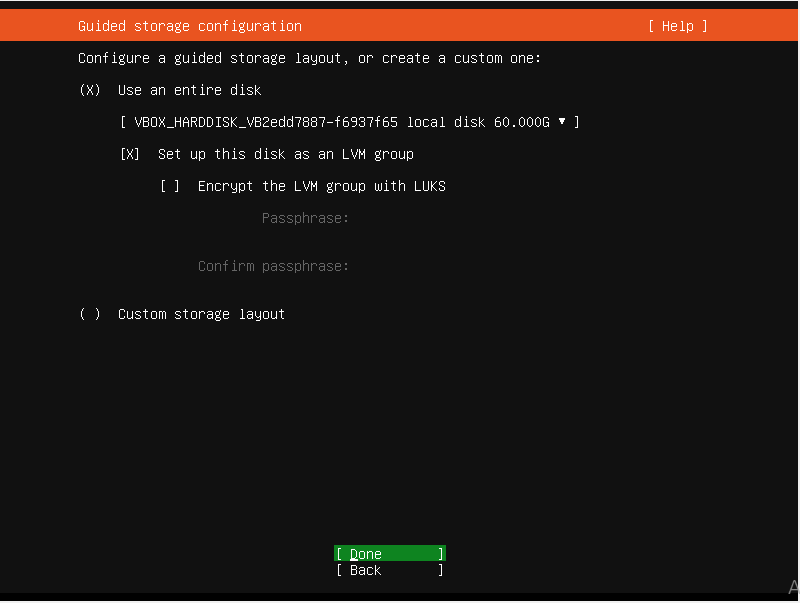
  1. In the Guided Storage Configuration, select the Partition Type like below:
    1. Do not enable encryption.
    2. If custom storage is added, ensure it is of LVM (Logical Volume Management) partition type.
Guided Storage Configuration
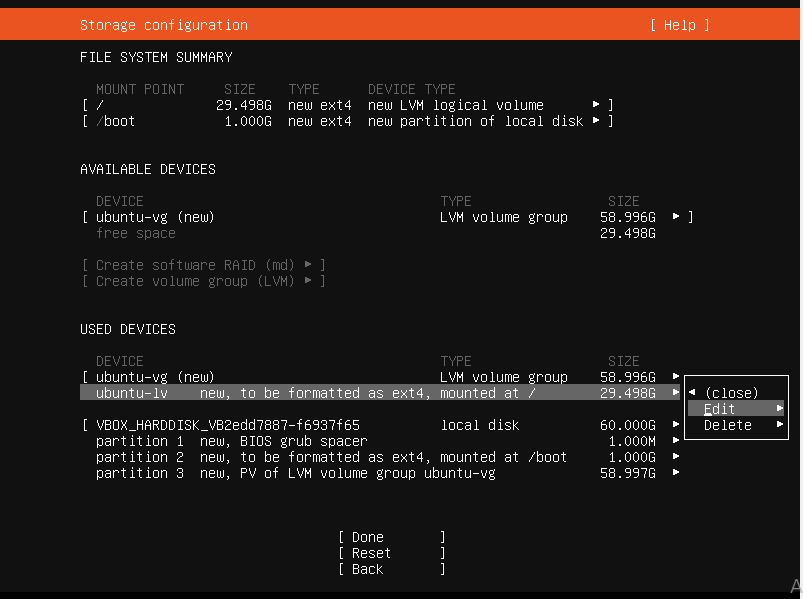
  1. In Storage Configuration, if the LVM partition is proper, select Done. Else, you can edit it to increase or decrease its size using the Edit option.
Storage Configuration

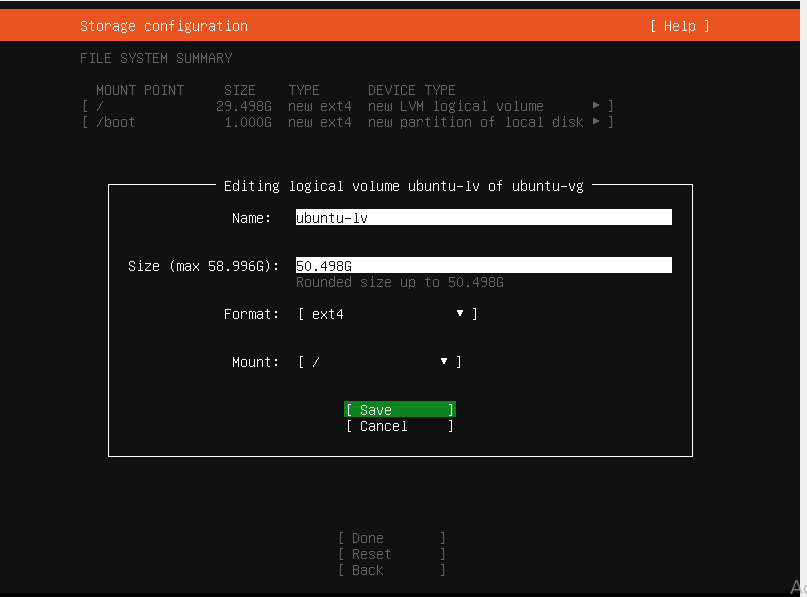
Once selected, the below screen appears. Enter the size as per your requirement and select Save.

Storage Configuration

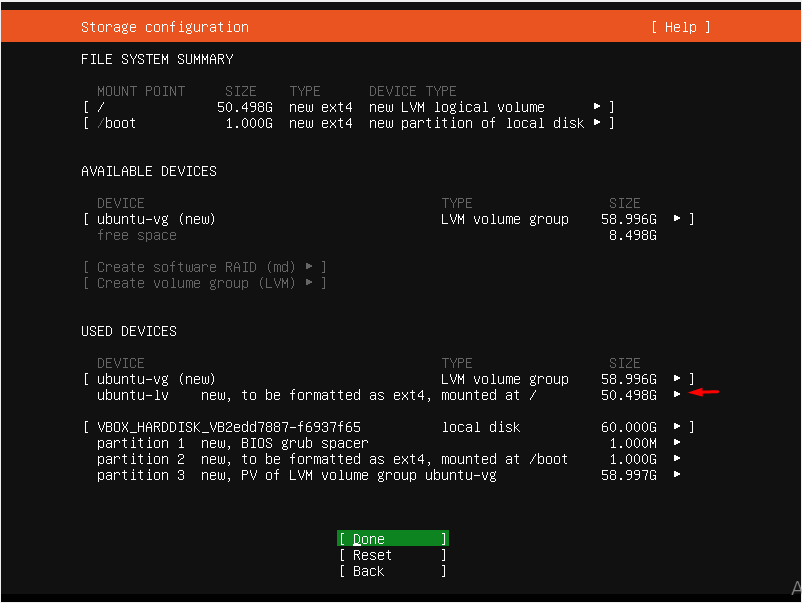
Select Done.

Storage Configuration
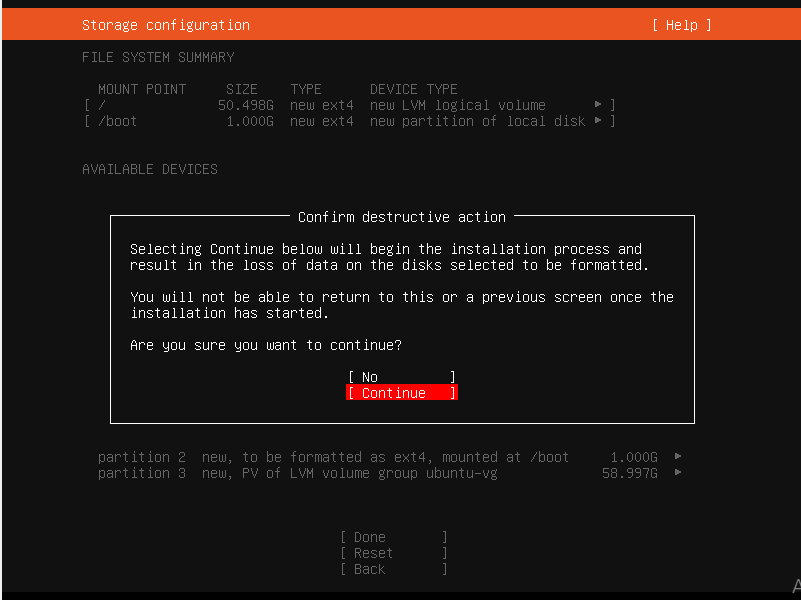
  1. Select Continue.
Storage Configuration
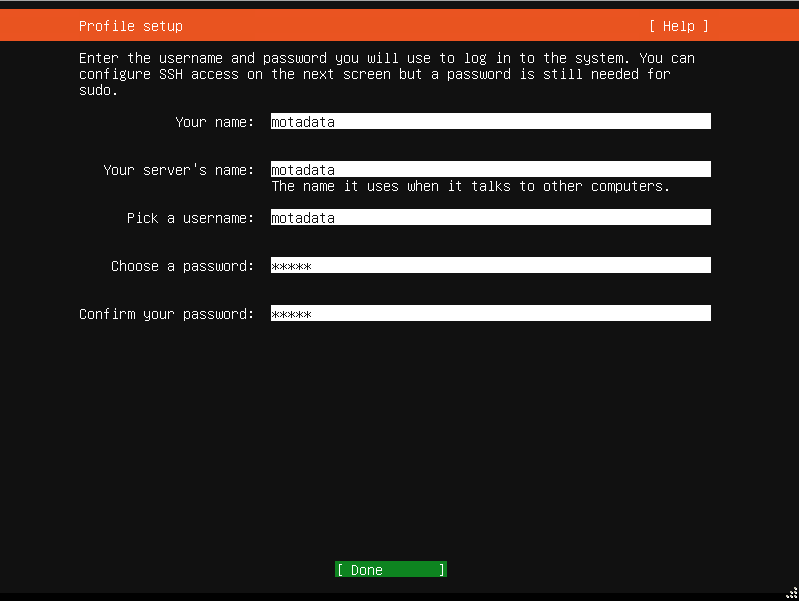
  1. In Profile setup, enter the username and password that will be used to login to the system. It is recommended to remember or save the details somewhere for future use.
Profile setup
Profile setup
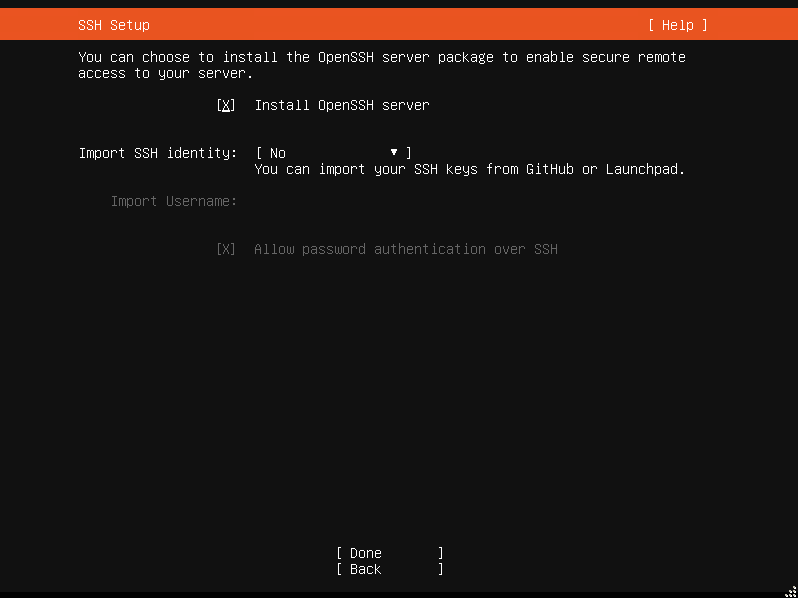
  1. In the SSH Setup, select the option Install OpenSSH server for SSH connection.
SSH Setup
SSH Setup
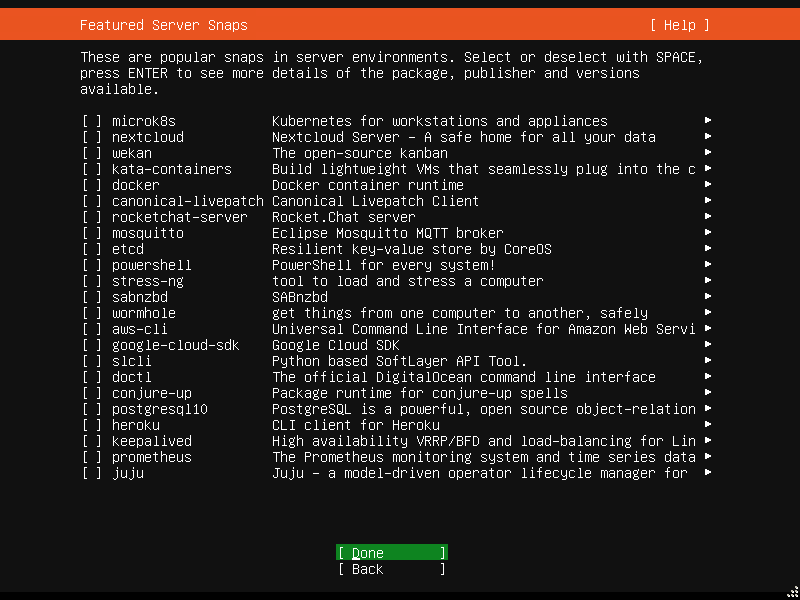
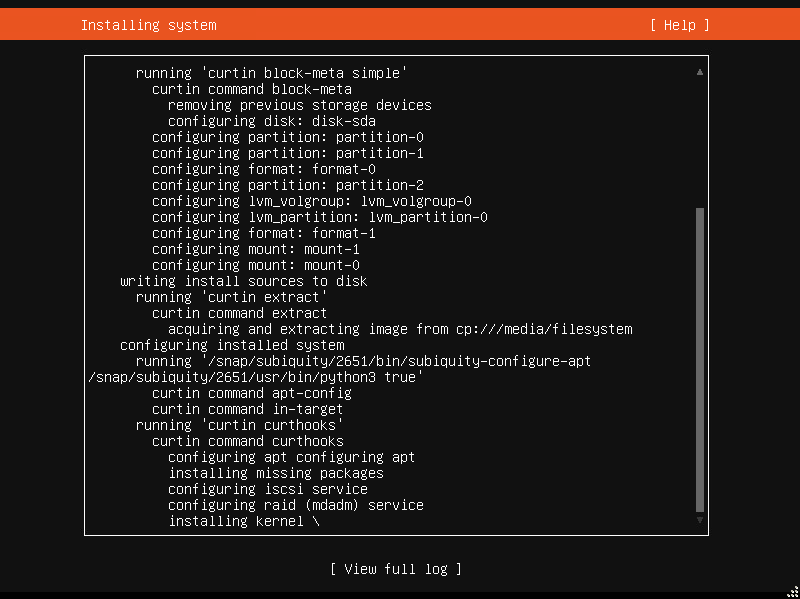
  1. In the Featured Server Snaps, select Done and the server installation process begins.
Installing System
Installing System
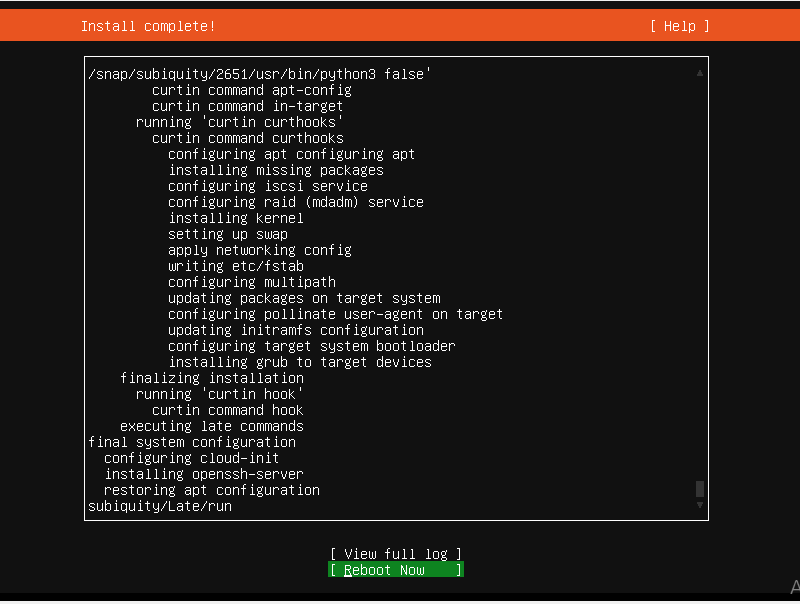
  1. In the Install complete, select Reboot Now.
Install Complete
Install Complete
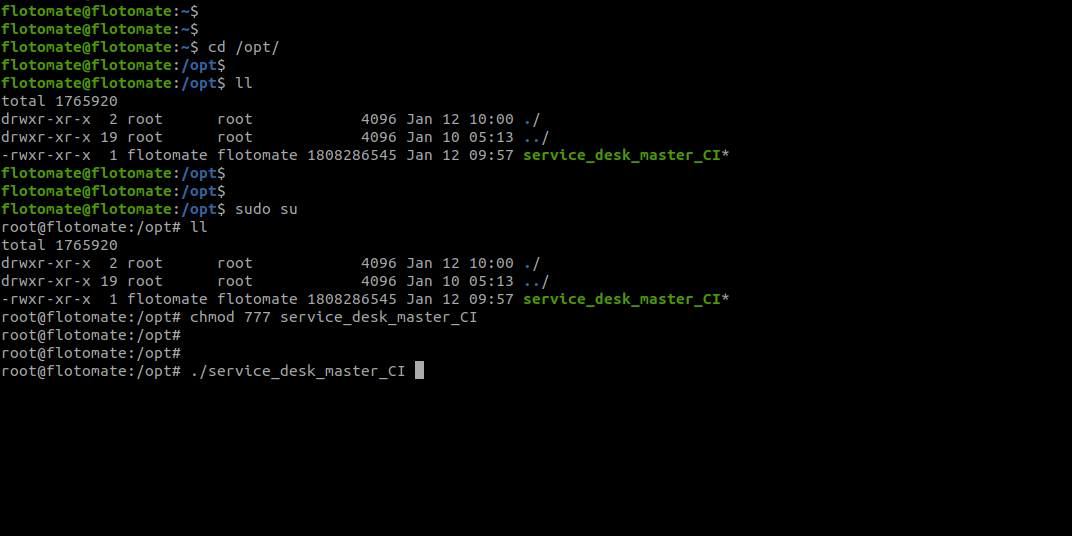
  1. The Service Desk Master CI will be available in the /opt folder.
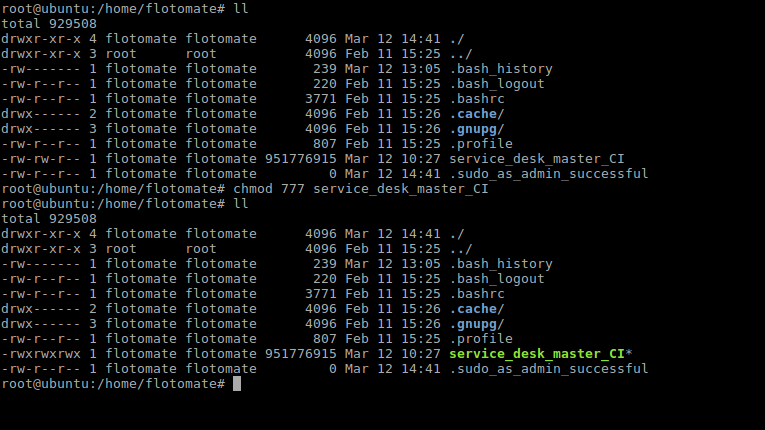
  2. Make sure you have execute permission to build file. If it does not have execute permission then you can change it using the below command.
    chmod 777 service_desk_master_CI
Chmod Command
Chmod Command
  1. Run Installer using the following command:
    ./service_desk_master_CI
Installer
Installer
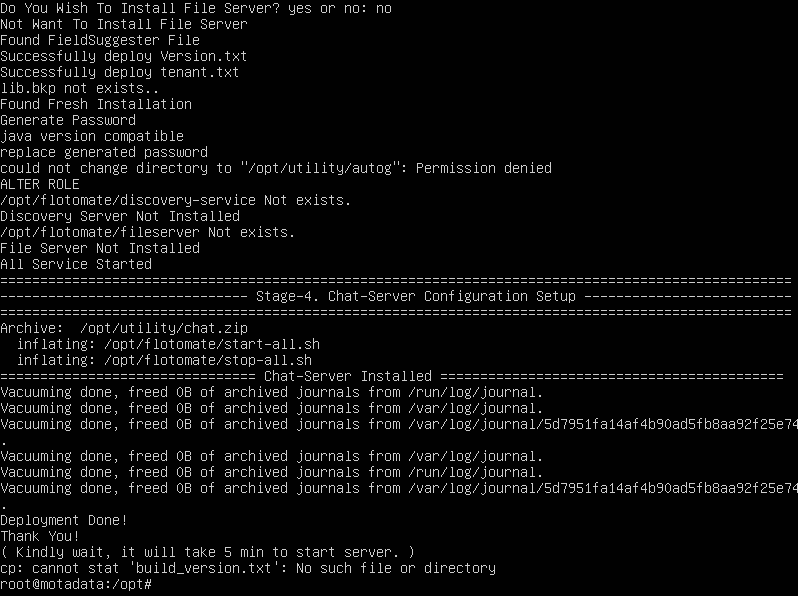
  1. Once you see the below screen, that means you have successfully installed the product.
Successful Installation
  1. After Installation, wait for five minutes. Navigate to http://{server_IP}/register, it will open the Registration form as below:
Registration Form
Registration Form
  1. Please provide the Super Admin user details there.
  2. Click on ‘Register’ once the form is filled. It will redirect you to the Login Page. Use the tab to switch between the Support and Technician Portal.
  3. Note that:
    1. You can login to Technician Portal by selecting the ‘Technician Portal Login’ tab.
    2. You can login to Support Portal by selecting the ‘Support Portal Login’ tab.
Motadata Service Desk – Server Installation via Build

System Hardware Requirements

Downloading and Installing Base OS

You can download the required OS using the below links:

Product Installer

If the base OS installed is Ubuntu 22.0.4.1, download product build/installer from following link : Download Link

If the base OS installed is Ubuntu 20.04.03, download product build/installer from following link : Download Link

If you are using RedHat version 8.4, download the product build installer from below link : Download Link

Fresh Installation Guide

After installing the Base OS, follow the below steps to install the product on your server:

  1. Copy release build installer (service_desk_master_CI) to target machine.
  2. Make Sure you have execute permission to build file. If it does not have execute permission then you can change it using below command:
    sudo chmod 777 service_desk_master_CI
Main Server
Main Server
  1. Run Installer by following command
    sudo ./service_desk_master_CI
Run Installer
Run Installer
  1. During Installation, Installer will prompt for Password. Please provide following password : mypassword
Password Prompt
Password Prompt
  • Once you see below screen, that means you have successfully installed the product.
Install Success
Install Success
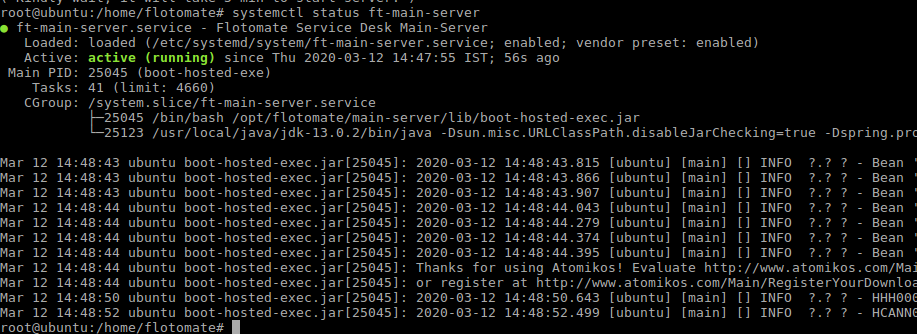
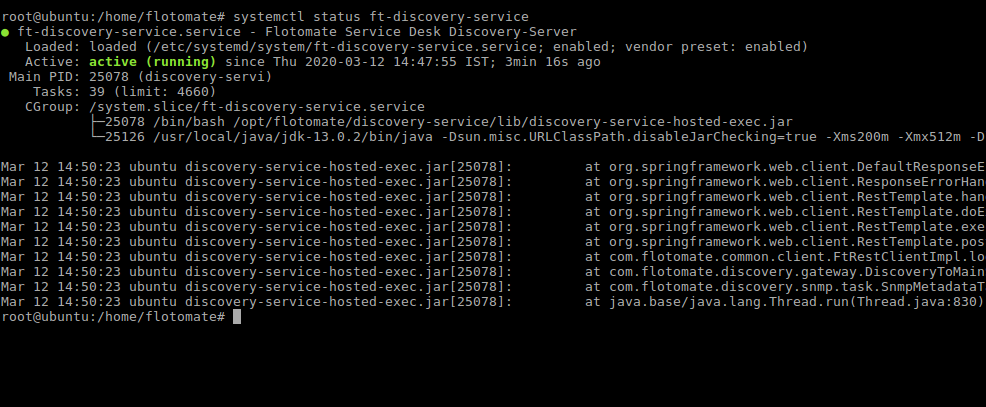
  1. After installation, check the services of ‘Main Server’, ‘Report Server’, and ‘Discovery Server’ using the below commands respectively:
    systemctl status ft-main-server
Main Server Services

systemctl status ft-analytics-server

Report Server Services

systemctl status ft-discovery-service

Discovery Server Services
  1. After Installation, wait for five minutes.
    Navigate to http://{server_IP}/register, it will open the Registration form as below :
Registration Form
Registration Form
  1. The registration form is for the first user, who is by default the Super Admin who has all the rights. Register the user, and use the credentials to login to the ServiceOps Portal.
  2. Click on ‘Register’ once the form is filled. It will redirect you to the Login Page. Use the tab to switch between the Support and Technician Portal.
  3. You can also access the ServiceOps Portal from a web-browser on http://{server_IP}/login.

Hardware Requirement

There are specific hardware requirements suggested for different modules, licenses, and user configurations for Help Desk and Service Desk. Please find them below:

Service Desk
Concurrent Technicians Login CPU RAM HardDisk
1-5 4 Core 8 GB 200 GB
5-20 8 Core 16 GB 500 GB
20-50 16 Core 32 GB 1 TB
50-100 32 Core 64 GB 1 TB
Asset Management
Asset Count CPU RAM HardDisk
1-1000 4 Core 8 GB 200 GB
1000-5000 8 Core 16 GB 500 GB
5000-10000 16 Core 32 GB 1 TB
10000-25000 32 Core 64 GB 1 TB
Service Desk and Asset Management
Concurrent Technicians Login Asset Count CPU RAM HardDisk
1-5 1-1000 8 Core 12 GB 500 GB
5-20 1000-5000 12 Core 24 GB 500 GB
20-50 5000-10000 24 Core 48 GB 1 TB
50-100 10000-25000 48 Core 96 GB 1 TB
Patch Management
Endpoint Count CPU RAM HardDisk
1-1000 8 Core 16 GB 300 GB
1000-5000 16 Core 32 GB 500 GB
5000-10000 32 Core 64 GB 500 GB
File/Relay Server for Patch Management (Need one file Server per location)
Endpoint Count CPU RAM HardDisk
1-1000 4 Core 8 GB 500 GB
1000-5000 4 Core 8 GB 1 TB
5000-10000 8 Core 16 GB 1 TB

Prerequisite Guide

Port Requirements for ServiceOps

Port serves as an interface between different servers. When setting up our product, opening the right ports is vital for proper functioning of ServiceOps solution. Following are the ports for all the services in Motadata ServiceOps:

  • Main Server
  1. Http/Https 80/443
  2. DNS 53
  3. SSH 22
  4. SNMP 161
  5. WMI 135 & 445, 5000 – 6000 (TCP), 49152 – 65535
  6. LDAP 389
  7. Discovery 8081
  8. Main-server 8080
  9. Main-server 8082
  10. RDP-Client 7070
  11. RDP-Server 5900
  12. SMTP 25/465/587 (could be any one)
  13. POP3 995/110 (based on default setup)
  14. IMAP 993/143 (based on default setup)
  15. ARP 219
  16. TCP Random ports once when ready for connection. These are dynamic port range.
  17. LDAPS 636
  18. Remote Port Number 8088/8089
  19. VNC RDP middleware server 5900 5901
  20. python3-pip should be installed
  21. python3 -m pip impacket should be installed
  22. apt install msitools
  23. python3 -m pip install smbprotocol
  24. python3 -m pip install pyreadline

Note: Check whether impacket is available in the Main Server. You can verify the packet from this location “/opt/flotomate/main-server/config/”.

  • Plugin server
  1. Plugin server 5050
  2. Http/Https 80/443
  • Agent
  1. Http/Https 80/443
  • Windows OS
  1. File sharing should be allowed.
  2. UAC (User Access Control) should be allowed (value 1) in the Registry Editor from the path: Computer\HKEY_LOCAL_MACHINE\SOFTWARE\Microsoft\Windows\CurrentVersion\Policies\System\LocalAccountTokenFilterPolicy.
  3. Add a folder (C:\Windows) in the Exclusions section under Virus and Threat Protection Settings.
  4. If Firewall is on, allow the below Inbound Rules:
    • Windows Management Instrumentation (DCOM-In) (Private, Public)
    • Windows Management Instrumentation (DCOM-In) (Domain)
    • Windows Management Instrumentation (WMI-In) (Private, Public)
    • Windows Management Instrumentation (WMI-In) (Domain)
    • Remote Service Management (NP-In) (Private, Public)
    • Remote Service Management (NP-In) (Domain)
Note: If the agent does not get installed after fulfilling the above prerequisites, reboot the machine, and try again to install the agent.

Introduction

Motadata ServiceOps is an ITIL compliant ITSM tool that uses AI/ML to optimize and streamline the service delivery across the various business processes. It automates the support workflows and discards the manual complexities. Apart from request tracking and management, it also provides Problem, Change, Release, Assets, Patches, Packages, Projects, Knowledge, Reports, and Task management functionalities. With all these services in a single ServiceOps instance, an organization does not need to buy multiple tools for different services, making it an All-in-One solution. Moreover, with a modern and user-friendly interface, the IT team can work effectively and streamline the IT service delivery. Thus, the technicians and administrators can resolve the queries or requirements of the end users in no time.

This guide walks you through the initial steps of installing the Motadata Service Desk. It provides the procedure about how to install the various servers, and configure high availability. Also, you can find the information to upgrade ServiceOps. For more details see the Upgrade Guide section.

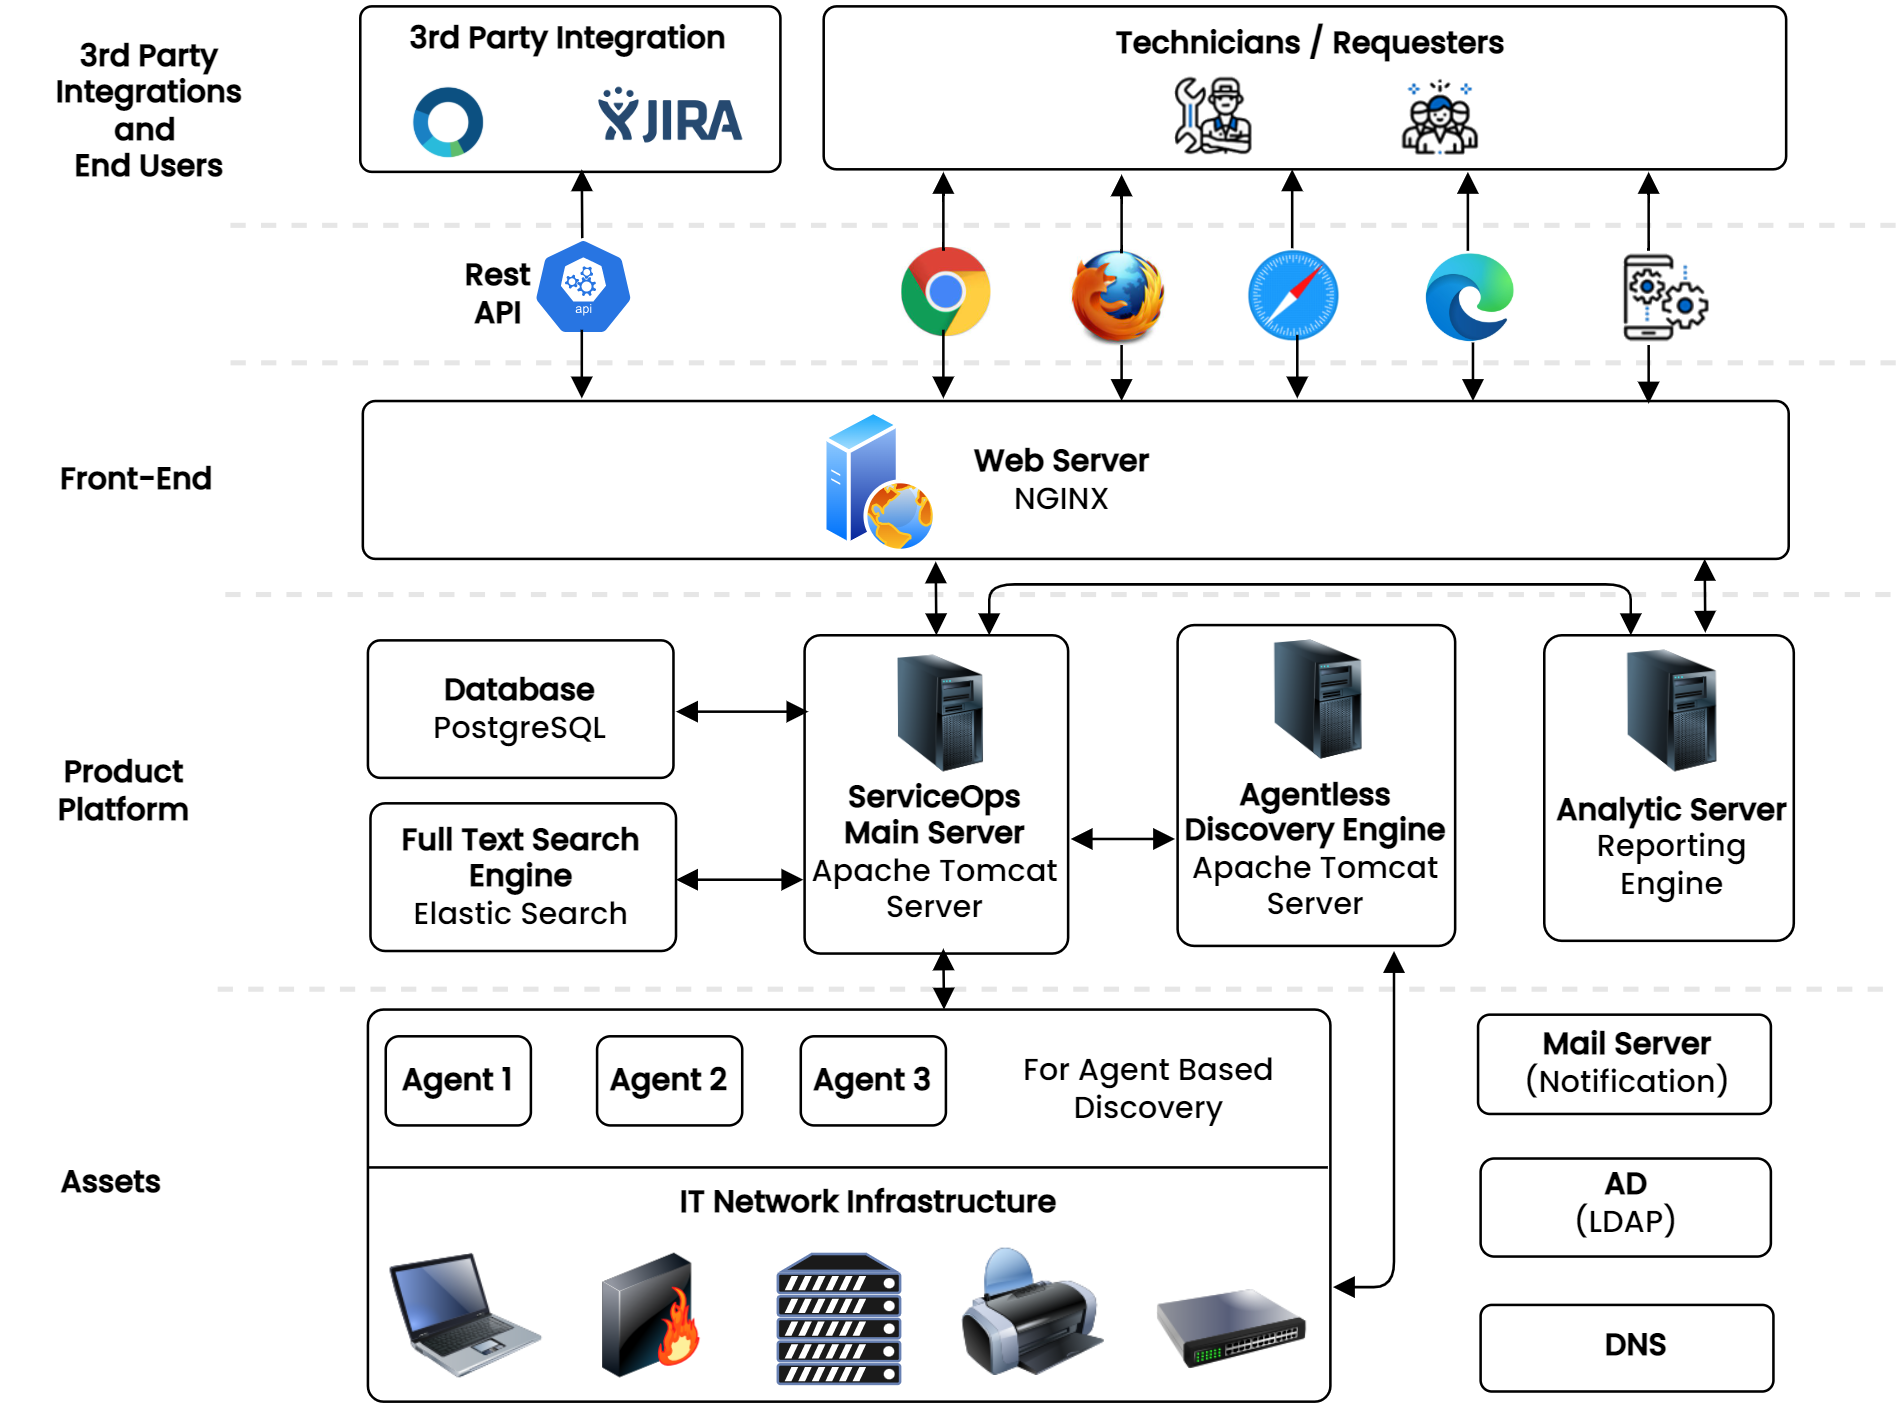
Before moving ahead, let’s understand the architecture of ServiceOps.

ServiceOps Architecture

Layered Architecture Diagram

The architecture contains the following layers:

  • Product Platform: This layer contains the ServiceOps Main Sever, Agentless Discovery Engine, Analytic Server, Database, and the Full Text Search Engine. It displays the communication of all the components with the Main Server.
  • Front-End: This layer contains the Web Server NGINX from which the end users and 3rd party applications can access the ServiceOps via Web Browser or Rest API.
  • Assets: This layer contains the Agents, IT Network infrastructure, Mail Servers, Active Directory, and Domain Name Server.
  • 3rd Party Integrations and End Users: This layer contains the applications which can be integrated with ServiceOps.

Based on the architecture, make your environment ready for installation.

Now, let’s start installing the required servers step-by-step.

It contains the following sections:

DELETE an Asset

BaseURL/api/v1/asset/modelName/assetId

Example (Response)

Hardware Asset

{
"userMessage": "Asset has been Archived Successfully.",
"warningMessage": null,
"id": 1
}

Software Asset

{
"userMessage": "Asset has been Archived Successfully.",
"warningMessage": null,
"id": 1
}

Non-IT Asset

{
"userMessage": "Asset has been Archived Successfully.",
"warningMessage": null,
"id": 1
}

UPDATE an Asset

BaseURL/api/v1/asset/assetId

Example (Request and Response)

Hardware Asset

Request

{
"type" : "HardwareAsset",
"name" : "Hardware Asset Name Updated",
"customField" : {
"number" : 8778,
"hardware-textbox" : "hardware-text-updated"
},
"assetPropertyList": [
{
"type": "ComputerProperty",
"osName": "Windows X10",
"propertyCustomField" : {
"computerproperty-textbox" : "computer-text-updated"
}
}
]
}

Response

{
"type": "HardwareAsset",
"id": 1,
"assetTypeName": "Computer",
"assetId": "AST-1",
"name": "Hardware Asset Name Updated",
"impactName": "Low",
"statusName": "In Use",
"origin": "manual",
"acquitionDate": "15-08-2020",
"tags": [
"tag-1",
"tag-2"
],
"customField": {
"hardware-textbox": "hardware-text-updated",
"number": 8778
},
"createdDate": "19-10-2020 11:23",
"updatedDate": "19-10-2020 11:41",
"assetPropertyList": [
{
"id": 1,
"refName": "AST-1",
"type": "ComputerProperty",
"osName": "Windows X10",
"osVersion": null,
"servicePackName": null,
"osLicenceKey": null,
"osArchitecture": null,
"bootupState": null,
"memorySize": 0,
"diskSize": 0,
"domainName": null,
"cpuSpeed": 0,
"cpuCoreCount": 0,
"partOfDomain": false,
"numberOfLogicalProcessors": 0,
"numberOfProcessors": 0,
"pcSystemType": null,
"lastLoggedInUser": null,
"activationStatus": null,
"propertyCustomField": {
"computerproperty-textbox": "computer-text-updated"
}
}
]
}

Software Asset

Request

{
"type" : "SoftwareAsset",
"name" : "Software Asset Name Updated",
"customField" : {
"number" : 889,
"software-textbox" : "software-text-updated"
},
"assetPropertyList": [
{
"type": "SoftwareProperty",
"softwareCost": 500,
"propertyCustomField" : {
"softwareproperty-textbox" : "softwareproperty-text-updated"
}
}
]
}

Response

{
"type": "SoftwareAsset",
"id": 1,
"assetTypeName": "OS",
"assetId": "AST-3",
"name": "Software Asset Name Updated",
"impactName": "Low",
"statusName": "In Use",
"origin": "manual",
"acquitionDate": "15-08-2020",
"tags": [
"tag-1",
"tag-2"
],
"customField": {
"number": 889,
"software-textbox": "software-text-updated"
},
"createdDate": "19-10-2020 11:30",
"updatedDate": "19-10-2020 11:39",
"assetPropertyList": [
{
"id": 1,
"refName": "AST-3",
"type": "SoftwareProperty",
"softwareCost": 500,
"licenseKeys": [],
"executableFileNames": [],
"propertyCustomField": {
"softwareproperty-textbox": "softwareproperty-text-updated"
}
}
],
"installationStatus": false
}

Non-IT Asset

Request

{
"type" : "NonITAsset",
"name" : "Non IT Asset Name updated",
"customField" : {
"number" : 89,
"nonit-textbox" : "nonit-textbox-updated"
}
}

Response

{
"type": "NonITAsset",
"id": 1,
"assetTypeName": "Document",
"assetId": "AST-4",
"name": "Non IT Asset Name updated",
"impactName": "Low",
"statusName": "In Use",
"origin": "manual",
"acquitionDate": "15-08-2020",
"tags": [
"tag-1",
"tag-2"
],
"customField": {
"number": 89,
"nonit-textbox" : "nonit-textbox-updated"
},
"createdDate": "19-10-2020 11:33",
"updatedDate": "19-10-2020 11:37"
}

GET an Asset

BaseURL/api/v1/asset/modelName/assetId

Example (Response)

Hardware Asset

BaseURL/api/v1/asset/asset_hardware/assetId

{
"type": "HardwareAsset",
"id": 1,
"assetTypeName": "Computer",
"assetId": "AST-1",
"name": "Hardware Asset Name Updated",
"impactName": "Low",
"statusName": "In Use",
"origin": "manual",
"acquitionDate": "15-08-2020",
"tags": [
"tag-1",
"tag-2"
],
"customField": {
"hardware-textbox": "hardware-text-updated",
"number": 8778
},
"createdDate": "19-10-2020 11:23",
"updatedDate": "19-10-2020 11:41",
"assetPropertyList": [
{
"id": 1,
"refName": "AST-1",
"type": "HardwareProperty",
"serialNumber": null,
"propertyCustomField": null
},
{
"id": 1,
"refName": "AST-1",
"type": "ComputerProperty",
"osName": "Windows X10",
"osVersion": null,
"servicePackName": null,
"osLicenceKey": null,
"osArchitecture": null,
"bootupState": null,
"memorySize": 0,
"diskSize": 0,
"domainName": null,
"cpuSpeed": 0,
"cpuCoreCount": 0,
"partOfDomain": false,
"numberOfLogicalProcessors": 0,
"numberOfProcessors": 0,
"pcSystemType": null,
"lastLoggedInUser": null,
"activationStatus": null,
"propertyCustomField": {
"computerproperty-textbox": "computer-text-updated"
}
}
]
}

Software Asset

BaseURL/api/v1/asset/asset_software/assetId

{
"type": "SoftwareAsset",
"id": 1,
"assetTypeName": "OS",
"assetId": "AST-3",
"name": "Software Asset Name Updated",
"impactName": "Low",
"statusName": "In Use",
"origin": "manual",
"acquitionDate": "15-08-2020",
"tags": [
"tag-1",
"tag-2"
],
"customField": {
"number": 889,
"software-textbox": "software-text-updated"
},
"createdDate": "19-10-2020 11:30",
"updatedDate": "19-10-2020 11:39",
"assetPropertyList": [
{
"id": 1,
"refName": "AST-3",
"type": "SoftwareProperty",
"softwareCost": 500,
"licenseKeys": [],
"executableFileNames": [],
"propertyCustomField": {
"softwareproperty-textbox": "softwareproperty-text-updated"
}
}
],
"installationStatus": false
}

Non-IT Asset

BaseURL/api/v1/asset/asset_non_it/assetId

{
"type": "NonITAsset",
"id": 1,
"assetTypeName": "Document",
"assetId": "AST-4",
"name": "Non IT Asset Name updated",
"impactName": "Low",
"statusName": "In Use",
"origin": "manual",
"acquitionDate": "15-08-2020",
"tags": [
"tag-1",
"tag-2"
],
"customField": {
"number": 89,
"nonit-textbox" : "nonit-textbox-updated"
},
"createdDate": "19-10-2020 11:33",
"updatedDate": "19-10-2020 11:37"
}

Software License APIs

Get All Software License

API (Post Method) : BaseURL/api/v1/asset/softwarelicense?offset=0&size=25

Request payload example

{
“softwareName” : “value”,
“licenseTypeName” : “value”
}

Response Data

License ID, License Name, License Type, Expiry Date , Product Name, Purchase Count, Installation Count

Response Data Example

{
"objectList": [
{
"id": “value”,
"softwareName": "value",
"licenseId": "value",
"licenseTypeName": "value",
"licenseName": "value",
"productName": "value",
"purchaseCount": "value"
"installationCount": "value",
"expiryDate": "value",
},
{
"id": “value”,
"softwareName": "value",
"licenseId": "value",
"licenseTypeName": "value",
"licenseName": "value",
"productName": "value",
"purchaseCount": "value",
"installationCount": "value",
"expiryDate": "value",
}
],
"totalCount": value
}

Note: softwareName and licenseTypeName in request payload is optional you can also pass an empty request body.

Get Software Usage Details

API (Post Method) : BaseURL/api/v1/asset/softwareusage?offset=0&size=25

Request payload example

{
“softwareName” : “value”,
“fromDate” : “dd-MM-yyyy”,
“toDate” : “dd-MM-yyyy ”,
}

Response Data

Asset ID, Host Name, IP Address, Usage Duration (minutes), Last Used

Response Data Example

{
"assetId": "AST-1",
"hostName": "value
"ipAddress": "value
"usageDuration": "2 Hours 15 Minutes",
"lastUsedTime": "16-09-2020 15:10"
}

Note: softwareName, fomDate and toDate is Mandatory in request payload.