Asset Type APIs

Get All AssetTypes:

API (Get Method) : BaseURL/api/v1/asset/assettype

Response Data Example

[
{
"node": {
"id": 1,
"name": "Hardware",
"parentId": 0,
"order": 1,
"createdDate": "27-07-2020 10:58",
"updatedDate": "27-07-2020 10:58"
},
"childrens":
[
{
"node": {
"id": 2,
"name": "Monitor",
"parentName": "Hardware",
"parentId": 1,
"order": 1,
"createdDate": "27-07-2020 10:58",
"updatedDate": "27-07-2020 10:58"
},
"childrens": null
},
{
"node": {
"id": 3,
"name": "Projector",
"parentName": "Hardware",
"parentId": 1,
"order": 2,
"createdDate": "27-07-2020 10:58",
"updatedDate": "27-07-2020 10:58"
},
"childrens": null
}
]
]

POST Create a Request

{{server-url}}/api/v1/request

In order to create a new request, you have to call the above endpoint with the following key-values:

Header

Key Description
Authorization Bearer {access token obtained after authorization}
Content-Type application/json

Body

You would be sending a JSON request that will create a ticket and populate its details. Some of the key-value pairs are compulsory, notice the description of each.

Note: Keys with asterisk are compulsory.
Key Value Type Description
subject* String Subject of the ticket.
categoryName String Category Name of a Request. Set to ‘Request’ as it is default to ‘Service Request’.
requesterEmail* String Email address of the user registered for the client.
ccEmailSet String Array Email Address of People to whom notification is to be sent for certain events on Request.
tags String Array These are additional identifiers attached to a ticket. Its a list that can contain n number of STRINGS.
impactName String Describes the effect of the Request. Possible values are: Low, On User , On department, Or On Business.
priorityName String Shows the importance of the Request. Possible values are: Low, Medium, High, or Urgent.
urgencyName String Marks the request as urgent. Possible values are: Low, Medium, High, or Urgent.
departmentName String Additional information about the ticket.
locationName String Name of the Location where Request happened. Note that Location Must Exist with same name.
supportLevel String Describes the level of the provisioned support. Possible Values are: Tier1, Tier2, Tier3, or Tier 4.
spam Boolean Possible Values are True or False.
assigneeEmail String Name of the Assignee.
Technician Group Name String Name of the group to which the Technician belongs.
source String It shows the origin of the ticket. The Source can be either Support Portal or the Technician portal. Default source for Rest API is ‘External’.
fileAttachments Object Array Reference File Name of attachments for a Request. For example:[ { “refFileName” : “abc”, “realName” : “xyz.pdf” } ]
statusName String Possible values are Open, In Progress, Pending, Resolved, and Closed.
linkAssetIds Object Array Add asset id with model name. For example :”linkAssetIds”: [{“assetModel”: “asset_hardware”,”assetId”: 1}].
customField MAP:{key: STRING, value: OBJECT} This key is related to custom fields. Example “customField”: {“New Dropdown”: “1”, “New Number”: 110.1,”New Text Area”: “a11”, “New Text Input”: “111”}

Example (Request & Response)

Request

curl --request POST
--url 'http://{Server-url}/api/v1/request'\
--header 'Authorization: Bearer eyJhbGciOiJIUzI1NiIsInR5cCI6IkpXVCJ9.eyJleHAiOjE1ODUxNTk0MTksInVzZXJfbmFtZSI6Im5pcmF2LnBhdGVsQG1vdGFkYXRhLmNvbSIsImp0aSI6ImZhZTY2YTdiLTY0NDQtNGY4OS1hNGNmLWZmOGY3NDIyMThhZiIsImNsaWVudF9pZCI6ImZsb3RvLXdlYi1hcHAiLCJzY29wZSI6WyJOTy1TQ09QRSJdLCJ0ZW5hbnRJZGVudGlmaWVyIjoiYXBvbG8ifQ.i65Huu91E5xP2fXk7hY45VBN1wZSRhvDAT1WRCqcuRw'
--header "Content-type: application/json"
--data '{
"requesterEmail": "a@b.com",
"ccEmailSet": [
"a@b.com"
],
"subject": "asdasd",
"impactName": "Low",
"priorityName": "Low",
"statusName": "Open",
"urgencyName": "Low",
"departmentName":"IT",
"spam":false,
"supportLevel":"tier2",
"customField": {
"New Dropdown": "1",
"New Number": 110.1,
"New Text Area": "a11",
"New Text Input": "111"
},
"name": "INC-1",
"tags": ["asdasd"]
}'

Response

{
"id": 1,
"createdTime": 1584699527485,
"updatedTime": 1584699528033,
"requesterEmail": "a@b.com",
"requesterName": "utsav",
"ccEmailSet": [
"a@b.com"
],
"subject": "asdasd",
"impactName": "Low",
"priorityName": "Low",
"statusName": "Open",
"urgencyName": "Low",
"tags": [],
"customField": {},
"source": "Technician Portal",
"spam": false,
"departmentName": "IT",
"supportLevel": "tier1",
"name": "INC-1"
}

Managing Request Using API

Welcome to ServiceOps Request Management API. Our APIs allow third party systems to create, update, and read a Request from our ServiceOps Platform.

All CRUD operations using APIs are done with the following methods: GETPOST, and DELETE.

First you need to setup your Client with our system and authenticate to acquire a Token ID. Using the Token ID you have to make all requests to our system.

Setting Up API Client

Before making any API requests, you have to register your Client with our ServiceOps system and acquire the below parameters:

  • Client ID
  • Client Secret
  • Username
  • Password

Log into the ServiceOps system, go to AdminIntegration (Under Automation), and register your product for REST API.

Authorization

Authentication with our ServiceOps system allows you to acquire an access token, using which you have to make incident requests.

POST Acquire Token

{{server-url}}/api/oauth/token

You have to make a POST request to the above endpoint using the following key-values:

Header

Key Description
Authorization Basic Client-ID:Client-Secret encoded in Base64.

Body

Key Description
username UserName of user (registered with our ServiceOps system) for whom API to be Executed.
password Password of User (registered with our ServiceOps system) for whom API to be Executed.
grant_type OAuth2 Grant Type. (i.e. password)

Example (Request & Response)

Request

curl --request POST \
--url 'http://{{server-url}}/api/oauth/token' \
--header 'Authorization: Basic bWFpbi13ZWItYXBwLWNsaWVudDptYWluLXdlYi1hcHAtc2VjcmV0' \
--header 'content-type: multipart/form-data; boundary=----WebKitFormBoundary7MA4YWxkTrZu0gW' \
--form username=tim@acme.com \
--form password=123 \
--form grant_type=password

Response

{
"access_token": "eyJhbGciOiJIUzI1NiIsInR5cCI6IkpXVCJ9.eyJncmFudF90eXBlIjoicGFzc3dvcmQiLCJ1c2VyX25hbWUiOiJ0aW1AYWNtZS5jb20iLCJzY29wZSI6WyJtYWluLXdlYi1hcHAtc2NvcGUiXSwiZXhwIjoxNTM4Njg0NTkzLCJhdXRob3JpdGllcyI6WyJVU0VSIl0sImp0aSI6IjZkM2JkMWU5LTdhOTYtNDFmZS1hZmY5LTgyYmQ1ZDVmNWNiZiIsImNsaWVudF9pZCI6Im1haW4td2ViLWFwcC1jbGllbnQifQ.1pHYIEKAsBcjNf0xiwot5fcu0KOH2E4COqiusDuVh6I",
"token_type": "bearer",
"refresh_token": "eyJhbGciOiJIUzI1NiIsInR5cCI6IkpXVCJ9.eyJncmFudF90eXBlIjoicGFzc3dvcmQiLCJ1c2VyX25hbWUiOiJ0aW1AYWNtZS5jb20iLCJzY29wZSI6WyJtYWluLXdlYi1hcHAtc2NvcGUiXSwiYXRpIjoiNmQzYmQxZTktN2E5Ni00MWZlLWFmZjktODJiZDVkNWY1Y2JmIiwiZXhwIjoxNTQxMjY5MzkzLCJhdXRob3JpdGllcyI6WyJVU0VSIl0sImp0aSI6ImU2YWUxZTMxLWQzZWQtNGJkYi05NTY4LWRhNmQ3NmUwZWE4YiIsImNsaWVudF9pZCI6Im1haW4td2ViLWFwcC1jbGllbnQifQ.aFV-DBgNrSS2hF91qv_zmtBsiRS2z3VsgnyoXVcAxeA",
"expires_in": 7199,
"scope": "main-web-app-scope",
"jti": "6d3bd1e9-7a96-41fe-aff9-82bd5d5f5cbf"
}

Introduction

Motadata provides a facility to integrate third-party clients with the ServiceOps Portal. This enables you to use the APIs and REST APIs via these applications and create or manage requests without logging into the ServiceOps Portal.

What are APIs?

An API (Application Programming Interface) acts as a mediator between the two software programs or applications to communicate with each other. Using this you can get the required details or perform the required action.

What are REST APIs?

A REST (REpresentational State Transfer) API defines a set of functions which the developers can use to perform requests and receive responses via the HTTP protocol such as GET and POST.

The integration guide is for those who want to create and manage requests using APIs and REST APIs. It contains the below sections:

Active Directory Self Service

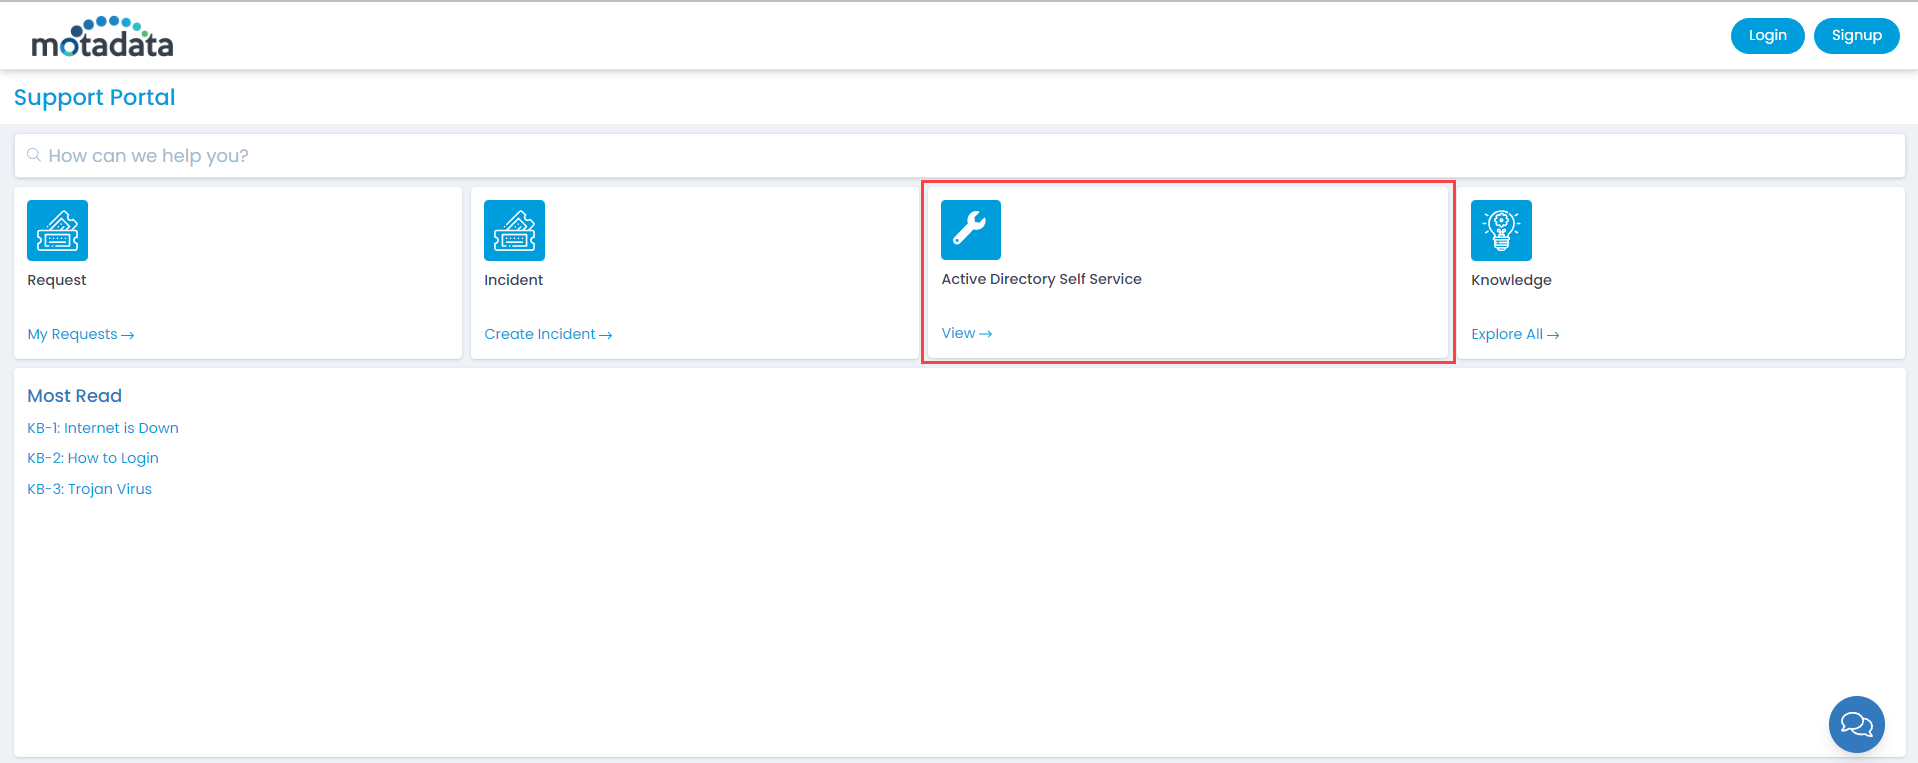
When any LDAP user forgets his password or account gets locked, one can login to the Support Portal and directly unlock or reset the password. For Non-Logged In users click the option Active Directory Self Service as shown below.

Active Directory Self Service Option
Active Directory Self Service

Enter the Email ID or Logon Name and click on Reset Password or Unlock Account whichever is feasible.

On clicking, answer and verify the security questions asked as shown below. The Security Questions configured in the Edit User Profile will be used here for Reset Password and Unlock Account.

Verify Security Questions

Once all the questions are verified, Reset the Password by entering the new Password and Confirm Password as shown below.

Reset Password
Reset Password

Once done, click Submit, and the password will get changed. Also, it will get updated in the LDAP server. You can now login to the Support Portal using the new password.

Similarly, following the same process you can unlock your account if it gets locked somehow.

Wake On LAN Schedules List Page

The Wake On LAN Schedules list page helps the technicians to track and manage all the schedules. It displays a list of schedules along with the options like enable/disable, create, settings, edit, and delete at one place.

To view the Wake On LAN Schedules list page, navigate to Admin > Asset Management > Wake On LAN, and the below page appears.

Wake On LAN Schedules List Page

Here, you can do the following:

  • Create WOL Schedule: You can create a new schedule.
  • Settings: You can configure the settings for Wake On LAN Schedule.
  • Enable or Disable: You can enable or disable the Wake On LAN Schedule. By default, it is enabled.
  • Edit: You can edit the details of the Wake On LAN Schedule.
  • Delete: You can delete the Wake On LAN Schedule. A confirmation message appears. Click Yes to continue or Cancel to stop the process.

Settings

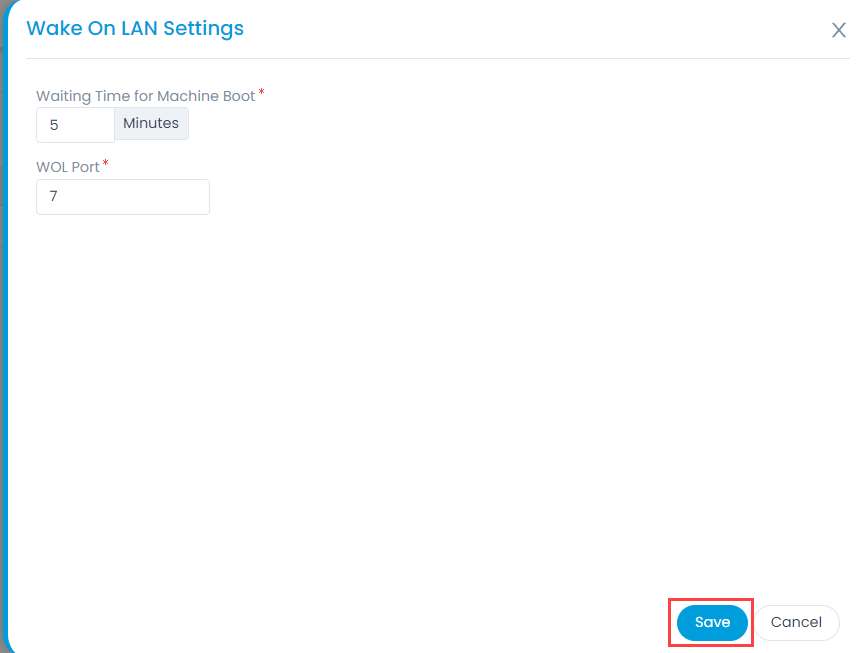
To configure the settings, click the Settings button and a popup appears.

Wake On LAN Settings Popup

Enter the below details:

  • Waiting Time for Machine Boot: Set the time till which a response is awaited from the remote machine. You can set the time from 5 to 60 minutes. The default value is 5 minutes.
  • WOL Port: Enter the port number on which WOL is configured. The default value is 6 or 7. You can use other port number as well.
    Note: With proper MAC Address, IP Address, and Subnet details configured, the computer will wake up though a different WOL port number is set.

Once done, click Save to save the settings.

Edit User Profile

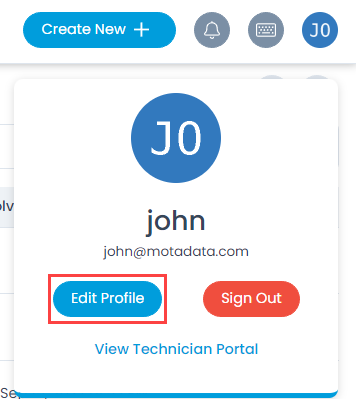
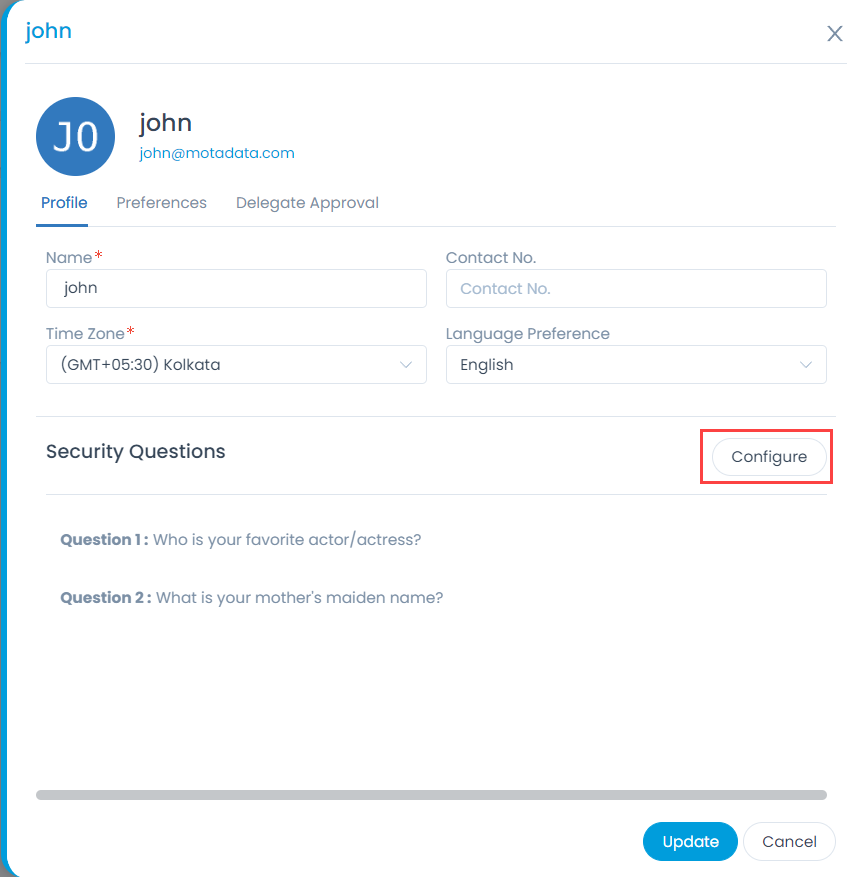
You can manage your profile and update the demographic details using ‘Edit Profile’ option. The option is available at the top-right corner of the application.

Edit Profile Option
Edit Profile Option
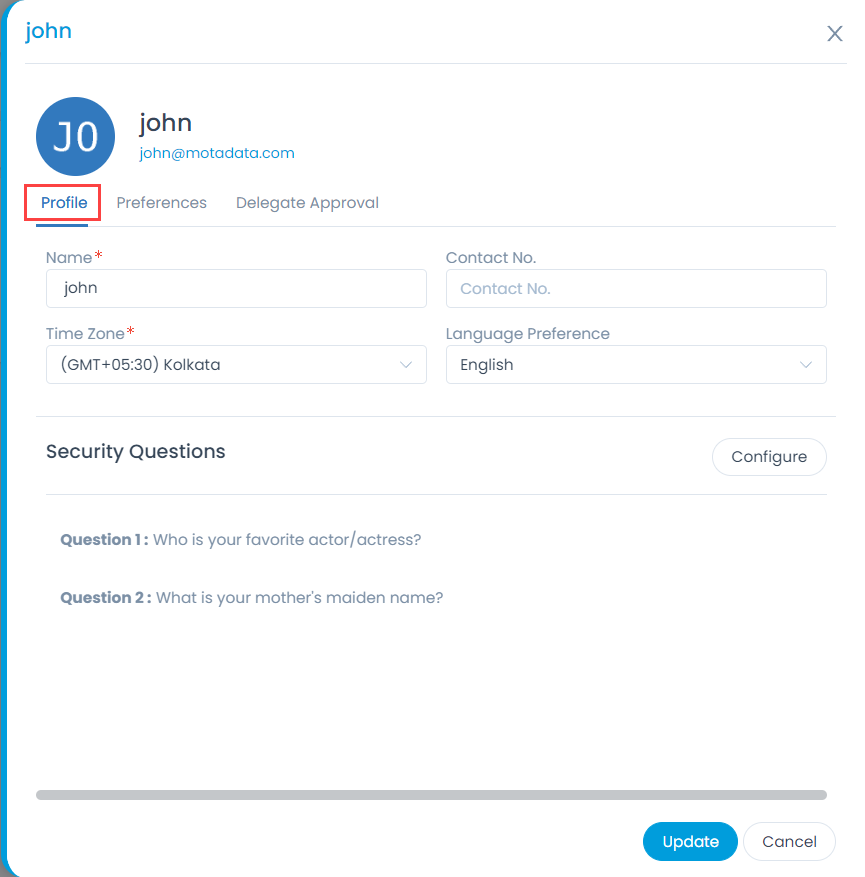
Edit Profile Popup
Edit Profile Popup

Profile

This tab allows you to edit the profile details. You can edit the following details:

  • Name
  • Contact No
  • Time Zone
  • Language Preference

Security Questions (Available only if AD Self Service is enabled from the Technician Portal)

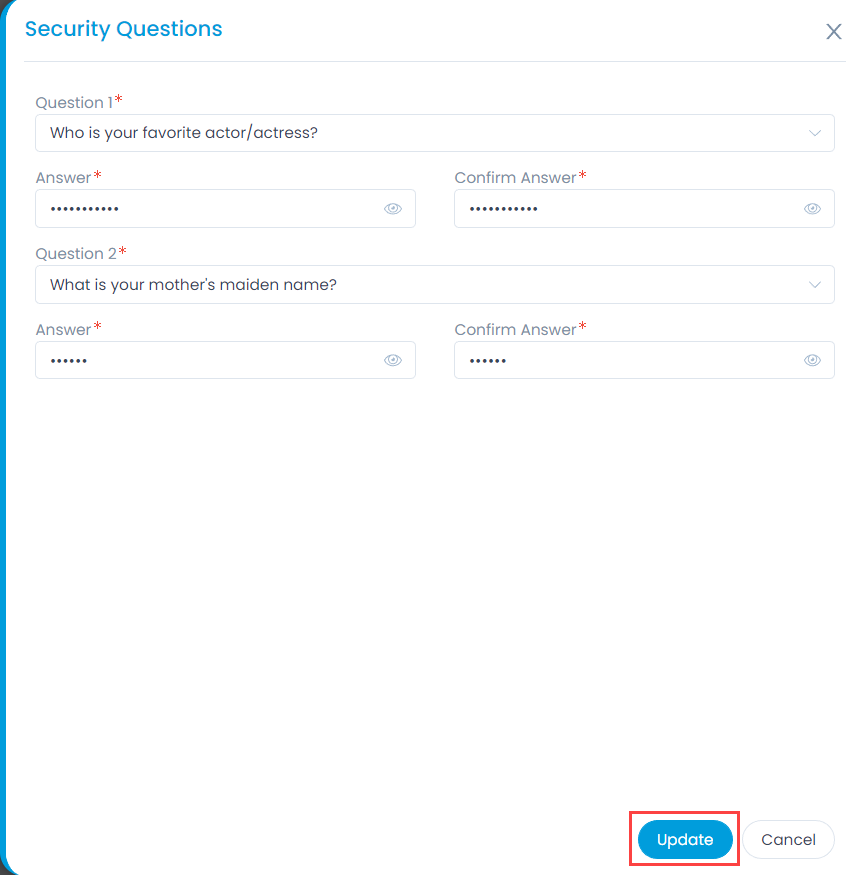
You can configure the security questions using the Configure button as shown below. These questions are used to reset the password and unlock account of the LDAP users only.

Configure Security Question button
Configure the Security Questions

Select the desired question from the list and enter the answer in the respective fields. You can set 2 questions. The questions available in the list are configured from the Technician Portal.

Once done, click Update.

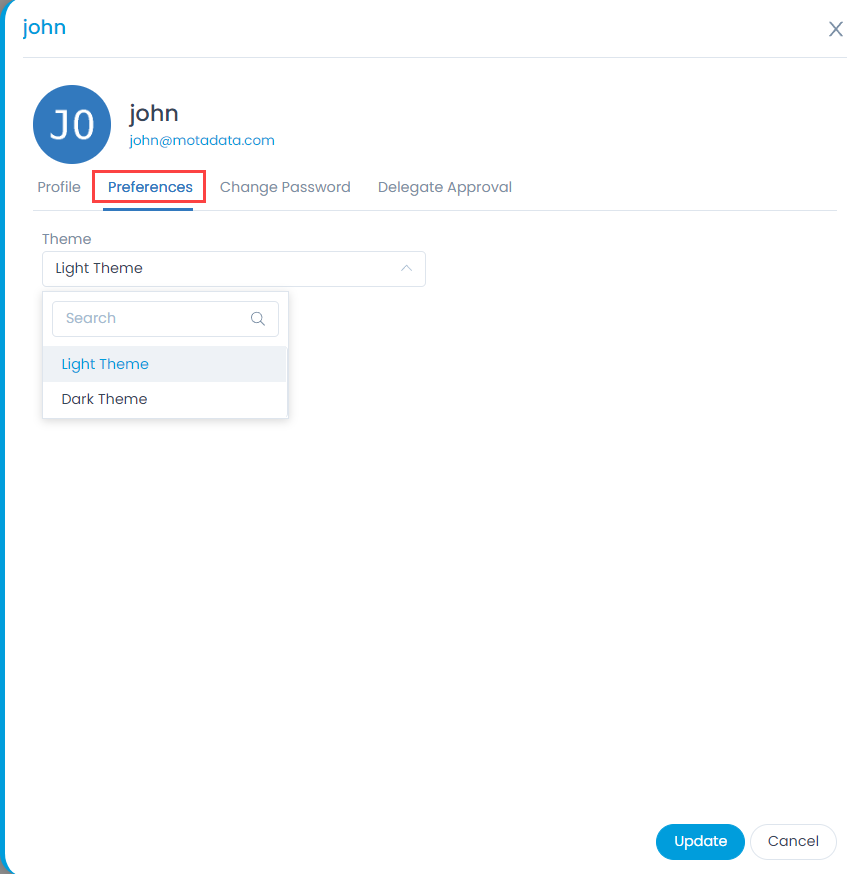
Preferences

This tab allows you to set the following:

  • Theme: You can set the theme as light or dark.
Preferences
Preferences

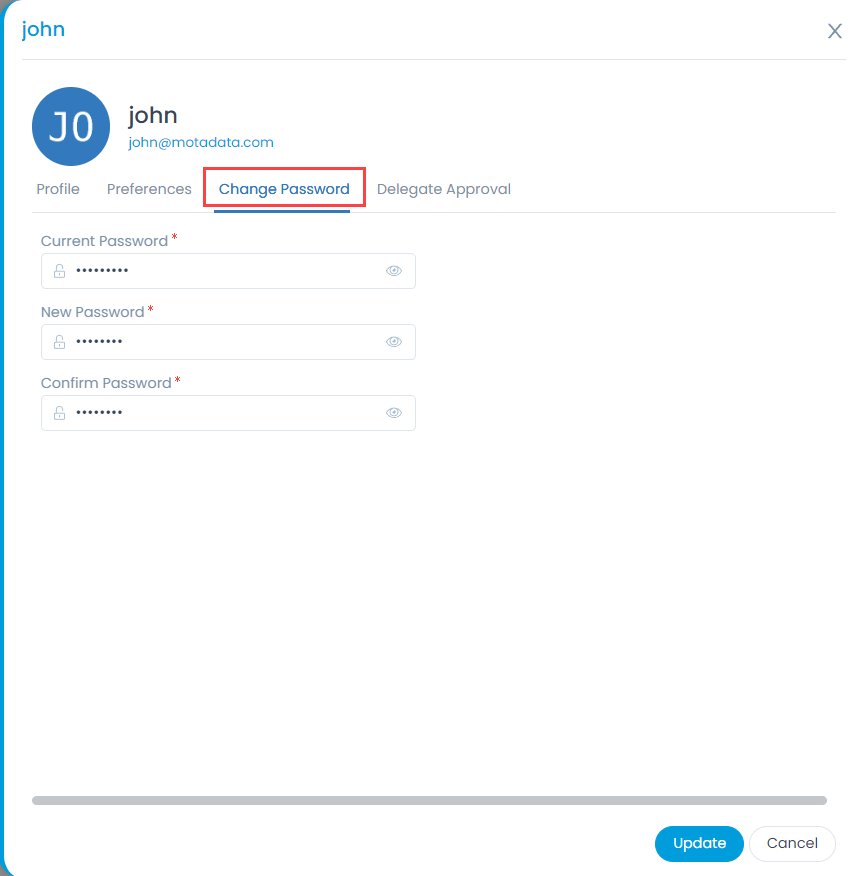
Change Password

You can change the password from the Support Portal directly.

Change Password
Change Password

Enter the Current, New, and Confirm Password, respectively. The password is in encrypted format. To view the password, click the Eye icon. Once the password is entered, click Update and it will get changed.

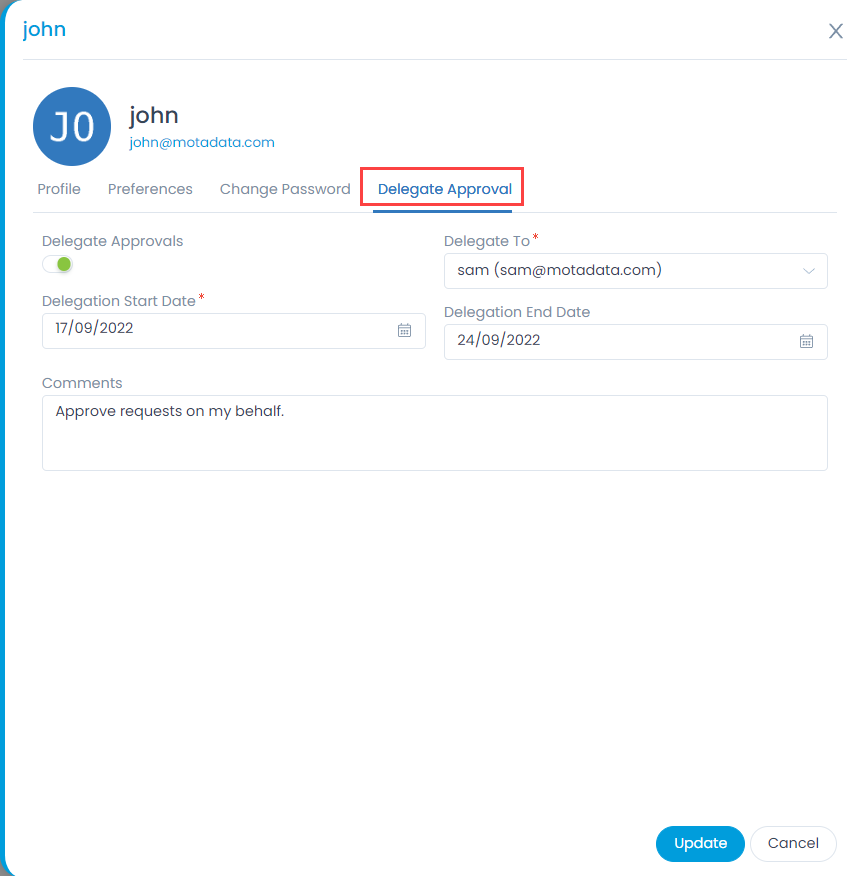
Delegate Approval

This tab allows you to delegate approval to other users in case you are not available. Once the approval is distributed, the delegated user can approve or reject the requests on your behalf.

Delegate Approval
Delegate Approval

Manage Approvals

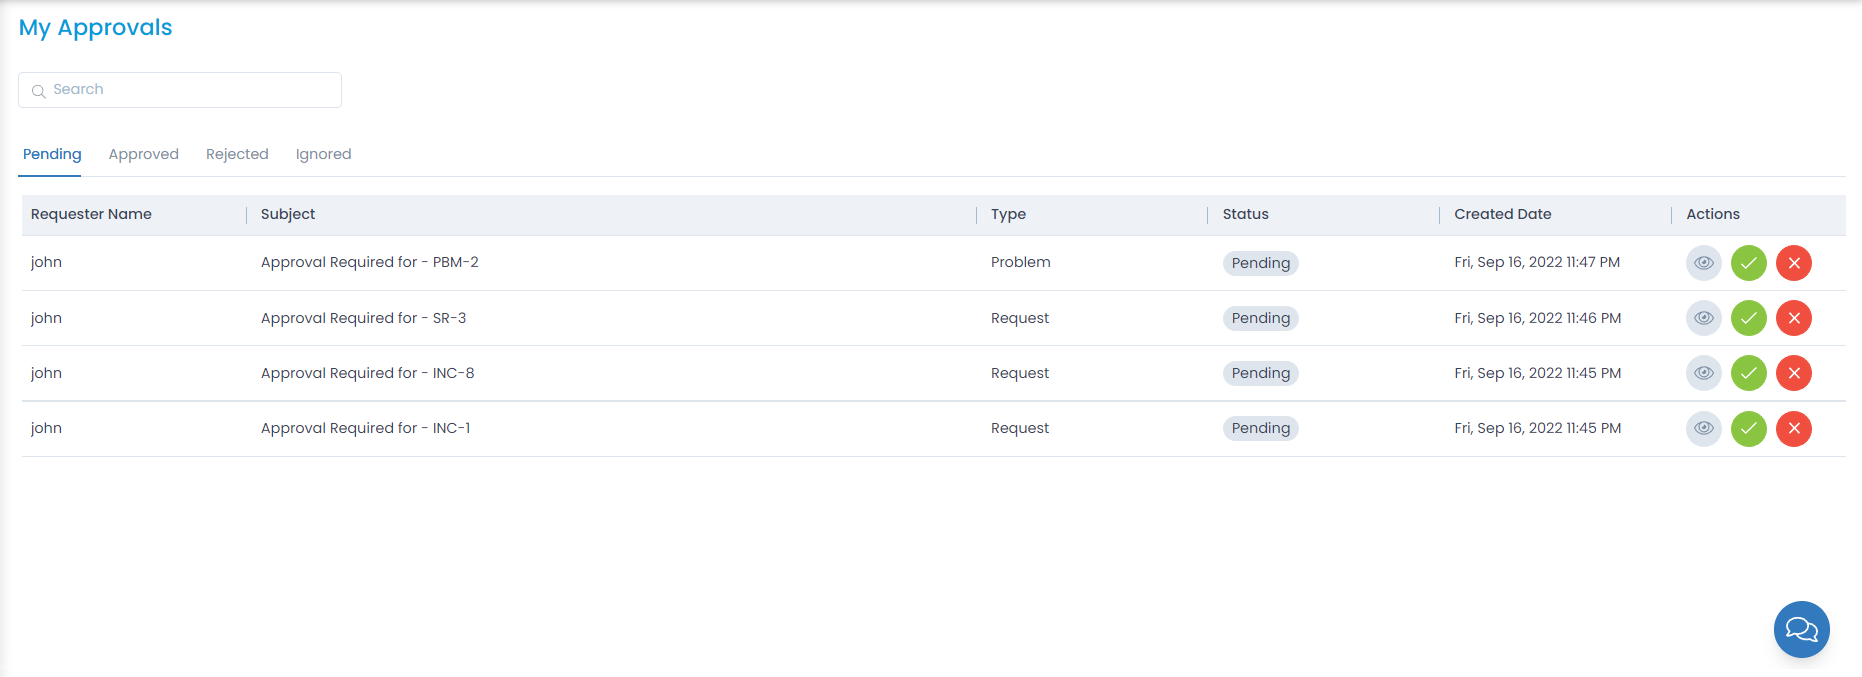
The page shows all the approvals that needs your attention. Here, you can search the approvals or see the list based approval status.

Approving or Rejecting a Request

  • On the ‘Pending’ tab, the list shows all the approvals that needs some action.
  • Click on the green button to approve a request or red button to decline.
  • To see the details of the request, click on the ‘Subject’.
Approvals Page
Approvals Page

Chat Support

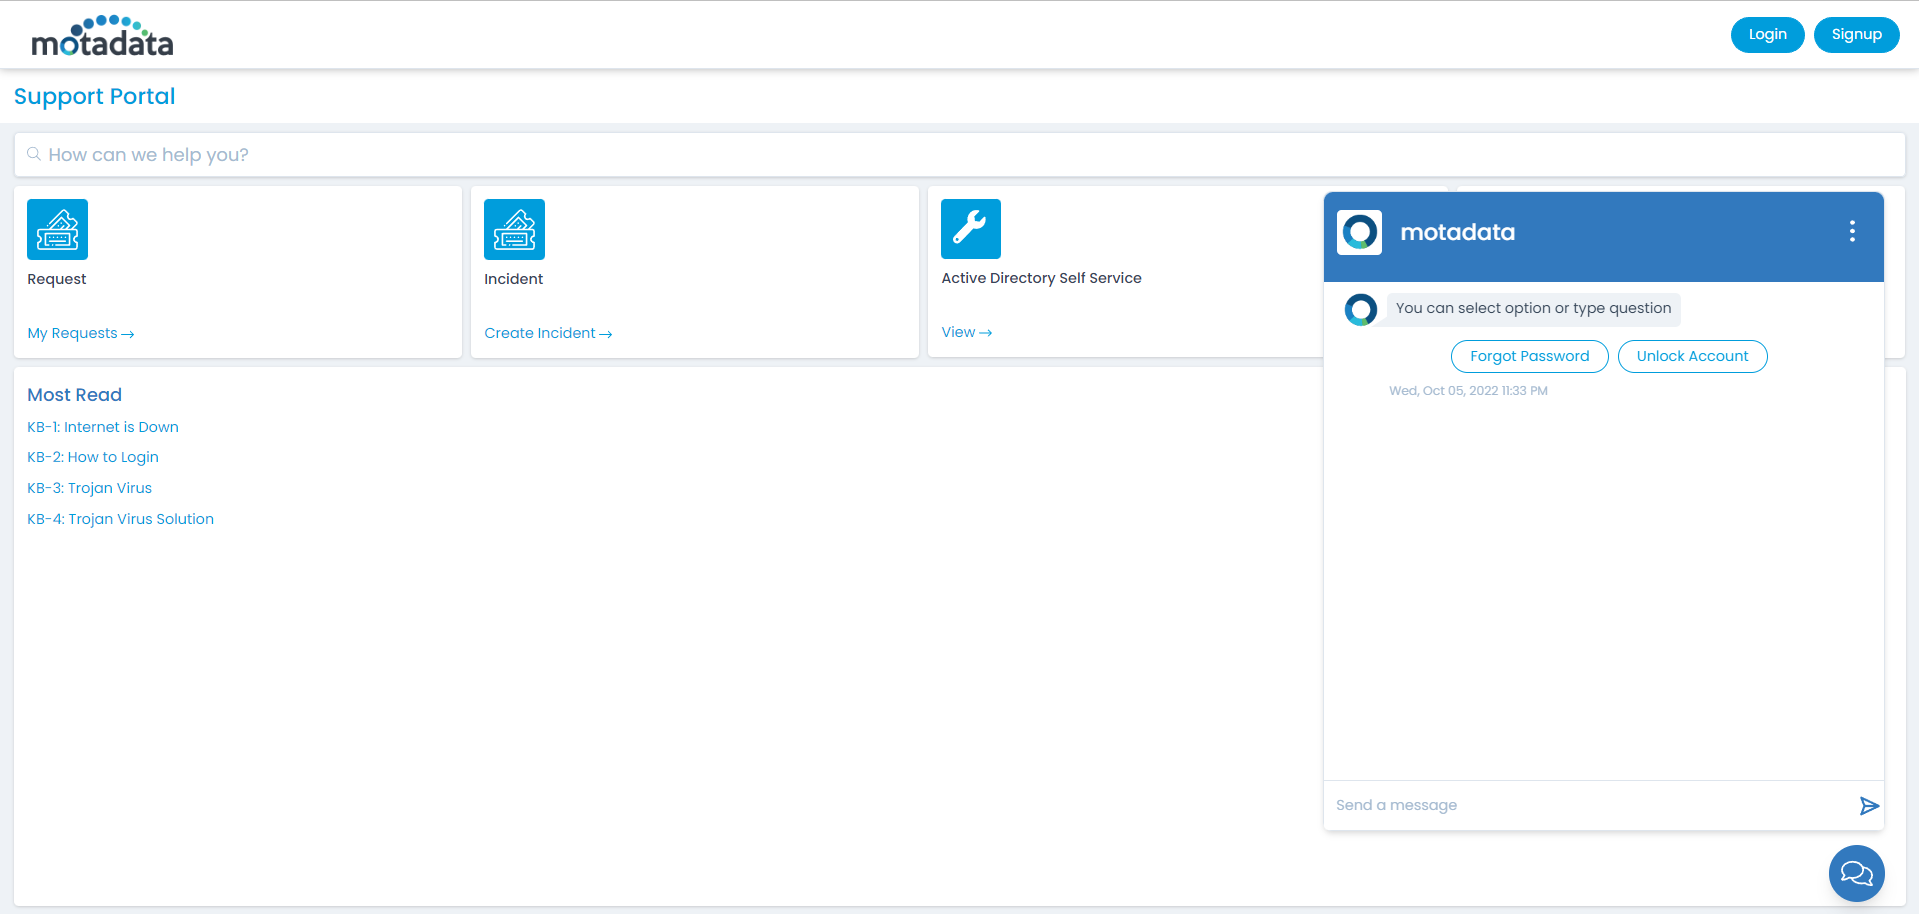
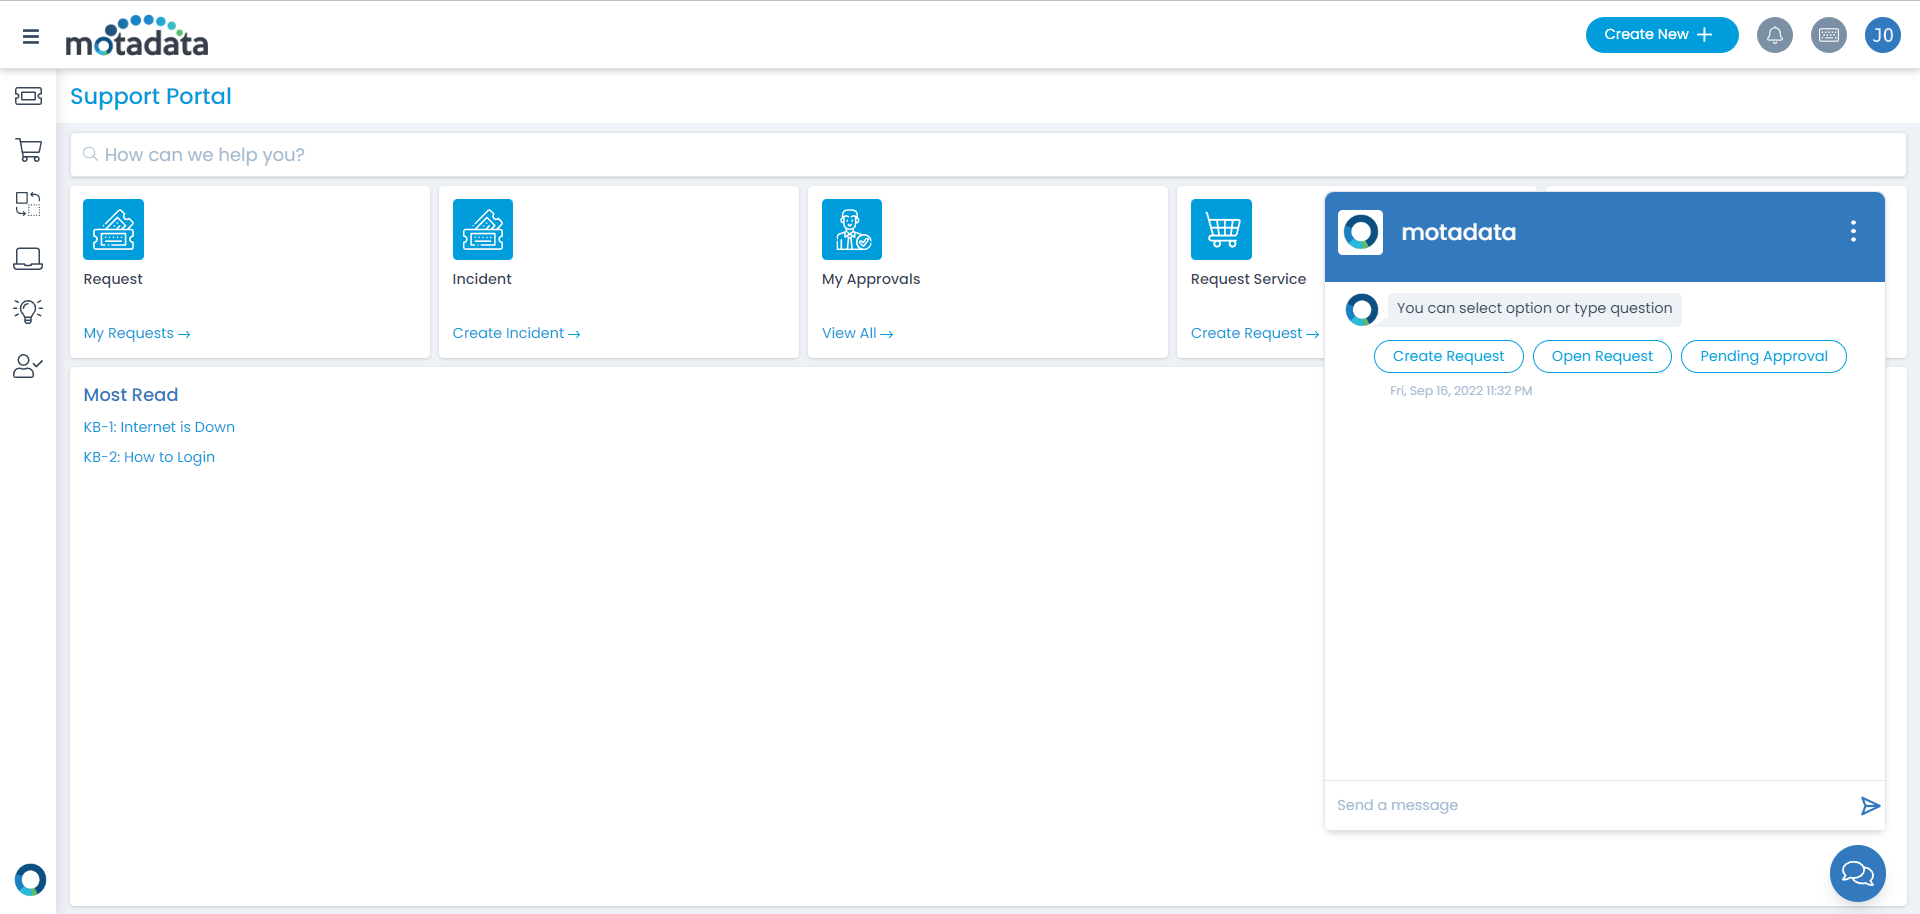
The chat support enables to provide immediate assistance to the requesters. For regular queries the chat agent provides the appropriate responses. In case, additional resolution is required, the requesters can also chat with the technicians. Once, an online technician claims the request, the requester can start the communication. The requester can also share images and documents with the technicians.

  • This feature helps the requesters to reach to the technician directly and speedily.
  • The requester is required to have the Chat Support functionality enabled from the Admin.
  • A chat window will appear where you can directly chat with the available technicians.
  • Also, the non-login requesters can access this chatbot to reset the password in case the account is locked or the password is forgotten.
Chat Support for Non-Login Users
Chat Support after Login
  • When the Chat icon appears on the Home Page, that means the Chat functionality is Enabled.
  • If Managed Services Provider or Tenant Management feature is enabled, a request can be created via Chat from a branch company’s Support Portal.

Benefits of Chat Support

  • Live Support
  • Sharing of images and documents with the technicians in the form of attachments
  • Immediate Resolution
  • Time Saving
  • Notification to all online technicians for faster Resolution

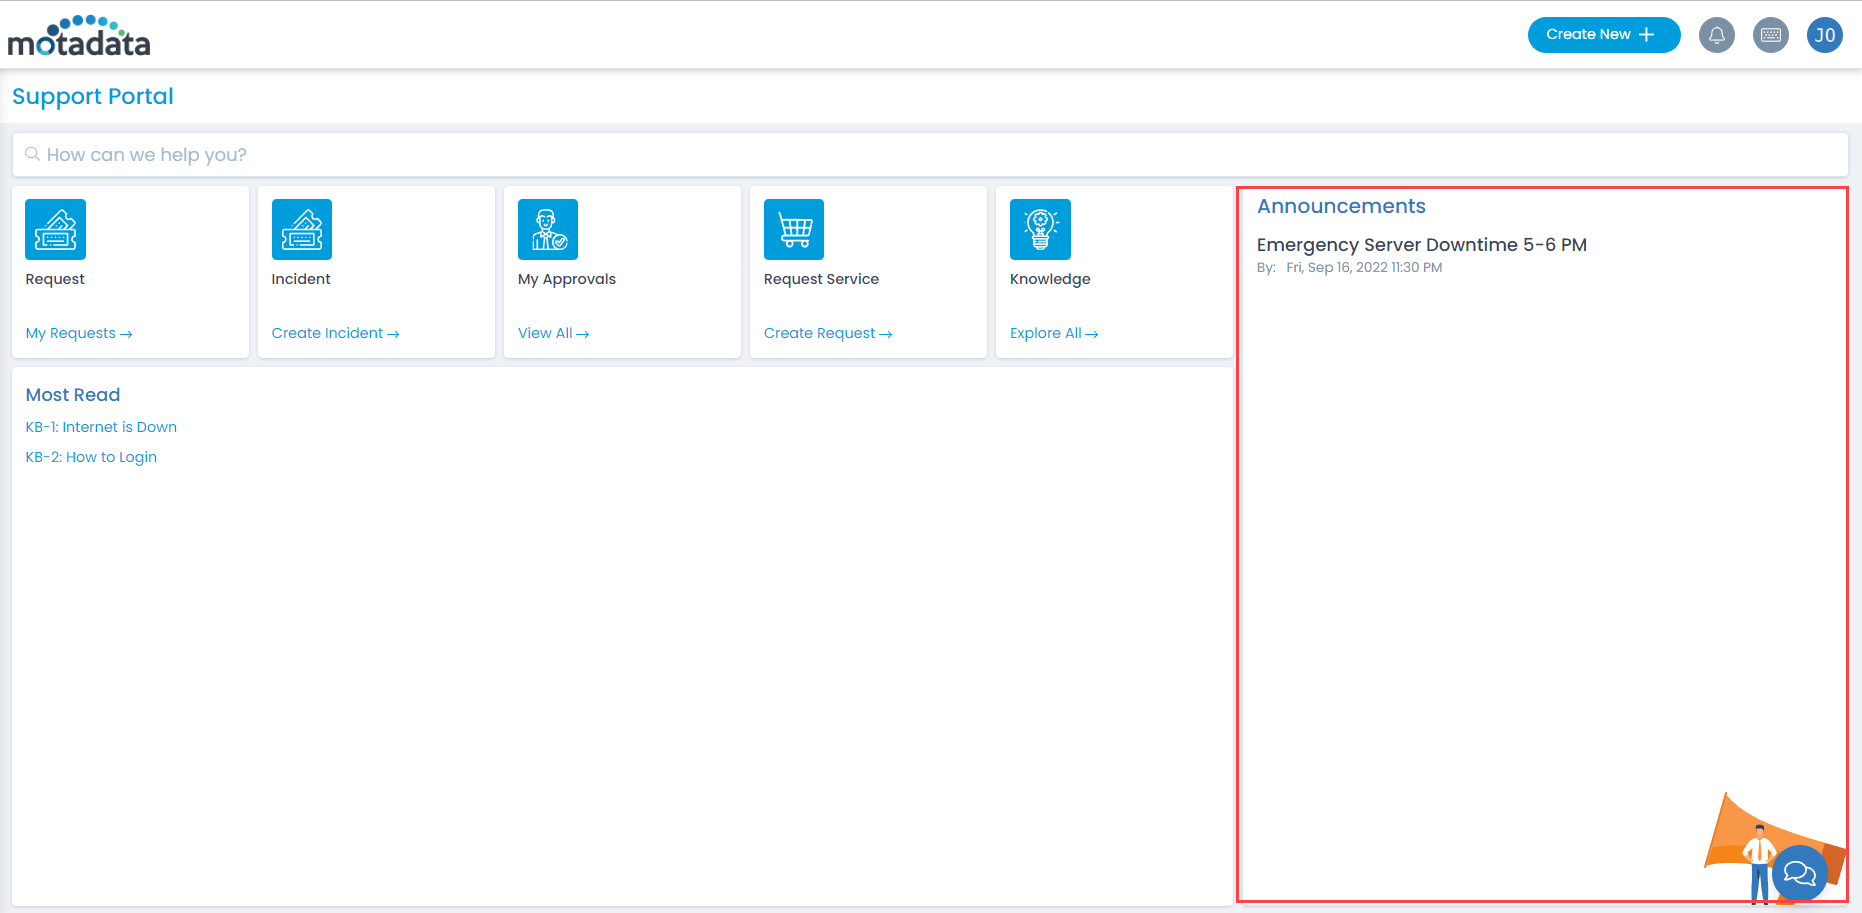
Announcements

Announcements from the system administrators are visible on the home page. System shows all the announcements that are currently active. To see the details, click on the announcement.

Announcements on home page