Knowledge Articles

Knowledge section is the library of all the articles, guides, and FAQs that are related to this system. The content of this section is available to all the people who can access the system URL. The content is totally free that means you do not need to register or login into the system to see the articles. The knowledge articles here are generally managed by the authenticated users who are also subject matter experts. The knowledge helps people to get self aware about something before raising unnecessary tickets.

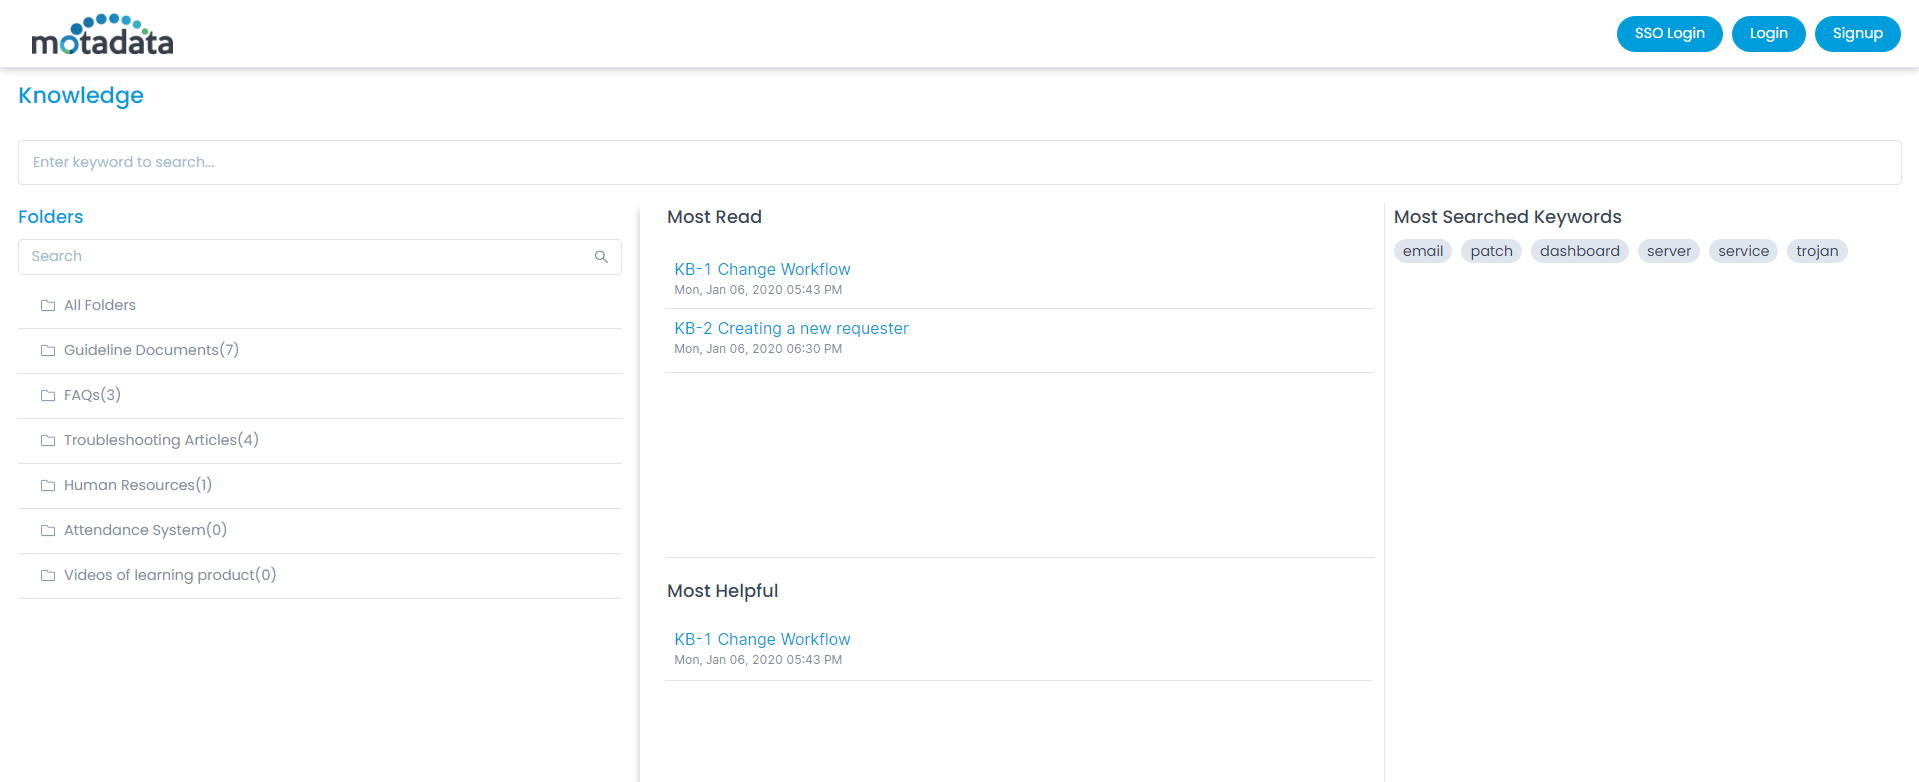
Knowledge Page Before Login

The user can only view the knowledge articles without logging in to the system. To like or dislike the articles one needs to login to the Support Portal.

Knowledge content is accessible without logging into system

Knowledge Page After Login

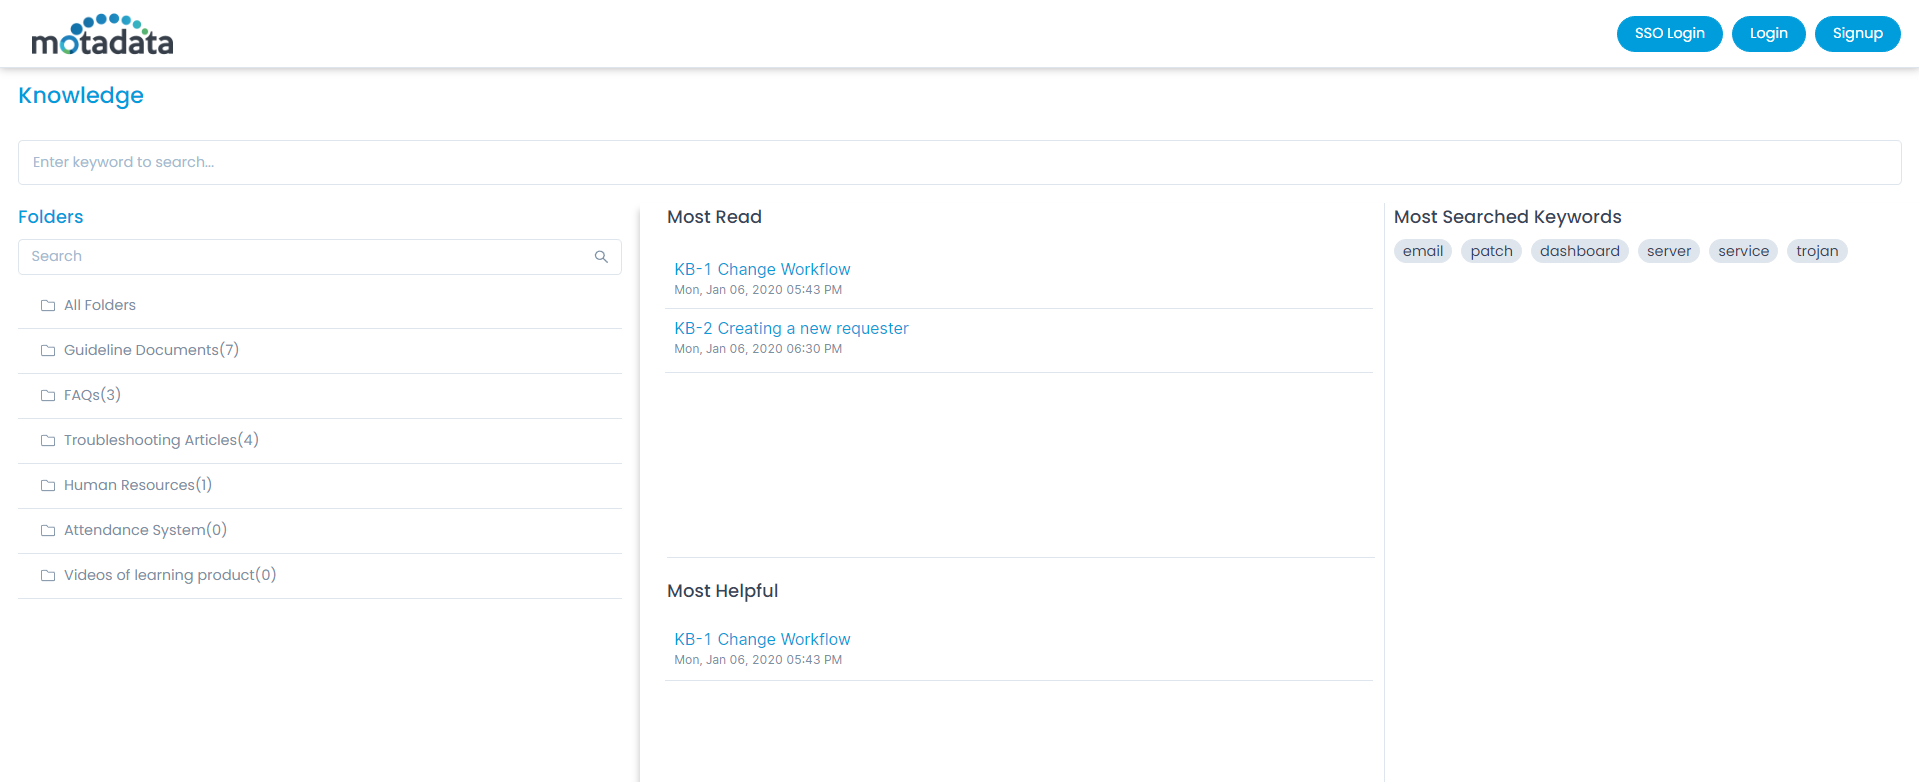
Once the user logs in to the Support Portal, go to the menu, and click the Knowledge menu. The following page appears.

Knowledge Page
Knowledge Page

Here, you can search, view, like, and dislike the articles.

View Articles

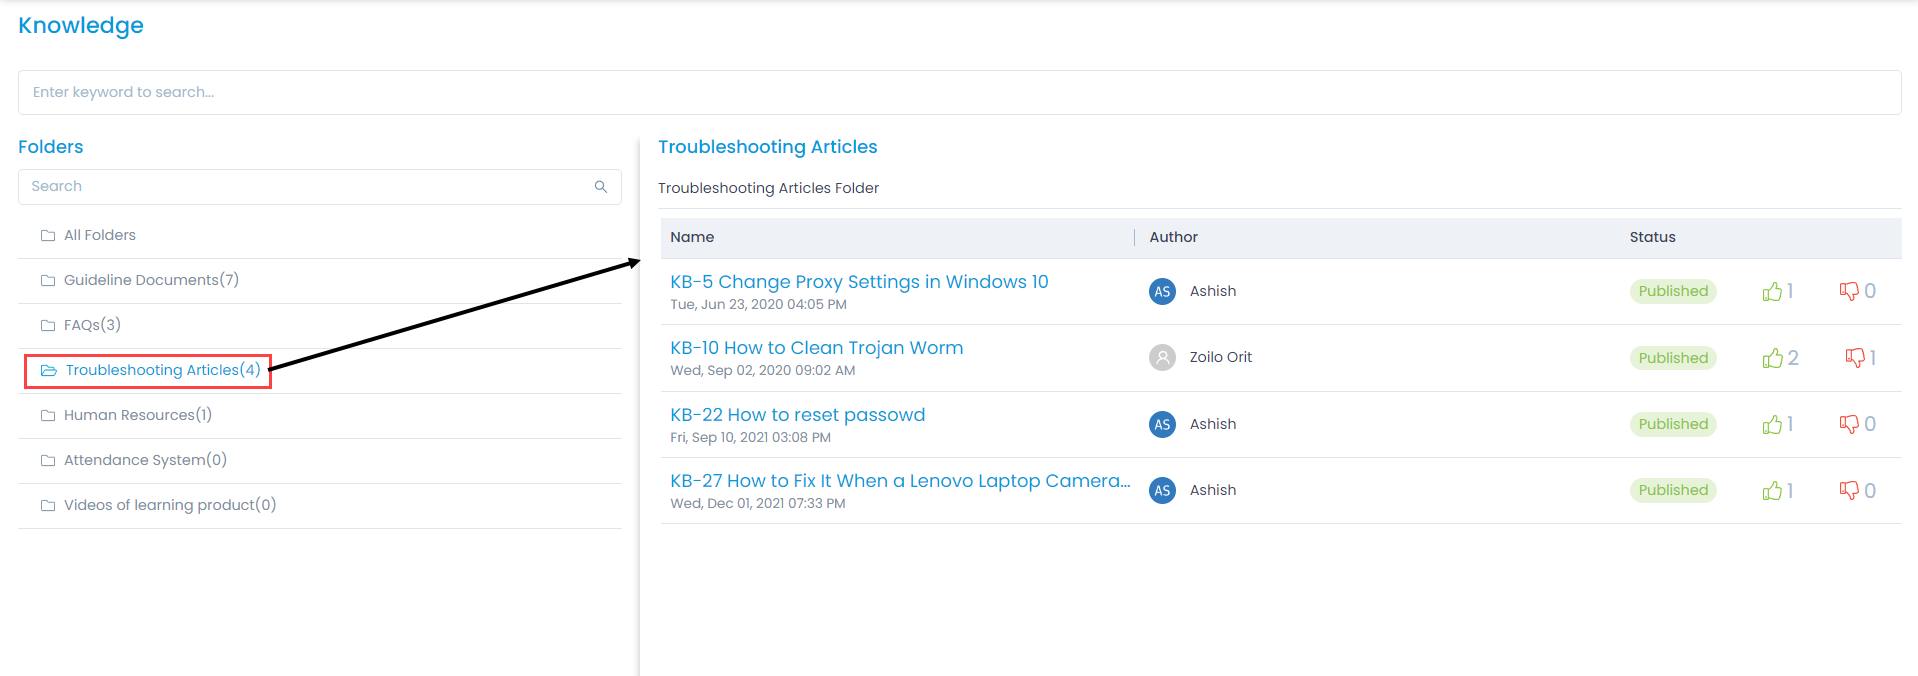
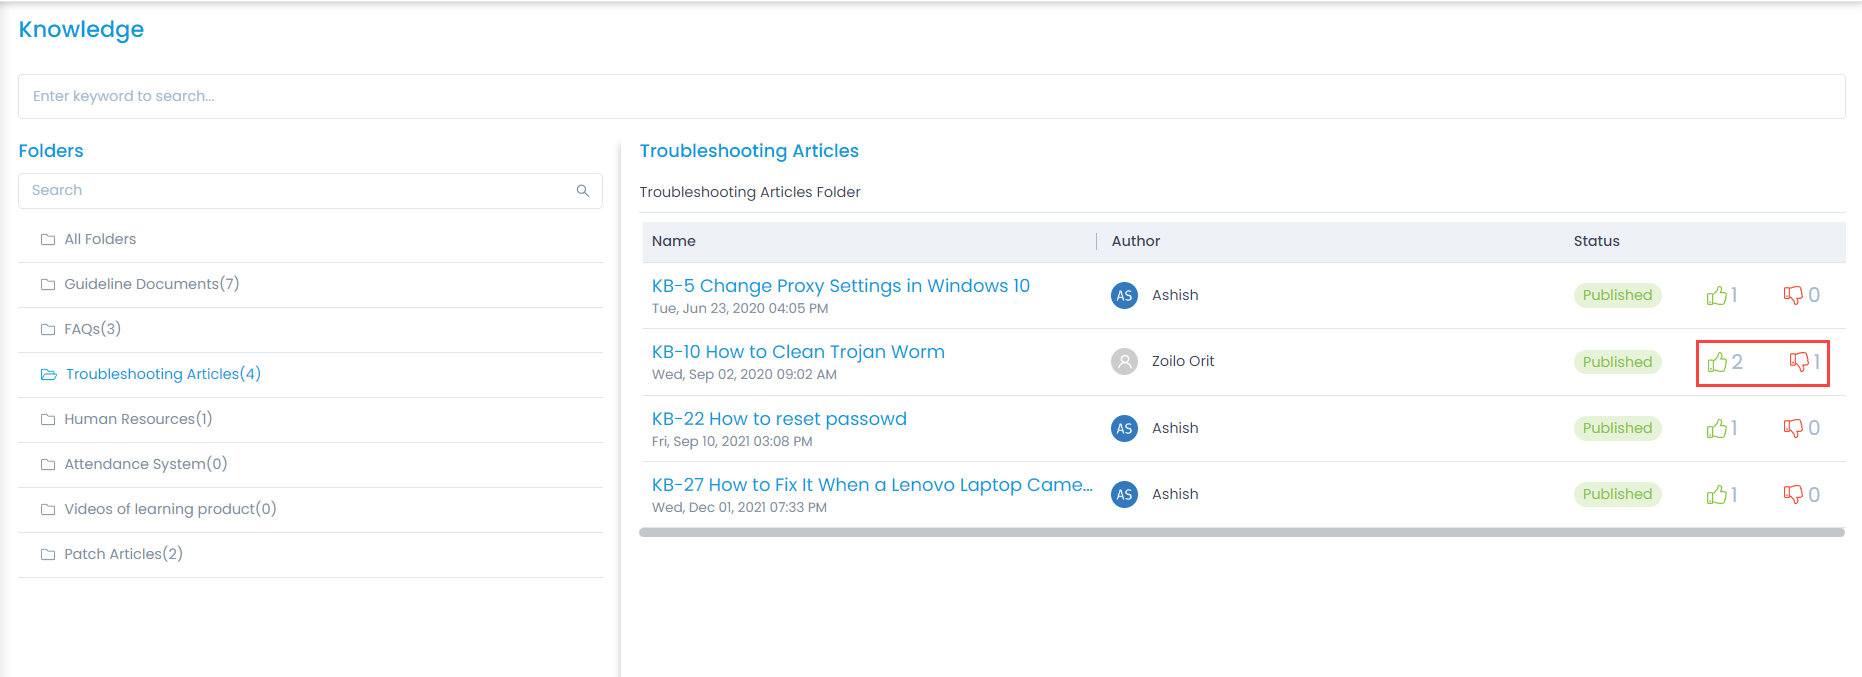
To view the articles, click any folder from the Folders panel and the list appears on the right-hand side. Here, the Troubleshooting Articles folder is used as an example.

List of Knowledge Articles

Like or Dislike Articles

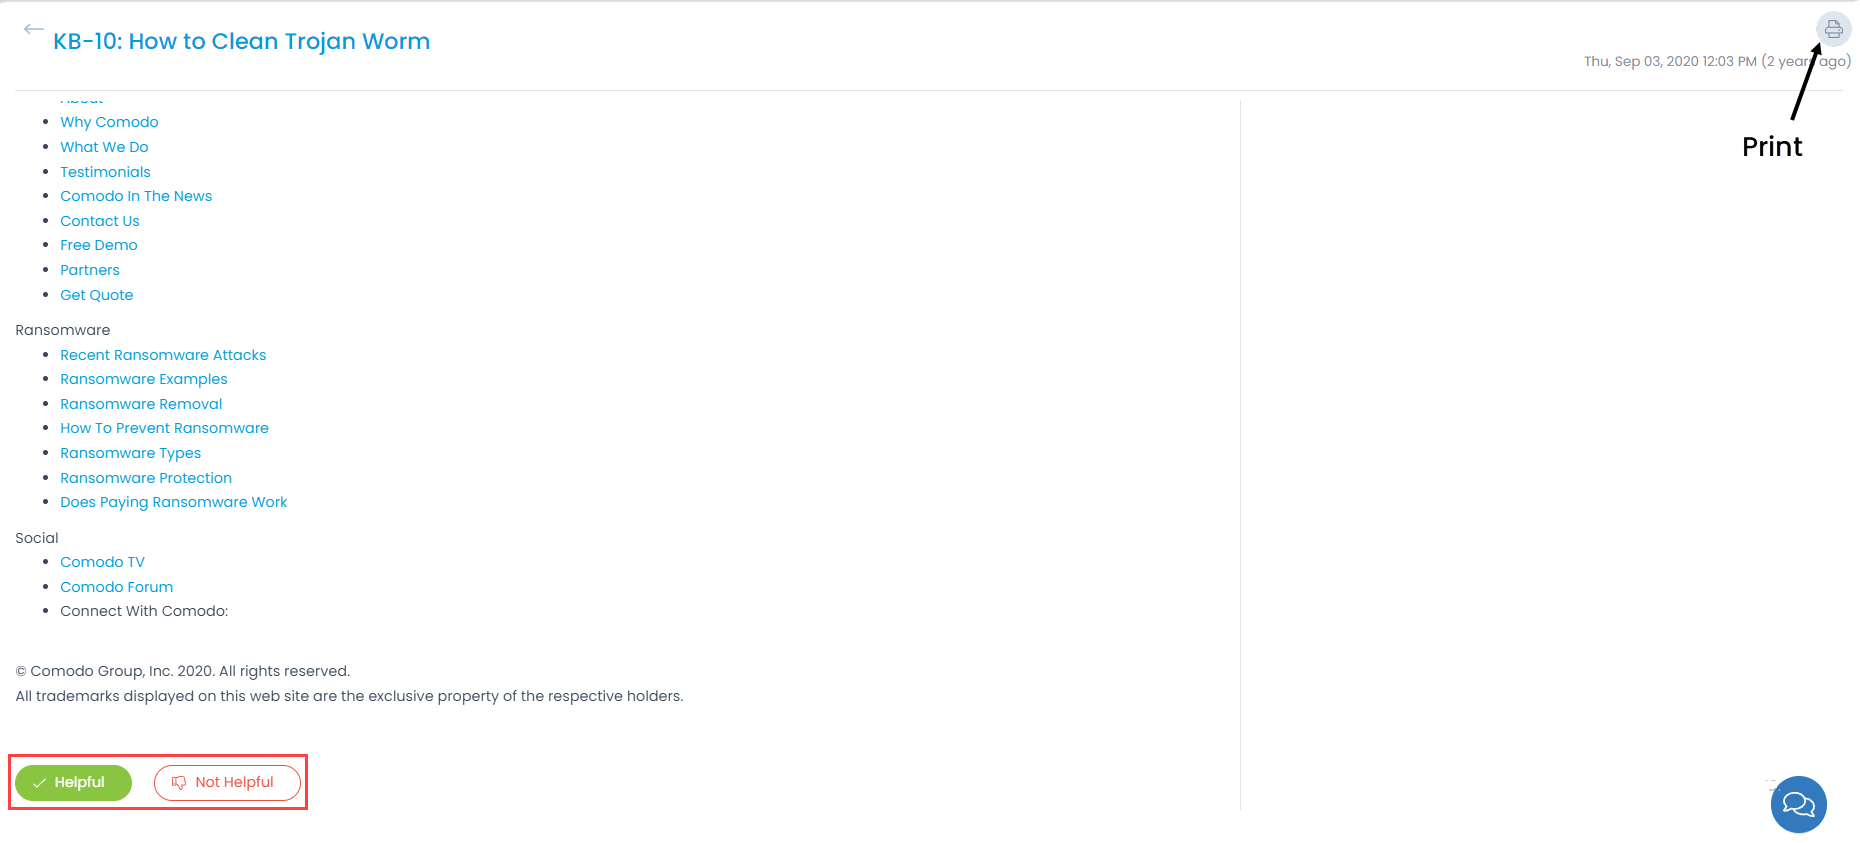
To like the article, click on the name of the desired article and the below page appears.

Knowledge Details
Knowledge Details

To like the article, click the Helpful (Green) button. To dislike click the Not Helpful (Red) button. The count of the likes and dislikes will get updated on the articles list page as shown below.

Likes and Dislikes Count

My Assets

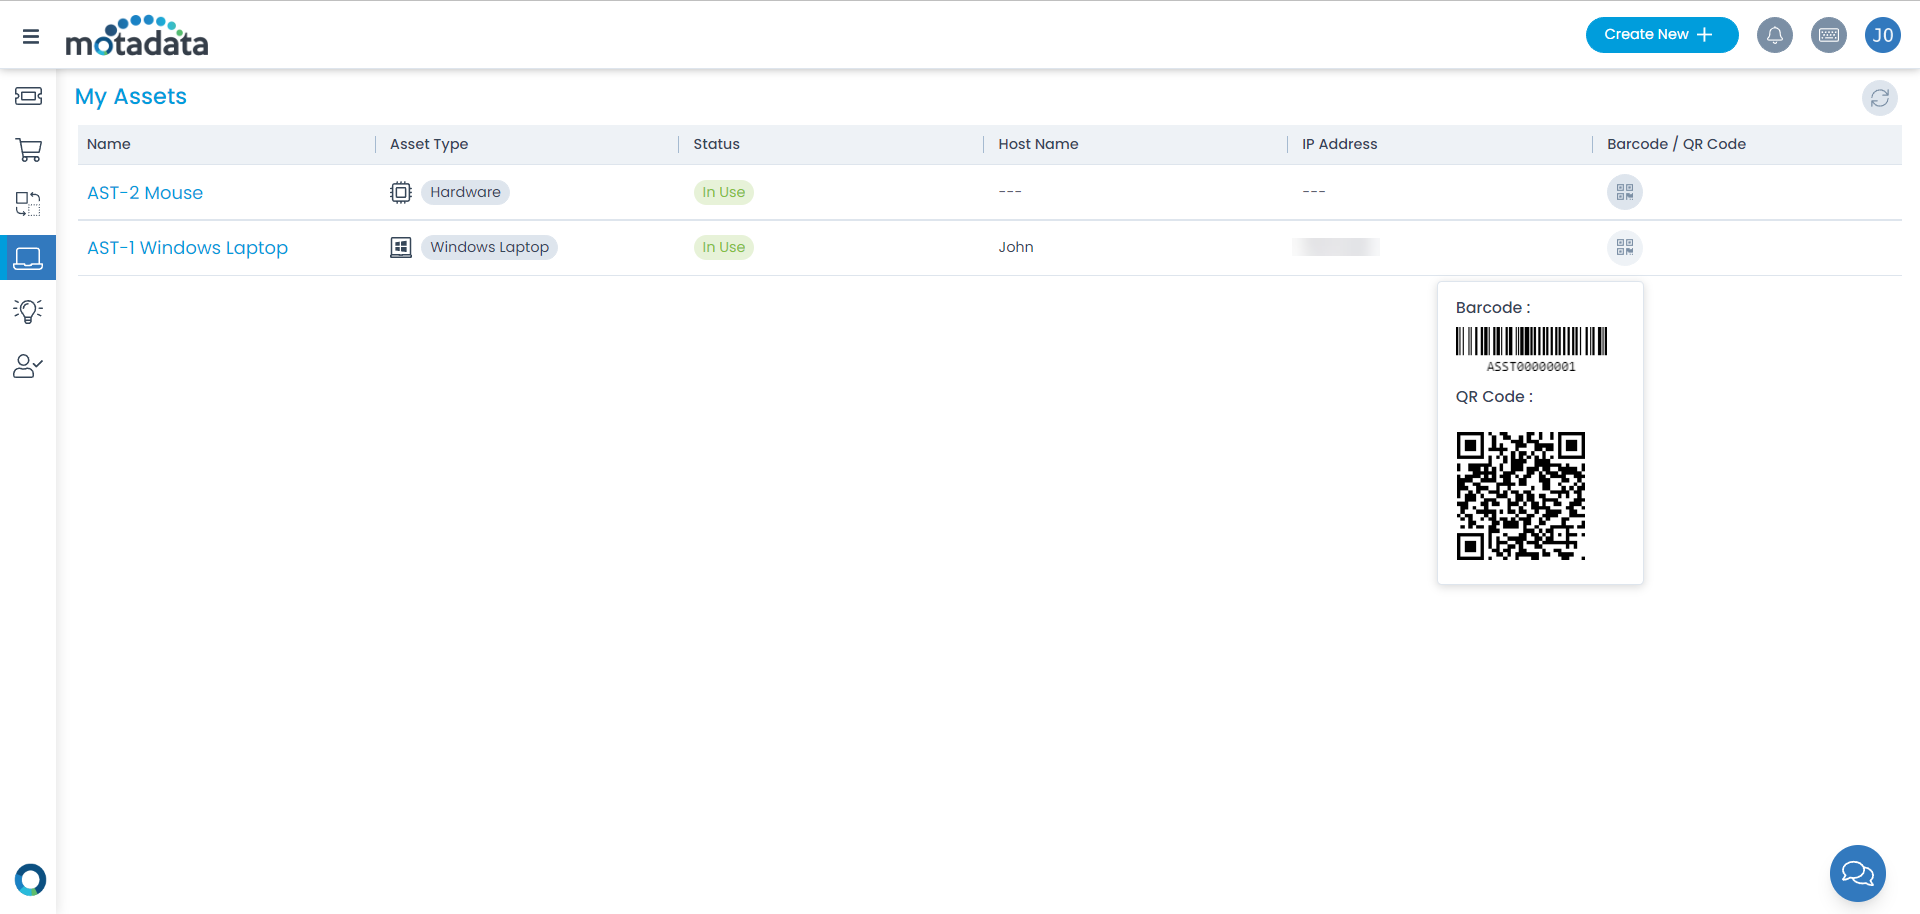
  • This page displays a list of Assets ‘Used By’ the logged in User.
  • Here, the assets can only be viewed but cannot be managed.
  • For example, a user John is logged and and a Windows Laptop is used by him, thus the assets belonging to him will appear in the list along with their details.
My Assets
My Assets
  • Requesters can view the barcode or QR code here. The barcode or QR code is visible only if the setting is enabled from the Technician Portal.
Note: This tab is available only if the relevant permission is granted from the Technician Portal.

My Changes

  • This page displays a list of Changes created by the logged in User.
  • Here, the Change(s) can only be viewed but cannot be managed.
  • For example, an user John is logged in and has created a Change with subject ‘Team Structure’, the details will appear here.
  • Also, the Changes can be viewed only if the permission is given by the Admin User.
My Changes
My Changes

Login into Portal

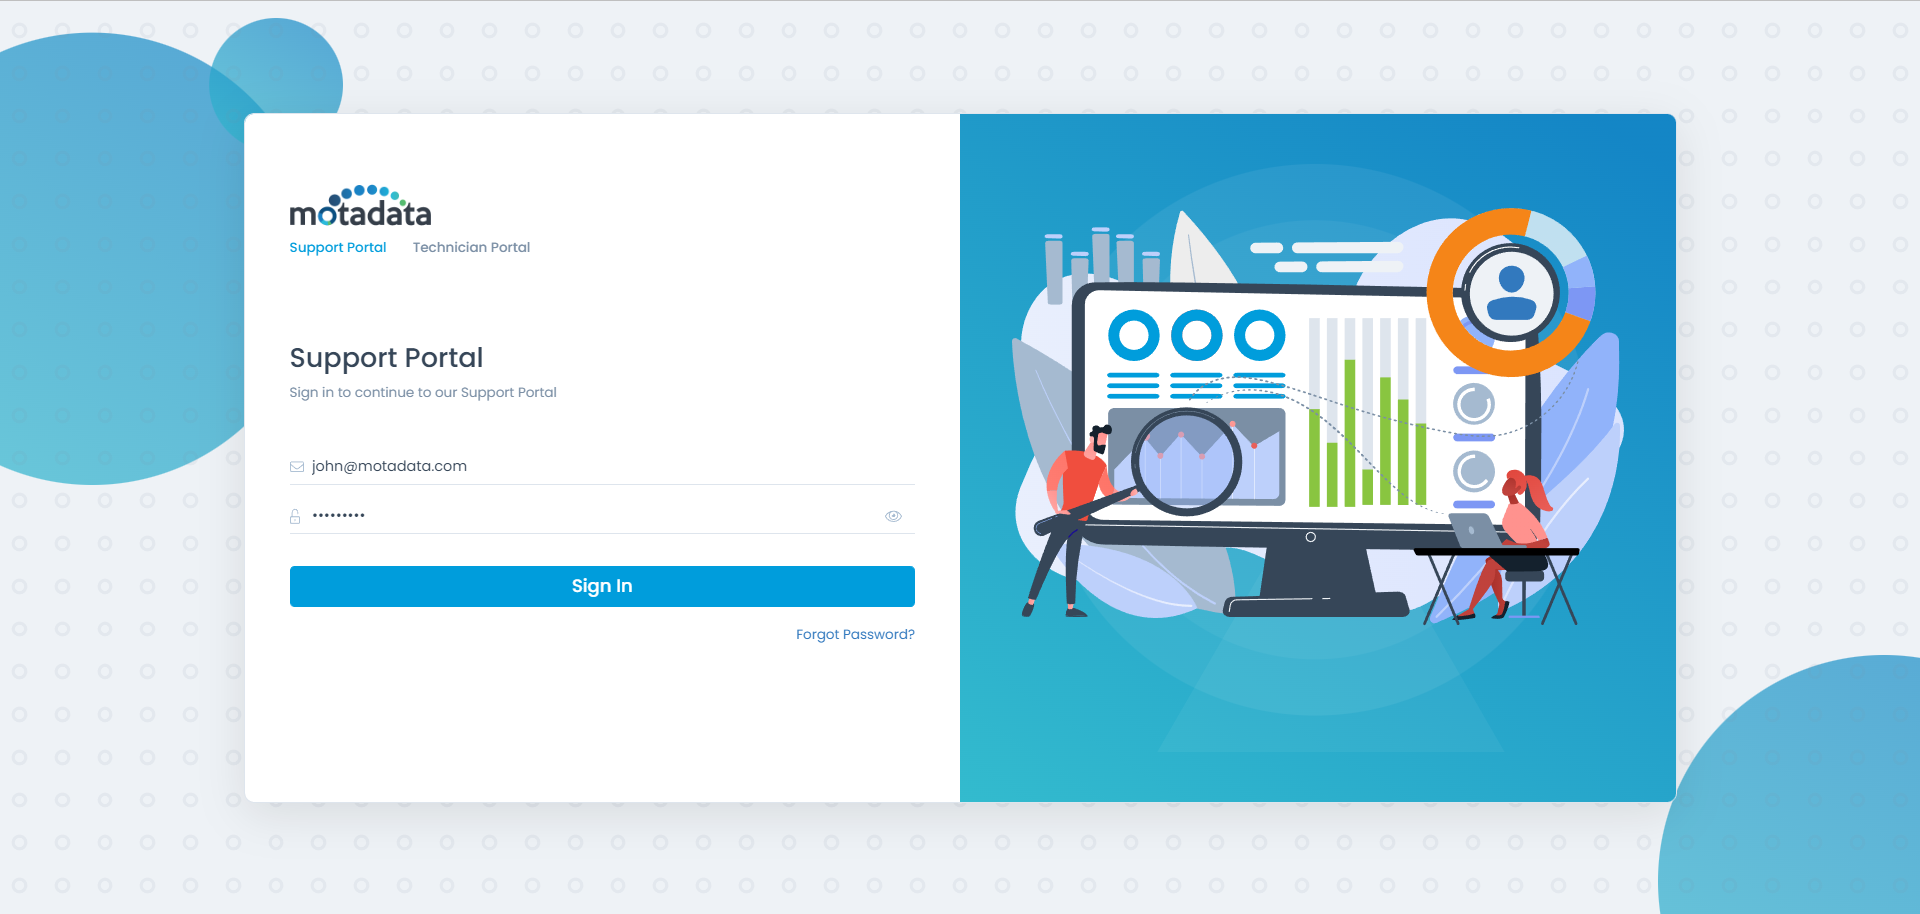
Some features in the Support Portal are available only after login. The login page is same for technician and requesters. You can login by using your email and password. If you do not have a login account, ask your administrator. After your account is created, you will get a verification link on your email address. When you click on the link, you will be redirected to the Change Password page. Create a secured password and proceed to login.

Login Page
Login Page
Home Page After Login

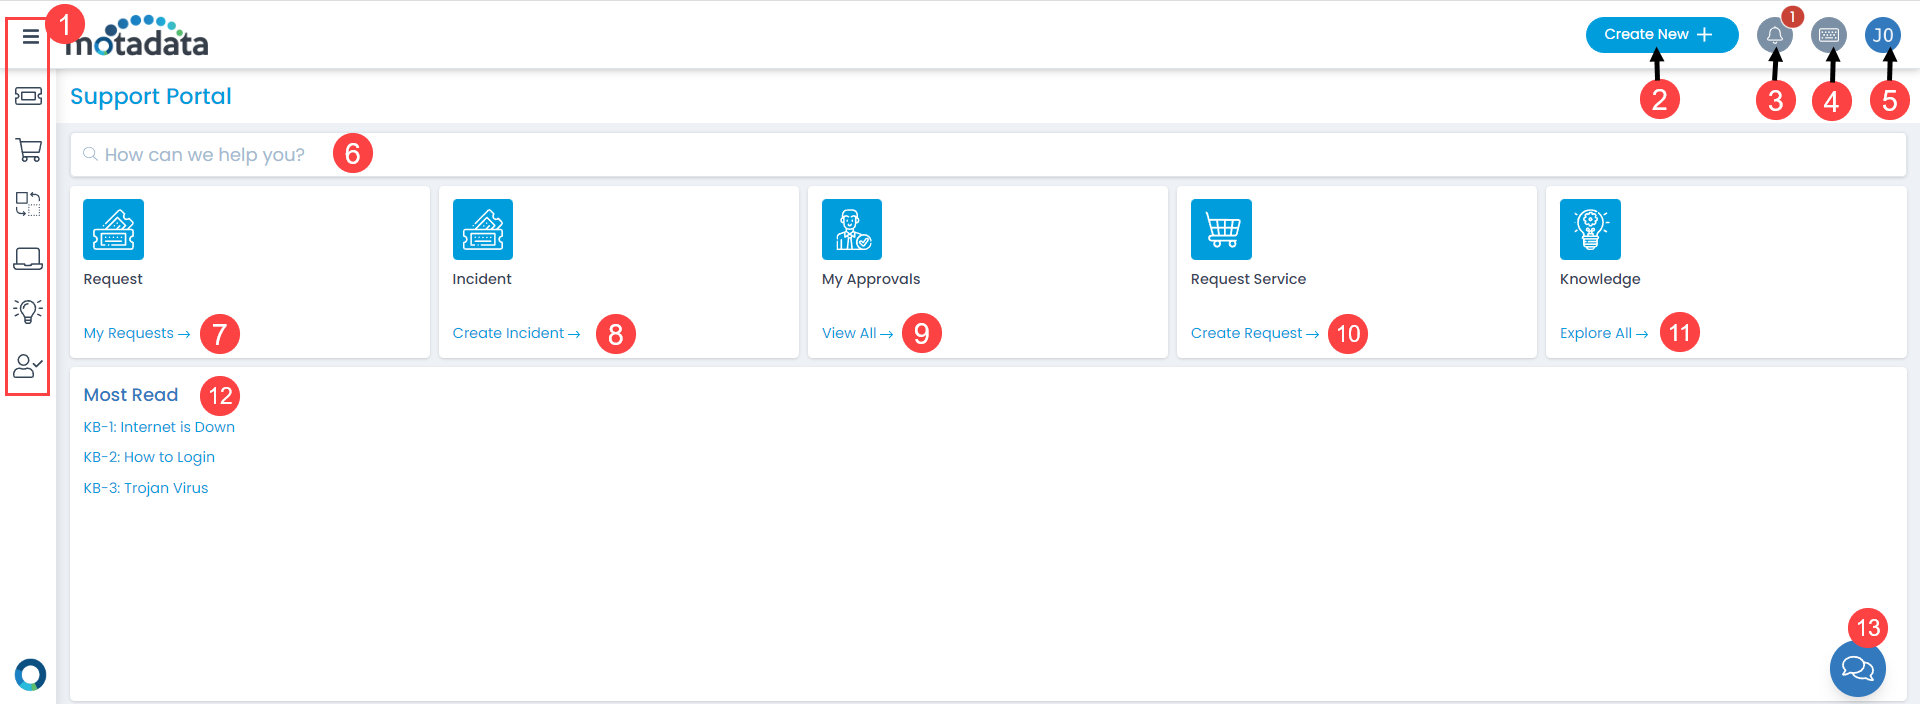
Here, you have the below options:

  1. Menu: You can hide or view the menu.
  2. Create New: You can create a new incident or service request.
  3. Notifications: You can view the notifications and configure the preference settings.
  4. Keyboard Shortcuts: You can view the available keyboard shortcuts.
  5. Edit Profile: You can view the edit profile, sign out, and technician portal options.
  6. Search: You can search for the required item.
  7. My Requests: You can view the requests assigned to yourself.
  8. Create Incident: You can create incident requests.
  9. View Approvals: You can view the approvals.
  10. Create Request Service: You can create a service request.
  11. View Knowledge: You can view the available knowledge articles.
  12. Most Read: You can view the knowledge articles that are read most.
  13. Chat: You can chat with the agent for any query.

Notifications

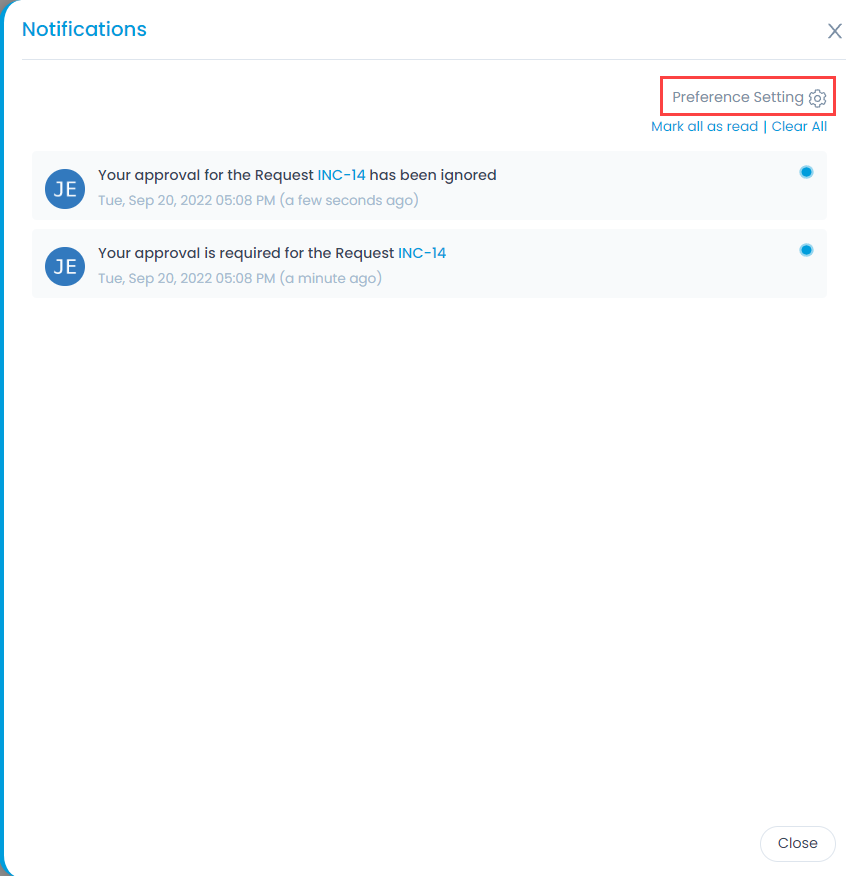
You can view the notifications received on various events and also configure the preferences based on which they will appear.

Notifications
Notifications
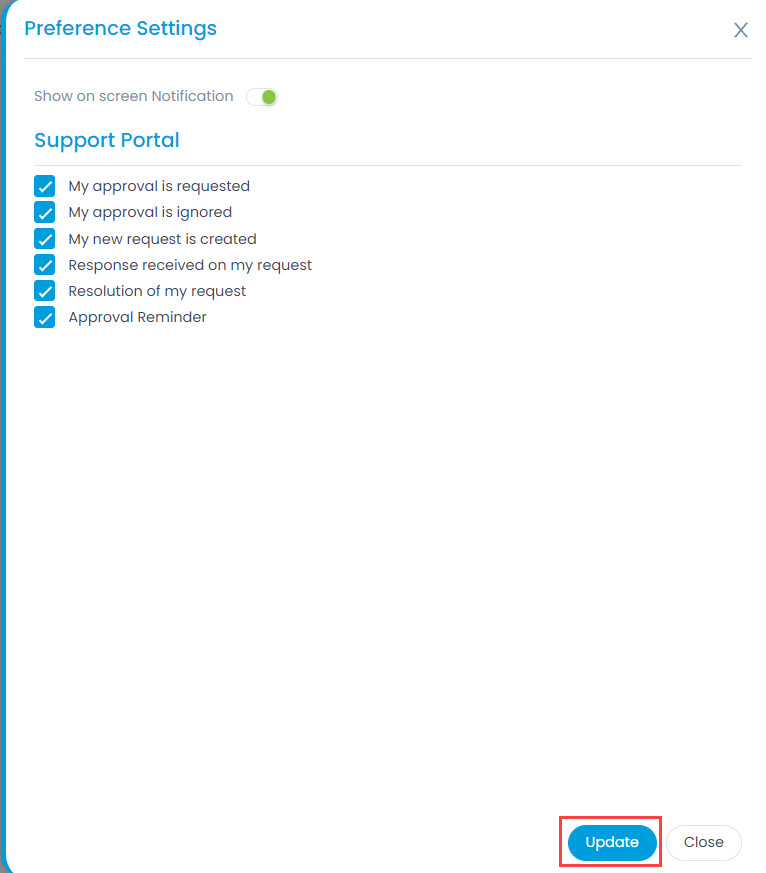
Preference Settings
Preference Settings

Enable Show on screen Notification to view the notifications on the screen.

Select the options whose notification you want to view. The options are:

  • My approval is requested
  • My approval is ignored.
  • My new request is created
  • Response received on my request
  • Resolution of my request
  • Approval Reminder

Self Sign-up

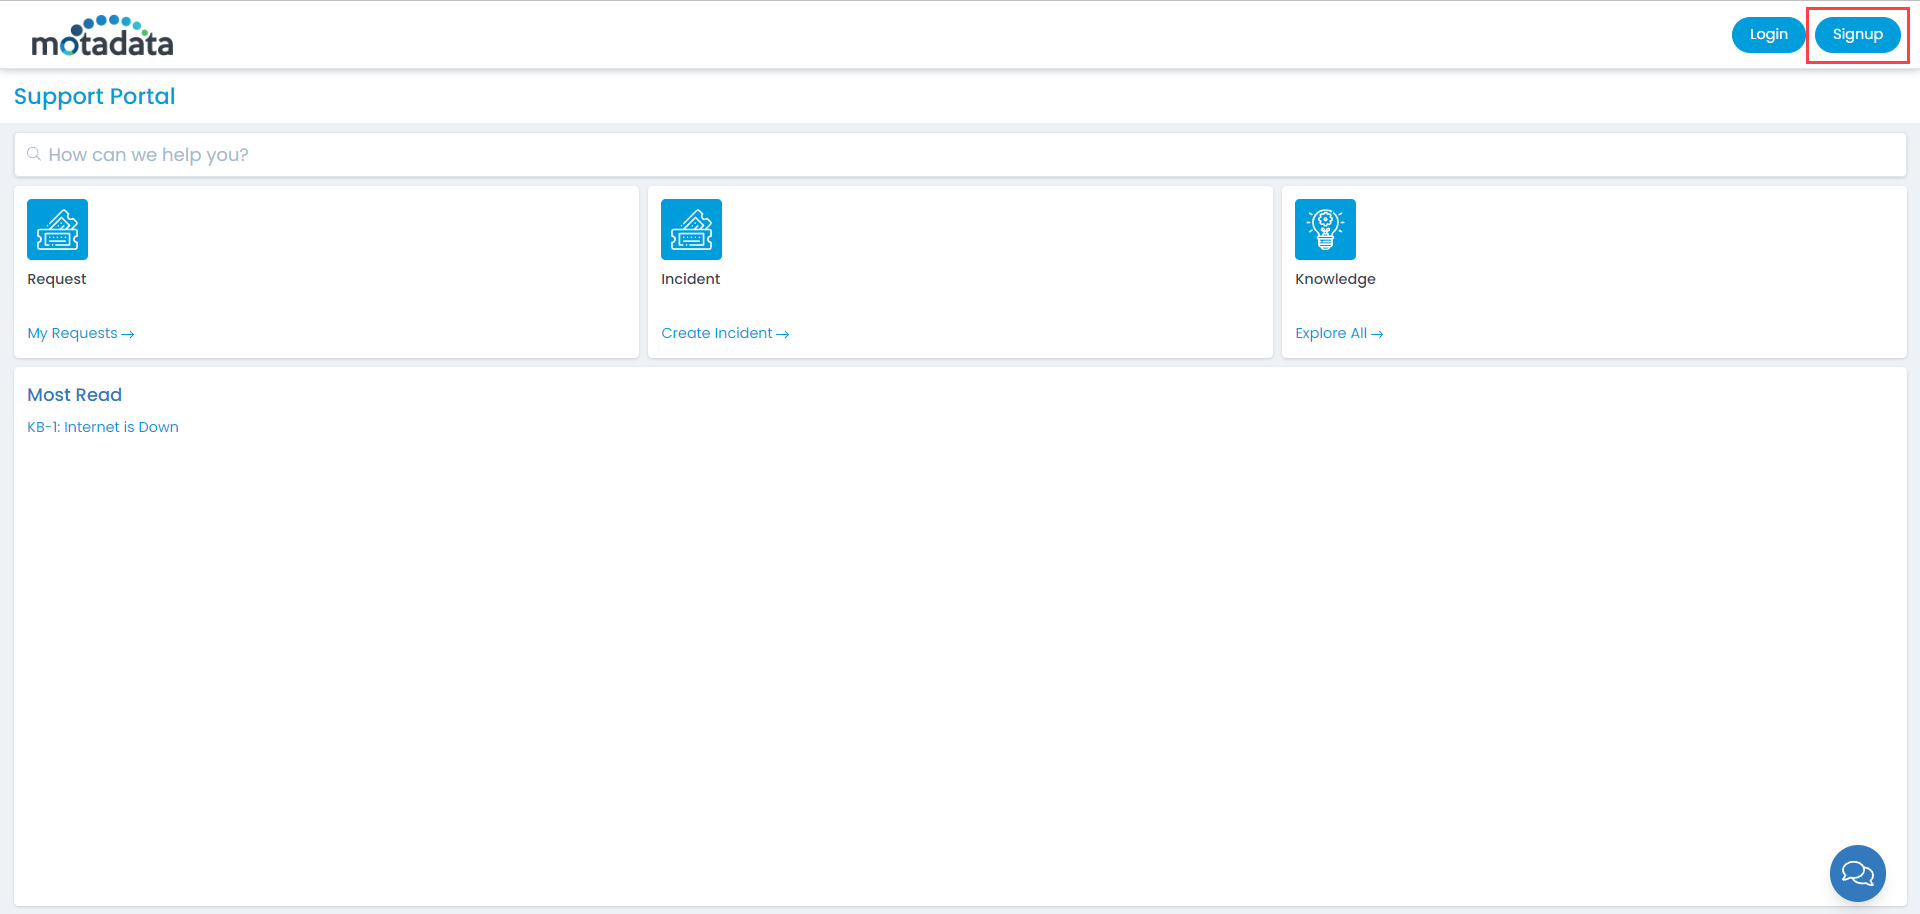
You can register yourself into the system to manage your requests. For self registration, click on the Signup button on the top-right corner of the home page. The registration process is as follows:

  1. Click on the Sign-Up button.
Self Sign-up
Self Sign-up
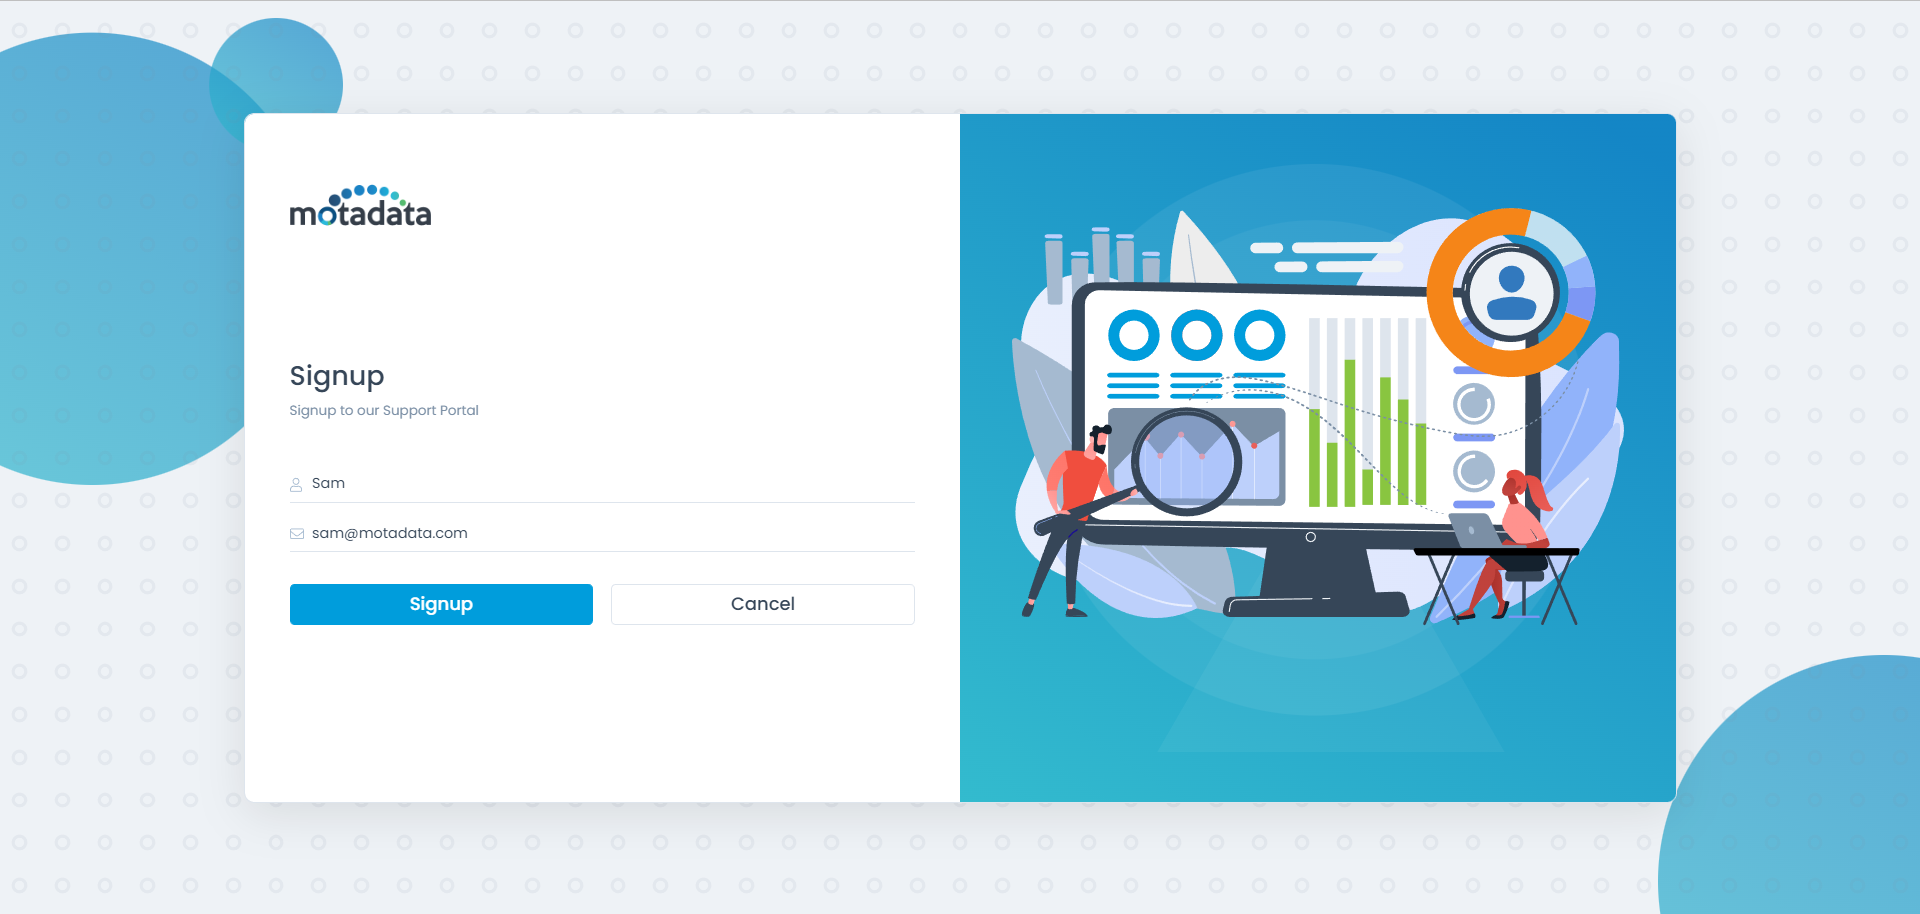
  1. In the next screen, provide your Name and Email address, and click Signup. The system will send a verification link in the email.
Self Sign-Up
Self Sign-Up
  1. Click on the link to verify your email address. You will be redirected to the Password Reset page.
  2. Type a strong password and click Submit. Your self-registration process is complete.
  3. Login with your email address and password to access the Support Portal.

Introduction

The Support Portal is for the requesters who want to raise their requests related to any incident or service they require. Apart from raising requests, the requesters can chat with the Motadata Chatbot to solve their queries. Also, the changes, assets, and approvals assigned to the logged-in user can be reviewed.

You can access the Support Portal through the URL provided by your network administrator.

The portal displays various options based on the permissions granted from the Technician Portal.

Support Portal Home Page
Note: The accessibility of the features depends on the permissions given by the admin. You may see some variations in the actual screens.

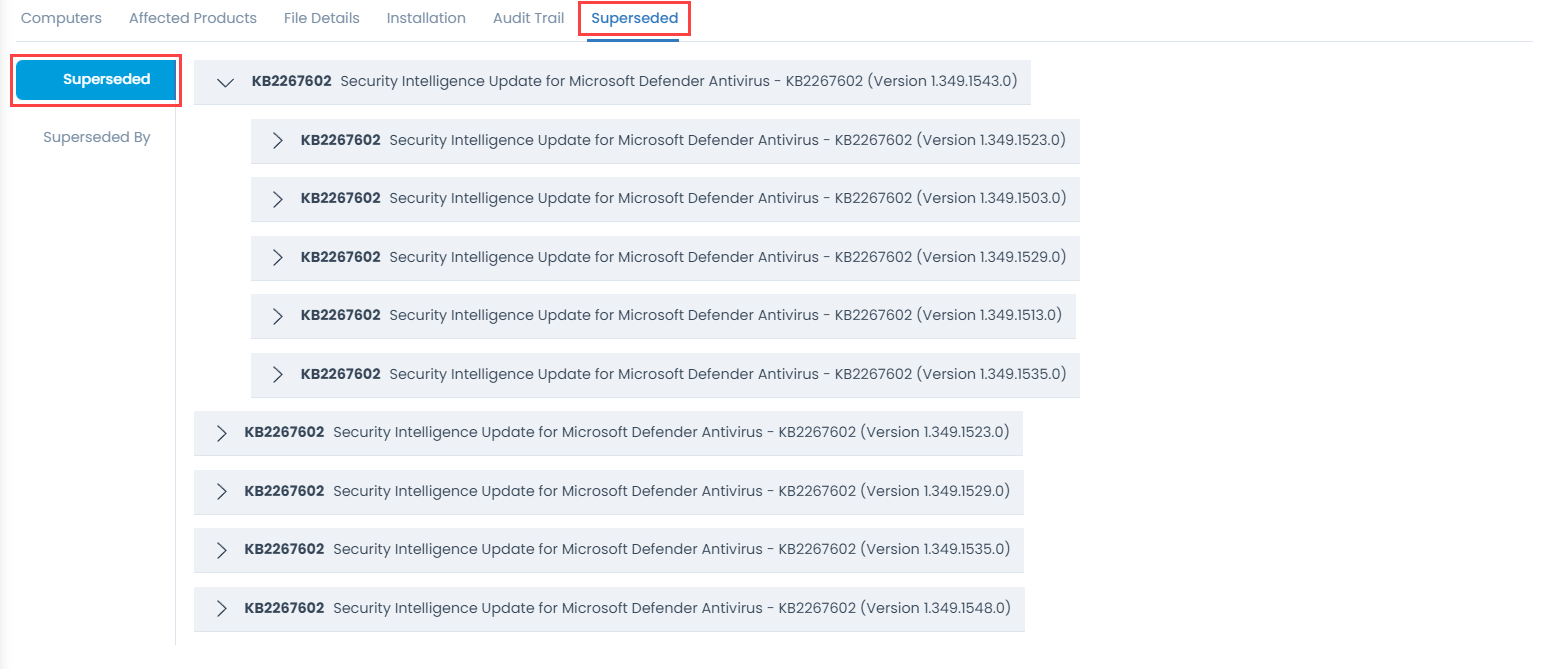
Superseded

This tab displays a list of superseded patches.

Superseded Tab
Superseded Tab

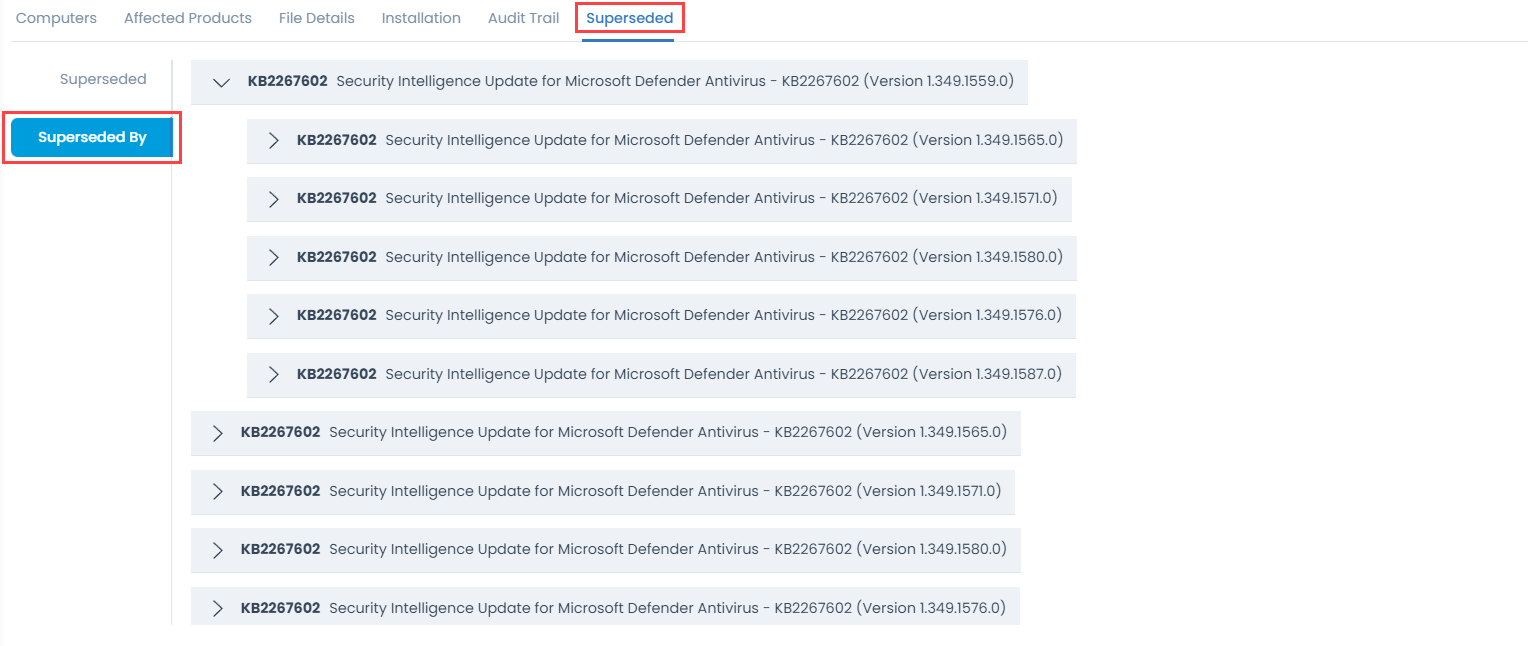
Superseded By

This tab displays a list of new patches that replaces the older ones.

Superseded By Tab
Superseded By Tab

File Details

This page displays the details of the patch like name, size, and language. You can also copy the URL or download the patch file if required.

File Details Tab
File Details Tab

In case of the manually created patch, you need to upload the exe file using the Upload File button as shown below.

Uploading File
Uploading File

Once uploaded, it appears in the table as shown below. Now, you can download the URL or delete it if required.

Uploaded Patch File
Uploaded Patch File

Asset Actions

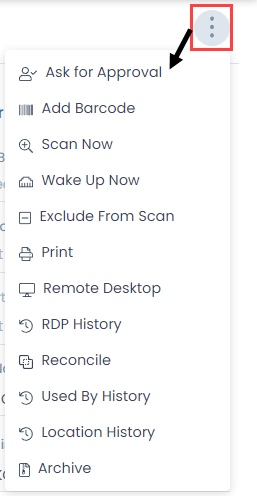
To view the asset actions, on the top-right corner of the page, click the vertical three dots, and a set of actions appear as shown below.
Action Options on Asset Details Page
  • Ask for Approval: This enables to ask for approval from the approvers.
  • Add Barcode: This enables to add a barcode to the asset. For more details, refer Barcodes.
  • Print QR Code: This enables to print the respective asset’s QR Code for scanning. For more details, refer to the QR Code page.
  • Scan Now: This enables to scan the asset by Agent Discovery. Once scanned, it gets logged in the Scan History.
  • Wake Up Now: This enables to manually wake up the remote computer which is in sleep mode. Once clicked, the status of the WOL event gets logged in the WOL History tab as shown below. The status changes from Requested to Initiated, and then to Failed or Success. For more details, refer to the Wake On LAN page.
WOL History
WOL History
  • Exclude from Scan/Include In Scan: This enables to exclude or include the asset in scan. If excluded, a tag Exclude from Scan is added next to the Add Tag. Also, this asset will not be scanned in Agent Discovery.
  • Print: This enables to print the entire details page in the form of a pdf file.
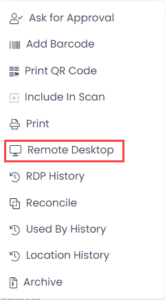
  • Remote Desktop: This enables the technician to remotely connect the computers within or outside the organization LAN.
  • RDP History: This enables to view the RDP history.
  • Reconcile: This enables to merge the duplicate entries of the asset with different names.
  • Used By History: This enables to view the history of users who have used this asset.
  • Location History: This enables to view the location history.
  • Archive: This enables to move assets as storage and use in future. Once the asset is archived, it can be restored or deleted from the list page.

Ask for Approval

To initiate an approval from the Asset Details page,

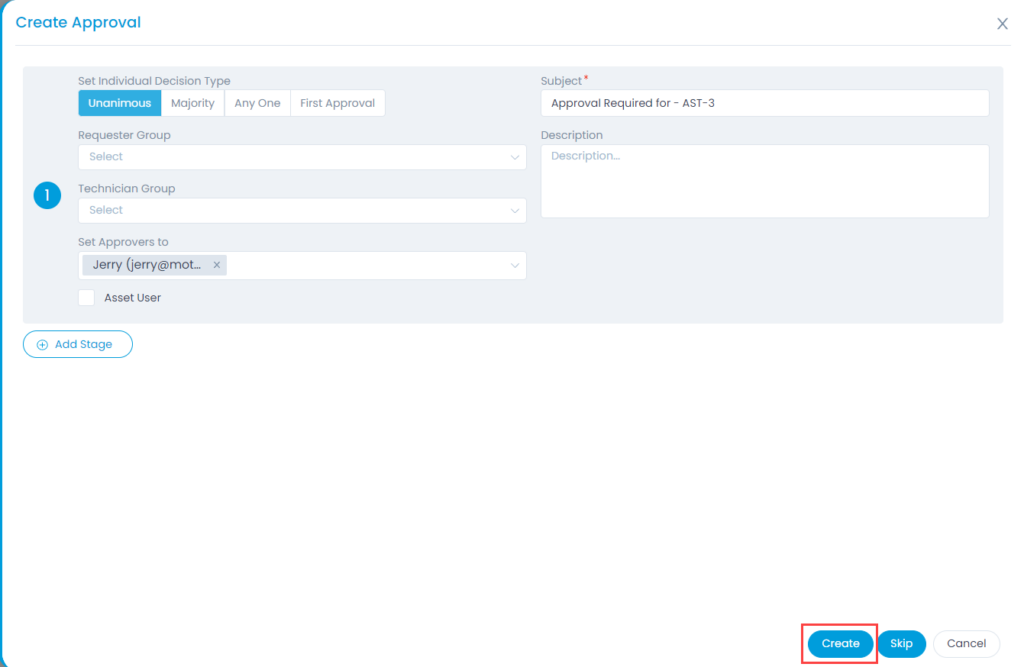
  1. Click on the vertical three dots on the top-right corner of the page and select Ask for Approval option. A popup appears as shown below.
Create Approval Form
  1. Provide the following details:
    • Set Individual Decision Type: Select the type of decision.
      • Unanimous: Everybody selected as approver has to approve the request.
      • Majority: Majority of approvers should approve the request.
      • Anyone: Any one approver can approve the request.
      • First Approval: If selected, the first approval received (Approved or Reject) will be considered and the rest will be ignored. For example, If 3 approvers are set and if the first approval received is Approved, then this is considered. The approvals from the rest of the approvers will be Ignored, though rejection is received later from other approvers.
    • Subject: Default subject is ‘Approval Required for – Asset ID’. You can replace it with your own subject.
    • Requester Group: Select the requester group whose members can give the approval.
    • Technician Group: Select the technician group whose members can give the approval.
    • Set Approvers to: Select the approvers if you want specific people to approve.
    • Description: Type the description so approvers can gain sufficient information about the approval required.
    • Asset User: Enable if the approval of the asset user is required.
    • Add Stage: If the approval process is a multi-level process, click on Add Stage to add another approval form. For e.g. When someone needs a new laptop, first the manager should approve. Secondly, IT department should approve, and then the hardware shop should approve as the 3rd level approver.
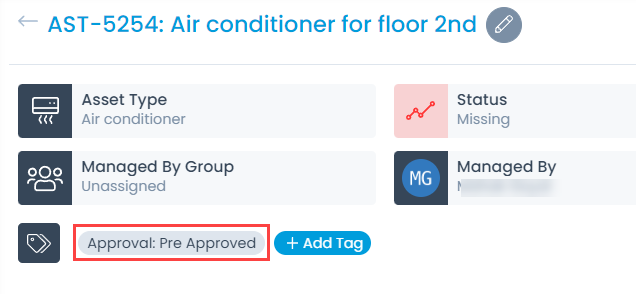
  2. Once all the details are provided, click Create. The created approval appears in the Approvals tab. If Skip is clicked, the change gets pre-approved and the status is displayed next to the Add Tag option as shown below. The pre-approved changes are not displayed in the Approvals tab.
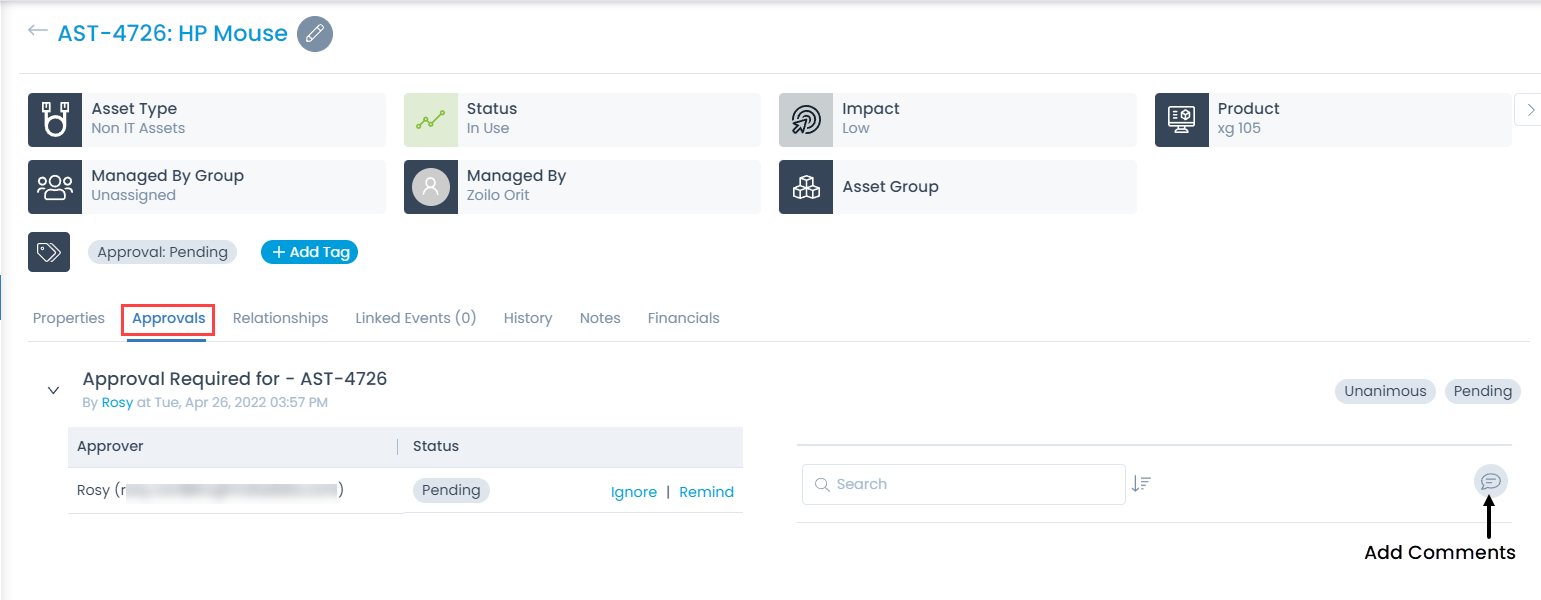
The Approvals tab displays all the approvals done or pending for the asset. From this tab, you can also ignore and remind the approvers for the approvals. As an approver, you can view, approve, and reject the approvals from My Approvals menu.

Pending Approvals

The list of pending approvals for an asset is visible in the Approvals tab. You can ignore the approval if no longer needed, or can remind the approver to take an action on it. Also, you can add comments in this section.

Note: The Approvals tab is visible only when there is a pending approval for the asset.
Pending Approvals
Pending Approvals
Pre-Approved Asset
Pre-Approved Asset

Remote Desktop

Using the Remote Desktop functionality, a technician can remotely connect the computers within or outside organization LAN.

This functionality can be used to remotely connect Windows and Linux machines after installation of Motadata Remote Desktop Agent application on client computers.

To configure Remote Desktop functionality, refer RDP-Configurations page.

Technician can initiate the remote desktop session on a particular computer from Hardware Asset details page.

To do so,

  1. Click on the Options icon (vertical three dots) and select the Remote Desktop option.
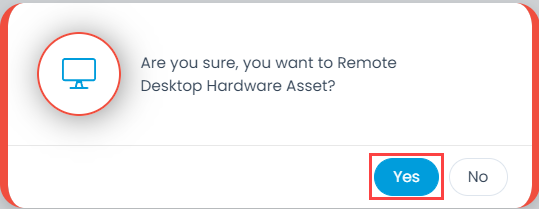
  2. Confirm the Remote Connection initiation.
Remote Desktop option
Confirmation Message
  1. A new tab opens in your browser where the connection is established.
Connection Establishment

Remote Desktop Recordings

This tab enables to view the video recording of the remote desktop session for a particular computer asset.

Note: The Video Recording parameter should be enabled from the Admin > Asset Management > RDP Configurations > RDP Configuration tab.
Remote Desktop Recordings

Download Video Recording File

You can download the particular session Video Recording file from the GUI.

Before downloading, the recording needs to be converted to the downloaded format by clicking on the Covert to M4V button. Once the file is converted, it can be downloaded by clicking on the Download button.

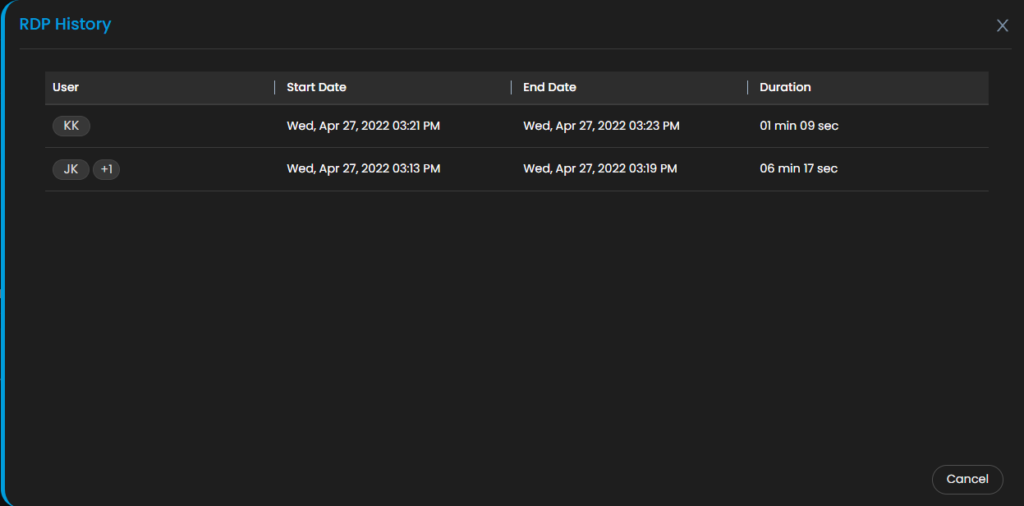
RDP History

This displays the RDP history of the asset. It displays the details like, user, start date, end date, and duration.

RDP History
RDP History

Reconcile

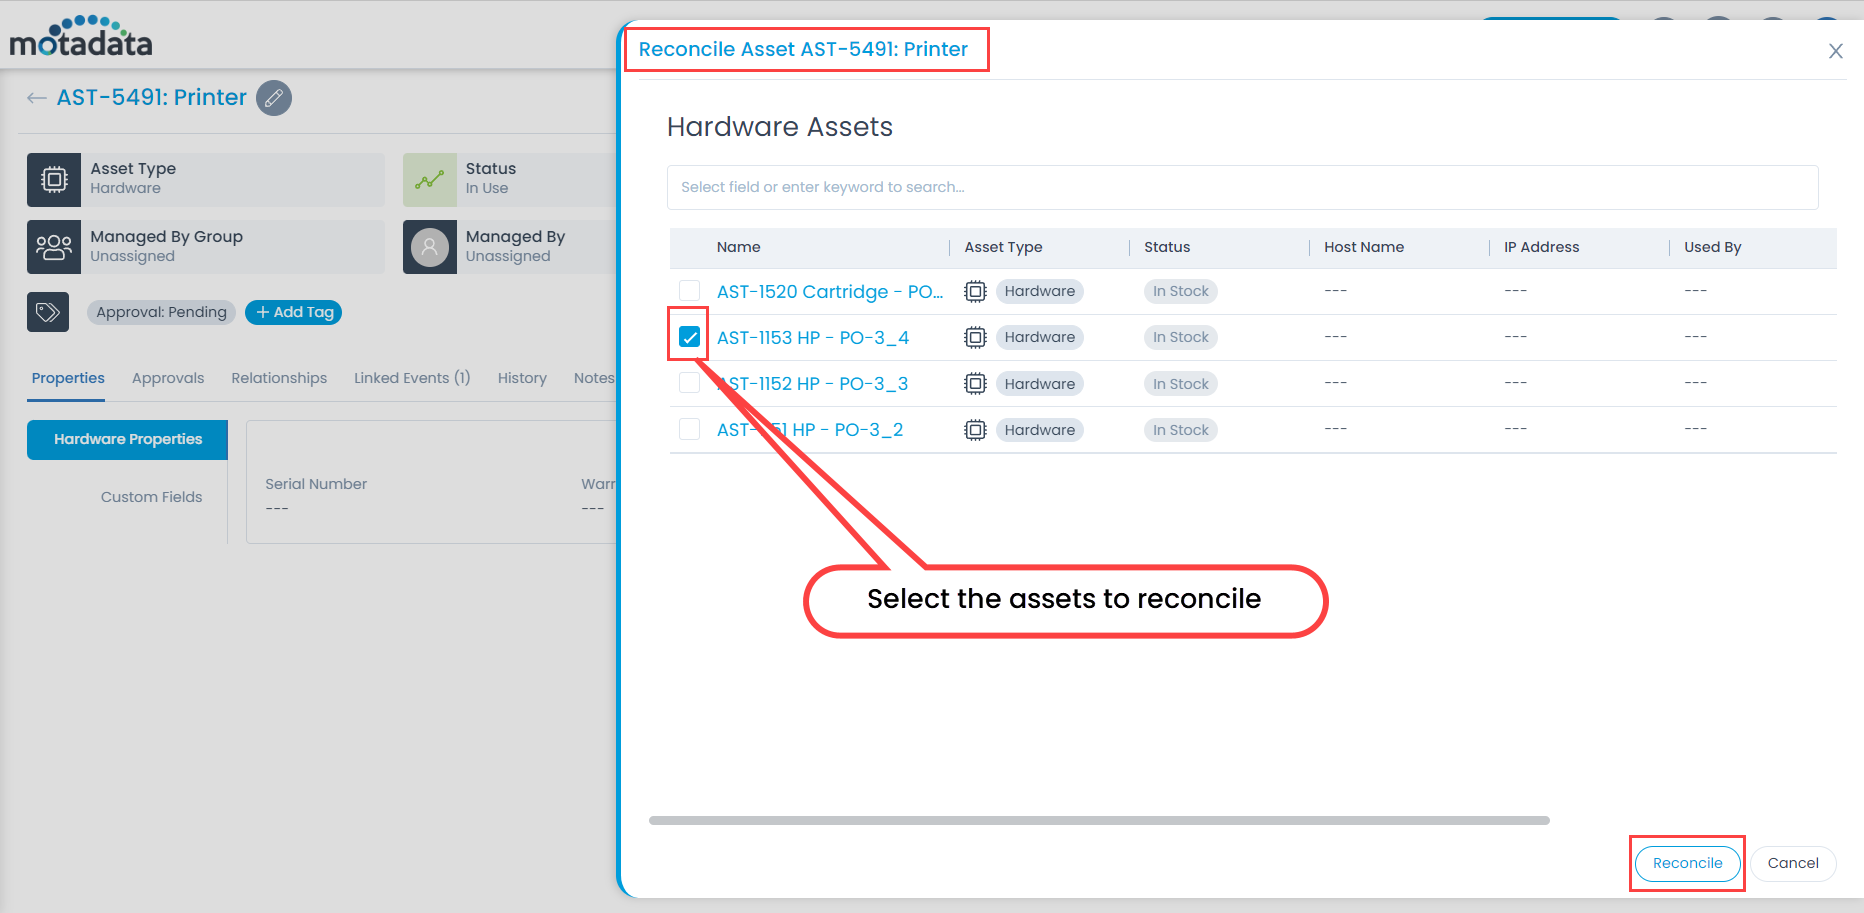
This enables to merge the duplicate entries of the asset. This is required when the assets received through Purchase Order are associated to some groups, and on executing a network scan, these assets get duplicated. Example: HP – PO-3_2 is the asset purchased and is renamed to Printer. On performing asset discovery, both the names will appear. Hence, to avoid this duplication you can reconcile the asset, where HP – PO-3_2 is deleted and Printer is retained.

To reconcile the asset,

  1. In the Asset Details page, click the Options icon (vertical 3 dots), and select the Reconcile option. A popup appears.
  2. Select the assets to be reconciled.
  3. Click the Reconcile button as shown below.
  4. Once reconciled, the selected assets get deleted.
Reconciling the Asset

Used By History

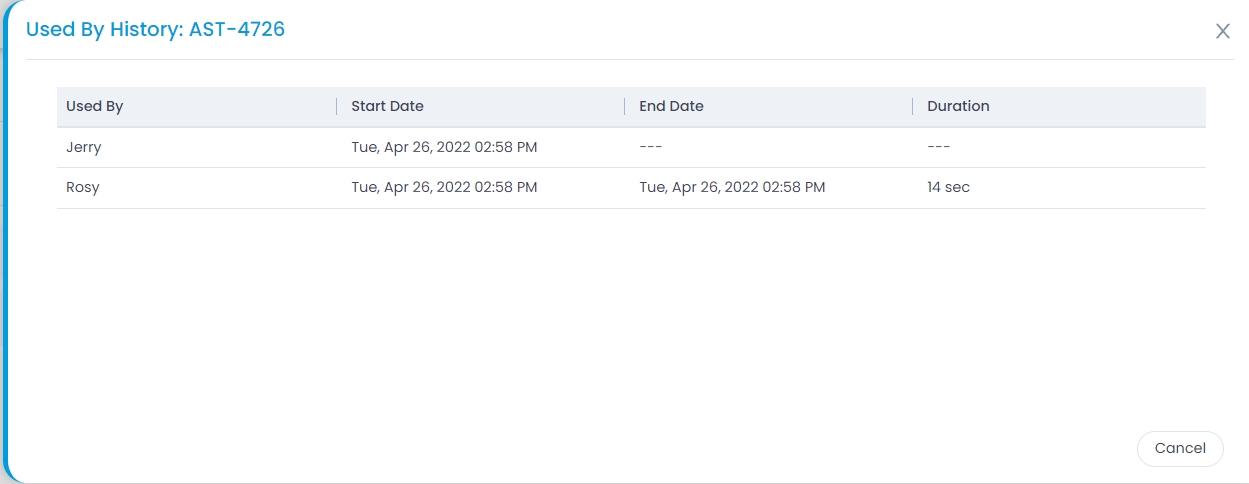
This displays the history of the people who used the asset and for how much duration as shown below.
Used By History
Used By History

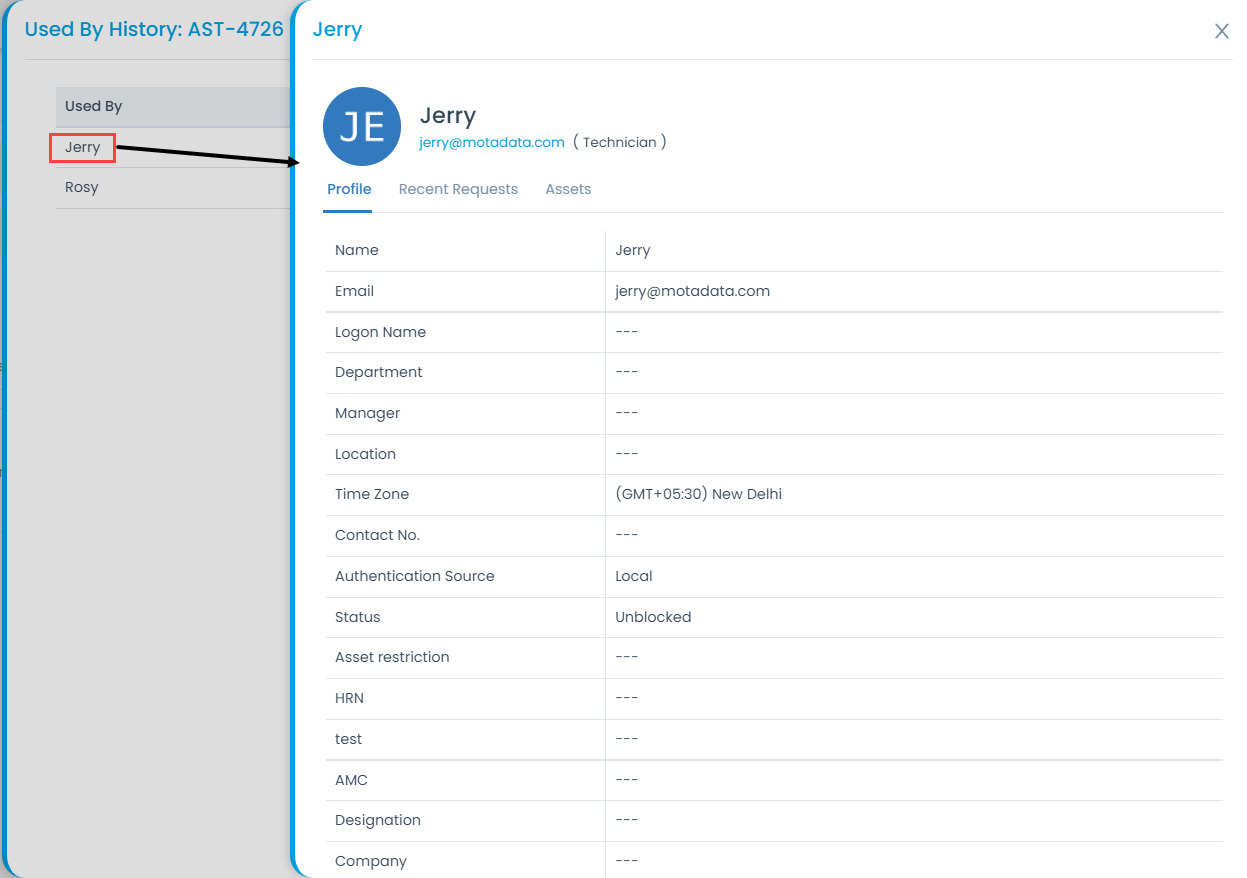
Here, you can also view the details of the user by clicking on the user’s name.

User Details
User Details

Location History

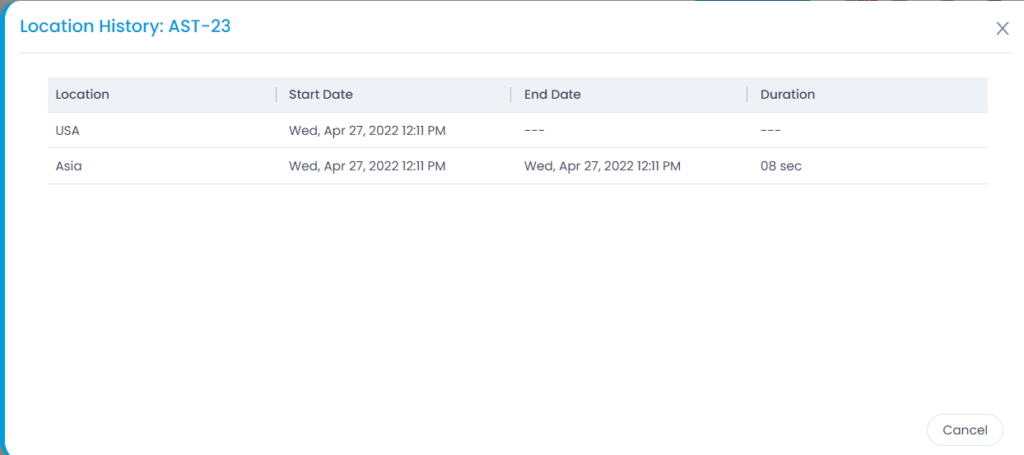
This displays the location history of the asset. It helps to keep a track of the asset location specially when it is sent for repair or for some other purpose.

Location History
Location History

Installation Notification

The Grey Bell icon on the Software Asset Details page, allows to enable the notification for the same software installation in any other asset. Admin would receive a notification if any other user is using the same software in his/her asset.
Once clicked, a confirmation message appears. Click Yes to continue or Cancel to discard the action. On clicking Yes, the color of the bell icon changes to Red.

Enabling the Installation Notification
Enabled Installation Notification

Approval Workflow

A common business process requires someone to take decisions at different levels of a ticket cycle. Approval workflows make sure that no ticket moves forward without the consent of the concerned stakeholders. For an effective approval process, the tickets should have sufficient details that enables informed decision making.

Approval workflows function best when:

  • The workflow is triggered automatically when the ticket parameters meet the workflow conditions.
  • The system sends appropriate notifications instantly.
  • Allows technicians to remind the stakeholders.
  • Negative flow scenarios are properly defined.
  • Workflows are not always rigid to be dependent only on one person.

Approval workflows are easy to create in the system and do much more than the traditional paper based sign-off. Technicians can create manual approval requests while you as an admin can create automated approval flows. An automated workflow can be a simple condition and action statement or could be a complex one with multiple conditions and a series of approvers.

Types of Approval Workflows

Approval workflows are broadly categorized into 2 types:

  • Manual: The Technicians can create manual requests for approval. They can decide who will be the approver. It is useful when a request is not standard and requires additional inputs from the stakeholders. From the admin perspective, you can enable or disable permissions to create the manual workflow. When allowed, the technicians can create approval requests from the details page of a ticket.
  • Automatic: For standard processes, when the technician asks for approval, one can use default approval workflows instead of manually defining one. From the admin perspective, you can define different conditions that leads to the selection of approval workflows.
Note: The approval workflows are optional. They come into picture only when someone asks for approval. This means that technicians can work and close tickets without asking for approvals. You can also use custom rules to force the technicians for getting an approval.